EAC 1.3 Setup Guide
Exact Audio Copy (EAC) is a free Windows program used for making copies of compact discs - commonly called "ripping". This guide walks thru the steps to install and configure the latest version (1.3) on your Windows PC.
Included are requirements to rip to the highest quality. Following this guide is necessary to success verification of your rips using UberLAME and UberFLAC.
This guide does not consider extra EAC features such as disc writing.
- EAC installer - see Recommended Tools for download link
- Latest FLAC or LAME required for configuration - see same link
- Windows XP or greater
- Internet connection
- .NET 3.5 for CUETools
- PC with SSE2 support (for generating log self-hash)
- A CD drive known to the AccurateRip offset database for offset detection
- Time and tenacity
EAC does not install the current FLAC encoder and does not install any MP3 encoder. One of these encoders will be required to complete configuration.
Windows 10 does not include .NET 3.5 by default. If the EAC installer detects that .NET 3.5 is not installed, it will prompt to install it. A system reboot is required to complete installation.
In the screen captures below, settings hilighted in yellow are required and settings hilighted in green are recommended. Each section covers the configuration dialogs for the given menu item.
- Launch the installer
eac-1.3.exe. Click thru the dialogs until the Choose Components dialog:
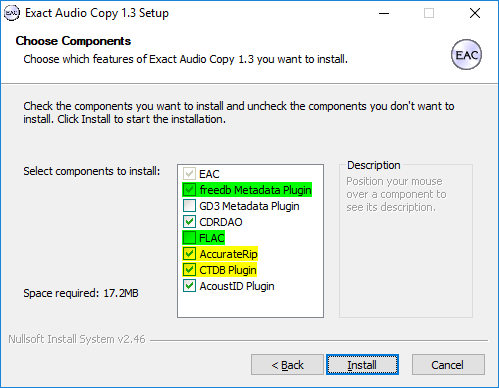
GD3 Metadata Plugin is short-lived trialware and not worth the bother.
Checking FLAC will not install the current version of FLAC. If you install the FLAC encoder here, please overwrite it with the current version.
Both AccurateRip and CTDB Plugin must be checked.
Now click Install. After the installation churn completes, launch EAC to begin configuration.
The first time EAC is launched, the Setup Wizard will appear. Most of the settings configured here will be overridden, but go ahead and run thru the dialogs anyway.
The second dialog configures which drives will be used to rip CDs.

Be sure to uncheck any virtual drives here.
Now click thru the feature detection dialogs. Specific settings will be forced later during configuration so don't worry about how things are set here.
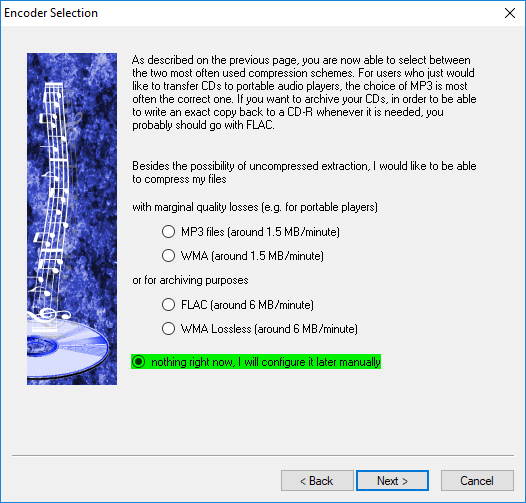
Encoder Selection should be configured later since it would need to be modified anyway.
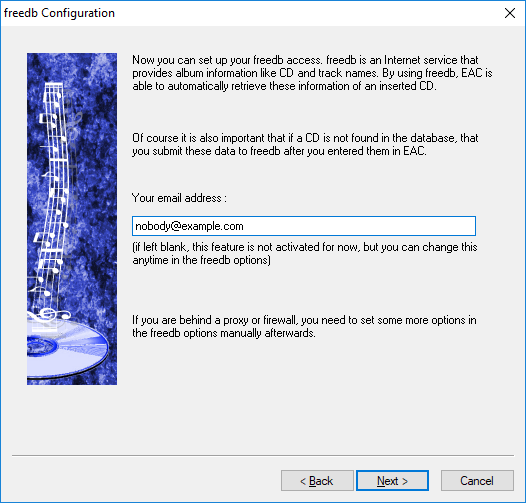
If you intend to contribute to freedb, enter a valid feedback email address here. Otherwise supply a dummy address to prevent later nagging. Now click Next for the Filename Configuration dialog.
All the provided naming schemes suck so a custom scheme should be supplied during configuration. If you feel the need to use one of these schemes, choose one that has a directory that includes the album name. Now click Next for the Done dialog.
Select I am an expert, let me use the full potential of EAC and click Finish.
This section provides details for customizing EAC using the three primary setup dialogs in the EAC menu. For additional information on these options, see:
https://wiki.hydrogenaud.io/index.php?title=EAC_Options

Fill up missing offset samples with silence must be checked for the majority of drives that do not fully support overreading.
If you are prone to accidentally ejecting discs during ripping, check Lock drive tray during extraction otherwise leave this unchecked as it allows a way to forcibly abort a bad rip.
Error recovery quality is indicated by a red grid of cells during ripping with each higher level adding a row. Setting this to High will allow EAC to make multiple attempts at copying tracks of a disc that initially fail.

Create log files always in English language must be checked as UberLAME/UberFLAC only parses this language. However, the dropdown language for the interface many be changed as it does not affect the log file.

Checking the first two boxes provides extra information for CUE files generated after ripping. Some older drives do not support this feature.
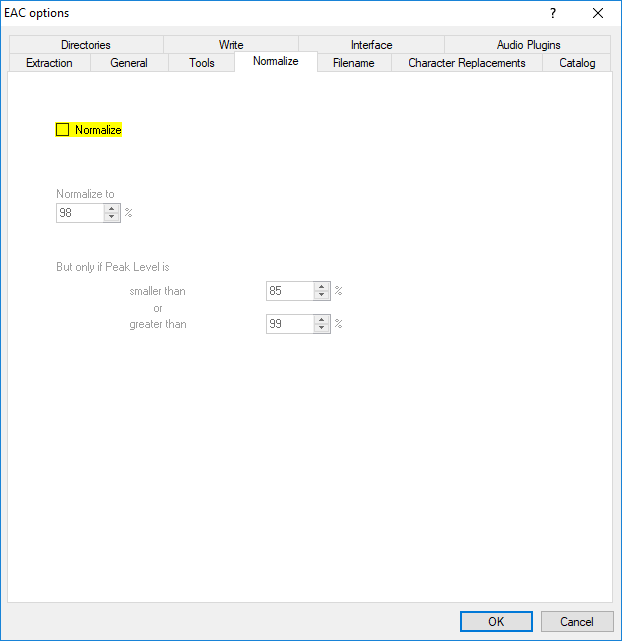
Normalize must be unchecked.

Files and directories are typically renamed later in the process.
For now it is important to ensure that rips of different discs are not placed in the same directory.
This dialog supplies the schemes
%albumartist% - %year% - %albumtitle%\%tracknr2% - %title%
and
%albumtitle% - %year%\%tracknr2% - %artist% - %title%.

Supply a directory of your choosing to place your rips. Keep the number of characters low to prevent contained files from overflowing Windows path length limit of 260 characters.

The CUETools DB plugin adds information to the EAC log that indicates whether your rip checksums match the known values in their database.
The steps in this section must be completed for each drive that will be used by EAC.

Ignore any detected features and use the settings shown.
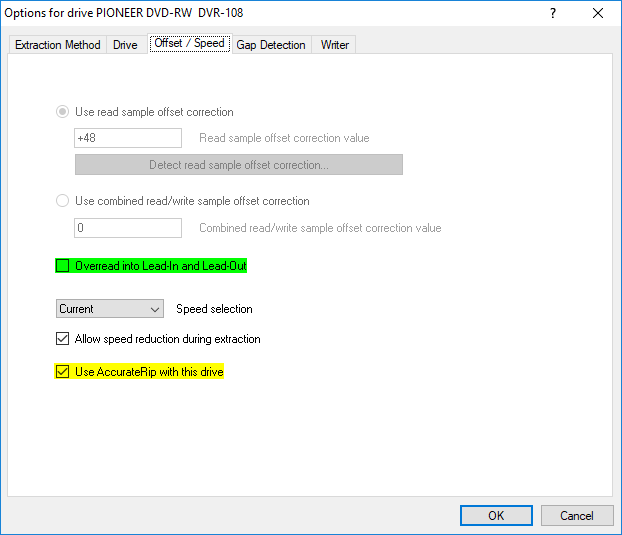
In the Offset / Speed dialog, the offset configuration should appear preconfigured and disabled from modification. If the offset boxes are editable, ensure that AccurateRip is enabled. If AccurateRip is enabled and these boxes are still editable, then your drive is not in the database.
Overread into Lead-In and Lead-Out should be unchecked unless you are certain your drive supports this feature. Very few drives support this feature.
Use AccurateRip with this drive must be checked. Checking this box automatically supplies values for the offset above.

These are settings for FLAC encoding. See below for MP3 esettings.
If the flac.exe encoder used is the one installed by EAC, it should be replaced with the latest version.
The recommended value for Additional command-line options is
-8 -T "ARTIST=%artist%" -T "TITLE=%title%" -T "ALBUM=%albumtitle%" -T "DATE=%year%" -T "TRACKNUMBER=%tracknr1%" -T "GENRE=%genre%" -T "COMMENT=%comment%" -T "BAND=%albuminterpret%" -T "ALBUMARTIST=%albuminterpret%" %source% -o %dest%
but may be customized with additional tags.
The '-8' parameter indicates maximum compression.
Add ID3 tag must be unchecked for FLAC rips as tagging FLACs with ID3 is as dumb as it gets.

These are settings for encoding to MP3. See above for FLAC settings.
Your path to the lame.exe encoder may vary. Use Browse to locate it.
For a download location of the latest lame, see the Recommended Tools wiki.
The recommended command line is -V 2 %source% %dest% which will ignore the quality toggle.
An alternate is %islow%-V 5%islow%%ishigh%-V 2%ishigh% %source% %dest%
which will use High quality/Low quality to switch between V2 and V5.
Add ID3 tag must be checked.
Bit rate is ignored for VBR encodings such as V2.
This dialog (and the previous dialog) only apply to tracks encoded to MP3.
Keep use ID3v2.4 tags instead of ID3v2.3 tags unchecked because v2.3 tags are more widely recognized.
Check write ID3V2 tags using UTF-16 to allow characters outside the Enlish-centric 8859-1 encoding.