How To Run
Run the installation instructions here before running.
The easiest way to run the local pathfinding system with ROS is to use multiple terminals. For each terminal, you will need to run source ~/catkin_ws/devel/setup.bash before running other commands (you can put this in your ~/.bashrc file as well to do this automatically). To run the full pathfinding simulation, you can run: roslaunch local_pathfinding all.launch". This runs:
-
The local pathfinding system, which includes the main_loop, ros_interface, and global_wind nodes. This systems listens to input ROS topics, decides if it needs to recalculate a new local path, and then publishes a desired heading to be used by the downstream controller.
-
The local path visualizer, which uses
matplotlibto visualize the boat's position and heading, the local path, the other boats, and the wind speed and direction. -
The mock inputs, which are a placeholder for the real inputs.

The pathfinding tries to avoid large turns, avoid sailing upwind or downwind, and minimize the path length. It prefers straight line paths if possible, but when the wind does not permit, it will generate paths with tacking maneuvers. The cost function to create these tacking paths was developed from a sailboat reactive planning paper, which can be found here.
The local path visualizer creates a visualization of the system, which is shown below. The red triangle is the autonomous sailboat, the star is the next global waypoint, the light red circle/wedges are other boats, the dark blue circle/wedges are the projected positions of other boats, and the top left arrow shows the direction of the wind. Note that the local path avoid sailing upwind by sailing at a 45 degree angle with respect to the wind and that the local path only avoids the projected positions of other boats, which incentivizes it to sail behind other boats.

You can also open OpenCPN to visualize the path finding progression over the entire map. The OpenCPN set up instructions can be found here

Click me to expand
These instructions assume that you've already got local_pathfinding set up withing the
srcdirectory of a catkin workspace. Also, thecatkin_makeandsourcecommands have been omitted.
-
Install OpenCPN
$ sudo apt install software-properties-common
$ sudo add-apt-repository ppa:opencpn/opencpn
$ sudo apt update
$ sudo apt install opencpn
-
Configure OpenCPN to listen to UDP port
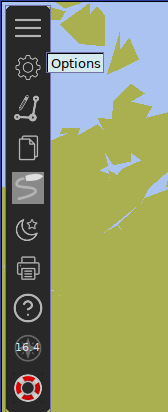
localhost:65500Press the Options button
Under connections, add a new UDP connection at
0.0.0.0:65500. Make sure to check Receive Input on this Port.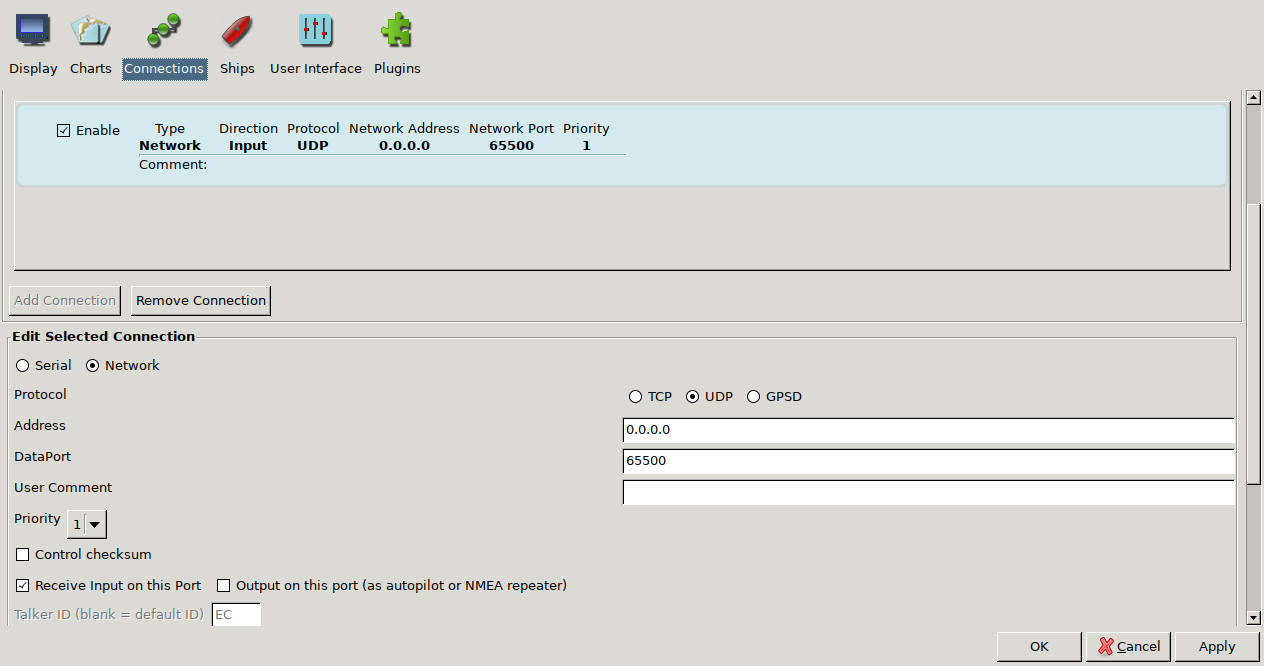
Click OK and close the Options window. You can (but shouldn't have to) confirm that OpenCPN is listening by using
netstatfrom thenet-toolspackage:$ sudo netstat -lp | grep opencpn udp 0 0 0.0.0.0:65500 0.0.0.0:* 14613/opencpn
-
Run the mock ROS nodes: Run the following commands in (preferably in separate terminals, or use
screenortmux)roscore rosrun local_pathfinding MOCK_AIS.py rosrun local_pathfinding MOCK_controller_and_boat.py rosrun local_pathfinding MOCK_UDP_bridge.py
-
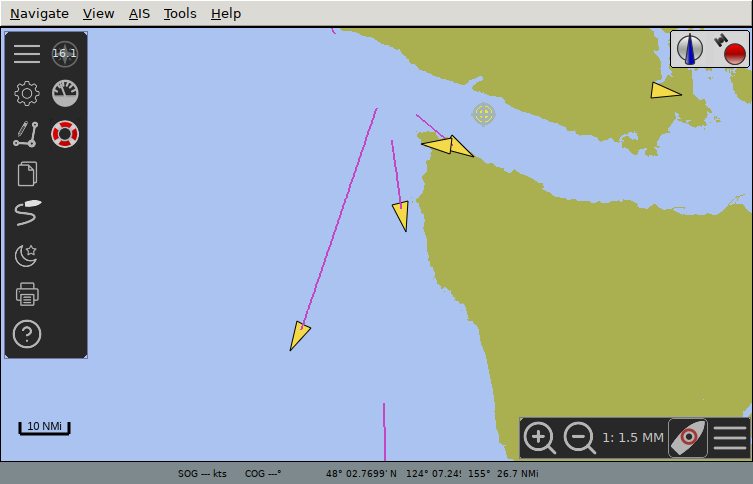
Launch OpenCPN: The boats should now be visible in the OpenCPN map. The yellow arrows are AIS units.
-
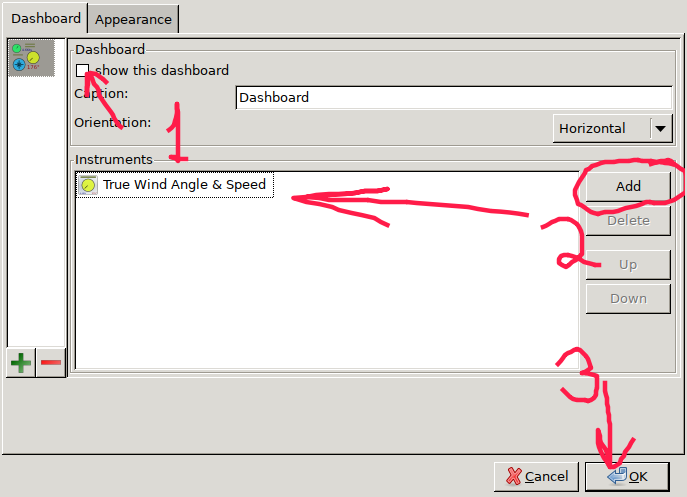
BONUS: Configure OpenCPN to show wind direction and speed: Open the Options window again, open the Plugins tab. Enable the Dashboard plugin, and hit Preferences.
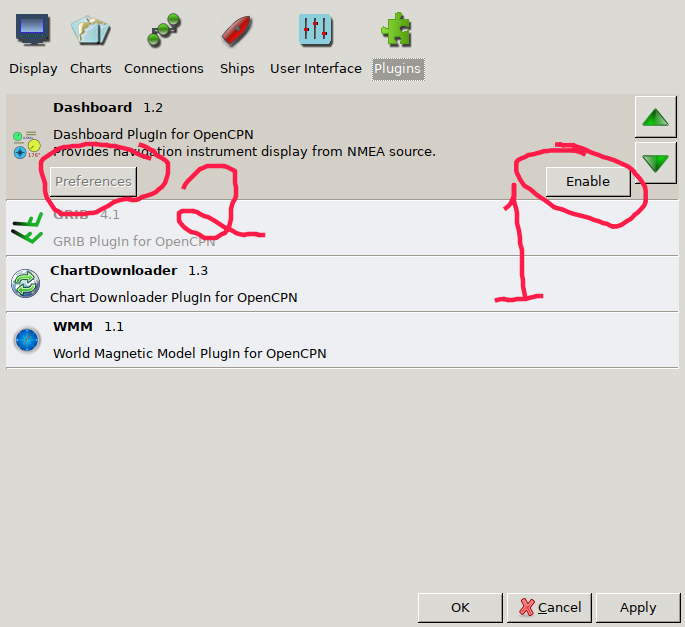
Enable Show this dashboard, and add the True Wind Angle and Speed instrument. Remove the others. Hit OK, and finally hit OK again to close the Options window.
All of the arguments for all.launch are optional. Below is a non-exhaustive list of the arguments:
-
speedup- Float value that changes the speed at which the simulation is run. Default:1.0 -
global_wind_direction_degrees- Float value that sets the global wind direction. -
global_wind_speed_kmph- Float value that sets the global wind speed. -
obstacle_type- String value that changes the obstacle representation of AIS ships. Accepted types are:"ellipse","wedge","circles","hybrid_circle", and"hybrid_ellipse". Default:"hybrid_circle" -
screenshot- Bool value that sets if screenshots should be taken each timecreatePathis run. Default:false. -
plot_pathfinding_problem- Bool value that sets if a plot of the pathfinding problem should shown each timecreatePathis run. Default:false. -
random_seed- Int value that we set the random seed to. Default:"", which results in the random seed being set by time. -
wandb- Bool value that sets if data should be logged to wandb for analysis. Need to login with UBC Sailbot credentials to log. Default:false.
Click me to expand
ais_file - sets AIS boat positions, speeds, and directions
gps_file - sets sailbot's initial position latlon
goal_file - sets the goal latlon (note: this is the final goal, not necessarily the first waypoint of the global path if it is sufficiently far away from the sailbot start
wind_file - sets the initial wind speed and direction
How to run an integration test:
- Source the workspace
- Navigate to a json test directory eg:
cd json/obstacles-currently-btwn-moving-away_goal-south_wind-east - Run pathfinding with the json files in this directory:
roslaunch local_pathfinding all.launch ais_file:=$(pwd)/myAIS.json gps_file:=$(pwd)/myGPS.json goal_file:=$(pwd)/myGoal.json wind_file:=$(pwd)/myWind.json
Each test directory name describes the obstacles, goal, and wind setup for each test.
How to create your own files:
You can create your own unit test files by copying the json files here, or by starting a simulation and then running (in another terminal) rosrun local_pathfinding json_dumper.py, which will save the current AIS and GPS conditions into files in your current directory.
During a simulation, you can run:
-
rostopic pub /requestLocalPathUpdatethen press TAB repeatedly to get a default messsage. Then send it to request a local path change, which will only actually change if the new path is lower cost than the current one. -
rostopic pub /forceLocalPathUpdatethen press TAB repeatedly to get a default messsage. Then send it to force a local path change, which will change the path, regardless if the new path is lower cost than the current one or not. -
rostopic pub /changeGPSthen press TAB repeatedly to get a default message. Edit the message to get sailbot position and speed that you want. This will change the sailbot position. -
rosparam set /global_wind_direction_degrees 70to update the global wind direction. -
rosparam set /global_wind_speed_kmph 5to update the global wind speed. -
rosparam set /plot_pathfinding_problem trueto start plotting the pathfinding problem at each call tocreatePath. Can changetruetofalseto turn it off. -
rosparam set /screenshot trueto start screenshotting at each call tocreatePath. Can changetruetofalseto turn it off. -
rosparam set /obstacle_type <selected_obstacle_type>(replace <selected_obstacle_type> with the one you want) to change the obstacle representation type. Accepted values are described in the arguments section above.
Click me to expand
Ensure all nodes are launched. Use roslaunch local_pathfinding all.launch
Add Boats
Type rostopic pub /new_boats ... and press Tab twice to generate a message template and fill in the parameters for the ship you would like to add.
Delete Boats
Type rostopic pub /delete_boats and press Tab twice. Fill in the ID of the boats you want to remove.
Type rostopic pub /boat_on_path ... and press Tab twice.
specify the addType as one of the following options:
-
addType = latlonwill just publish a boat with the specified parameters in addBoat.ship -
addType = nextWaypointwill publish a boat at the next localWaypoint with the specified ID, heading, and speed in addBoat.ship (lat lon params are ignored) -
addType = onBoatwill publish a boat at the current location of the Sailbot with the specified ID, heading, and speed in addBoat.ship (lat lon params are ignored) -
addType = indexwill publish a boat at localPath[addBoat.waypointIndex] with the specified ID, heading, and speed in addBoat.ship (lat lon params are ignored)
You can run rostopic echo / then press TAB repeatedly to see the available topics for listening. One of the most useful is rostopic echo /localPathCostBreakdown to see how the local path cost is being calculated.