Celo Validators are strongly encouraged to operate an Attestation Service instance. If you are a recipient of or considering applying to receive votes from the Celo Foundation, running a reliable Attestation Service is a requirement for eligibility.
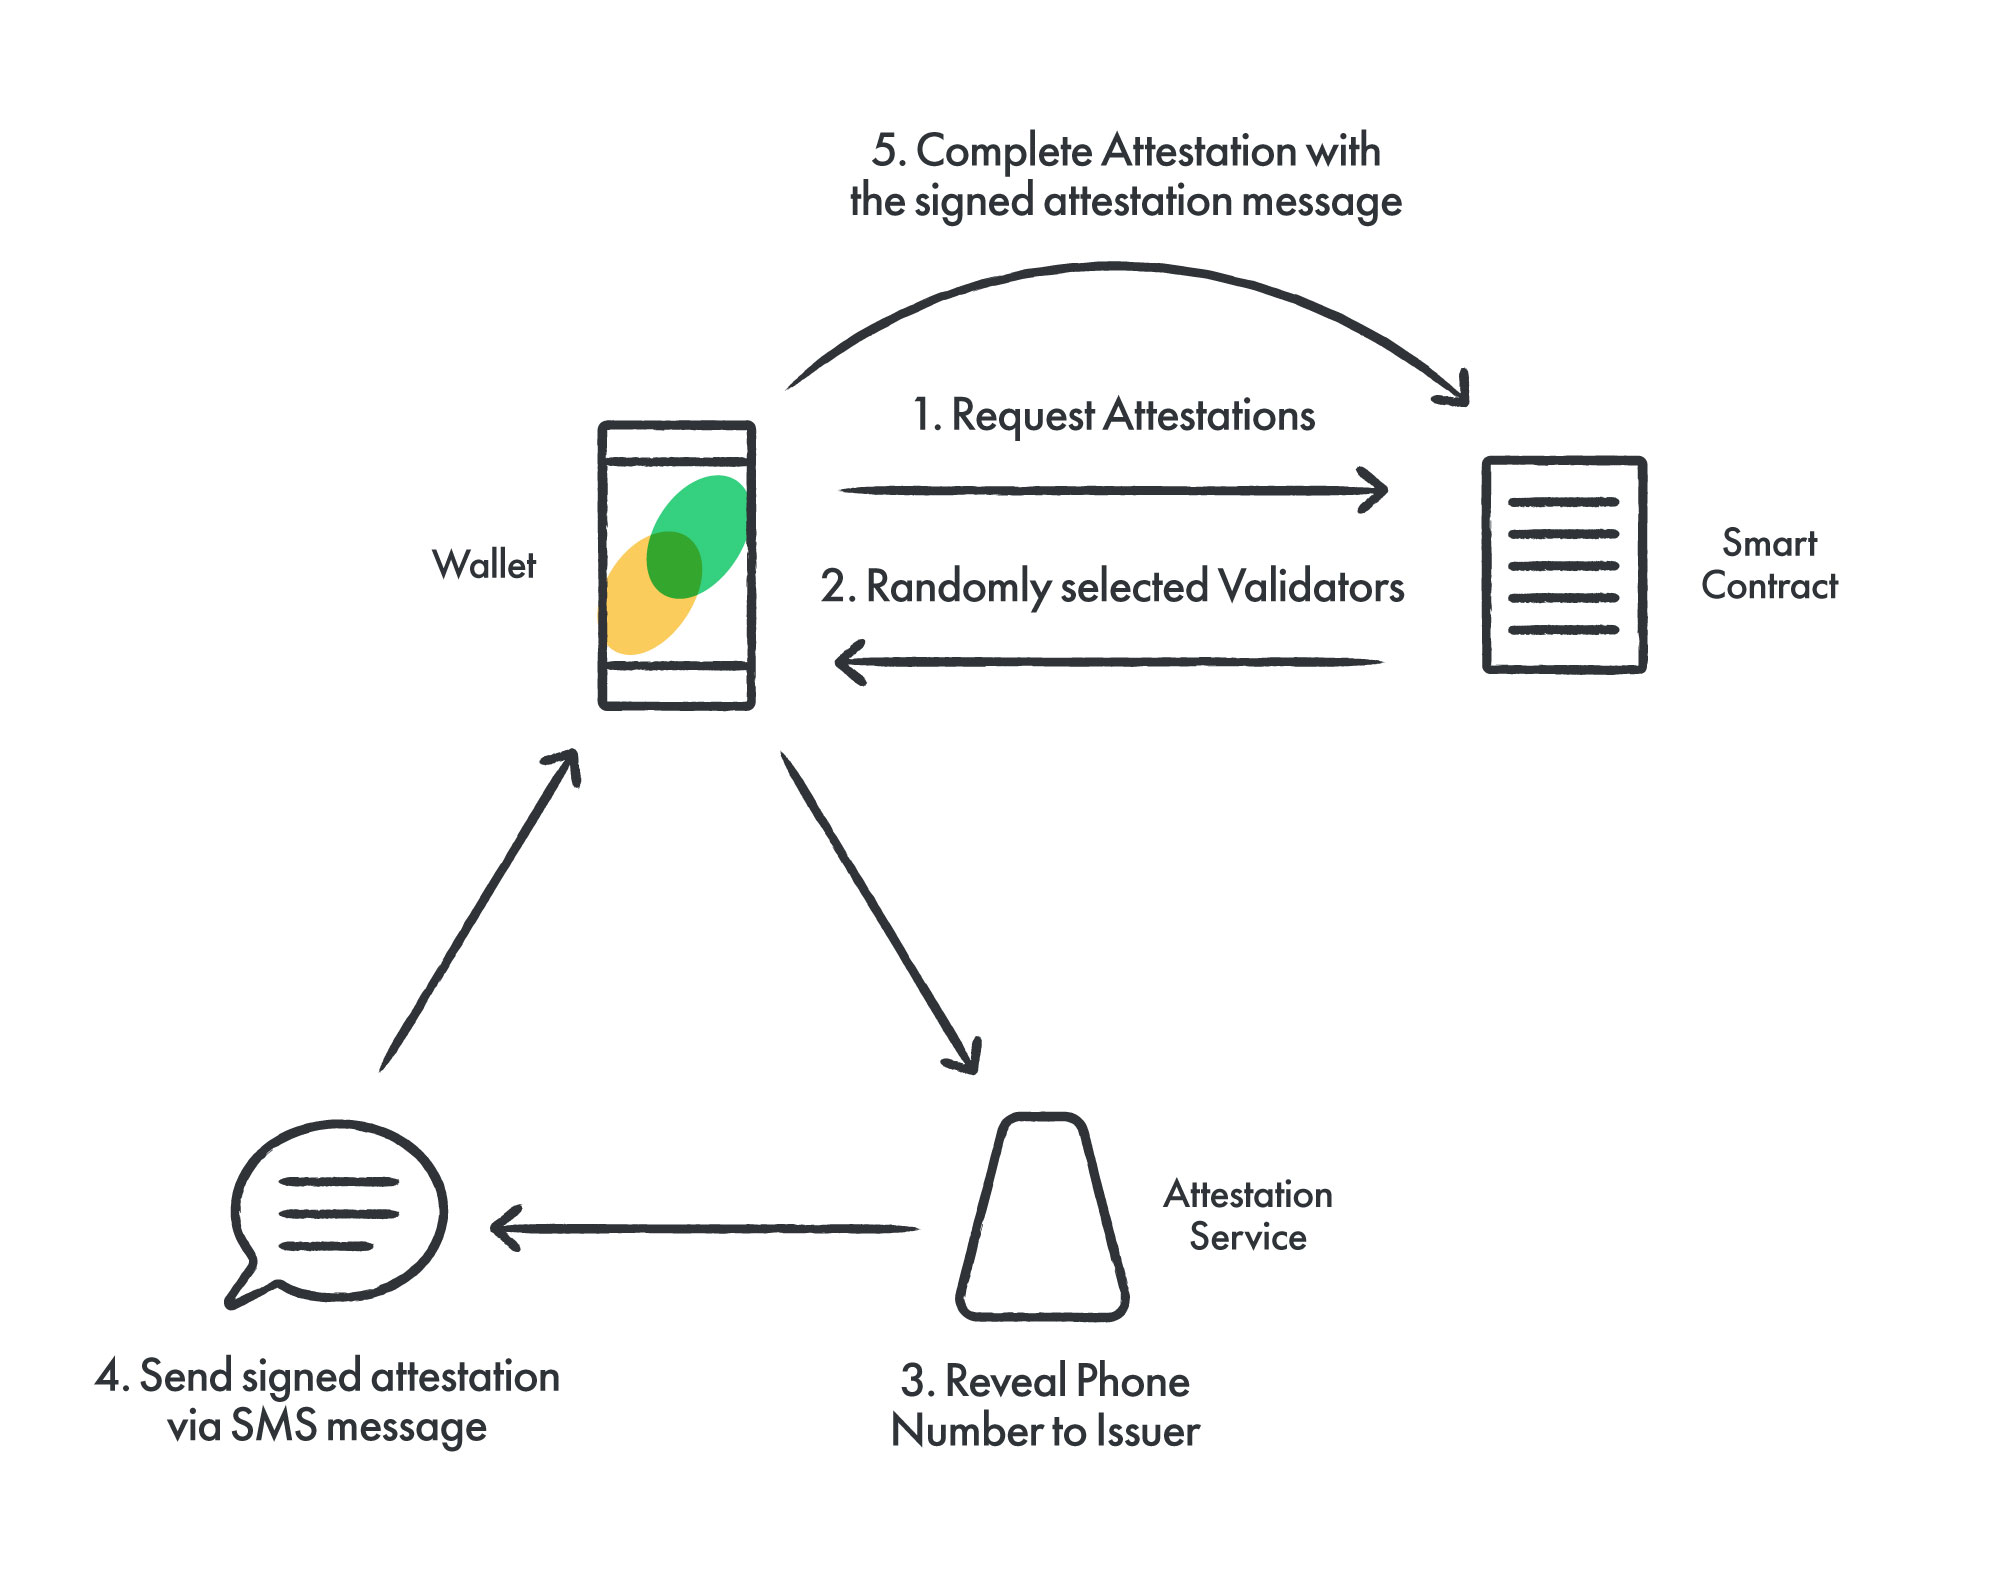
The Attestation Service is part of the Celo identity protocol. It sends SMS on behalf of users to allow them to attest to having access to a phone number and to map that to a Celo account, securely and privately. This is shown as Steps 3 and 4 in this diagram:
Validators receive a fee (set by on-chain governance, currently 0.05 cUSD) for every attestation that they process and that is then successfully redeemed on-chain by the user. In a future release, validators will be able claim and withdraw this fee.
This guide steps you through setting up an Attestation Service:
- Follow the instructions to set up a validator on mainnet or baklava
- Configure Twilio, MessageBird and Nexmo, the SMS providers used by Attestation Service
- Generate and register an attestation signer key
- Deploy a Celo full node, with the attestation signer key unlocked
- Deploy the attestation service
- Configure and publish validator metadata so that clients can find your attestation service
- Configure monitoring for the full node and attestation service
- Attestation Service v1.2.0 (latest production release)
- Attestation Service v1.1.0
Attestation Service needs to expose a HTTP or HTTPS endpoint to the public Internet. This means it should not be deployed on the same physical host as a Validator, which should be firewalled to allow incoming connections only from its proxy.
The PORT environment variable sets the listening port for the service on the local instance. Note that depending on your setup, this may be different from the port exposed to the public Internet.
Attestation Service exposes a HTTP endpoint, but it is strongly recommended that you adopt a setup that implements TLS. Attestation Service must expose the following routes to the public Internet: POST /attestations, POST /test_attestations, GET /get_attestations, POST /delivery_status_twilio, POST /delivery_status_nexmo, and (from version 1.2.0) GET (not POST) /delivery_status_messagebird. It should also expose GET /status. Optionally you may choose to expose GET /healthz and GET /metrics. Note that the URL provided in the validator metadata should not include any of these suffixes.
An Attestation Service is usually deployed alongside a Celo full node instance, which needs to have the attestation signer key unlocked. This can be either deployed on the same physical machine, or in a VM or container on a different host. It is possible but not recommended to use a proxy node as the associated full node, but in this case ensure RPC access is locked down only to the Attestation Service.
Attestation Service is a stateless service that uses a database to persist status of current and recently completed SMS delivery attempts. The most straightforward deployment architecture is to have a single machine or VM running three containers: one the attestation service, a Celo Blockchain node, and a single database instance.
For a high availability setup, multiple instances can be deployed behind a load balancer and sharing a single database service. The load balancer should be configured with a round robin routing policy using the instances' /healthz endpoint as a healthcheck. Deploying a high availability database setup is beyond the scope of these instructions, but is straightforward with most cloud providers. In this setup, if a delivery report for an SMS issued by one instance is received by another instance, that instance can identify the matching record in the shared database and act on the receipt to resend if necessary.
Every record in the database includes the issuer (i.e. validator) in its key, so a single setup like the above can be used to provide attestations for multiple validators.
Currently the Attestation Service supports three SMS providers:
- Twilio
- Nexmo
- MessageBird (from version 1.2.0 and later)
It is recommended that you sign up with all three.
See the Configuration section for information about how to specify configuration options.
After you sign up for Twilio at https://www.twilio.com/try-twilio, you should see your ACCOUNT SID and your AUTH_TOKEN in the top right of the console. You'll also want to enter in a credit card to fund the account. For most text messages, the costs are typically very low (and significantly lower than the attestation fee paid by the user). Find a more comprehensive price list at https://www.twilio.com/sms/pricing. If there are countries that you do not want to serve, you can specify them with the TWILIO_UNSUPPORTED_REGIONS configuration option.
Next, adjust the Geo settings to serve phone numbers globally under https://www.twilio.com/console/sms/settings/geo-permissions. Otherwise, the service will not be able to send SMS to Celo's global user base and your validator will negatively impact the Celo user experience.
To actually be able to send SMS, you need to create a messaging service under Programmable SMS > SMS. Provide the resulting SID in the TWILIO_MESSAGING_SERVICE_SID configuration variable.
Now that you have provisioned your messaging service, you need to buy at least 1 phone number to send SMS from. You can do so under the Numbers option of the messaging service page. It is strongly recommended that you purchase at least a US (+1) number which seem to provide high delivery success rates. If you purchase numbers in other locales, Twilio will intelligently select the best number to send each SMS.
After signing up for Nexmo, click the balance in the top-left to go to Billing and Payments, where you can add funds. It is strongly recommended that you use a credit or debit card (as opposed to other forms of payment) as you will then be able to enable Auto reload. You should also enable Low balance alerts. Both of these will help avoid failing to deliver SMS when your funds are exhausted. It appears that these options may not be immediately available for all new accounts due to fraud checks: try sending a few SMS, checking back after a few days, or raising a support ticket.
Under Your Numbers, create a US number and ensure that is enabled for SMS. Note that Nexmo numbers appear to have a rate limit of 250 SMS per day.
Under Settings, copy the API key into the environment variable NEXMO_KEY, and API secret into NEXMO_SECRET.
If you wish to partition the numbers used within this account, you may choose to create and configure a Nexmo application for each one. In each application, enable messaging (labeled as Communicate with WhatsApp, Facebook Messenger, MMS and Viber) and assign a number. Copy each application's Application Id value into the appropriate instance's NEXMO_APPLICATION configuration value. There is no need to generate or use a public/private keypair. By default an Attestation Service will pick a number from the global pool of numbers not linked to a specific Nexmo application. The only effect of supplying NEXMO_APPLICATION is to select numbers from those linked to that application.
Note that Attestation Service from version 1.2.0 no longer requires callback URLs to be supplied in the Nexmo dashboard, so supports using a single account for multiple Attestation Services.
MessageBird support is introduced in version 1.2.0 and later. After signing up for MessageBird, locate the Your API Keys section on the Dashboard, click Show next to the Live key, and copy its value into the MESSAGEBIRD_API_KEY configuration variable. Click Top Up to add credit. MessageBird requires a dedicated number and/or KYC approval to send SMS to certain countries that validators must support. Click Numbers then Buy Number to purchase a number. You will need to purchase separate numbers for both the USA and Canada. Then visit SMS Settings and request approval to send to these countries.
This section uses several environment variables defined during the validator setup. You'll need to export CELO_IMAGE and CELO_VALIDATOR_RG_ADDRESS on this machine.
Setting up an Attestation Service first requires an Attestation Signer key to be registered (Similar to Validator and Vote signer keys). For that let's start our node on the Attestations machine (keep track of the password you use for this account):
# On the Attestation machine
docker run -v $PWD:/root/.celo --rm -it $CELO_IMAGE account new
export CELO_ATTESTATION_SIGNER_ADDRESS=<YOUR-ATTESTATION-SIGNER-ADDRESS>
Let's generate the proof-of-possession for the attestation signer:
# On the Attestation machine
docker run -v $PWD:/root/.celo --rm -it $CELO_IMAGE account proof-of-possession $CELO_ATTESTATION_SIGNER_ADDRESS $CELO_VALIDATOR_RG_ADDRESS
With this proof, authorize the attestation signer on your local machine:
# On your local machine
export CELO_ATTESTATION_SIGNER_SIGNATURE=<ATTESTATION-SIGNER-SIGNATURE>
export CELO_ATTESTATION_SIGNER_ADDRESS=<YOUR-ATTESTATION-SIGNER-ADDRESS>
celocli releasegold:authorize --contract $CELO_VALIDATOR_RG_ADDRESS --role attestation --signature 0x$CELO_ATTESTATION_SIGNER_SIGNATURE --signer $CELO_ATTESTATION_SIGNER_ADDRESS
You can now run the node for the attestation service in the background with the following command. Remember to specify the password you used during the creation of the CELO_ATTESTATION_SIGNER_ADDRESS. And, if you want to run the attestation service for Baklava, add the --baklava flag.
# On the Attestation machine
echo <CELO-ATTESTATION-SIGNER-PASSWORD> > .password
docker run --name celo-attestations -it --restart always -p 127.0.0.1:8545:8545 -v $PWD:/root/.celo $CELO_IMAGE --verbosity 3 --syncmode full --rpc --rpcaddr 0.0.0.0 --rpcapi eth,net,web3,debug,admin --unlock $CELO_ATTESTATION_SIGNER_ADDRESS --password /root/.celo/.password --allow-insecure-unlockFor storing and retrieving the attestation requests the service needs a database to persist that information. Currently sqlite, postgres and mysql are supported. For testing purposes you can use sqlite but it's recommended to run a stand-alone database server using mysql or postgres if your intention is running the Attestation Service in a production environment. If you are running on a popular cloud provider, consider using their hosted SQL services.
Depending on your database technology you need to create a database with the access for a specific user and password.
For specifying the database url you need to setup the DATABASE_URL variable in one of these ways:
# On the Attestation machine
export DATABASE_URL="sqlite://db/attestation.db"
export DATABASE_URL="mysql://user:password@mysql.example.com:3306/attestation-service"
export DATABASE_URL="postgres://user:password@postgres.example.com:5432/attestation-service"
Example of setting up a local postgres database on Ubuntu:
apt install postgresql
sudo -u postgres createdb attestation-service
sudo -u postgres psql -c "ALTER USER postgres PASSWORD '<DATABASE_PASSWORD>';"
export DATABASE_URL="postgres://postgres:<DATABASE_PASSWORD>@localhost:5432/attestation-service"Attestation Service can use its config from a file that can be specified using CONFIG environment variable. It is recommended that you start using the template Attestation Service config file:
# Choose a location for the config and fetch the defaults
export CONFIG=/path/to/attestation-service-config
curl https://raw.githubusercontent.com/celo-org/celo-monorepo/master/packages/attestation-service/config/.env.development >$CONFIG
Lines beginning # are treated as comments. In addition, any options specified as environment variables override values provided in this file.
Required options:
| Variable | Explanation |
|---|---|
DATABASE_URL |
The URL to access the local database, e.g. sqlite://db/attestations.db |
CELO_PROVIDER |
The node URL for your local full node at which your attestation signer key is unlocked. e.g. http://localhost:8545. Do not expose this port to the public internet! |
CELO_VALIDATOR_ADDRESS |
Address of the Validator account. If Validator is deployed via a ReleaseGold contract, this is the contract's address (i.e. $CELO_VALIDATOR_RG_ADDRESS), not the beneficiary. |
ATTESTATION_SIGNER_ADDRESS |
Address of the Validator's attestation signer key |
SMS_PROVIDERS |
Comma-separated list of all enabled SMS providers. Can include twilio, nexmo. From v1.2.0, can include messagebird. Providers are tried from first to last, unless SMS_PROVIDERS_RANDOMIZED is set to 1, in which case they are tried in a random order. |
|
Optional environment variables:
| Variable | Explanation |
|---|---|
PORT |
Port to listen on. Default 3000. |
RATE_LIMIT_REQS_PER_MIN |
(v1.2.0+) Requests per minute over all endpoints before new requests are rate limited. Default 100. |
SMS_PROVIDERS_<country> |
Override to set SMS providers and order for a specific country code (e.g SMS_PROVIDERS_MX=nexmo,twilio) |
SMS_PROVIDERS_RANDOMIZED |
(v1.2.0+) If set to 1 and no country-specific providers are configured for the country of the number being requested, randomize the order of the default providers. Default 0. |
MAX_DELIVERY_ATTEMPTS |
Number of total delivery attempts when sending SMS. Each attempt tries the next available provider in the order specified. If omitted, the deprecated MAX_PROVIDER_RETRIES option will be used. Default value is 3. |
MAX_REREQUEST_MINS |
Number of minutes during which the client can rerequest the same attestation. Default value is 55. |
EXTERNAL_CALLBACK_HOSTPORT |
Provide the full external URL at which the service can be reached, usually the same as the value of the ATTESTATION_SERVICE_URL claim in your metadata. This value, plus a suffix e.g. /delivery_status_twilio will be the URL at which service can receive delivery receipt callbacks. If this value is not set, and VERIFY_CONFIG_ON_STARTUP=1 (the default), the URL will be taken from the validator metadata. Otherwise, it must be supplied. |
VERIFY_CONFIG_ON_STARTUP |
Refuse to start if signer or metadata is misconfigured. Default 1. If you disable this, you must specify EXTERNAL_CALLBACK_HOSTPORT. |
MAX_AGE_LATEST_BLOCK_SECS |
(v1.2.0+) Maximum age of the latest received block, in seconds, before the health check reports failure. Default is 20. |
DB_RECORD_EXPIRY_MINS |
Time in minutes before a record of an attestation in the database may be deleted. Default 60 minutes. |
LOG_LEVEL |
One of fatal, error, warn, info, debug, trace |
LOG_FORMAT |
One of json, human, stackdriver |
APP_SIGNATURE |
A value that is shown under the key appSignature field in the /status endpoint that you can use to identify multiple instances. |
Twilio configuration options:
| Variable | Explanation |
|---|---|
TWILIO_ACCOUNT_SID |
The Twilio account ID |
TWILIO_MESSAGING_SERVICE_SID |
The Twilio Message Service ID. Starts with MG |
TWILIO_AUTH_TOKEN |
The API authentication token |
TWILIO_UNSUPPORTED_REGIONS |
Optional. A comma-separated list of country codes to not serve, recommended value CU,SY,KP,IR,SD |
Nexmo configuration options:
| Variable | Explanation |
|---|---|
NEXMO_KEY |
The API key to the Nexmo API |
NEXMO_SECRET |
The API secret to the Nexmo API |
NEXMO_APPLICATION |
Optional. Use only numbers linked to the Nexmo application with matching ID, rather than the global pool. |
NEXMO_UNSUPPORTED_REGIONS |
Optional. A comma-separated list of country codes to not serve, recommended value CU,SY,KP,IR,SD |
NEXMO_ACCOUNT_BALANCE_METRIC |
Optional. Disabled by default. If set to 1, Nexmo balances will be published under the attestation_provider_balance metric. |
MessageBird configuration options (v1.2.0+):
| Variable | Explanation |
|---|---|
MESSAGEBIRD_API_KEY |
The API key to the MessageBird API |
MESSAGEBIRD_UNSUPPORTED_REGIONS |
Optional. A comma-separated list of country codes to not serve, recommended value CU,SY,KP,IR,SD |
Celo uses Metadata to allow accounts to make certain claims without having to do so on-chain. Users can use any authorized signer address to make claims on behalf of the registered Account. For convenience this guide uses the CELO_ATTESTATION_SIGNER_ADDRESS, but any authorized signer will work. Note that metadata needs recreating if the key signing it is changed; it is recommended not to use the validator signer address since that key is typically rotated more regularly.
To complete the metadata process, we have to claim which URL users can request attestations from. Run the following commands on your local machine. This section uses several environment variables defined during the validator setup.
# On your local machine
celocli account:create-metadata ./metadata.json --from $CELO_VALIDATOR_RG_ADDRESS
The CELO_ATTESTATION_SERVICE_URL variable stores the URL to access the Attestation Service deployed. In the following command we specify the URL where this Attestation Service is. Note that the URL provided in the validator metadata should be the base path at which the serice is accessible; it should NOT include /attestations.
# On your local machine
celocli account:claim-attestation-service-url ./metadata.json --url $CELO_ATTESTATION_SERVICE_URL --from $CELO_ATTESTATION_SIGNER_ADDRESS
You should now host your metadata somewhere reachable via HTTPS. You can use a service like gist.github.com. Create a gist with the contents of the file and then click on the Raw button to receive the permalink to the machine-readable file.
Now we can register this url for others to see. To do this, we must have the beneficiary address of the ReleaseGold contract (CELO_VALIDATOR_ADDRESS) unlocked.
(Note: If you used a Ledger to create the beneficiary address, add the --useLedger flag and possibly the --ledgerAddresses=N flag to the below command. The latter flag will have the ledger check N number of addresses, e.g. --ledgerAddresses=5 would have the Ledger check 5 addresses. Don't forget to confirm the transaction on your Ledger after initiating it via the CLI.)
# On your local machine
celocli releasegold:set-account --contract $CELO_VALIDATOR_RG_ADDRESS --property metaURL --value <METADATA_URL>
If everything goes well users should be able to see your claims by running:
# On your local machine
celocli account:get-metadata $CELO_VALIDATOR_RG_ADDRESSBefore running the attestation service, ensure that your local node is fully synced and that the metadata has been registered.
# On the Attestation machine
sudo celocli node:synced --node geth.ipc
The following command for running the Attestation Service uses --network host to access a local database (only works on Linux), and listens for connections on port 80.
It assumes all of the configuration options needed have been added to the config file located under $CONFIG which Docker will process. Alternatively, you can pass the config file for the service to read on startup using -e CONFIG=<docker-path-to-config-file>, and other environment variables directly by adding arguments of the form -e DATABASE_URL=$DATABASE_URL.
Set the TAG environment variable to determine which image to install. Use attestation-service-mainnet for the latest image suitable for mainnet (as below), attestation-service-baklava for the latest image suitable for baklava, or specify a specific build as given in the release notes linked above.
# On the Attestation machine
export TAG=attestation-service-mainnet
docker run --name celo-attestation-service -it --restart always --entrypoint /bin/bash --network host --env-file $CONFIG -e PORT=80 -p 80:80 us.gcr.io/celo-testnet/celo-monorepo:$TAG -c " cd /celo-monorepo/packages/attestation-service && yarn run db:migrate && yarn start "Attestation Services supports delivery receipts so that SMS providers can callback to provide delivery information. This triggers retries as needed, even between providers, and enables delivery success and timing metrics to be logged and made accessible to the client.
There is no configuration necessary to enable Twilio or Nexmo delivery receipts. The Attestation Service uses the URL in the validator metadata, provided that VERIFY_CONFIG_ON_STARTUP is enabled. The URL for callbacks can always be specified with the EXTERNAL_CALLBACK_HOSTPORT configuration option. The service appends /delivery_status_{twilio, nexmo} on to the URL, and supplies that to the provider through its API.
For MessageBird, provide the callback URL (be sure to include /delivery_status_messagebird) in the MessageBird dashboard's API Settings page.
If you are using a load balancer in front of Attestation Service with a URL based routing configuration, be careful to prevent these routes being filtered.
Attestation Service provides a test endpoint.
You can run the following command ([reference]("../command-line-interface/identity.md#celocli identity:test-attestation-service")) to test an Attestation Service and send an SMS to yourself:
celocli identity:test-attestation-service --from $CELO_ATTESTATION_SIGNER_ADDRESS --phoneNumber <YOUR-PHONE-NUMBER-E164-FORMAT> --message <YOUR_MESSAGE> [--provider <PROVIDER>]You need the attestation signer key available and unlocked on your local machine.
You may wish to do this once for each provider you have configured (--provider=twilio, --provider=nexmo etc). (If this option is not recognized, try upgrading celocli).
Note that this does not use an identical code path to real attestations (since those require specific on-chain state) so this endpoint should not be used in place of monitoring logs and metrics.
You should receive an SMS, and the Attestation Service should log messages indicating that the message was Sent and then, if delivery reports can be made successfully, Delivered. Depending on the provider, you may receive several callbacks as the message progresses through the network.
If this works then your attestation service should be successfully deployed!
It is important to monitor the Attestation Service and also monitor the full node that it depends on.
The Attestation Service provides JSON-format structured logs.
The /healthz endpoint will respond with status 200 when all of the following are true: the attestation signer key is available and unlocked, the node is not syncing, the latest block is recent, and the database is accessible. Otherwise it will respond with status 500.
Use this endpoint when configuring a load balancer in front of multiple instances. The results of the last healthcheck are reported via the attestation_service_healthy metric.
Attestation Service also has a /status endpoint for configuration information.
Attestation Service exposes the following Prometheus format metrics at /metrics for attestations made. Please note that metrics are per instance.
Please note that monitoring endpoints including metrics are exposed as a path on the usual host port. This means they are public by default. If you want metrics to be internal only, you will need to configure a load balancer appropriately.
Metrics for the service:
attestation_service_healthy: Gauge with value0or1indicating whether the instance failed or passed its last healthcheck. Calls to/healthzupdate this gauge, and the process also runs a background healthcheck every minute. It is strongly recommended that you monitor this metric.
Metrics for attestation requests:
-
attestation_requests_total: Counter for the number of attestation requests. -
attestation_requests_rerequest: Counter for the number of attestation re-requests. A client that rerequests the same attestation is similar to the service receiving a delivery failure notification. -
attestation_requests_already_sent: Counter for the number of attestation requests that were received but dropped because the local database records that they have already been completed. -
attestation_requests_wrong_issuer: Counter for the number of attestation requests that were received but dropped because they specified the incorrect validator. -
attestation_requests_without_incomplete_attestation: Counter for the number of attestation requests that were received but when querying the blockchain no matching incomplete attestation could be found. -
attestation_requests_valid: Counter for the number of requests received that are for the correct issuer and an incomplete attestation exists. -
attestation_requests_attestation_errors: Counter for the number of requests for which producing the attestation failed. This could be due to phone number or salt that does not match the hash, or the attestation was recorded fewer than 4 blocks ago. -
attestation_requests_unable_to_serve: Counters for the number of requests that could not be served because no SMS provider was configured for the phone number in the request. Labelcountrybreaks down the count by country code. -
attestation_requests_number_type: Counter for attestation requests by the type of the phone number. Labelcountrybreaks down the counny by country code. Labeltypehas values including:fixed_line,mobile,fixed_line_or_mobile,toll_free,premium_rate,shared_cost,voip,personal_number,pager,uan,voicemail,unknown. -
attestation_requests_sent_sms: Counter for the number of SMS successfully sent. -
attestation_requests_failed_to_send_sms: Counter for the number of SMS that failed to send. -
attestation_requests_believed_delivered_sms: Counter for the number of SMS that were eventually delivered, or believed to be delivered after a timeout without hearing about delivery failure. -
attestation_requests_unexpected_errors: Counter for the number of unexpected errors.
The following metrics track each delivery attempt. Each client request for an attestation may result in several delivery attempts, at most MAX_DELIVERY_ATTEMPTS configured for that country:
-
attestation_attempts_delivery_status: Counter for delivery attempts made. Labelcountrybreaks down the count by country code. Labelprovideridentifies the provider. Labelstatusidentifies the outcome:-
Created: The request was accepted by the provider. -
Queued: The SMS is buffered or queued, but still in flight. -
Upstream: The SMS was passed to an upstream carrier. -
Delivered: A final delivery receipt was received indicating the SMS was succesfully delivered.
-
-
attestation_attempts_delivery_error_codes: Counter for delivery attempts made. Labelcountrybreaks down the count by country code. Labelprovideridentifies the provider. Labelcodeidentifies the provider-specific error codes: see Twilio error codes and Nexmo error codes for more details.
Administrative metrics:
- The
attestation_provider_balancetracks the value of the balance of accounts at supported providers. Labelprovideridentifies the provider. This is currently only supported for Nexmo, and is off by default but can be enabled by settingNEXMO_ACCOUNT_BALANCE_METRIC. The metric is populated as a value in the account currency, e.g USD, and only once a successful SMS has been delivered by that provider.
The number of requested and entirely completed attestations is in effect recorded on the blockchain. The values can be seen at Celo Explorer: enter the Validator's address and click the 'Celo Info' tab.
TheCelo tracks global attestation counts and success rates, and shows detailed information about recent attestation attempts.
After your service is up and running, you can monitor its performance using the public Attestation Service Dashboard. Enter your validator address in the top right search bar to view your service's stats. This dashboard can also be useful for troubleshooting various issues that will arise with certain geographic regions or providers.