BullSequana Edge Ansible Playbooks and Modules allows Data Center and IT administrators to use RedHat Ansible or AWX to automate and orchestrate the operations (power, update) of BullSequana Edge.
BullSequana Edge
Ansible playbooks can be used as is with following prerequisites:
- AWX 4.0+
- Ansible 2.8.5+
- Python 3.6.8+
- modules Python : ansible-vault and tzlocal (delivered in "prerequisites" directory)
Optionaly, 2 ready-to-go AWX-Ansible images are available on Dockerhub
- Dockerhub AWX images
- Docker CE
- Docker compose
- BullSequana Edge Playbooks
- What to do first on AWX
- What to do first on Ansible
- What are Firmware update Workflows
- How to manage AWX encrypted passwords
- How to manage Ansible encrypted passwords
- How to change your proxy
- How to change technical states file path
- How to change certificat on AWX server
- How to change AWX passwords
- How to log on a docker container
- How to build your own docker container
- Warning for updates
- More help
- Support
- LICENSE
- Version
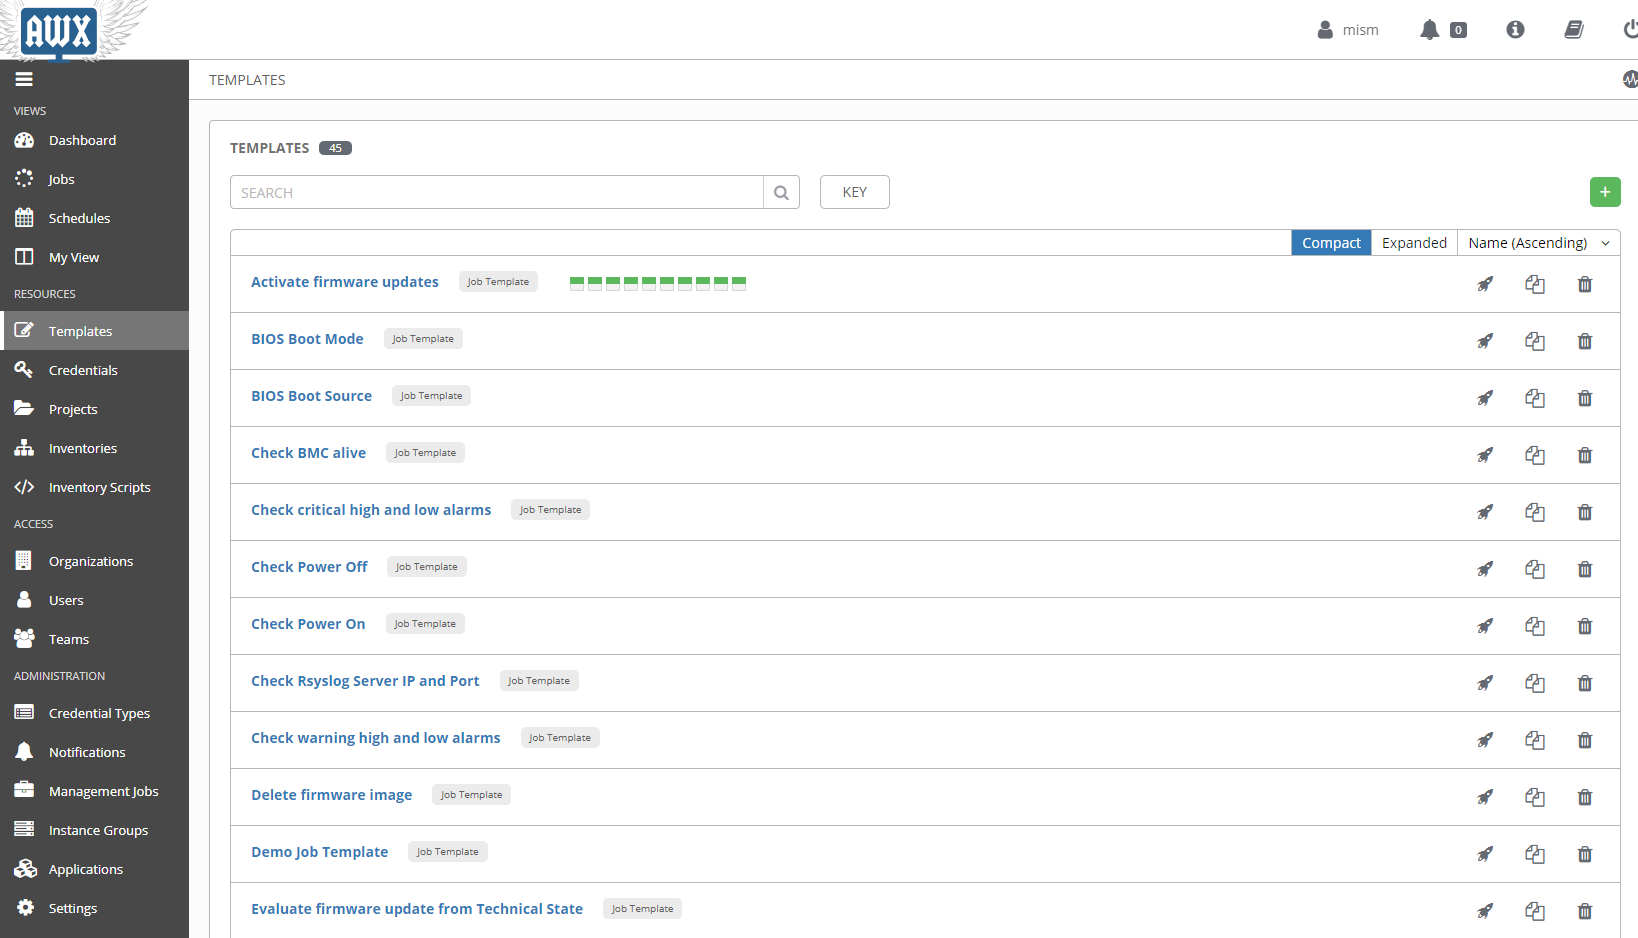
Activate firmware updates: Activate BullSequana Edge uploaded firmwares - Do NOT upload firmwares (need to be planed before)Evaluate firmware update from Technical State:Evaluate firmware update from Atos specific Technical State file (comparaison)Delete firmware image: Delete a firmware image by idFirmware inventory- Active: Get firmware inventory in "Active" stateFirmware inventory - Ready: Get firmware inventory in "Ready" stateBIOS Boot Mode: Get current BIOS Boot ModeSet BIOS Boot Mode Regular: Set BIOS Boot Mode to RegularSet BIOS Boot Mode Safe: Set BIOS Boot Mode to SafeSet BIOS Boot Mode Setup: Set BIOS Boot Mode to SetupBIOS Boot Source: Get current BIOS Boot SourceSet BIOS Boot Source Default: Set BIOS Boot Source to DefaultSet BIOS Boot Source Disk: Set BIOS Boot Source to DiskSet BIOS Boot Source Media: Set BIOS Boot Source to MediaSet BIOS Boot Source Network: Set BIOS Boot Source to NetworkUpdate firmware from file: Update Firmware from a file (tar or gzip file)Update firmwares from Technical State: Update all Firmwares from technical state (Atos specific TS file)Upload firmware images from Technical State: Upload images from technical state (Atos specific TS file) - Do NOT activate firmwares (need to be planed after)Check critical high and low alarms: Check critical high and low alarm states from sensorsCheck warning high and low alarms: Check warning high and low alarm states from sensorsState BMC: Get BullSequana Edge current BMC stateState Chassis: Get BullSequana Edge current chassis stateState Host:Get BullSequana Edge current host stateGet FRU: Get BullSequana Edge FRU informationGet Network: Get BullSequana Edge Network informationGet Sensors: Get BullSequana Edge Sensors informationGet System: Get BullSequana Edge System informationCheck Rsyslog Server IP and Port: Compare Rsyslog Server IP and Port to variables defined in inventoryRsyslog Server IP and Port: Get BullSequana Edge Rsyslog IP and PortNTP Server Ip and Sync: NTP Server Ip and SyncSet Rsyslog Server IP: Set Rsyslog BullSequana Edge IPSet Rsyslog Server Port:Set Rsyslog BullSequana Edge PortSet NTP Server Ip and Sync: Set BullSequana Edge Server Ip and SyncImmediate Shutdown: Request an Immediate ShutdownCheck BMC alive: Check if BullSequana Edge device is aliveCheck Power Off: Check if BullSequana Edge host is powered offCheck Power On: Check if BullSequana Edge host is powered onGet LED state: Get BullSequana Edge LED statePower Cap: Get BullSequana Edge Power CapOrderly Shutdown: Request an Orderly ShutdownPower On: Request a Power OnReboot: Reboot the BullSequana Edge BMCSet LED on/off: Set BullSequana Edge LED stateSet Power Cap on/off: Set BullSequana Edge Power cap on/off
The proxy environment variables are automatically copied in AWX docker context :
- HTTP_PROXY
- HTTPS_PROXY
- NO_PROXY
You can check while installating and starting your containers:
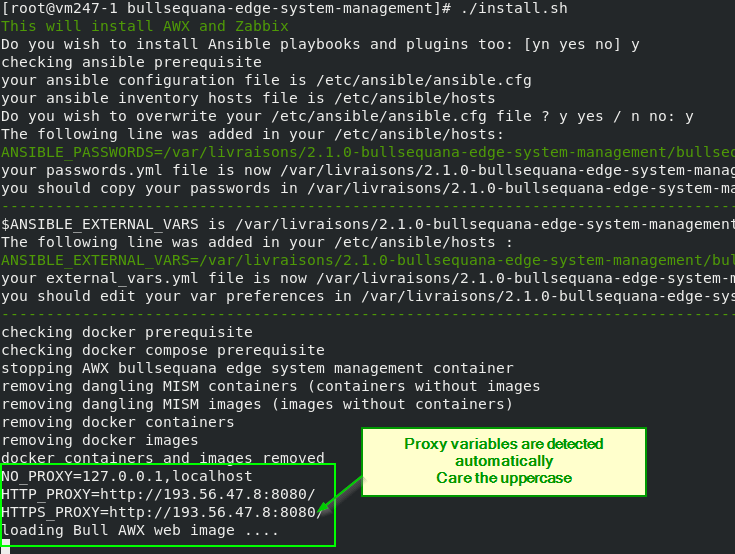
For more details, read the How to change your Proxy
You can get it from
- Bull SOL (Support on line): full installation
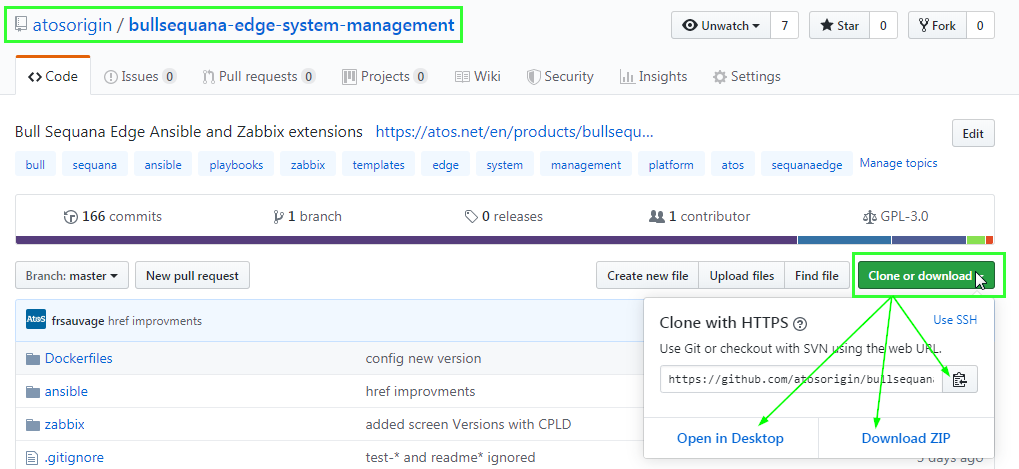
- get zip from this repository
- clone this repository
from zip file, just unzip the file:
unzip <your_zip>
from this repository, just clone:
git clone https://github.com/atosorigin/bullsequana-edge-system-management.git
Bull Sequana Edge Ansible Extensions has 3 AWX installers and an option to try it
Just choose your favorite installation for your environment
on existing AWX: nothing to install: go to the next section to add playbooks and plugins
full install: <install_dir>/install.sh Full install : it will load all docker containers and optionnaly install Ansible playbooks and plugins => use stop.sh and start.sh after
partial install AWX: <install_dir>/install_awx.sh it will build docker containers and install Ansible/AWX docker containers with your local Dockerfiles that you can adapt as needed => use stop_awx.sh and start_awx.sh after
try it: <install_dir>/install_awx_from_dockerhub.sh mainly dedicated to try bullsequana edge system management tool, it will install dockerhub atosorigin images, you cannot adapt the local Dockerfiles => use stop_awx.sh* and start_awx.sh after
For more information about dockerhub installation Visit https://hub.docker.com/repository/docker/atosorigin/bull-sequana-edge-awx-web
👍 Best Practice: remove useless install, stop and start scripts
🌎 Info: if tar files are not present, images are loaded from internet
run a browser with: https://<your_server>

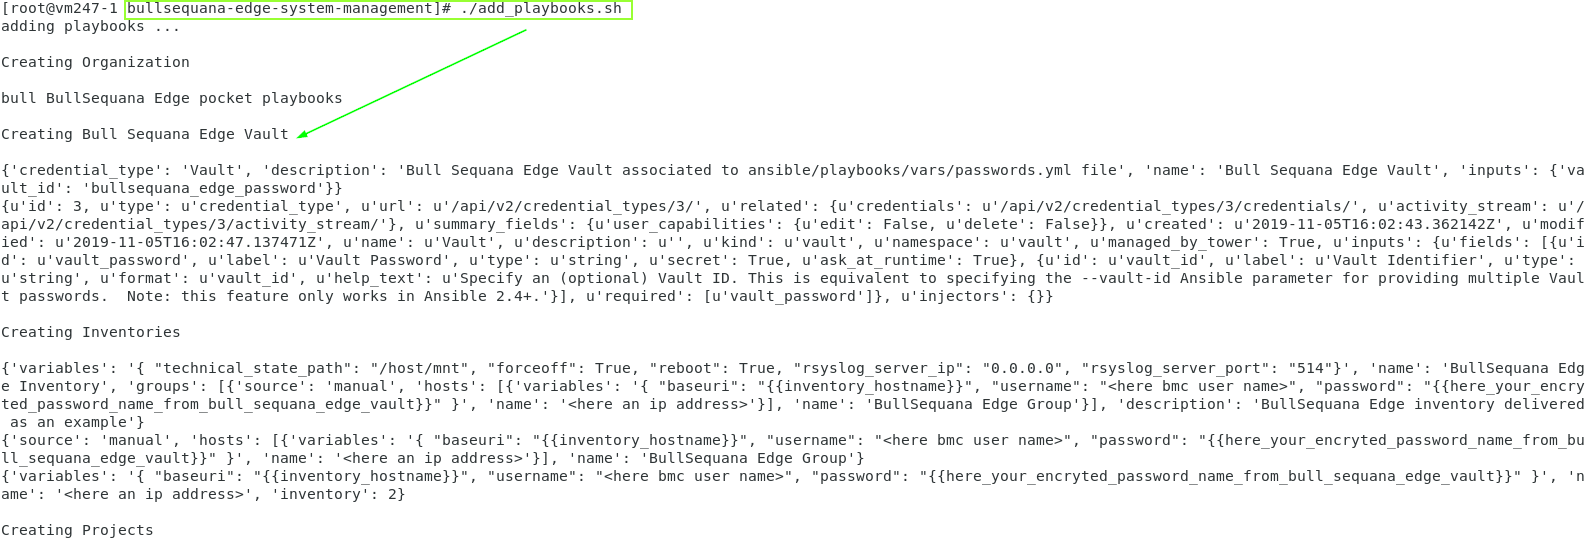
If you did not already add your playbooks, just run:
<install_dir>/add_awx_playbooks.sh
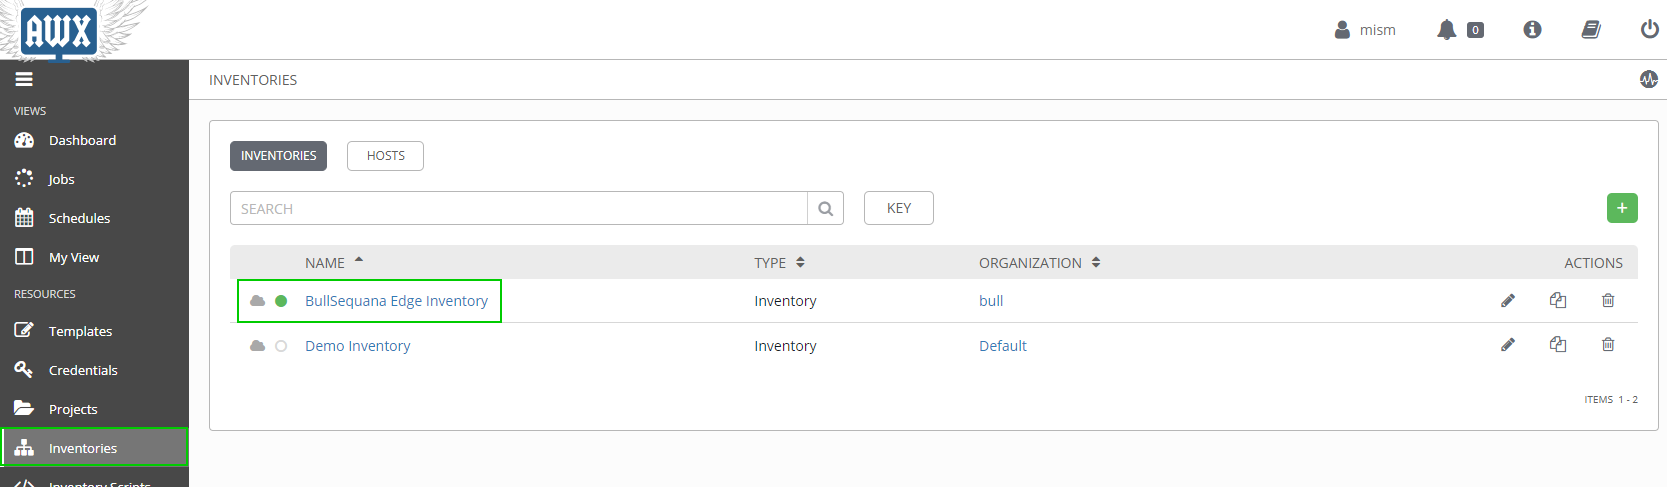
You should have now:
- 1 Organization : Bull
- 1 Inventory : BullSequana Edge Inventory
- 1 Group : BullSequana Edge Group
- 1 Host as an example
- 1 Project : BullSequana Edge Playbooks
- 1 Credential : Bull Sequana Edge Vault
- Bull playbooks
- go to Inventory
- select or create an inventory
- add your hosts
- optionally, depending on host number, create multiple groups
Don't forget to copy/paste baseuri in every host as is baseuri: {{inventory_hostname}}
Optionally, your can import hosts from ansible: See how to export ansible inventory hosts file to awx inventory section
Optionally, your can detect hosts with nmap inventory script: See nmap in Command line section
The technical state path should point to a technical state directory - technical iso file delivered by Atos.
The default value is mapped to the /mnt root of the host, in other words, /host/mnt in the docker containers:
technical_state_path = /host/mnt
You can change this value in the inventory variables:
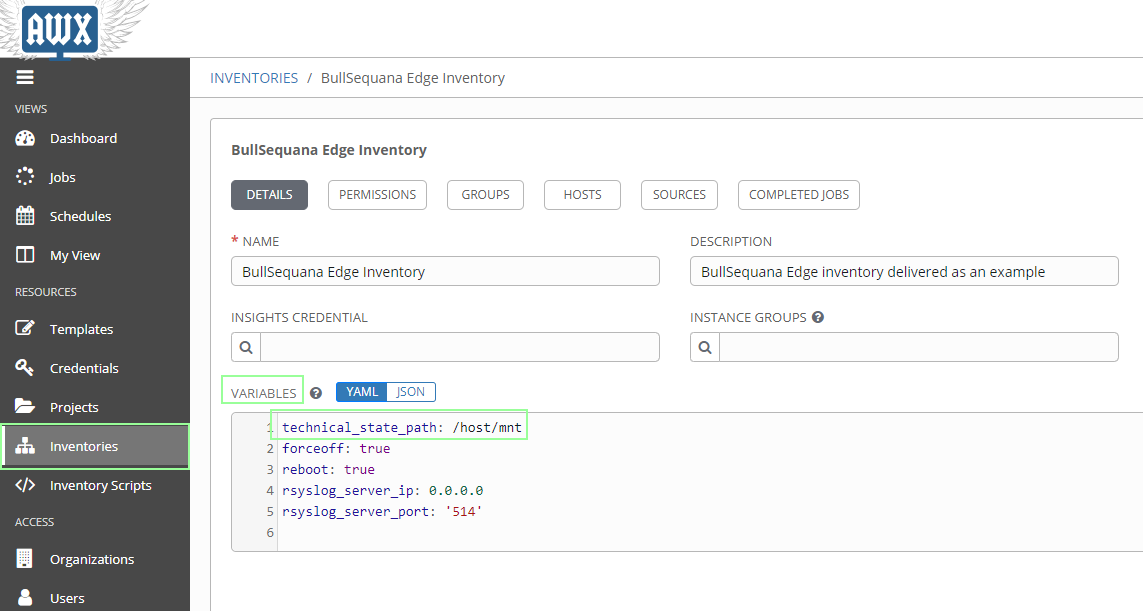
For more information See How to change technical states file path
Default value is True
Following playbooks need to reboot in case of BMC update firmware:
- Update firmwares from Technical State
- Update firmware from file
- Activate firmware updates
if you never want to automatically reboot the BMC, you need to change reboot variable in your inventory / variable part:
reboot = False
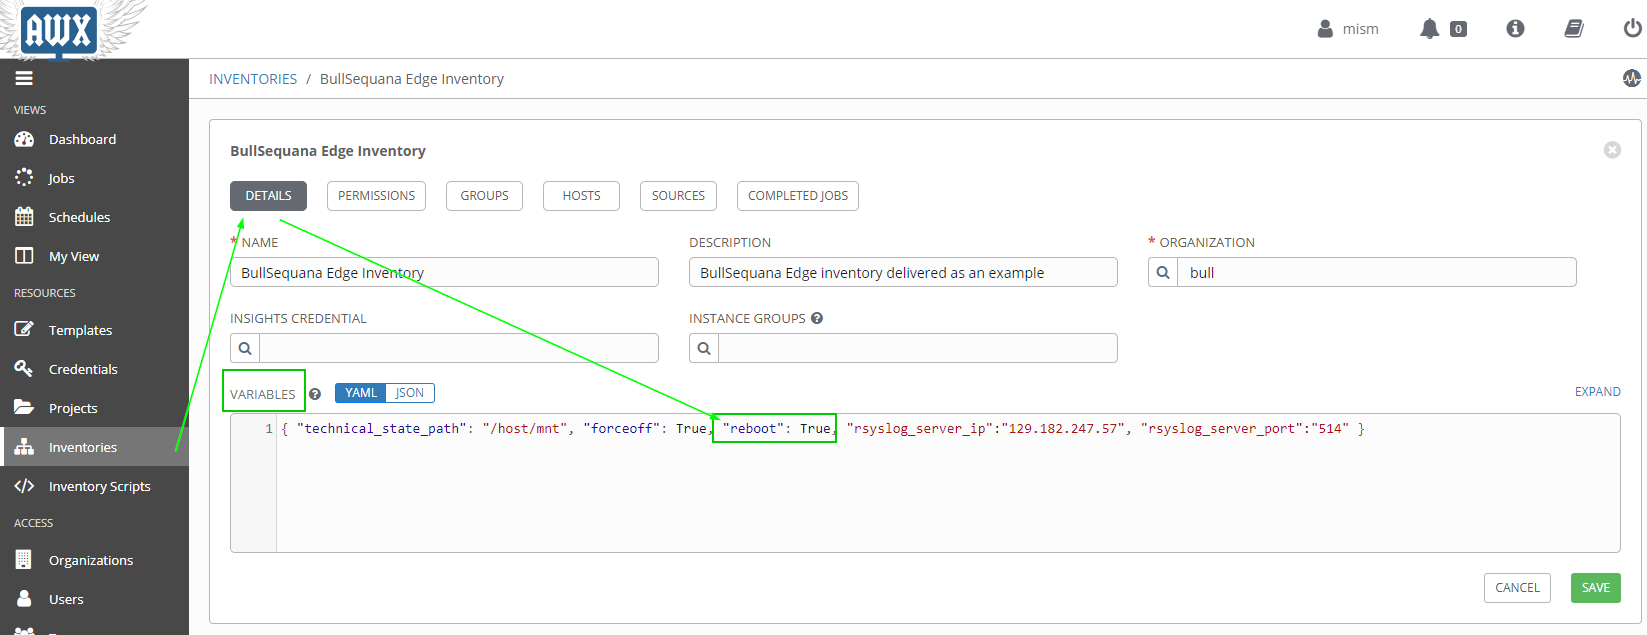
- Default is True meaning the BMC will reboot automatically after an update
- Playbooks needing a reboot will not proceed to reboot: BMC update will be effective next reboot
- Reboot playbook does NOT care this variable
Default value is True
Following playbooks need to reboot in case of BMC update firmware:
- Update firmwares from Technical State
- Update firmware from file
- Activate firmware updates
if you never want to automatically force the remote server power off, you need to change forceoff variable in your inventory / variable part:
forceoff = False
- Default is True meaning the BMC will power off automatically the host (server) during BIOS update
- Playbooks needing a forceoff will not activate BIOS update: BIOS update will be effective next power off / on cycle
- Immediate Shutdown and Orderly Shutdown playbooks do NOT care this variable
power_cap is used in Set Power Cap on playbook
So, the power_cap variable is defined localy inside external_vars section of the playbook
Change the external_vars section as needed:
power_cap: 500
Adjust the prompt on launch option as needed, you can unselect it:
prompt on launch
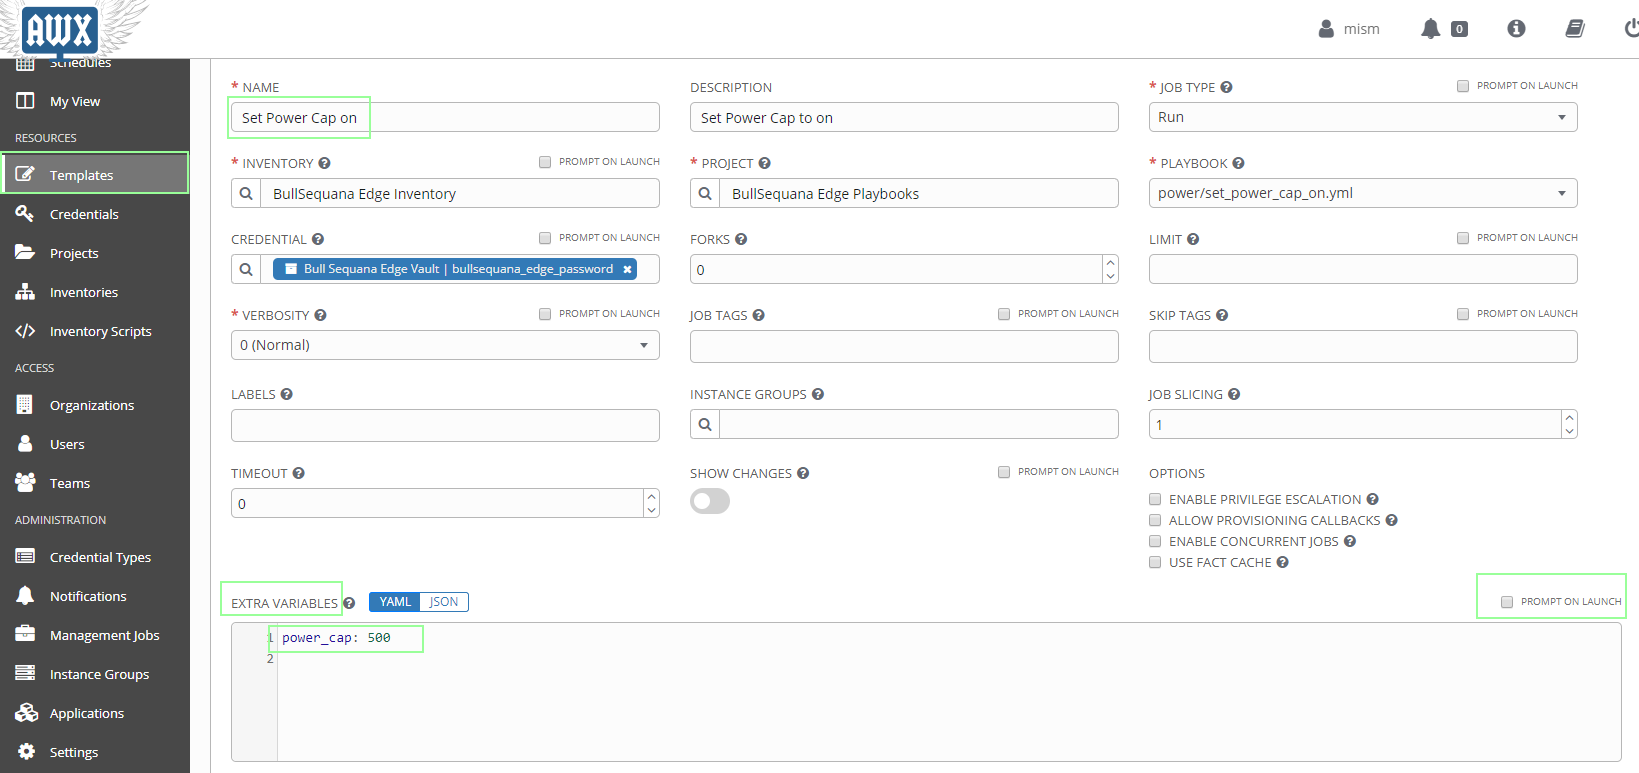
By default, the "prompt on launch" option is selected and this is a way to change the value on the fly, a pop-up window will appear at each launch:

file_to_upload is used in Update firmware from file playbook
So, the file_to_upload variable is defined localy inside external_vars section of the playbook
Change the external_vars section as needed:
file_to_upload: /host/mnt/Resources/your_image.ext"
Adjust the prompt on launch option as needed:
prompt on launch
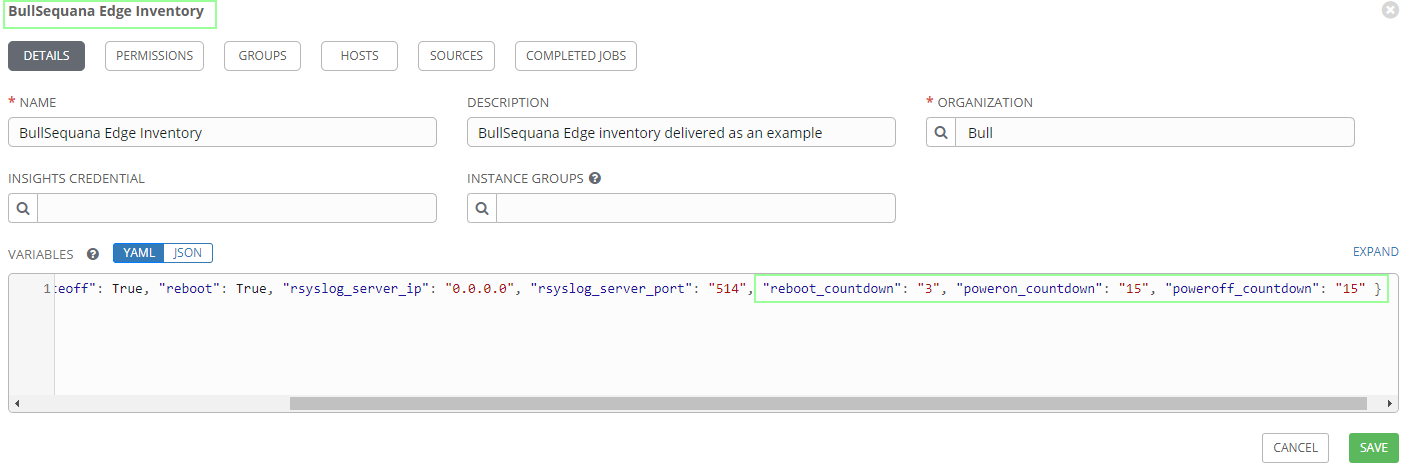
In your inventory Variables section, just change the appropriate countdown variable:
In your inventory Variables section, just change the appropriate maxretries variable (same as countdowns)
Following playbooks need these variables:
- Check Rsyslog Server IP and Port
- Set Rsyslog Server IP
- Set Rsyslog Server Port
The add_awx_playbooks.sh script already creates a vault for you and associates every templates to this vault.
The default Bull Sequana Edge Vault has intentionaly NO password, so you should define your own password
- go to AWX Credentials
- select Bull Sequana Edge Vault
- change the vault password
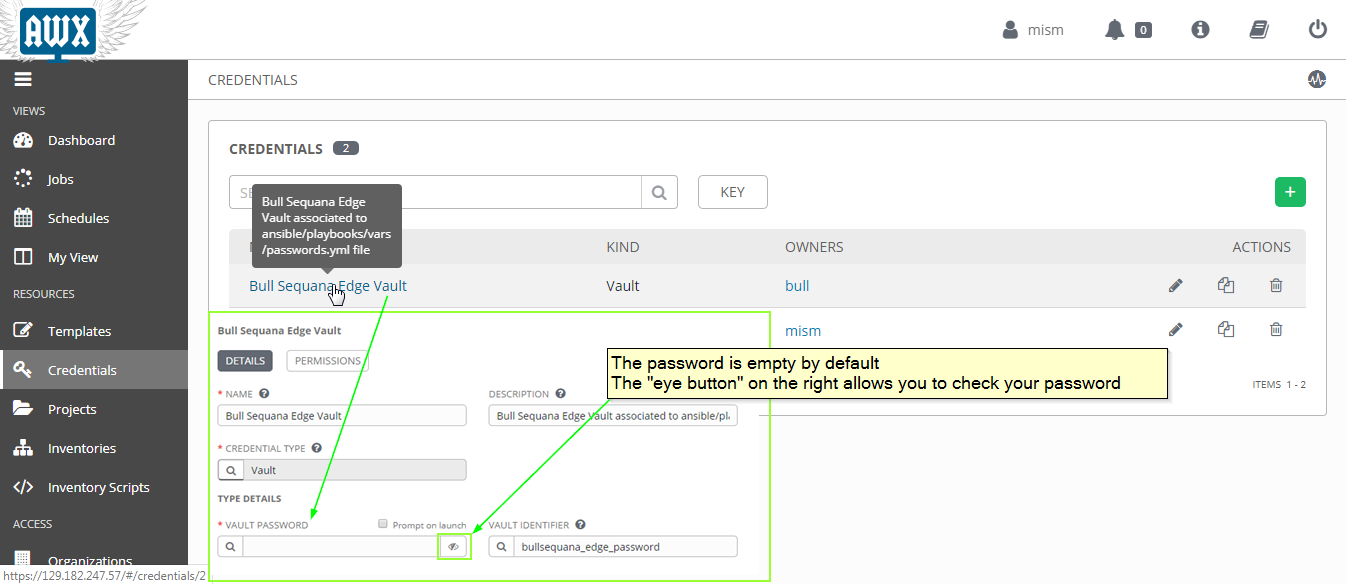 4. save your change
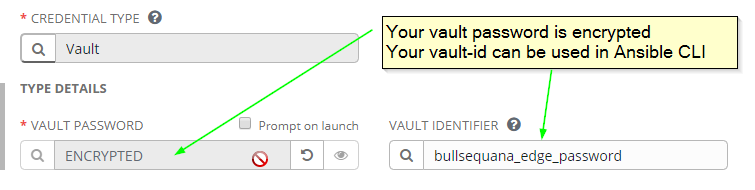
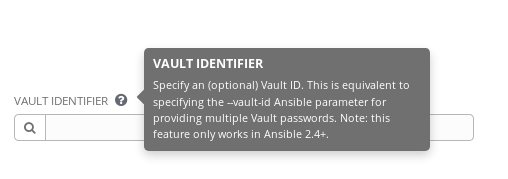
🔒 Info: The vault-id can be used in ansible command line
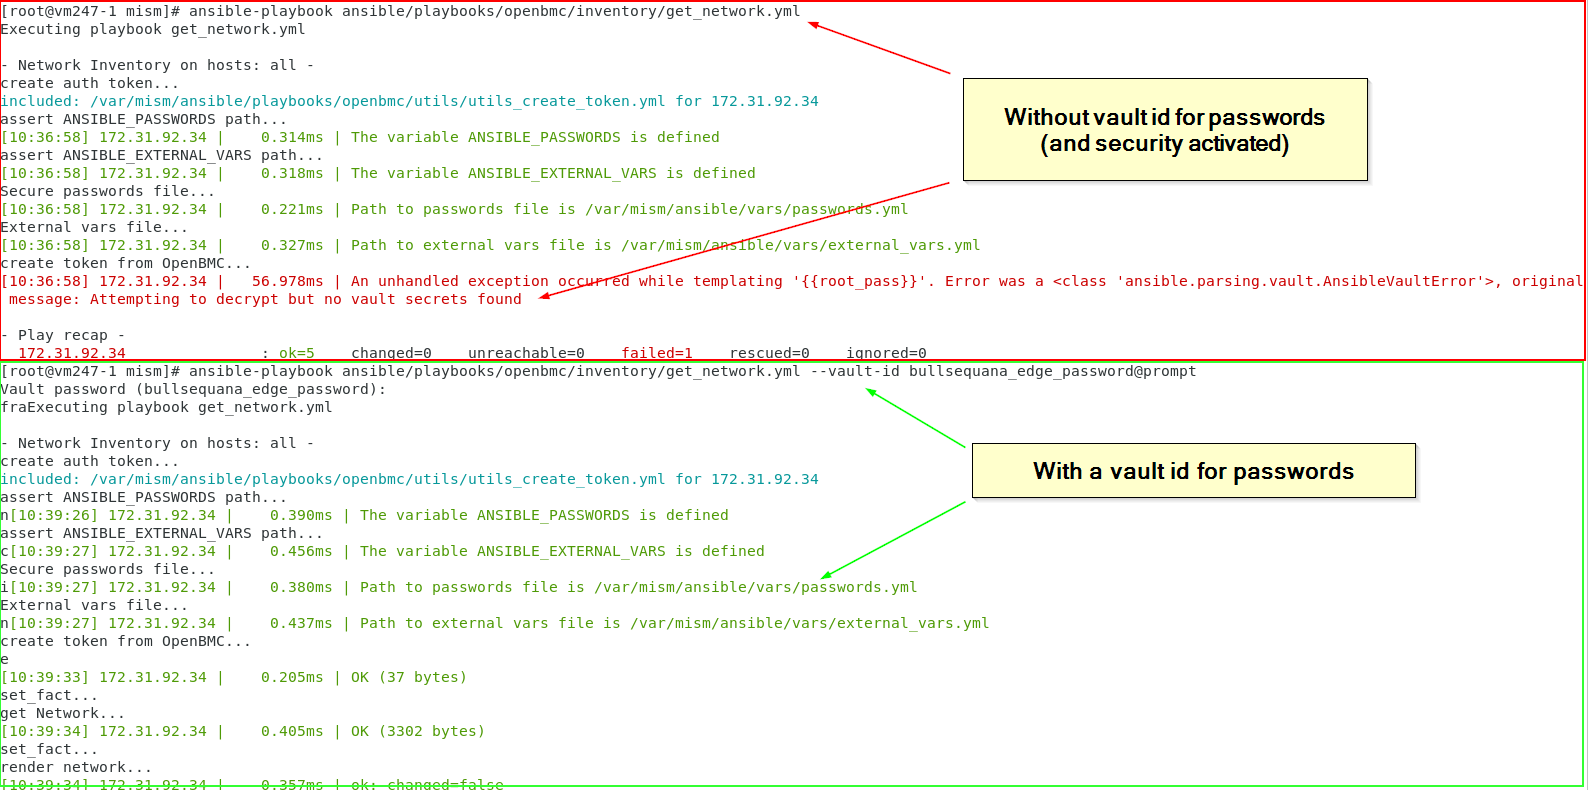
🔒 Info: If you forget to change vault AWX vault credential, you have the following run error
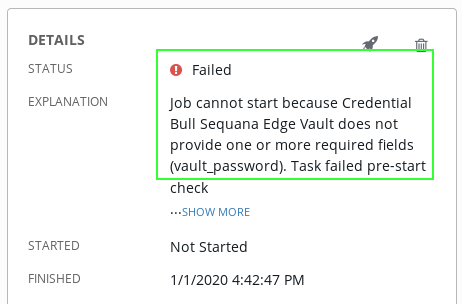
You can now generate your passwords: See How to manage AWX encrypted passwords You should generate as many password variables as different real passwords you have.
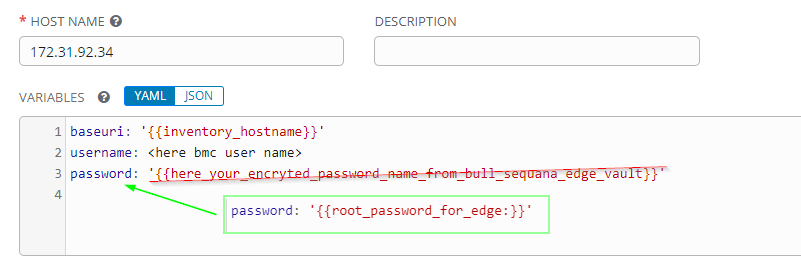
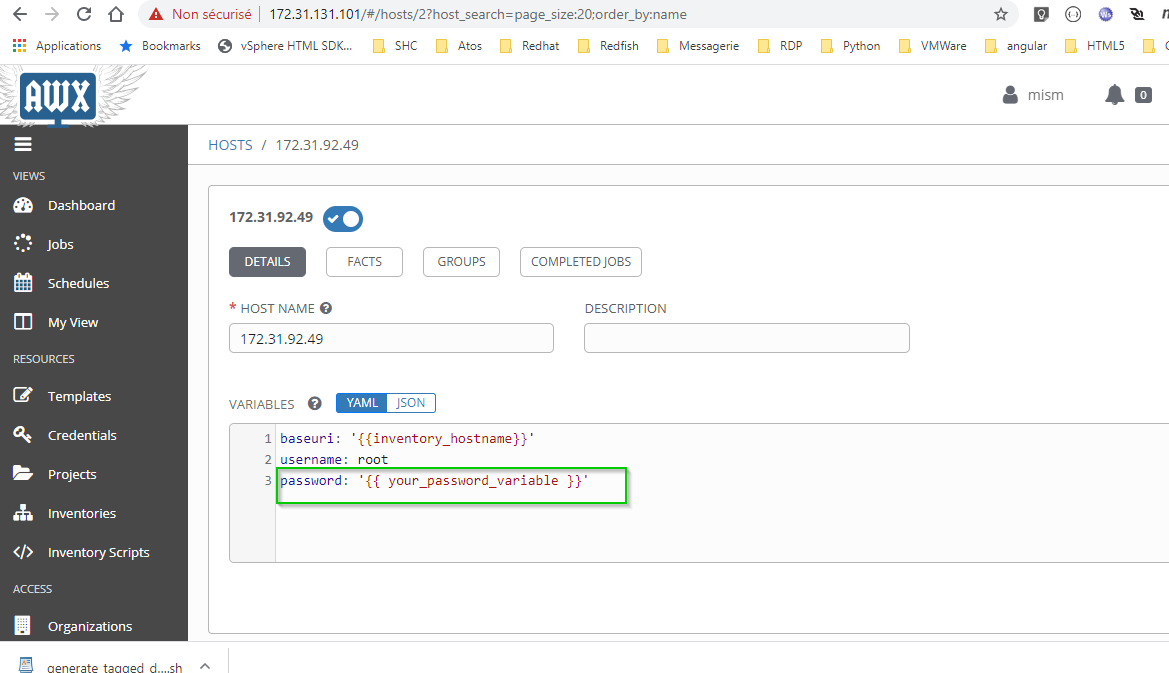
- go to AWX Inventory
- select the host where you need to customize the password
- add "password:" variable for each host
password: "{{root_password_for_edge}}"
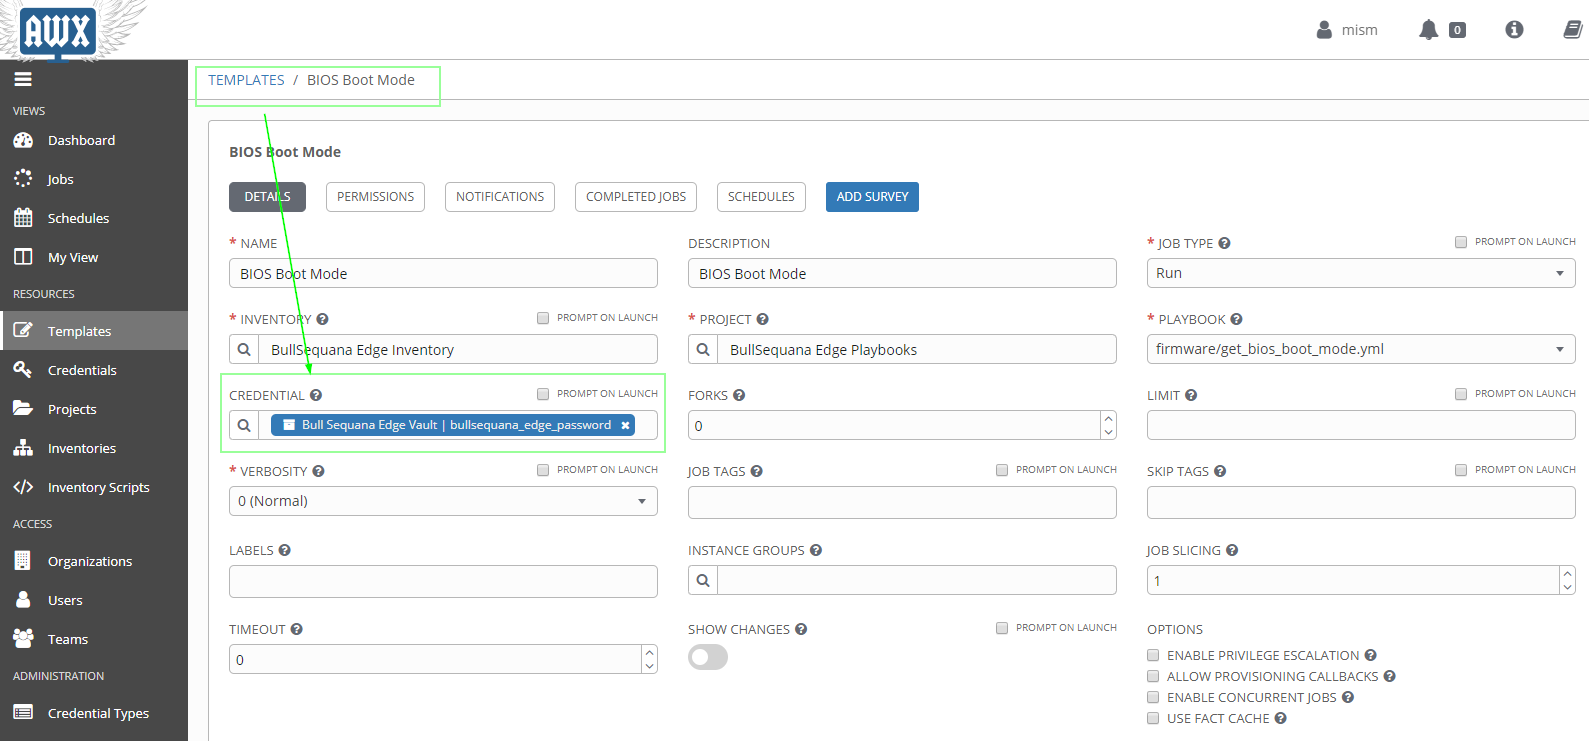
You can check the credential of your job template:
- go to Templates
- select a job template
- check the Credential section
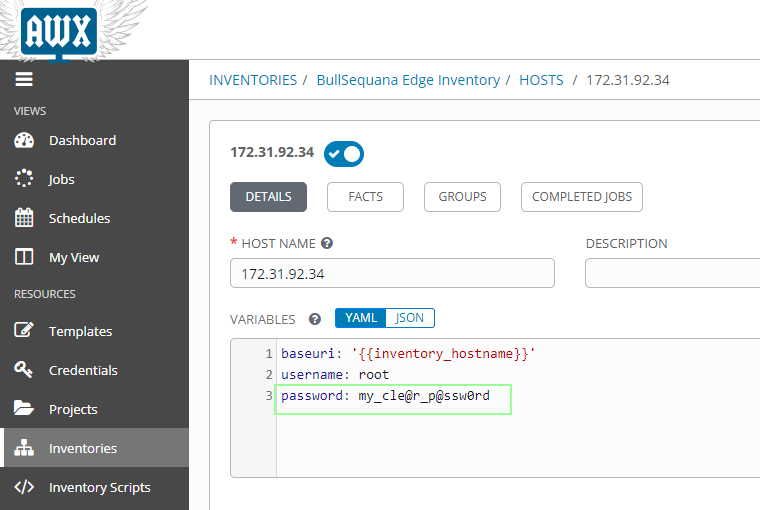
For test purpose, you can always use a clear password in a host:
- go to Inventory
- select a host
- change the password in clear
Bull Sequana Edge Ansible extension contains:
- Playbooks
- One Inventory Plugin for nmap detection
- One Callback Plugin for better CLI stdout UX
This extension can be installed:
- locally if you have or you want to have a local Ansible, or inside docker containers => See install ansible locally
- inside a container to have AWX and a docker ansible through container => See install ansible docker
If you already have an Ansible installation, you can just install ansible playbooks and plugins:
- install python3 as a prerequisite
yum install python3 - install ansible
pip3 install ansible - run the script (Careful: edit the script => See Warning after)
<install_dir>/install_playbooks_and_plugins.sh - optionnaly if you use Ansible vault:
pip3 install pycryptodome
pip3 install ansible-vault
Check your ansible python version:
ansible --version
As explained in the documentation, you should force python3 interpreter:

Bull Sequana Edge Ansible Extensions has three docker installers: Just choose your favorite installation for your environment
<install_dir>/install.shrun all (Ansible and Zabbix Bull Sequana Edge Extensions) => use stop.sh and start.sh after<install_dir>/install_awx.shbuild and run from local Dockerfile that you can adapt => use stop_awx.sh and start_awx.sh after<install_dir>/install_awx_from_dockerhub.shdownload and run atosorigin dockerhub images => use stop_awx.sh and start_awx.sh after
👍 Best Practice: remove useless install, stop and start scripts
Here is the basic configuration for ansible:
config file = /etc/ansible/inventory/ansible.cfg file
inventory = /etc/ansible/inventory/hosts file
variables = <install_dir>/ansible/vars/external_vars.yml file
encrypted passwords = <install_dir>/ansible/vars/passwords.yml file
💻 Info: With docker installation, for all CLI commands like ansible or ansible-playbook, you should be logged on a docker awx_web container: See How to log on a docker container
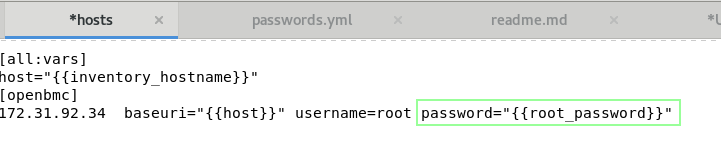
- edit <install_dir>/ansible/inventory/hosts file
- add your ip addresses or hostnames followed by baseuri and username variables
# add a group optionaly []
[linux_mipocket]
10.10.0.2 baseuri={{ host }} user=root password=A_cle@r_p@ssw0rd
- generate an encrypted password for your password variable
- add your encrypted password variable
password='{{ your_encryoted_variable }}'
For test purpose, you can always use a clear password in your hosts file

- edit <install_dir>/ansible/vars/external_vars.yml file
- comment/uncomment/modify your variables
- optionaly log on to awx_web docker container
- go to your playbook directory
- execute ansible-playbook command with appropriate parameters and desired playbook
<source can be @prompt to be prompted or any encrypted source file>
- optionaly log on to docker awx_web
docker exec -it awx_web bash - get your targeted inventory id
tower-cli inventory list
example: inventory id for 'Ansible Inventory' name is 2
bash-4.2# tower-cli inventory list

- export with awx_manage
awx-manage inventory_import --source=inventory/ --inventory-id=3
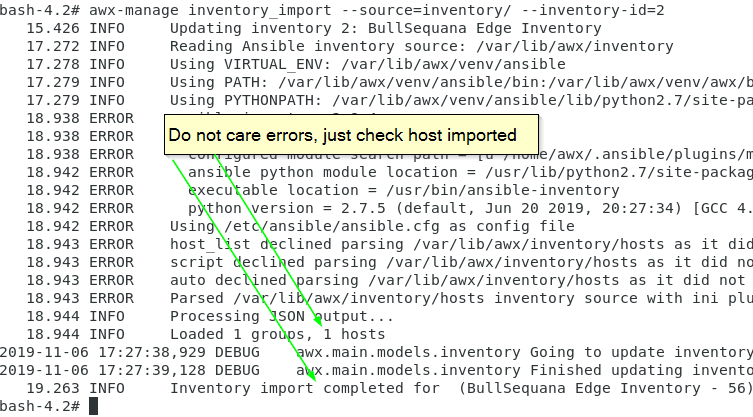
Your hosts should appear as imported
Variables and groups should appear as imported too

General options can always be used with any ansible command as an optional and cumulative parameter
--limit=<your_group>
<your_group> should be declared in hosts file
-e "username=<mon user> password=<mon mot de passe>"
You can refer to Ansible documentation: Visit https://docs.ansible.com/ansible/2.5/user_guide/playbooks_variables.html
To summarize, two main possibilities:
- As a command parameter, indicate variable/value with --extra-vars as CLI argument :
ansible-playbook yourfile.yml --extra-vars "ma_variable=your_value"
- In the appropriate external_vars file <install_dir>/ansible/vars/external_vars.yml, uncomment and set the desired variable :
your_variable: your_value
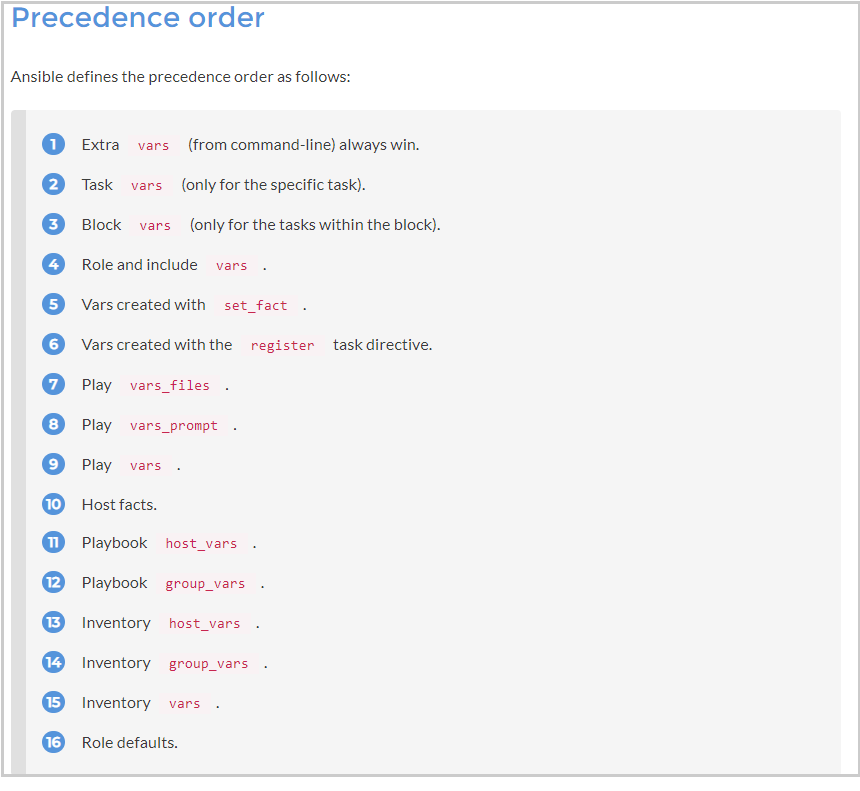 Best site that explain variable orders and conflicts: Visit https://subscription.packtpub.com/book/networking_and_servers/9781787125681/1/ch01lvl1sec13/variable-precedence
ansible-playbook --extra-vars "file_to_upload=<path_and_filename>" update_firmware_from_file.yml
exemple:
[root@awx firmware]# ansible-playbook --limit=openbmc --extra-vars "file_to_upload=/mnt/BIOS_SKD080.13.03.003.tar.gz username=root password=mot_de_passe" -vv update_firmware_from_file.yml
ansible-playbook evaluate_firmware_update.yml
ex: [root@awx firmware]# ansible-playbook --limit=openbmc -vv evaluate_firmware_update.yml
ansible-playbook -vv upload_firmwares.ymlansible-playbook --limit=openbmc update_firmwares.yml -vvansible-playbook get_firmware_inventory.ymlex: [root@awx firmware]# ansible-playbook --limit=openbmc -vv get_firmware_inventory.yml
ansible-playbook delete_firmware_image.yml -vv --extra-vars "image=81af6684"ex: [root@awx firmware]# ansible-playbook --limit=openbmc delete_firmware_image.yml -vv --extra-vars "image=81af6684 username=root password=mot_de_passe"
ansible-playbook power_off.yml
ex: [root@awx power]# ansible-playbook --limit=openbmc -e "username=your_user password=your_pass" power_off.yml
ansible-playbook power_on.ymlex: [root@awx power] ansible-playbook --limit=openbmc -e "username=root password=mot_de_passe" power_on.yml
ansible-playbook set_rsyslog_server_ip.yml
ansible-playbook set_rsyslog_server_port.yml
ex: [root@awx logs]# ansible-playbook set_rsyslog_server_port.yml
- rsyslog_server_ip: 0.0.0.0
- rsyslog_server_port: 514
in your external_vars file, just uncomment the appropriate value: power_cap: 500
in your external_vars file, just change the appropriate value:
# Count down before checking a successfull reboot in MINUTES
reboot_countdown: 3
# Count down before checking a successfull for power on/off in SECONDS
poweron_countdown: 5
poweroff_countdown: 5
# Count down before checking a successfull end of  activating state in SECONDS
activating_countdown: 30
in your external_vars file, just change the appropriate value:
# Max retries for reboot in in repeated
reboot_maxretries: 10
# Max retries for power on/off in repeated times
poweron_maxretries: 10
poweroff_maxretries: 10
# Max retries for activation (update) in repeated times
activating_maxretries: 10
./get_redfish_nmap_hosts.sh
you can copy/paste detected hosts in your AWX inventory or your ansible 'hosts' file
you should adapt each BMC user/password
On each Ansible CLI, add :
-i /usr/share/ansible/plugins/inventory/redfish_plugin_ansible_inventory.yml
ansible-playbook get_system.yml -i /etc/ansible/redfish_plugin_ansible_inventory.yml
ansible-playbook evaluate_firmware_update.yml -i /etc/ansible/redfish_plugin_ansible_inventory.yml
- generate your encrypted password: See How to manage encrypted passwords
- run your playbook
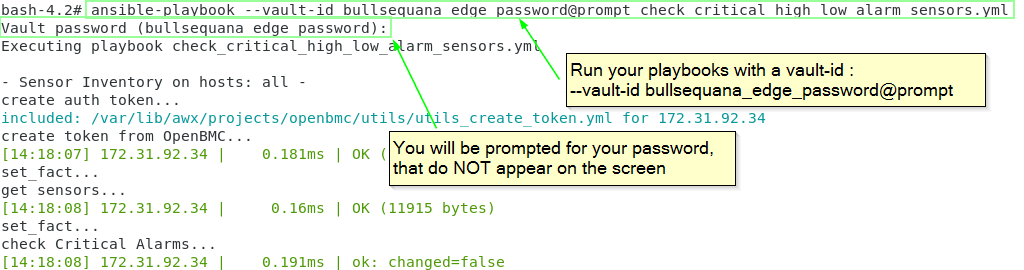
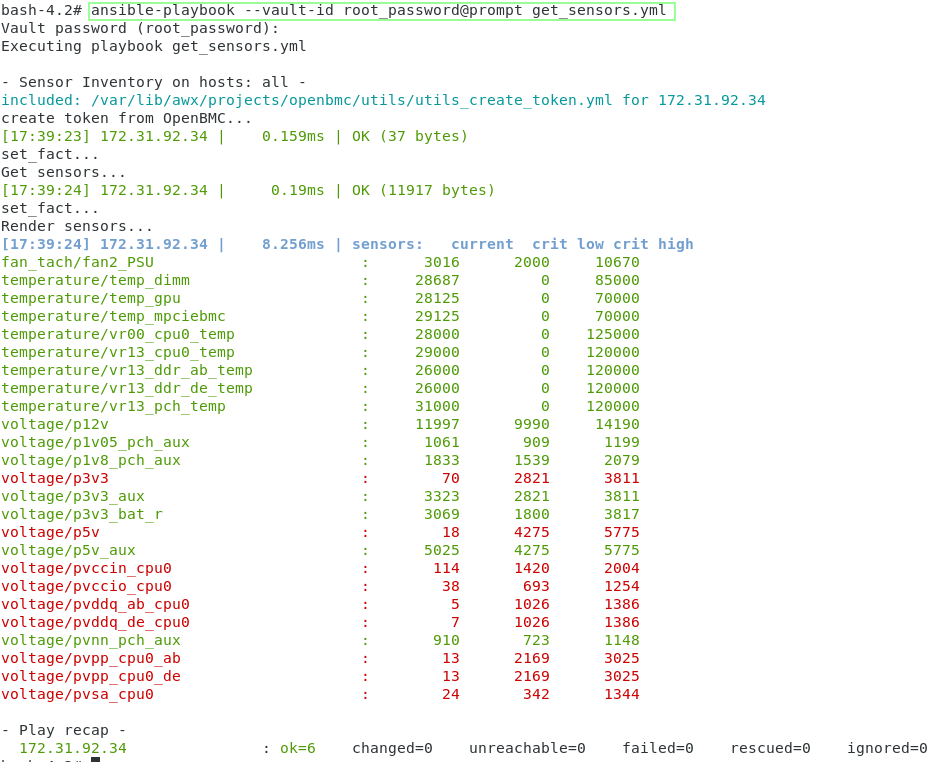
ansible-playbook --vault-id root_password@prompt projects/openbmc/inventory/get_sensors.yml
@prompt means that you should enter the Vault password during the process (hidden)
Visit https://www.youtube.com/watch?v=Ulrr9knCc_w >>> How to add certificate for AWX login <<<
-
Stop the server:
./stop.sh -
Go to ssl directory:
cd <instal_dir>/ansible/awx_ssl -
Generate private key (2048): without passwphrase:
openssl genrsa -out nginx.key 3072
alternatively : it is HIGHLY recommanded to generate your private key with a passphrase you should remember
with passphrase
openssl genrsa -out nginx.key -passout stdin 3072
This command generates 1 file : nginx.key
- Générer une demande de certificat csr:
openssl req -sha256 -new -key nginx.key -out nginx.csr -subj '/CN=awx_web.local'
This command generates 1 file : nginx.csr
- Générer le certificat crt: openssl x509 -req -sha256 -days 365 -in nginx.csr -signkey nginx.key -out nginx.crt
This command generates the certificat : nginx.crt
- change user and password in ansible.env files DATABASE_USER= DATABASE_NAME= DATABASE_HOST= DATABASE_PORT= DATABASE_PASSWORD=
- change in credentials.py
DATABASES = {
    'default': {
        'ATOMIC_REQUESTS': True,
        'ENGINE': 'django.db.backends.postgresql',
        'NAME': "mism",
        'USER': "<here your new postgres user>",
        'PASSWORD': "<here your new postgres password>",
        'HOST': "awx_postgres",
        'PORT': "5432",
    }
}
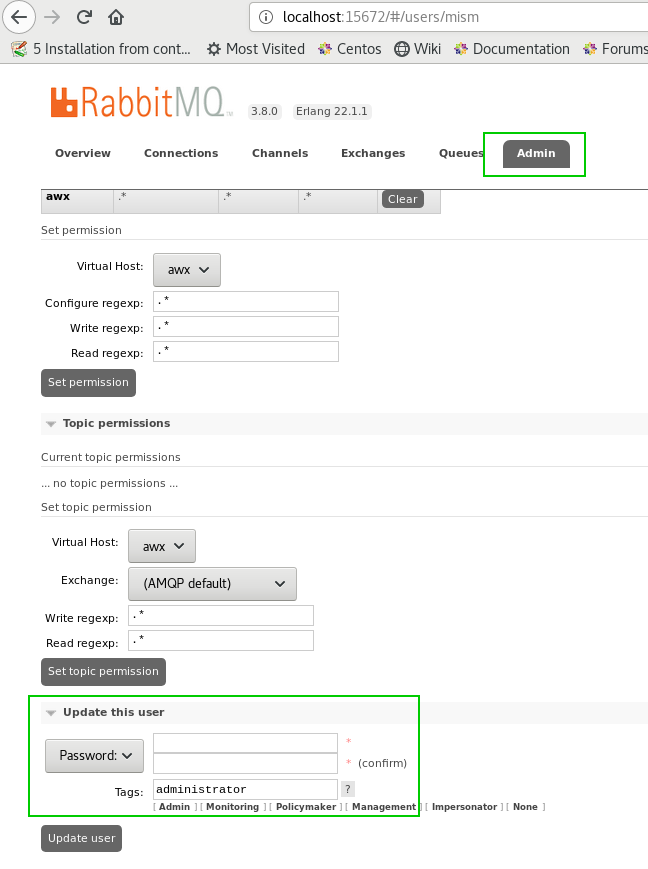
You should first change the user and password from gui
- Select Admin
- Choose "Update this user"
- change in credentials.py
BROKER_URL = 'amqp://{}:{}@{}:{}/{}'.format(
    "<here your new rabbitmq user>",
    "<here your new rabbitmq password>",
    "rabbitmq",
    "5672",
    "awx")
- change rabbitmq environment variable in Dockerfiles/ansible.env
RABBITMQ_HOST=rabbitmq
RABBITMQ_DEFAULT_VHOST=awx
RABBITMQ_DEFAULT_USER=
RABBITMQ_DEFAULT_PASS=
- change user and password from gui
- change awx and tower environment variable in Dockerfiles/ansible.env
AWX_ADMIN_USER=
AWX_ADMIN_PASSWORD=
TOWER_USERNAME=
TOWER_PASSWORD=
- change the next environment variable if the certificate is not self-signed
TOWER_VERIFY_SSL=false
TOWER_INSECURE=true
By default, when you start the installer, the proxy environment variables are added in containers thanks to the following section in docker-compose-awx.yml file:
    env-file:
        - Dockerfiles/ansible.env
      ...
You can see your PROXY environment while starting up your AWX:
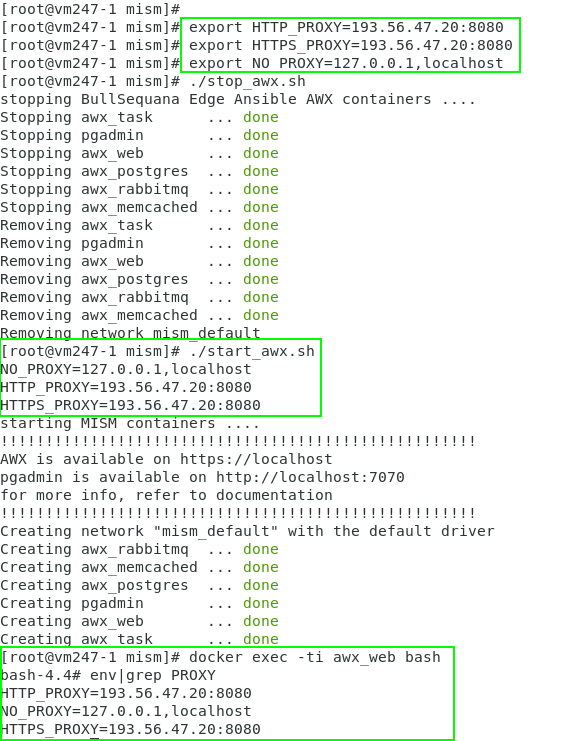
💻 Info: If your bullsequana edge IP address is not declared in proxy: You may need to add your bullsequana edge IP address in your NO_PROXY configuration to bypass the proxy
export NO_PROXY="<your bullsequana edge IP address>,$NO_PROXY"
If you don't want to use the host configuration for XX_PROXY environment variables:
- Remove the following line in install and start shells
. ./proxy.sh
- Add your proxy environement as desired in docker-compose-awx.yml file with explicit IP addresses and host names:
    env-file:
      ansible.env
    environment:
      HTTP_PROXY: http://<your proxy>:<your port>
      HTTPS_PROXY: https://<your proxy>:<your port>
      NO_PROXY: <your bullsequana edge IP address>,127.0.0.1,localhost,zabbix-web,zabbix-server,zabbix-agent,awx_web,awx_task,rabbitmq,postgres,memcached
      ...
💻 Info: If you change a XXX_PROXY env variable, you should restart the containers :
./stop.sh or ./stop_awx.sh
./start.sh or ./start_awx.sh
By default, the root host directory '/' is mapped as a read only access in the docker containers:
- /:/host:ro
So, in your inventory, you can define the technical_state_path: variable to whatever you want
technical_state_path: /host/mnt
technical_state_path: /host/var
technical_state_path: /host/usr/me
For any reason, if you really need to adapt the 'volumes' mapping, follow the instructions:
- edit docker-compose-awx.yml
- locate to 'volumes' section of awx_web and awx_task services:
  volumes:
    - /mnt:/mnt:ro
- change mapped volumes with whatever you want except:
/tmp:/tmp => do NOT map /tmp directory => it change AWX behavior
/:/ => NO sens
⛔ Warning: Be careful to change both awx_web and awx_task docker containers and to adapt the technical_state_path variable of your inventory
technical_state_path: /mnt
in the previous example: if you change the /mnt of your host, it does NOT change the /mnt of your docker container, so be careful if you change the docker volumes mapping
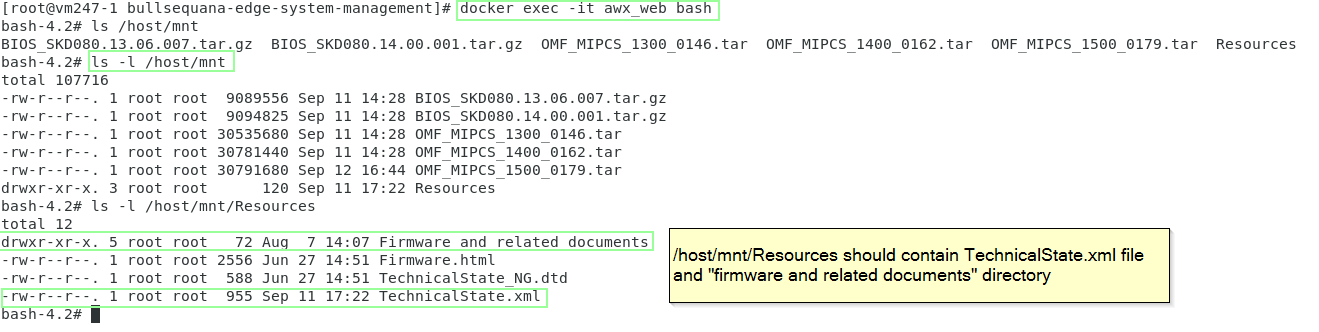
If you need to check the directory, just log on to the docker awx_web/awx_task containers and check the file system:
host$> docker exec -it awx_web bash
bash# ls /host/mnt
bash# exit
host$> docker exec -it awx_task bash
bash# ls /host/mnt
To log on a container with an interactive terminal:
docker exec -it <container name> <executable command or shell>
where:
-i = interactive
-t = terminal
<container name> is awx_web or awx_task : both can be use to use ansible CLI
<executable command or shell>
  shell : could be bash or sh
  command : any ansible command
container names are :
awx_web
awx_task
awx_postgres
memcached
rabbitmq
💻 Info: tower-cli is installed on awx_web. You can use any tower-cli command. For more info Visit https://docs.ansible.com/ansible-tower/latest/html/towerapi/index.html
examples
docker exec -it awx_task bash`
docker exec -it awx_web ansible-playbook projects/openbmc/inventory/get_sensors.yml`
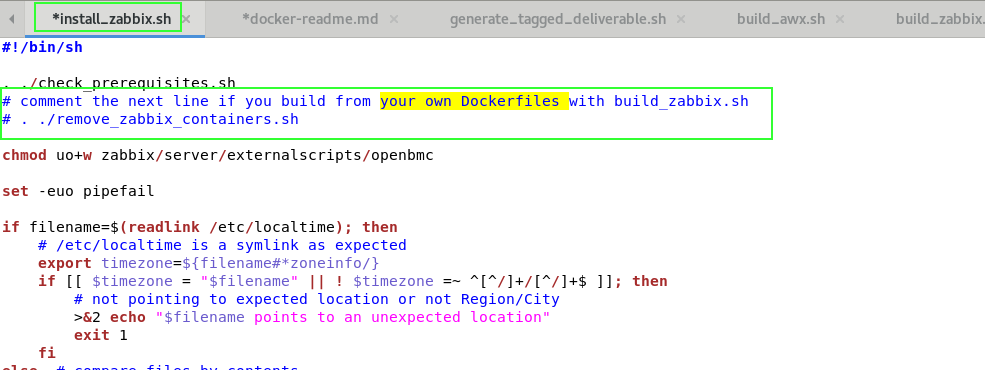
If you need to adapt a Dockerfile in Dockerfiles directory:
- edit the desired Dockerfile-xxx.tag and adapt it
- run the corresponding build-xxx
- edit the corresponding install-xxx script
- comment the remove-xxx-containers.sh line
- run your newly modified install script

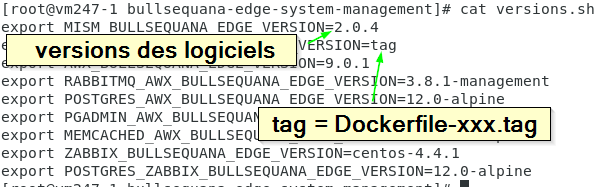
if you need to adapt the versions:
- edit versions.sh and adapt it
- run the corresponding build-xxx
- edit the corresponding install-xxx script
- comment the remove-xxx-containers.sh line
- run your newly modified install script
- versions tag
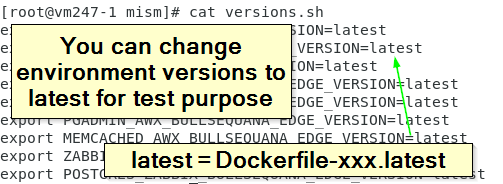
- versions latest
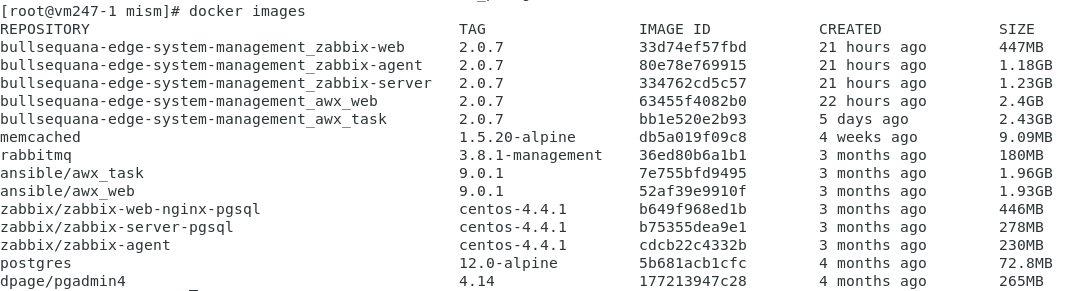
After a build and install process, the result should be:
- execute the following native ansible command with the name of your password and the real password you want to encrypt
generate_encrypted_password_for_Ansible.sh --name your_password_name your_real_password_to_encrypt - you are prompted for a vault password you should remember
example
[root@vm247-1 mism]# ./generate_encrypted_password_for_Ansible.sh --name bmc_root_password "p@s$w0rd[$#34"
New vault password (bullsequana_edge_password):
Confirm new vault password (bullsequana_edge_password):
bmc_root_password: !vault |
          $ANSIBLE_VAULT;1.2;AES256;bullsequana_edge_password
          39656666313438326438616632616163666339376539366439313935356232346634343135376430
          3735393731386363313838363238653361303536663736310a666161656563633436316539346234
          62353536313164306161356365623539646334393337383732636539643036613338643539653139
          3338663538303138350a323363623164383837633934373233333437353730613630316635646464
          6139
Encryption successful
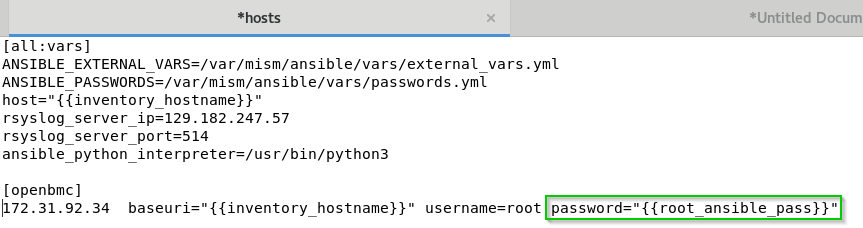
You should replace " password= " in your hosts file
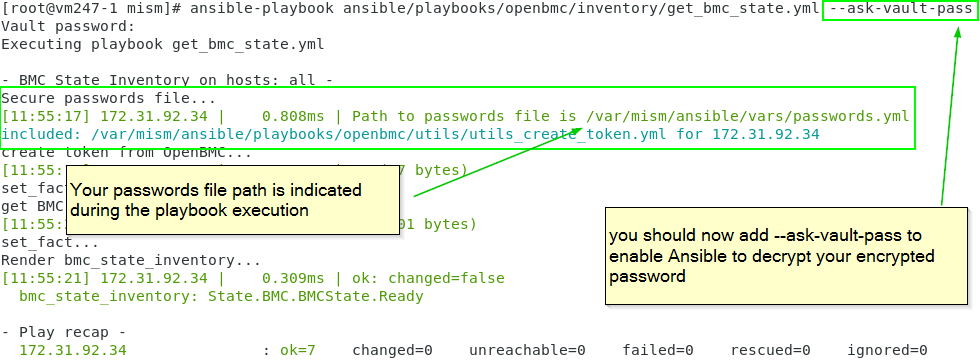
🔒 Info: you should run your playbooks with --ask-vault-pass or --vault-id in command line (alternatively you can indicate a vault_password_file in your ansible.cfg : See next section)
--ask-vault-pass
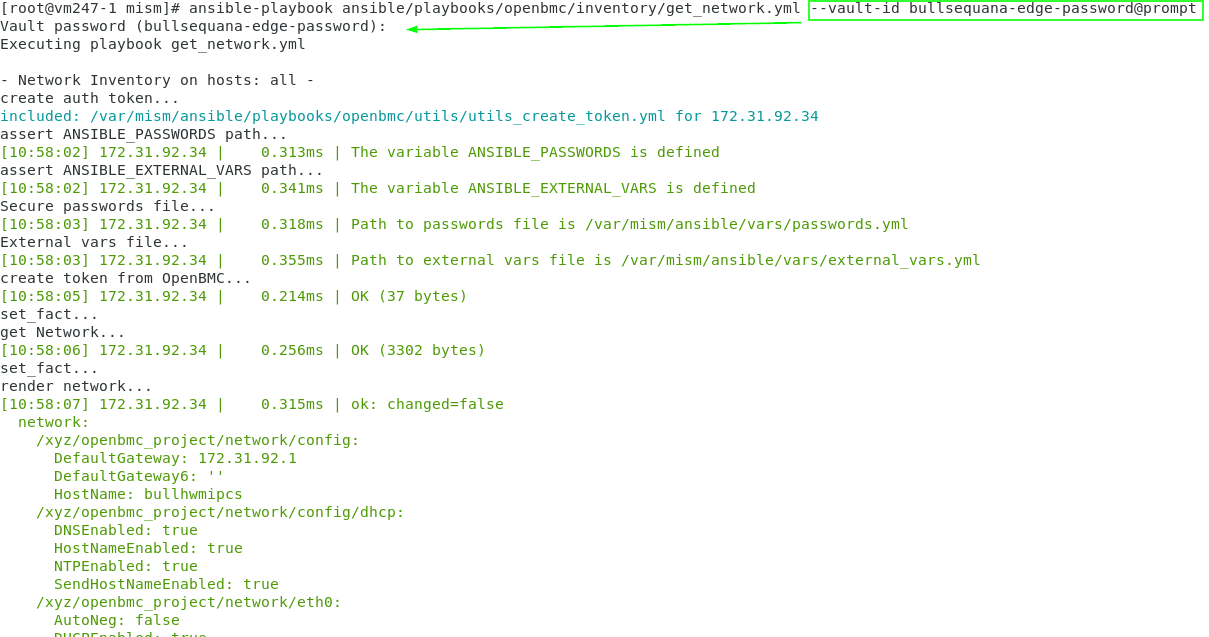
or alternatively --vault-id
🔒 Info: you should install optional prerequisites => See install ansible locally
The previous chapter create only encrypted variables in a vault-id named bullsequana_edge_password.
You are prompted to provide the vault password
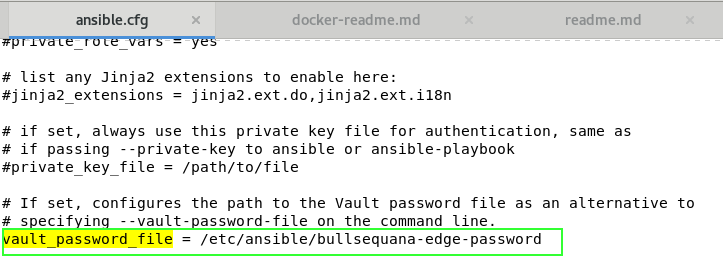
You can specify a vault-password-file in ansible.cfg file
The following steps is an example of how to create a file that contains the vault password, to decrypt all passwords in passwords.yml file, but you can use whatever ansible vault technology you want, especially a python script instead of a clear vault password file
- create a file - preferably named bullsequana_edge_password to be compatible with AWX vault password id:

-
edit your ansible.cfg file
-
uncomment the vault_password_file section
-
add the /path/filename to your vault password file
-
edit the generate_encrypted_password_for_Ansible.sh shell script
-
remove the --vault-id ...@prompt part
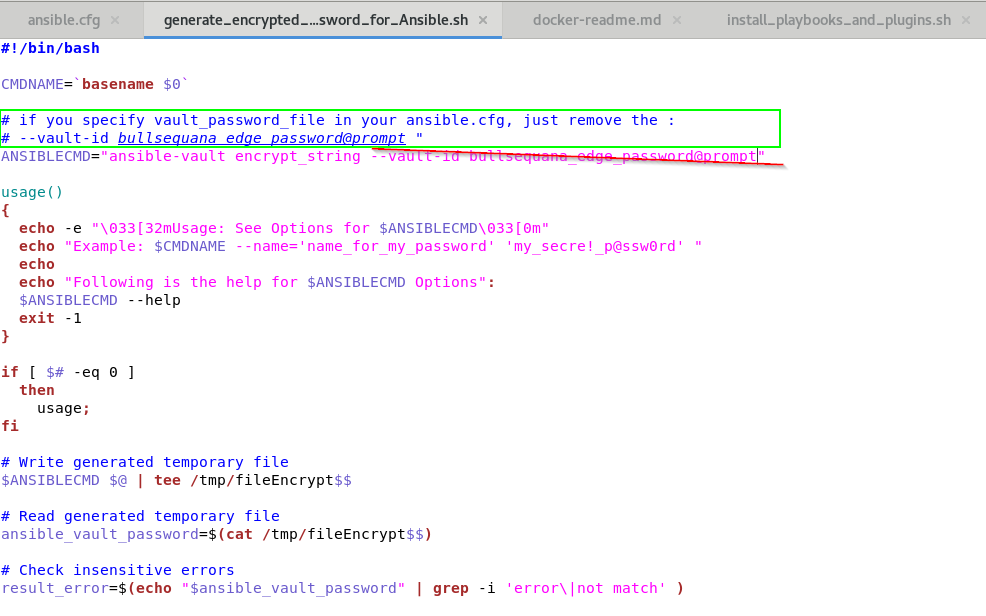
you can now generate as many encrypted password variables as needed and play your playbooks without been prompted to the vault password
👍 Best Practice: Vault passwords could be retrieved from python script. For more information See https://docs.ansible.com/ansible/latest/user_guide/vault.html
- edit the file <install_dir>/ansible/vars/passwords.yml
- remove the password entry as desired
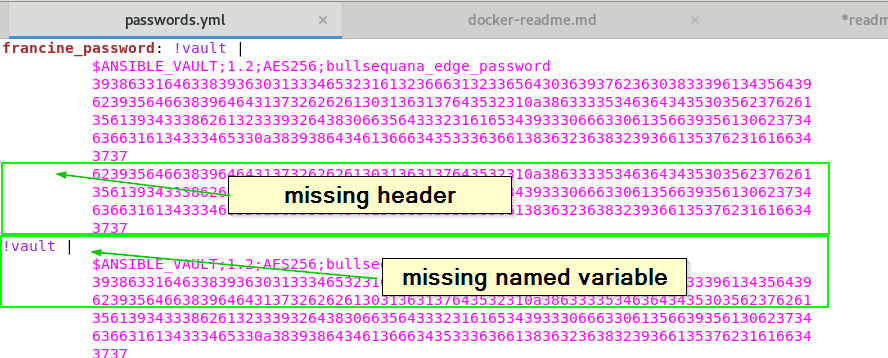
- edit the file <install_dir>/ansible/vars/passwords.yml
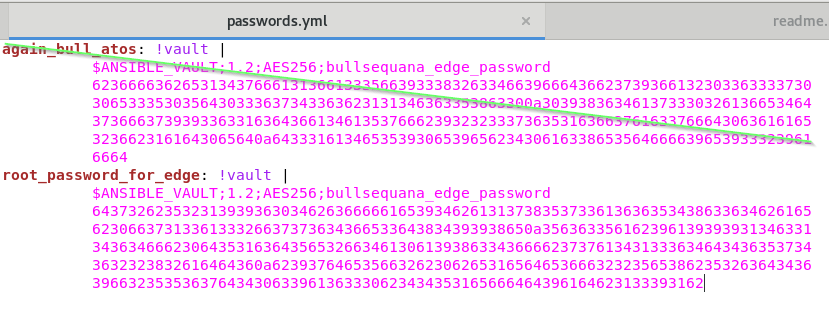
- check that each line has the following structure
a_named_variable: !vault |
$ANSIBLE_VAULT;1.2;AES256;bullsequana_edge_password
39386331646338393630313334653231613236663132336564303639376236303833396134356439
6239356466383964643137326262613031363137643532310a386333353463643435303562376261
35613934333862613233393264383066356433323161653439333066633061356639356130623734
6366316134333465330a383938643461366634353336366138363236383239366135376231616634
3737
- remove the lines that are corrupted
- open a terminal on the host
- execute the following script with the name of your password and the real password you want to encrypt
./generate_encrypted_password_for_AWX.sh --name your_password_name your_real_password_to_encrypt

you should indicate your customized vault password during this generation
You should replace your " password:" in your inventory / hosts VARIABLES part:
You can use the directory ansible/playbooks to add your own playbooks.
Ansible Help is accessible as Ansible Documentation :
docker exec -it awx_web ansible-doc -t module atos_openbmc
ansible-doc -t inventory --list
- This branch corresponds to the release actively under development.
- If you want to report any issue, then please report it by creating a new issue Vist https://github.com/atosorigin/bullsequana-edge-system-management/issues
- If you have any requirements that is not currently addressed, then please let us know by creating a new issue Visit https://github.com/atosorigin/bullsequana-edge-system-management/issues
This project is licensed under GPL-3.0 License. Please see the COPYING for more information
BullSequana Edge System Management Playbook version 2.1.10 MISM_BULLSEQUANA_EDGE_PLAYBOOKS_VERSION=2.1.10