Estimated time: 90 minutes
Welcome to the lab Deploying Main Application. You should have all the code working from the previous modules in this capstone. The lab focuses on deploying the Django application on IBM Kubernetes Services.
After completing this lab you will be able to:
- Create a
Dockerfileto containerize Django applications - Use the
kubectlCLI - Work with Kubernetes deployment
yamlfile - Create a Kubernetes
Deploymenton IKS
Note: Kindly complete the lab in a single session without any break because the lab may go on offline mode and may cause errors. If you face any issues/errors during the lab process, please log out from the lab environment. Then clear your system cache and cookies and try to complete the lab.
::page{title="Verify the environment and command line tools"}
- If a terminal is not already open, open a terminal window by using the menu in the editor:
Terminal > New Terminal.
Note: Please skip this step if the terminal already appears.
- Verify that
kubectlCLI is installed.
kubectl version- Change to your project folder.
cd /home/project::page{title="Exercise 1: Django - Clone the Github Repository and Set Up Environment"}
You created a new repository for the Django application from the provided template in a previous lab. If not, go back to the Create Band Website with Django lab and ensure you complete it before coming back to this lab.
-
Open a terminal with
Terminal>New Terminalif one is not open already. -
Next, use the export GITHUB_ACCOUNT command to export an environment variable that contains the name of your GitHub account.
Note: Substitute your real GitHub account for the {your_github_account} placeholder below:
export GITHUB_ACCOUNT={your_github_account} -
Then use the following commands to clone your repository.
git clone https://github.com/$GITHUB_ACCOUNT/Back-end-Development-Capstone.git -
Change to the Back-end-Development-Capstone directory, and execute the
./bin/setup.shcommand.cd Back-end-Development-Capstone bash ./bin/setup.sh -
You should see the follow at the end of the setup execution:
-
Finally, use the
exitcommand to close the current terminal. The environment will not be fully active until you open a new terminal in the next step.
::page{title="Exercise 2: Django - Connect Services and Run Locally"}
You need to have the pictures and the songs microservices running from the previous lab in order to complete this part. If you don't have them running please ensure you walk through the previous labs and take note of the service URLs to fill in here. Also ensure you are able to perform all the curl operations in the previous lab before continuing here.
Change to the server directory.
cd Back-end-Development-CapstoneOpen views.py in the editor.
::openFile{path="Back-end-Development-Capstone/concert/views.py"}
-
The
def songs(request):method currently returns an array of songs. Change the code as follows and replace theSONG_URLwith the songs microservice deployed in the previous lab.def songs(request): songs = req.get("SONGS_URL/song").json() return render(request, "songs.html", {"songs": songs["songs"]}) -
The
def photos(request):method currently returns an array of songs. Change the code as follows and replace thePHOTO_URLwith the songs microservice deployed in the previous lab.def photos(request): photos = req.get("PHOTO_URL/picture").json() return render(request, "photos.html", {"photos": photos}) -
Perform migrations to create necessary tables.
python3 manage.py makemigrations
-
Run migration to activate models for the app.
python3 manage.py migrate
Take a screenshot of the terminal after executing the
migratecommand and save asdjango-songs-photos-migrate.jpg(or .png). -
Start the local development server.
python3 manage.py runserver
If the application does not run locally, you should return to module 3 and ensure you have finished the final lab. The application should connect to the songs and photos services that are running on IBM Code Engine and RedHat OpenShift.
::page{title="Exercise 3: Django - Finish the Dockerfile"}
Unlike the other services, there is no option to deploy the main Django application using the source-to-image method to IBM Kubernetes Service.You will have to write a Dockerfile to build the image. Your task in this exercise is to fill out the incomplete Dockerfile.
Open the Back-end-Development-Capstone/Dockerfile file in the editor.
::openFile{path="Back-end-Development-Capstone/Dockerfile"}
-
Insert code to use a python base image. Remember the way to specify a base image for your image is with the
FROMstatement in the Dockerfile. Use theFROMstatement to specifyFROM python:3.9.16-slimas the base image.Click here for a hint.
FROM python:3.8.2 -
Insert code to change the working directory. Recall that
WORKDIRis used in Dockerfile to set the working directory for any subsequent files.Click here for a hint.
WORKDIR $APP -
Insert code to copy the requirements.txt file to $APP Recall that the
requirements.txttext file lists all the Python dependencies required by a Django project to run. You need to copy it to the container.Click here for a hint.
COPY requirements.txt $APP -
Next, you need to tell the container to install all the dependencies from the
requirements.txtfile using thepiptool using theRUNcommand syntax.Click here for a hint.
RUN pip3 install -r requirements.txt -
Once the requirements have been installed, you can copy the rest of the source code to the image using the
COPYcommand again.Click here for a hint.
COPY . $APP -
The next step is to expose port 8000 using the
EXPOSEcommand. This command informs Docker that the container will listen on the specified network ports at runtime. It does not actually publish the port to the host machine but rather provides metadata to help users understand how to interact with the container.Click here for a hint.
EXPOSE 8000 -
Great! You are almost done. The last line in the Dockerfile should tell Docker how to run the container. We want to run the
python manage.py runserver 0.0.0.0:8000command when the container starts. Note the0.0.0.0:8000at the end. Without the 0.0.0.0:8000 argument, the server would only listen on the loopback interface (127.0.0.1) and would not be accessible from outside the container.Click here for a hint.
CMD ["python", "manage.py", "runserver", "0.0.0.0:8000"]
Ensure your code looks like the this:
Click here for a hint.
FROM python:3.9.16-slim

ENV PYTHONBUFFERED 1
ENV PYTHONWRITEBYTECODE 1

RUN apt-get update \
    && apt-get install -y netcat

ENV APP=/app

# Change the workdir.
WORKDIR $APP

# Install the requirements
COPY requirements.txt $APP

RUN pip3 install -r requirements.txt

# Copy the rest of the files
COPY . $APP

EXPOSE 8000

RUN chmod +x /app/entrypoint.sh

ENTRYPOINT ["/bin/bash","/app/entrypoint.sh"]

CMD ["python", "manage.py", "runserver", "0.0.0.0:8000"]
::page{title="Exercise 4: Django - Build and Upload Image to Registry"}
The next step is build the Docker image and then push it to the lab IBM Container Registry.
-
Build the Docker image using the
docker buildcommand.Click here for a hint.
docker build . -t djangoserverTake a screenshot of the output of
docker buildcommand in the terminal and save asdeploy-getdjango-1.jpg(or .png). -
Export the
MY_NAMESPACEvariable. This is your namespace in the lab and the container registry. We will push the image to this namespace in the next step.export MY_NAMESPACE=sn-labs-$USERNAME
You can echo the MY_NAMESPACE variable in the terminal to see the value. In my case, the variable is
sn-labs-captainfedo1. It would be something different for you:echo $MY_NAMESPACE
-
Tag the image with the correct path for your IBM Container Registry. Your container registry in the lab environment has the format
us.icr.io/$MY_NAMESPACE.Click here for a hint.
docker tag djangoserver us.icr.io/$MY_NAMESPACE/djangoserver:1Note that the MY_NAMESPACE variable is automatically populated from the environment if you correctly set it with the
exportcommand in the previous step. -
Push the docker image to the ICR regisry:
docker push us.icr.io/$MY_NAMESPACE/djangoserver:1This command may take a couple of minutes to complete. You should see progress in the terminal as follows:
The push refers to repository [us.icr.io/sn-labs-captainfedo1/djangoserver] f82006359bac: Pushed ca49210f87e2: Pushed 7db8dc861f85: Pushing [===================> ] 26.84MB/69.14MB 6308aca94bbb: Pushed 855c8cc5561a: Pushed 730529d9e57d: Pushed 550beda58888: Pushed 43b1c6b4f686: Pushed 7ca0a8cd8bdd: Pushed 36e5ac463d7d: Pushed 4695cdfb426a: Pushing [===================> ] 31.98MB/80.51MB -
You can check that the image got pushed to your registry namespace with this command:
ibmcloud cr images --restrict $MY_NAMESPACEYou should see an output similar to the following. You might have images here from other labs as well.
Listing images...

Repository                                    Tag   Digest         	Namespace              Created      Size     Security status
us.icr.io/sn-labs-captainfedo1/djangoserver   1     41932716f7d5   	sn-labs-captainfedo1   1 week ago   153 MB   -
- Take a screenshot of the
docker buildcommand running in the lab terminal. Save the screenshot asdeploy-getdjango-1.jpg(or .png).
::page{title="Exercise 5: Django - Complete the Deployment File"}
The lab template contains an incomplete deployment.yaml file. You will complete the file in this step.
Open the Back-end-Development-Capstone/deployment.yml file in the editor.
::openFile{path="Back-end-Development-Capstone/deployment.yml"}
- Insert kind of
Deploymentin the code below:kind: # {insert kind here} - Insert image name in the code below:
image: # {insert image here} - Insert port for the Django application in the code below:
containerPort: # {insert port here}
Ensure your code looks like the following:
Click here for a hint.
Replace $MY_NAMESPACE with your namespace.
apiVersion: apps/v1
kind: Deployment
metadata:
  labels:
    run: djangoserver
  name: djangoserver
spec:
  replicas: 1
  selector:
    matchLabels:
      run: djangoserver
  strategy:
    rollingUpdate:
      maxSurge: 25%
      maxUnavailable: 25%
    type: RollingUpdate
  template:
    metadata:
      labels:
        run: djangoserver
    spec:
      containers:
      - image: us.icr.io/$MY_NAMESPACE/djangoserver:1
        imagePullPolicy: Always
        name: djangoserver
        ports:
        - containerPort: 8000
          protocol: TCP
      restartPolicy: Always
::page{title="Exercise 6: Django - Deploy Django application to IKS"}
-
In order to deploy the application to IBM Kubernetes Service, you can simply apply the deployment file:
kubectl apply -f ./deployment.yml
-
You can see the pods running by using the command:
kubectl get pods -w
The
-wflag will watch the output. You should see thedjangoserverpod in running status after going through other states:$ kubectl get pods -w NAME READY STATUS RESTARTS AGE djangoserver-7d77df49f8-2g7kc 0/1 Pending 0 0s djangoserver-7d77df49f8-2g7kc 0/1 Pending 0 1s djangoserver-7d77df49f8-2g7kc 0/1 ContainerCreating 0 1s djangoserver-7d77df49f8-2g7kc 0/1 ContainerCreating 0 2s djangoserver-7d77df49f8-2g7kc 1/1 Running 0 9sThe watch flag will keep the
kubectl getcommand open. You can usectr+ckeys to close the command so the terminal is available for other commands. -
Next, in order to access the deployment from outside the cluster, you need to use the
kubectl port-forwardcommand to forward the ports from the lab environment into the running pod. Replace the pod name with your pod name in the command below:kubectl port-forward po/djangoserver-688dc44d47-bs5x7 8000:8000
You should see an output similar to this:
$ kubectl port-forward po/djangoserver-7d77df49f8-2g7kc 8000:8000 Forwarding from 127.0.0.1:8000 -> 8000 Forwarding from [::1]:8000 -> 8000 -
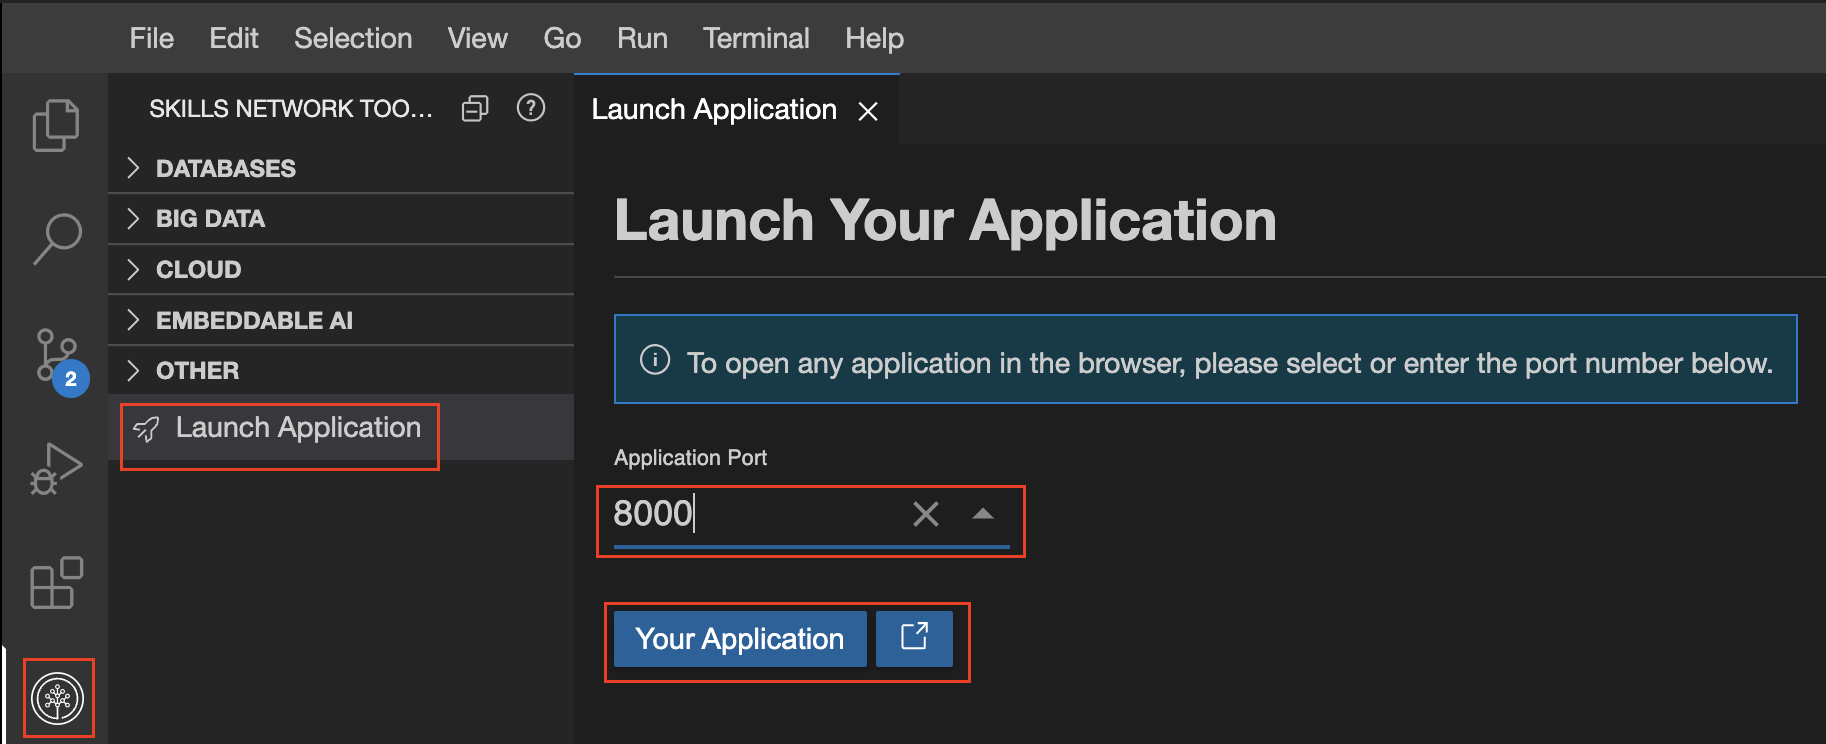
You can proceed to launch the application in a new tab by clicking
Launch Applciationicon on the left bar. Once the tab opens, you can enter port as8000and click theYour Applicationbutton.
- Take a screenshot of the
kubectl apply -fcommand running in the lab terminal. Save the screenshot asdeploy-getdjango-3.jpg(or .png).
::page{title="Evidence Checklist"}
Now that you have the application running in the lab environment, you need to take a few more screenshots to submit for peer review.
- Take a screenshot named
deploy-getdjango-4.jpg(or a png) showing the main Django application running in the browser. - Take a screenshot named
deploy-getdjango-5.jpg(or a png) showing you are able to see the songs page. - Take a screenshot named
deploy-getdjango-6.jpg(or a png) showing you are able to see the pictures page. - Take a screenshot named
deploy-getdjango-7.jpg(or a png) showing you are able to log in as the admin user. - Take a screenshot named
deploy-getdjango-8.jpg(or a png) showing you are able see concerts on the concert page. You will have to create one or more concerts as the admin user first.
Congratulations! You have completed the capstone project. You can proceed to submit your evidence for peer review and also review one of your peer's submission.
CF
| Date | Version | Changed by | Change Description |
|---|---|---|---|
| 2023-02-10 | 1.0 | Lavanya | Created initial version |
| 2023-02-20 | 1.0 | CF | Added more content |
| 2023-02-22 | 2.0 | Steve Hord | QA pass with edits |


