| title | description | position | category |
|---|---|---|---|
Application |
Application Quick Start |
4 |
Overview |
This quick start case takes Alibaba Cloud Function Computing as an example to quickly start with Serverless Devs(Of course, Serverless Devs also supports AWS Lambda, Baidu Cloud Function Computing, Huawei Cloud Function Workflow , Tencent Cloud Function and many other cloud vendors’ FaaS platforms. For details):
- Step 1: Install Node.js (>=10.8.0) and NPM package management tool;
- Step 2: Install Serverless Devs developer tools;
$ npm install @serverless-devs/s -g
- Step 3: You can use
s -vto judge whether the tool is installed successfully. If the installation is successful, you can see the corresponding version information, for example:@serverless-devs/s: 2.0.89, @serverless-devs/core: 0.1.7, darwin-x64, node-v12.15.0
Since this quick start document will take Alibaba Cloud Function Computing as an example, the password configuration here is also based on Alibaba Cloud password configuration:
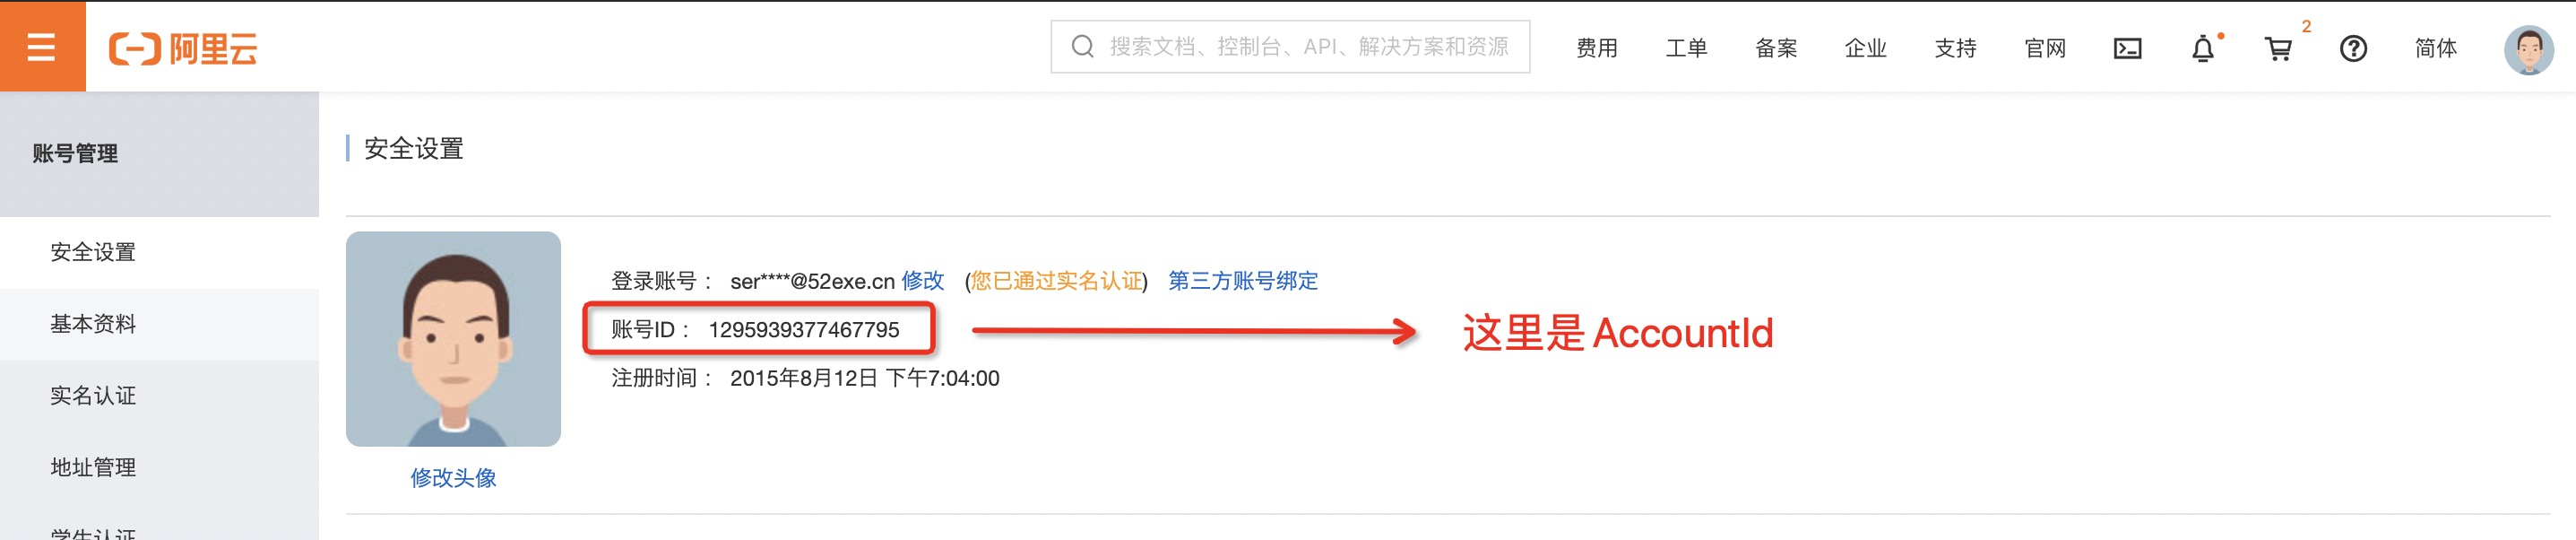
- Get AccountId: https://account.console.aliyun.com/#/secure
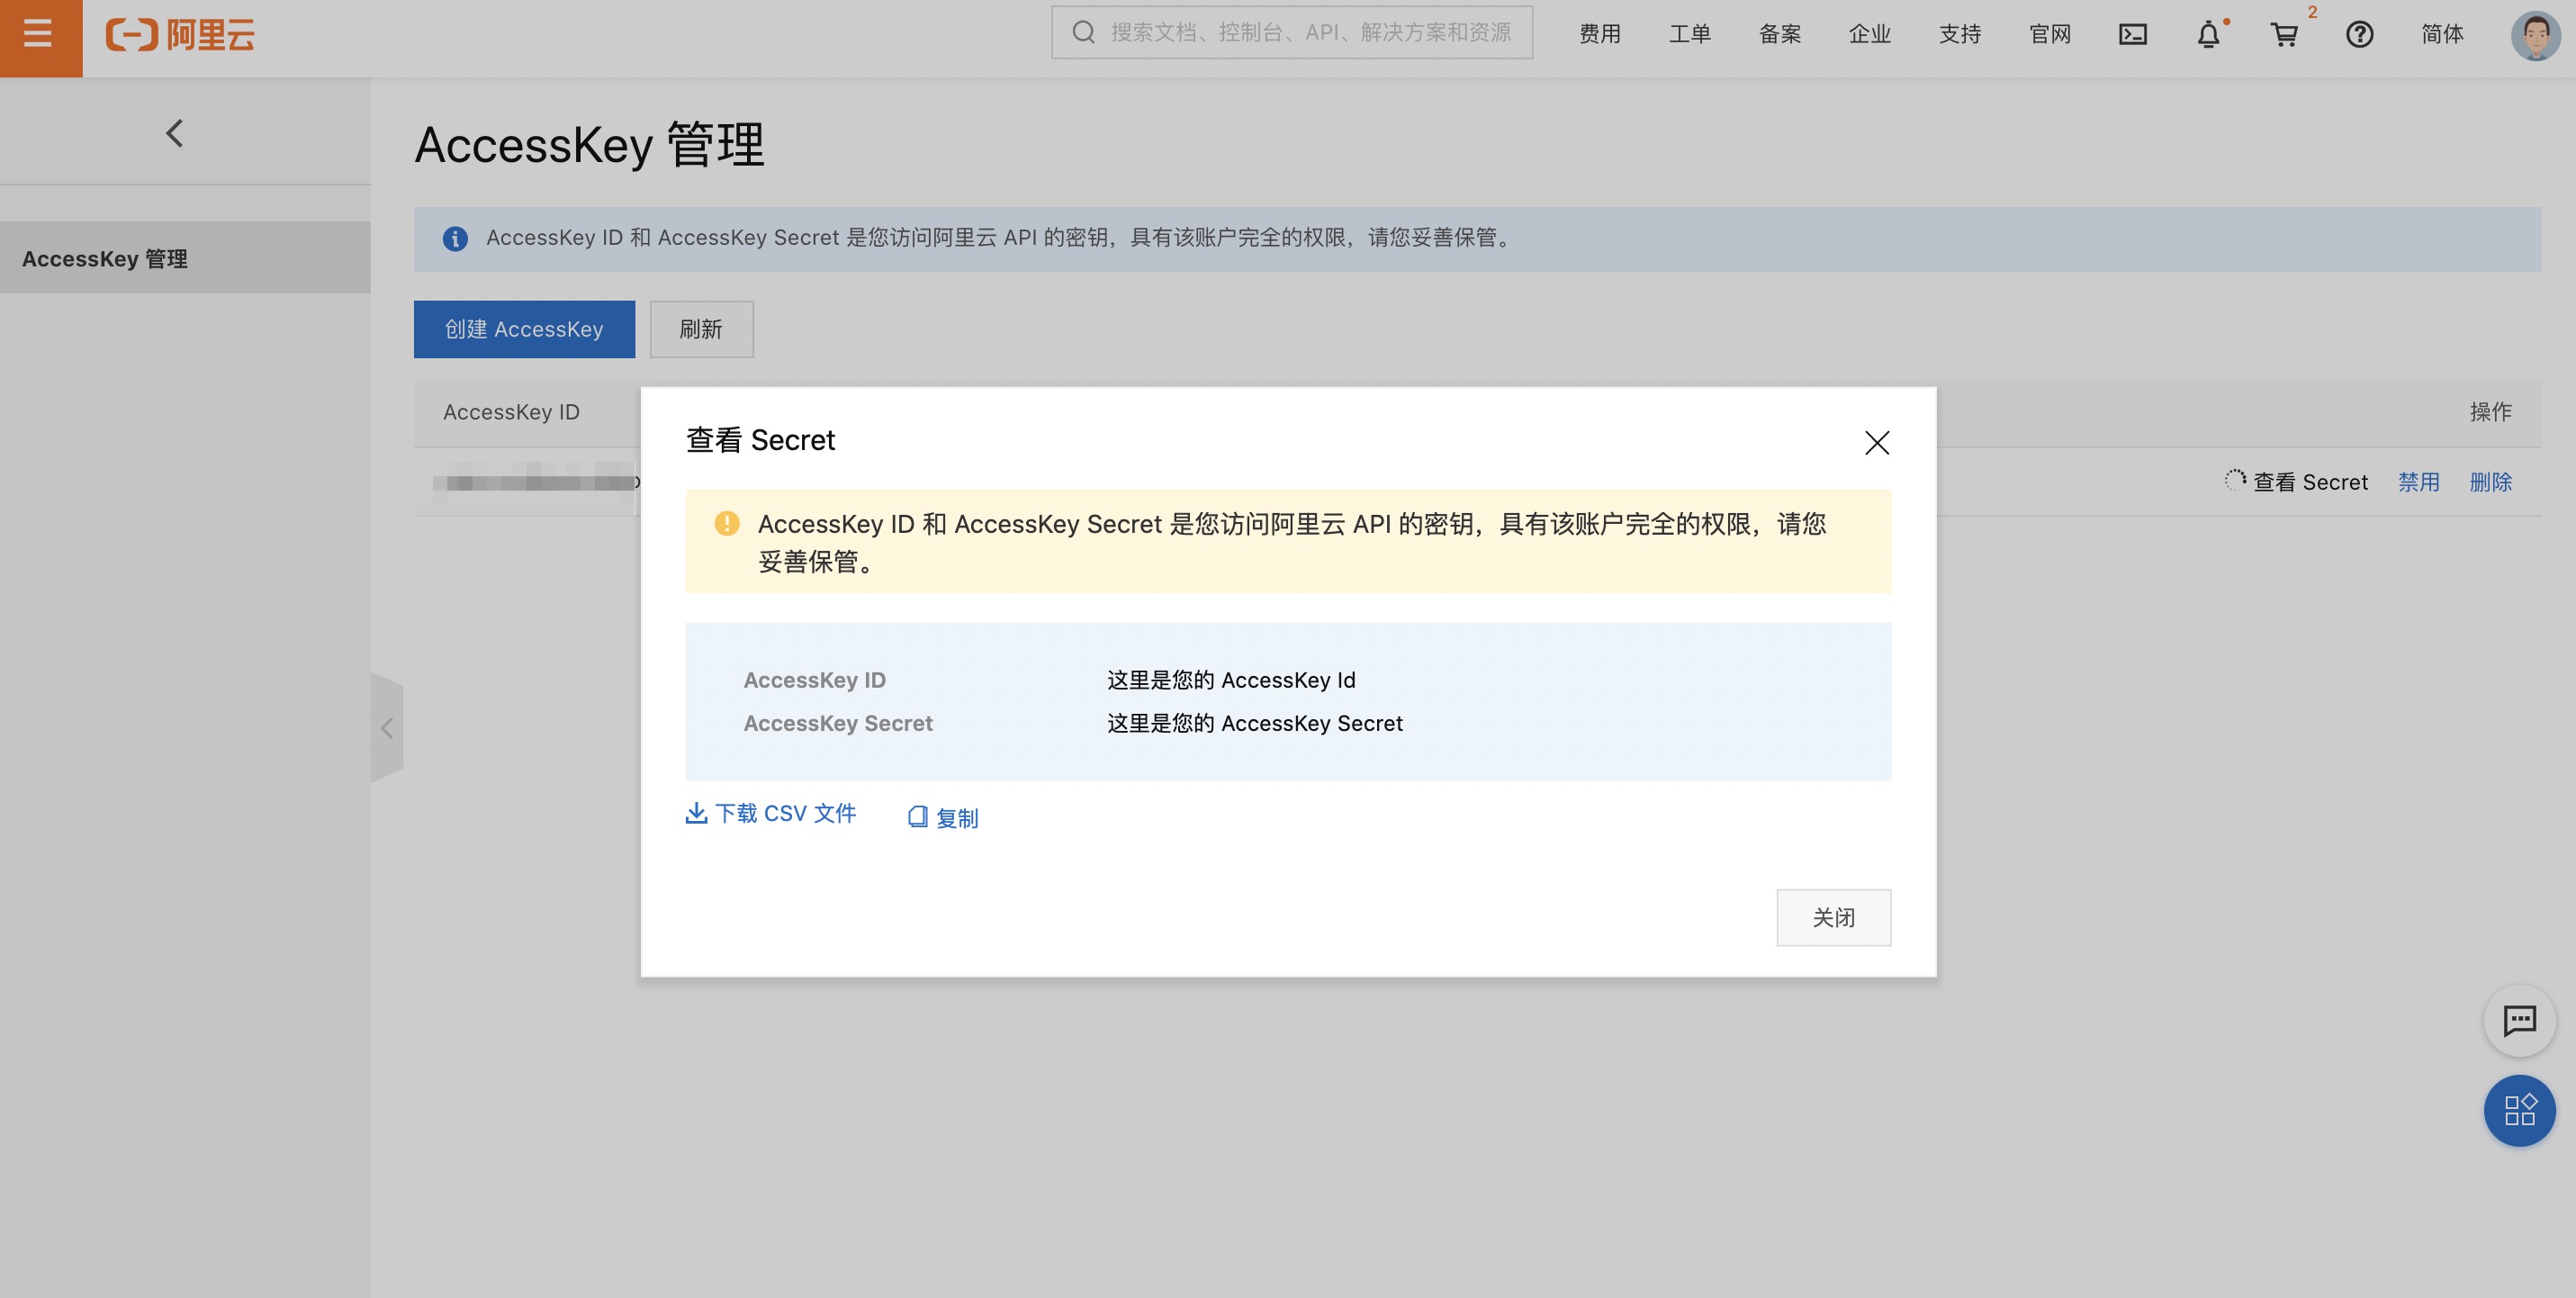
- Get key: https://usercenter.console.aliyun.com/#/manage/ak
-
Open Get AccountId Page to obtain AccountId:
-
Open Get Key Page to obtain key:
-
Execute
s config addand selectAlibaba Cloud (alibaba):$ s config add ? Please select a template: Alibaba Cloud (alibaba) 🧭 Refer to the document for alibaba key: http://config.devsapp.net/account/alibaba ? AccountID ()
-
At this point, you can follow the instructions to configure the key:
? Please select a template: Alibaba Cloud (alibaba)
🧭 Refer to the document for alibaba key:  http://config.devsapp.net/account/alibaba
? AccountID Fill in AccountID here
? AccessKeyID Fill in AccessKeyID here
? AccessKeySecret Fill in AccessKeySecret here
? Please create alias for key pair. If not, please enter to skip alibaba-access

    Alias: alibaba-access
    AccountID: Fill in AccountID here
    AccessKeyID: Fill in AccessKeyID here
    AccessKeySecret: Fill in AccessKeySecret here

Configuration successful
-
In order to verify whether the password is correctly configured, you can view the specified password through
s config get -aalibaba-access:$ s config get -a alibaba-access [2021-10-27T17:39:39.881] [INFO ] [S-CLI] - alibaba-access: AccountID: *******ID AccessKeyID: *********ID AccessKeySecret: *************key
For more detailed key configuration methods, please refer to Secret Configuration Document
AccessKey is the key for your cloud account to access the Alibaba Cloud API. It has full permissions for the account. Please keep it safe! Do not share AccessKey to external channels in any way (eg Github) to avoid being used by others to cause security threat.
Strongly recommended that you follow the Alibaba Cloud Security Best Practices and use the RAM sub-user AccessKey to make API calls.
-
Execute the
scommand:$ s ? Serverless Devs project is not detected. Do you want to create a new project? (Y/n)
-
Fill in
yand press Enter to enter the creation guide section:🚀 Serverless Awesome: https://github.com/Serverless-Devs/package-awesome ? Hello Serverless for Cloud Vendors (Use arrow keys or type to search) ❯ Alibaba Cloud Serverless AWS Cloud Serverless Baidu Cloud Serverless Huawei Cloud Serverless Tencent Cloud Serverless Dev Template for Serverless Devs
-
At the same time, you only need to select the corresponding option and follow the instructions. For example, if you select
Alibaba Cloud Serverless, you can see the classification of application templates under Alibaba Cloud Serverless products:? Please select an Serverless-Devs Application (Use arrow keys or type to search) ❯ fc-runtime-starter - Quickly deploy an FC function... fc-custom-container-stater - Quickly deploy a custom-container application web-framework-stater - Quickly deploy a web framework static-website-stater - Quickly deploy a static website serverless-best-practice - Quickly experience serverless best practices
-
At this time, you can continue to select specific applications under a certain category for initialization. For example, after selecting
fc-runtime-starter, you can see the specific template applications under that category:? Please select an templete (Use arrow keys or type to search) ❯ fc-http-nodejs - Quickly deploy a nodejs12 http function fc-http-python - Quickly deploy a python3 http function fc-http-php - Quickly deploy a php http function fc-http-java - Quickly deploy a java8 http function fc-event-nodejs - Quickly deploy a nodejs12 event function fc-event-python - Quickly deploy a python3 event function fc-event-php - Quickly deploy a php event function
Select
fc-http-nodejsto complete the creation. During the boot process, the process of filling in the project name and selecting the key may appear:- The project name can be:
start-fc-http-nodejs12 - The key can be the one we created above:
alibaba-access
E.g:
🚀 Serverless Awesome: https://github.com/Serverless-Devs/package-awesome ? Hello Serverless for Cloud Vendors Alibaba Cloud Serverless ? Please select an Serverless-Devs Application fc-runtime-starter - 快速部署一个 FC 函数 ? Please select an templete fc-http-nodejs - 快速部署一个 nodejs12 http函数 😋 Create application command: [s init devsapp/start-fc-http-nodejs12] ? Please input your project name (init dir) start-fc-http-nodejs12 ✔ file decompression completed ? please select credential alias alibaba-access ... ... 🏄 Thanks for using Serverless-Devs 👉 You could [cd /Users/jiangyu/start-application/start-fc-http-nodejs12] and enjoy your serverless journey! 🧭️ If you need help for this example, you can use [s -h] after you enter folder. 💞 Document ❤ Star:https://github.com/Serverless-Devs/Serverless-Devs ? Do you want to deploy the project now? (Y/n)
- The project name can be:
-
The system has a reminder at the end whether you want to deploy the project. At this time, you can enter
yto directly deploy the project. After a while, you can see the deployment result:fc-deploy-test: region: cn-hangzhou service: name: fc-deploy-service function: name: http-trigger-nodejs12 runtime: nodejs12 handler: index.handler memorySize: 128 timeout: 60 url: system_url: https://1583208943291465.cn-hangzhou.fc.aliyuncs.com/2016-08-15/proxy/fc-deploy-service/http-trigger-nodejs12/ custom_domain: - domain: http://http-trigger-nodejs12.fc-deploy-service.1583208943291465.cn-hangzhou.fc.devsapp.net triggers: - type: http name: httpTriggerAt this point, you can open the domain name returned to us by
domainfor testing.
-
Execute the command
s init devsapp/image-prediction-appto initialize an existing artificial intelligence target detection project. During this process, the process of filling in the project name and selecting the key may appear:- The project name can be:
image-prediction-app - The key can be the one we created above:
alibaba-access
E.g:
$ s init devsapp/image-prediction-app 🚀 Serverless Awesome: https://github.com/Serverless-Devs/package-awesome ? Please input your project name (init dir) image-prediction-app ✔ file decompression completed ? please select credential alias alibaba-access ___ __ __ _______ _______ _______ | | | |_| || _ || || | | | | || |_| || ___|| ___| | | | || || | __ | |___ | | | || || || || ___| | | | ||_|| || _ || |_| || |___ |___| |_| |_||__| |__||_______||_______| Welcome to the image-prediction-app application This application requires to open these services: FC : https://fc.console.aliyun.com/ This application can help you quickly deploy the image-prediction-app project. The application uses FC component:https://github.com/devsapp/fc The application homepage: https://github.com/devsapp/image-prediction-app 🏄 Thanks for using Serverless-Devs 👉 You could [cd /Users/jiangyu/start-application/image-prediction-app] and enjoy your serverless journey! 🧭️ If you need help for this example, you can use [s -h] after you enter folder. 💞 Document ❤ Star:https://github.com/Serverless-Devs/Serverless-Devs
- The project name can be:
-
Enter the project directory:
cd image-prediction-app -
Execute the
deploycommand to deploy the project:Tips for next step ====================== * Display information of the deployed resource: s info * Display metrics: s metrics * Display logs: s logs * Invoke remote function: s invoke * Remove Service: s remove service * Remove Function: s remove function * Remove Trigger: s remove trigger * Remove CustomDomain: s remove domain imageAi: region: cn-hangzhou url: custom_domain: - domain: http://server.ai-cv-image-prediction.1583208943291465.cn-hangzhou.fc.devsapp.net
-
At this point, you can open the test domain name assigned by the system and upload a picture for testing:

-
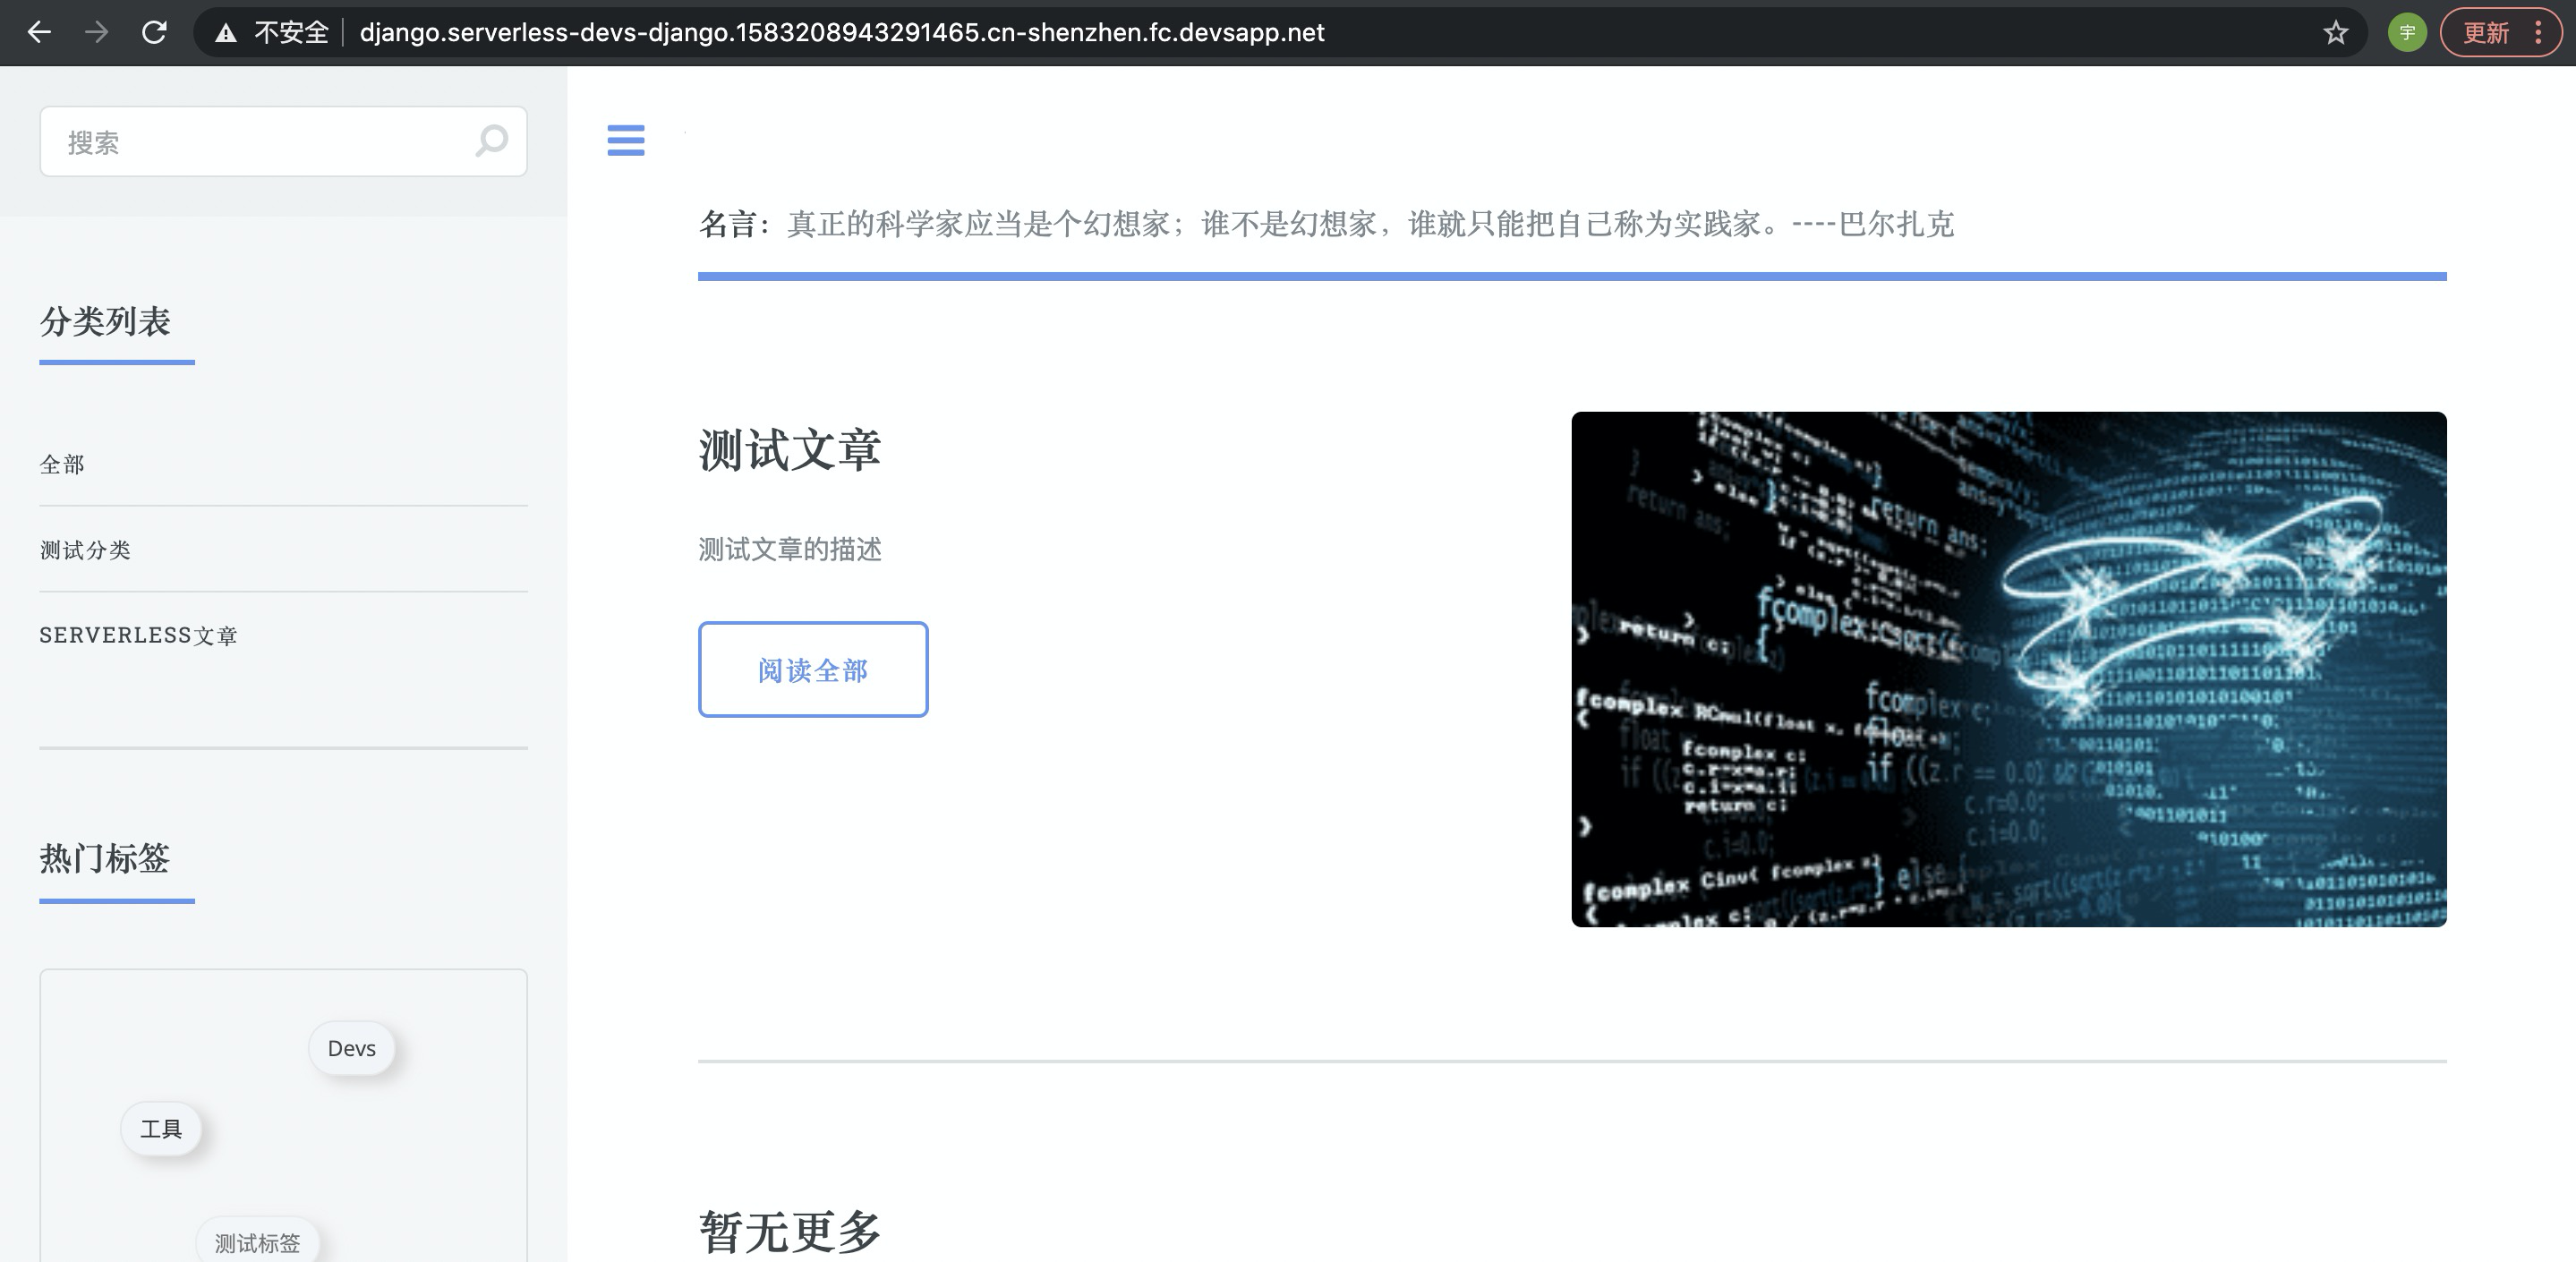
Execute the
s init django-blogcommand to initialize an existing Django-based blog project. During the initialization process, the process of filling in the project name and selecting the key may appear:- The project name can be:
django-blog - The key can be the one we created above:
alibaba-access
E.g:
$ s init django-blog 🚀 Serverless Awesome: https://github.com/Serverless-Devs/package-awesome ? Please input your project name (init dir) django-blog ✔ file decompression completed ? please select credential alias alibaba-access ______ ___ _______ __ _ _______ _______ _______ ___ _______ _______ | | | || _ || | | || || || _ || | | || | | _ | | || |_| || |_| || ___|| _ || |_| || | | _ || ___| | | | | | || || || | __ | | | || || | | | | || | __ | |_| | ___| || || _ || || || |_| || _ | | |___ | |_| || || | | || || _ || | | || |_| || || |_| || || || |_| | |______| |_______||__| |__||_| |__||_______||_______||_______||_______||_______||_______| Welcome to the django-blog application This application requires to open these services: FC : https://fc.console.aliyun.com/ This application can help you quickly deploy the django-blog project. The application uses Django component:https://github.com/devsapp/django The application homepage: https://github.com/devsapp/django-blog * Python 3.7 is recommended; * If the version is greater than Python 3.7: * Operation error: ImportError: cannot import name 'metadata' from 'importlib', you can refer to: https://stackoverflow.com/questions/59216175/importerror-cannot-import-name-metadata-from-importlib * Default information: * Admin:/admin * Default Admin Username: blog * Default Admin Password: myblog12345! 🏄 Thanks for using Serverless-Devs 👉 You could [cd /Users/jiangyu/django-blog] and enjoy your serverless journey! 🧭️ If you need help for this example, you can use [s -h] after you enter folder. 💞 Document ❤ Star:https://github.com/Serverless-Devs/Serverless-Devs
- The project name can be:
-
Enter the project directory:
cd django-blog -
Execute the
deploycommand to deploy the project:Tips for next step ====================== * Invoke remote function: s invoke ✔ Try container acceleration djangoBlog: region: cn-shenzhen serviceName: serverless-devs-django functionName: django customDomains: - http://django.serverless-devs-django.1583208943291465.cn-shenzhen.fc.devsapp.net
-
At this point, you can open the test domain name assigned by the system and upload a picture for testing: