Jaeger is a distributed tracing system.
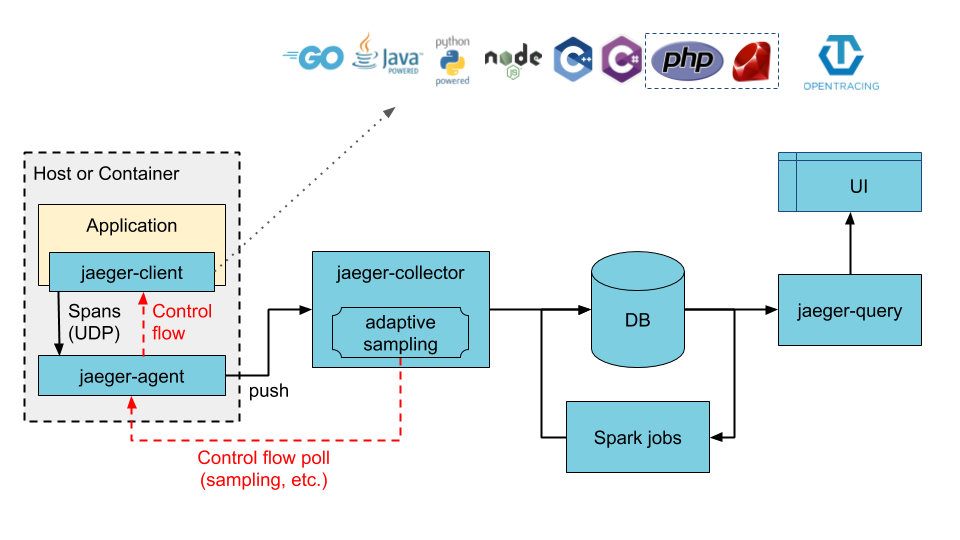
This chart adds all components required to run Jaeger as described in the jaeger-kubernetes GitHub page for a production-like deployment. The chart default will deploy a new Cassandra cluster (using the cassandra chart), but also supports using an existing Cassandra cluster, deploying a new ElasticSearch cluster (using the elasticsearch chart), or connecting to an existing ElasticSearch cluster. Once the storage backend is available, the chart will deploy jaeger-agent as a DaemonSet and deploy the jaeger-collector and jaeger-query components as Deployments.
Add the Jaeger Tracing Helm repository:
helm repo add jaegertracing https://jaegertracing.github.io/helm-chartsTo install a release named jaeger:
helm install jaeger jaegertracing/jaegerBy default, the chart deploys the following:
- Jaeger Agent DaemonSet
- Jaeger Collector Deployment
- Jaeger Query (UI) Deployment
- Cassandra StatefulSet (subject to change!)
See Customizing the Chart Before Installing. To see all configurable options with detailed comments, visit the chart's values.yaml, or run these configuration commands:
$ helm show values jaegertracing/jaegerYou may also helm show values on this chart's dependencies for additional options.
If installing with a dependency such as Cassandra, Elasticsearch and/or Kafka their, values can be shown by running:
helm repo add elastic https://helm.elastic.co
helm show values elastic/elasticsearch
helm repo add incubator https://kubernetes-charts-incubator.storage.googleapis.com/
helm show values incubator/cassandrahelm repo add bitnami https://charts.bitnami.com/bitnami
helm show values bitnami/kafkaPlease note, any dependency values must be nested within the key named after the
chart, i.e. elasticsearch, cassandra and/or kafka.
As per Jaeger documentation, for large scale production deployment the Jaeger team recommends Elasticsearch backend over Cassandra, as such the default backend may change in the future and it is highly recommended to explicitly configure storage.
If you are just starting out with a testing/demo setup, you can also use in-memory storage for a fast and easy setup experience using the Jaeger All in One executable.
If using the Elasticsearch Rollover feature, elasticsearch must already be present and so must be deployed separately from this chart, if not the rollover init hook won't be able to complete successfully.
To install the chart with the release name jaeger using a new ElasticSearch cluster instead of Cassandra (default), run the following command:
helm install jaeger jaegertracing/jaeger \
  --set provisionDataStore.cassandra=false \
  --set provisionDataStore.elasticsearch=true \
--set storage.type=elasticsearchA release can be configured as follows to use an existing ElasticSearch cluster as it as the storage backend:
helm install jaeger jaegertracing/jaeger \
  --set provisionDataStore.cassandra=false \
  --set storage.type=elasticsearch \
  --set storage.elasticsearch.host=<HOST> \
  --set storage.elasticsearch.port=<PORT> \
  --set storage.elasticsearch.user=<USER> \
--set storage.elasticsearch.password=<password>If you already have an existing running ElasticSearch cluster with TLS, you can configure the chart as follows to use it as your backing store:
Content of the jaeger-values.yaml file:
storage:
  type: elasticsearch
  elasticsearch:
    host: <HOST>
    port: <PORT>
    scheme: https
    user: <USER>
    password: <PASSWORD>
provisionDataStore:
  cassandra: false
  elasticsearch: false
query:
  cmdlineParams:
    es.tls.ca: "/tls/es.pem"
  extraConfigmapMounts:
    - name: jaeger-tls
      mountPath: /tls
      subPath: ""
      configMap: jaeger-tls
      readOnly: true
collector:
  cmdlineParams:
    es.tls.ca: "/tls/es.pem"
  extraConfigmapMounts:
    - name: jaeger-tls
      mountPath: /tls
      subPath: ""
      configMap: jaeger-tls
      readOnly: true
spark:
  enabled: true
  cmdlineParams:
    java.opts: "-Djavax.net.ssl.trustStore=/tls/trust.store -Djavax.net.ssl.trustStorePassword=changeit"
  extraConfigmapMounts:
    - name: jaeger-tls
      mountPath: /tls
      subPath: ""
      configMap: jaeger-tls
      readOnly: true
Generate configmap jaeger-tls:
keytool -import -trustcacerts -keystore trust.store -storepass changeit -alias es-root -file es.pem
kubectl create configmap jaeger-tls --from-file=trust.store --from-file=es.pem
helm install jaeger jaegertracing/jaeger --values jaeger-values.yamlIf you already have an existing running Cassandra cluster, you can configure the chart as follows to use it as your backing store (make sure you replace <HOST>, <PORT>, etc with your values):
helm install jaeger jaegertracing/jaeger \
  --set provisionDataStore.cassandra=false \
  --set storage.cassandra.host=<HOST> \
  --set storage.cassandra.port=<PORT> \
  --set storage.cassandra.user=<USER> \
--set storage.cassandra.password=<PASSWORD>If you already have an existing running Cassandra cluster with TLS, you can configure the chart as follows to use it as your backing store:
Content of the values.yaml file:
storage:
  type: cassandra
  cassandra:
    host: <HOST>
    port: <PORT>
    user: <USER>
    password: <PASSWORD>
    tls:
      enabled: true
      secretName: cassandra-tls-secret

provisionDataStore:
  cassandra: false
Content of the jaeger-tls-cassandra-secret.yaml file:
apiVersion: v1
kind: Secret
metadata:
  name: cassandra-tls-secret
data:
  commonName: <SERVER NAME>
  ca-cert.pem: |
    -----BEGIN CERTIFICATE-----
    <CERT>
    -----END CERTIFICATE-----
  client-cert.pem: |
    -----BEGIN CERTIFICATE-----
    <CERT>
    -----END CERTIFICATE-----
  client-key.pem: |
    -----BEGIN RSA PRIVATE KEY-----
    -----END RSA PRIVATE KEY-----
  cqlshrc: |
    [ssl]
    certfile = ~/.cassandra/ca-cert.pem
    userkey = ~/.cassandra/client-key.pem
    usercert = ~/.cassandra/client-cert.pem
kubectl apply -f jaeger-tls-cassandra-secret.yaml
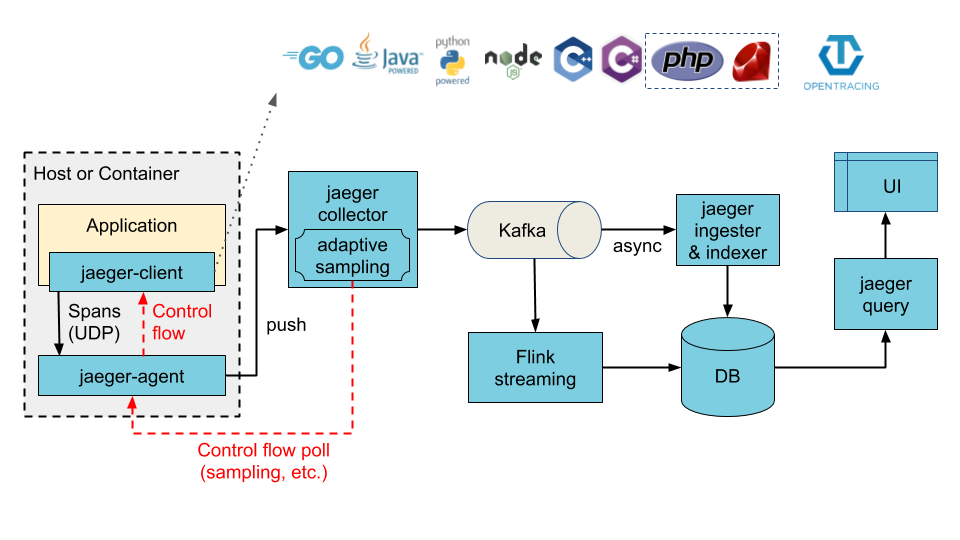
helm install jaeger jaegertracing/jaeger --values values.yamlThe architecture illustrated below can be achieved by enabling the ingester component. When enabled, Cassandra or Elasticsearch (depending on the configured values) now becomes the ingester's storage backend, whereas Kafka becomes the storage backend of the collector service.
To provision a new Kafka cluster along with jaeger-ingester:
helm install jaeger jaegertracing/jaeger \
  --set provisionDataStore.kafka=true \
--set ingester.enabled=trueYou can use an existing Kafka cluster with jaeger too
helm install jaeger jaegertracing/jaeger \
  --set ingester.enabled=true \
  --set storage.kafka.brokers={<BROKER1:PORT>,<BROKER2:PORT>} \
--set storage.kafka.topic=<TOPIC>If you are using grpc-plugin based storage, you can set environment variables that are needed by the plugin.
As as example if using the jaeger-mongodb
plugin you can set the MONGO_URL as follows...
storage:
  type: grpc-plugin
  grpcPlugin:
    extraEnv:
      - name: MONGO_URL
        valueFrom:
          secretKeyRef:
            key: MONGO_URL
name: jaeger-secretsTo install the chart with the release name jaeger using in-memory storage and the All in One
executable, configure the chart as follows:
Content of the values.yaml file:
provisionDataStore:
  cassandra: false
allInOne:
  enabled: true
storage:
  type: memory
agent:
  enabled: false
collector:
  enabled: false
query:
  enabled: false
It's possible to specify resources, extra environment variables, and extra secrets for the all in one deployment:
allInOne:
  extraEnv:
    - name: QUERY_BASE_PATH
      value: /jaeger
  resources:
    limits:
      cpu: 500m
      memory: 512Mi
    requests:
      cpu: 256m
      memory: 128Mi
  extraSecretMounts:
    - name: jaeger-tls
      mountPath: /tls
      subPath: ""
      secretName: jaeger-tls
      readOnly: true
helm install jaeger jaegertracing/jaeger --values values.yamlIf extra protection of the Jaeger UI is needed, then the oAuth2 sidecar can be enabled in the Jaeger Query. The oAuth2 sidecar acts as a security proxy in front of the Jaeger Query service and enforces user authentication before reaching the Jaeger UI. This method can work with any valid provider including Keycloak, Azure, Google, GitHub, and more.
Offical docs here
Content of the jaeger-values.yaml file:
query:
  enabled: true
  oAuthSidecar:
    enabled: true
    resources: {}
    image:
      registry: quay.io
      repository: oauth2-proxy/oauth2-proxy
      tag: v7.6.0
    pullPolicy: IfNotPresent
    containerPort: 4180
    args:
      - --config
      - /etc/oauth2-proxy/oauth2-proxy.cfg
      - --client-secret
      - "$(client-secret)"
    extraEnv:
      - name: client-secret
        valueFrom:
          secretKeyRef:
            name: client-secret
            key: client-secret-key
    extraConfigmapMounts: []
    extraSecretMounts: []
    config: |-
      provider = "oidc"
      https_address = ":4180"
      upstreams = ["http://localhost:16686"]
      redirect_url = "https://jaeger-svc-domain/oauth2/callback"
      client_id = "jaeger-query"
      oidc_issuer_url = "https://keycloak-svc-domain/auth/realms/Default"
      cookie_secure = "true"
      cookie_secret = ""
      email_domains = "*"
      oidc_groups_claim = "groups"
      user_id_claim = "preferred_username"
skip_provider_button = "true"If additional kubernetes objects need to be installed alongside this chart, set the extraObjects array to contain
the yaml describing these objects. The values in the array are treated as a template to allow the use of variable
substitution and function calls as in the example below.
Content of the jaeger-values.yaml file:
extraObjects:
  - apiVersion: rbac.authorization.k8s.io/v1
    kind: RoleBinding
    metadata:
      name: "{{ .Release.Name }}-someRoleBinding"
    roleRef:
      apiGroup: rbac.authorization.k8s.io
      kind: Role
      name: someRole
    subjects:
      - kind: ServiceAccount
name: "{{ include \"jaeger.esLookback.serviceAccountName\" . }}"If the hotrod example application is enabled it will export traces to Jaeger
via the Jaeger exporter. To switch this to another collector and/or protocol,
such as an OpenTelemetry OTLP Collector, see the example below.
The primary use case of sending the traces to the collector instead of directly to Jaeger is to verify traces can get back to Jaeger or another distributed tracing store and verify that pipeline with the pre-instrumented hotrod application.
NOTE: This will not install or setup the OpenTelemetry collector. To setup an example OpenTelemetry Collector, see the OpenTelemetry helm charts.
Content of the jaeger-values.yaml file:
hotrod:
  enabled: true
  # Switch from the jaeger protocol to OTLP
  extraArgs:
    - --otel-exporter=otlp
  # Set the address of the OpenTelemetry collector endpoint
  extraEnv:
    - name: OTEL_EXPORTER_OTLP_ENDPOINT
value: http://my-otel-collector-opentelemetry-collector:4318In the Kafka Helm Chart version 24.0.0 major refactors were done to support Kraft mode. More information can be found here.
If you are upgrading from Kraft mode, follow the instructions here.
If you are upgrading from Zookeeper mode, follow the instructions here.
After you complete the steps above, follow the instructions here to finally migrate from Zookeeper.

