Z-Wave JS is a set of NodeJS libraries and apps used to control all known 500 and 700 series Z-Wave controller.
📝 Reference doc : https://zwave-js.github.io/zwave-js-ui//#/README
The Z-Wave JS UI includes the server and allows to :
- Add, control the Zwave nodes from a web UI
- Expose Z-Wave devices to an MQTT broker in a fully configurable manner
- Display a Network Graph
Plug the Z-wave controller on host and search for the serial device
$ lsusb

Bus 001 Device 005: ID 0658:0200 Sigma Designs, Inc. Aeotec Z-Stick Gen5 (ZW090) - UZB
[...]

$ ls /dev/serial/by-id/
/dev/serial/by-id/usb-0658_0200-if00
Do not use /dev/ttyUSBX serial devices, as those mappings can change over time.
Instead, use the /dev/serial/by-id/X serial device for your Z-Wave stick.
Add the following content to the Docker Compose file:
services:
  zwave-js-ui:
    image: zwavejs/zwave-js-ui:latest
    container_name: zwave-js-ui
    restart: always
    tty: true
    stop_signal: SIGINT
    environment:
      - SESSION_SECRET=mysupersecretkey
      - ZWAVEJS_EXTERNAL_CONFIG=/usr/src/app/store/.config-db
      - TZ=Europe/Paris
    networks:
      - zwave
    devices:
      # Do not use /dev/ttyUSBX serial devices, as those mappings can change over time.
      # Instead, use the /dev/serial/by-id/X serial device for your Z-Wave stick.
      - '/dev/serial/by-id/usb-0658_0200-if00:/dev/zwave'
    volumes:
      - /mnt/usbdrive/docker/volumes/zwave-js:/usr/src/app/store
    ports:
      - "8091:8091" # port for web interface
      - "3000:3000" # port for Z-Wave JS websocket server
networks:
  zwave:
Finally run the container
docker-compose -f compose-files/z-wave-ui.yml up -d
The Web UI is accessible from http://hostname.local:8091
Activate authentication and logging. Default credentials to login will be:
- Username: admin
- Password: zwave
Generate security keys and then save configuration
Z-Wave network keys for secure inclusion S0/S2. You can manually input them or auto-generate them by using random generator button or by pasting your OZW keys in the input, they will be auto-converted in the correct format. Example of a valid key is: 5C14897467C42598518AF155DE6CCEA8 (length is 32).
- S0_Legacy : Legacy S0 key
- S2 Unauthenticated: Like S2 Authenticated, but without verification that the correct device is included (skip DSK verification step)
- S2 Authenticated: Security systems, sensors, lighting, etc.
- S2 AccessControl (highest): Used for Door locks, garage doors, etc.
Note : Backup these keys in a separate secret file
Enter the broker info including credentials (username/password).
To reach another docker container localhost cannot be used, instead use the Host IP address.
Open the Z-Wave JS UI Settings page and then enable the "WS Server" setting in the Home Assistant panel. This allows Home Assistant Z-Wave JS integration to discover entities.
In HomeAssistant add a new integration and select Z-wave (Z-wave JS).
Then provide the correct IP/hostname shall be provided in the websocket URL , for instance : ws://a0d7b954-zwavejs2mqtt:3000 (default to ws://localhost:3000).
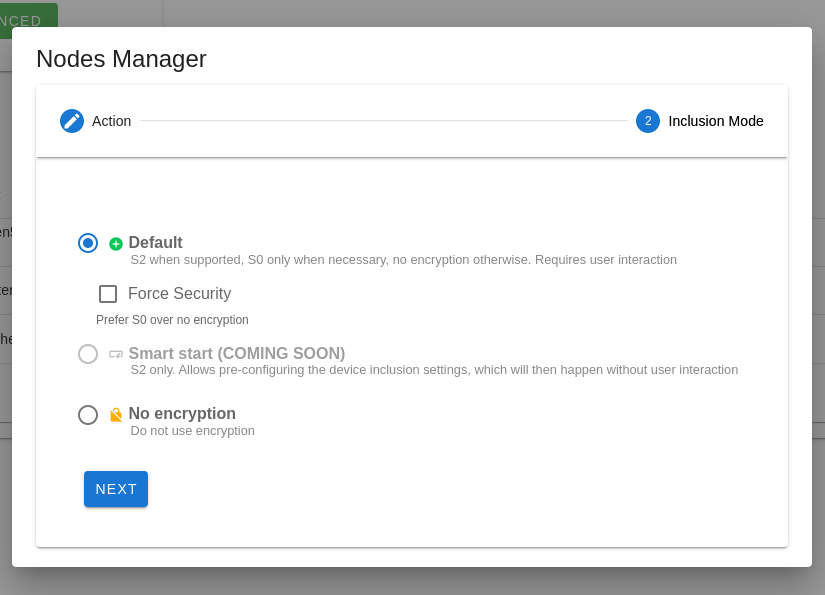
Perform first a hard reset of the controller in order to recreate network from scratch
Nodes can be managed from the Control Panel page by clicking on Actions > Manage Nodes.
Reference docs : https://zwave-js.github.io/zwave-js-ui//#/usage/nodes-management
In that tab Z-Wave mesh network can be visualized and you can also check connectivity issues between nodes and the controller.
http://hostname.local:8091/mesh
By clicking on nodes a panel will open containing more detailed node information, including the last working route (if supported by your stick). At the bottom of this panel there is a button CHECK HEALTH that opens a dialog that allows to perform health checks on that node.
The list of the supported environment variables are described here : https://zwave-js.github.io/zwave-js-ui//#/guide/env-vars
To embed Web UI in Home Assistant https://zwave-js.github.io/zwave-js-ui//#/homeassistant/accessing-lovelace
Health check : https://zwave-js.github.io/zwave-js-ui//#/guide/healthcheck