
Git is a free and open-source distributed version control system used to handle all aspects of project development. It is commonly used by programmers to collaboratively manage and track source code.
Git has two primary data structures:
- Mutable Index (Stage or Cache) – Stores information about the working directory and the next revision to be committed.
- Object Database – Stores immutable objects, including commits, trees, and blobs.
In Git terminology:
- A blob is a file, represented as a sequence of bytes.
- A tree is a directory structure that maps names to blobs or other trees (allowing nested directories).
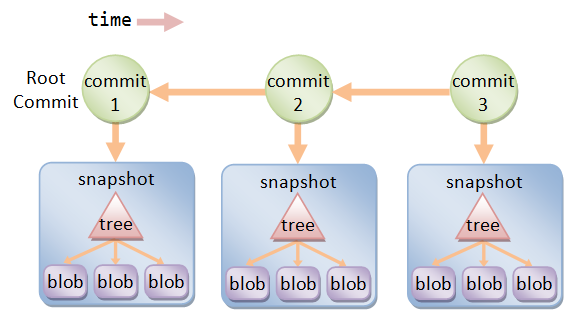
Image source: NTU - Git HowTo
A repository (repo) is a storage space containing files, directories, historical records, commits, and branches. It can be:
- Local (stored on your machine)
- Remote (hosted on platforms like GitHub, GitLab, or Bitbucket)
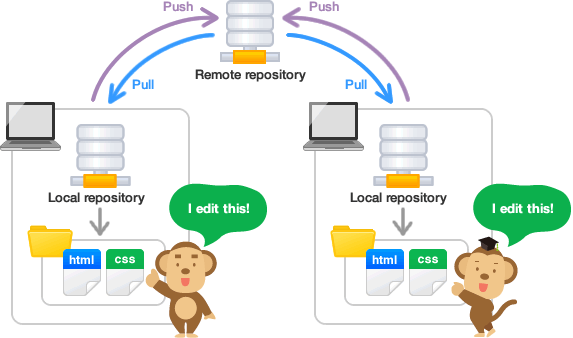
Image source: Kevin T. Shoemaker - Git Tutorial
.gitDirectory – Contains configuration files, logs, branches, HEAD, and more.- Working Tree – Represents the project's current state.
- Index (Staging Area) – A middle layer between the working tree and the Git repository.
- HEAD – A pointer to the latest commit in the active branch.
A commit is a snapshot of the repository at a specific moment.
- Each commit has a unique ID (SHA-1 hash).
- It records changes made to files (added, modified, or deleted). For example, if you added 5 files, and removed 2 others, these changes will be contained in a commit.
A branch is a parallel version of your project.
- By default, Git creates a branch called
main(formerlymaster). - Branches enable independent feature development before merging changes.
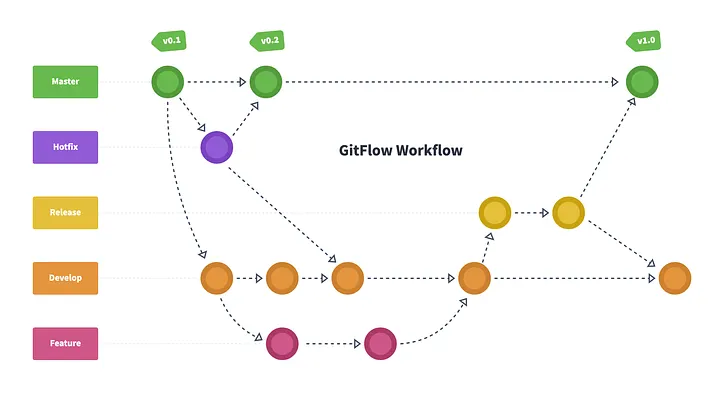
Image source: Choosing the Right Branching Strategy for Your Git Workflow
- Modified – Changes have been made to a file but file has not been committed to Git Database yet.
- Staged – The file is marked to be included in the next commit.
- Committed – Files have been committed to the Git Database.
Merging is the process of combining changes from different branches. It integrates the work from one branch into another.
# Merge a branch into the current branch
git merge <branch-name>
Image source: GeeksforGeeks - Git Merge
Cloning is copying a repository from a remote server to your local machine.
git clone <repository-url>- Pull: Fetches changes from a remote repository and merges them into your local branch.
- Push: Sends committed changes from your local repository to a remote repository.
git pull
git push origin <branch-name>#Create an empty Git repository.
git init
# Set global username and email
$ git config --global user.email "MyEmail@ncsu.com"
$ git config --global user.name "My Name"
# Quickly check available commands
$ git help
# Add files to staging area
git add <file>
# Commit your changes
git commit -m "Commit message"
# Check the status of your files. Will display the branch, untracked files, changes and other differences
git status
# List existing branches & remotes
git branch -a
# Create a new branch
git branch <new-branch>
# Delete a branch
git branch -d <branch-name>
# Rename a branch
git branch -m <old-branch-name> <new-branch-name>
# By default, git push will push and merge changes from the current branch to its remote-tracking branch
git push
# Push commits to a remote repository
git push origin <branch-name>
# By default, git pull will update your current branch
git pull
# Create a new branch
git checkout -b <branch-name>
# Switching Branches
git checkout <branch-name>
# Restoring Files to a Previous State
git checkout <branch-name> -- <file-name>
# Checking Out a Specific Commit
git checkout <commit-hash>
# Merge a branch into the current branch
git merge <branch-name>
#To intentionally untrack file(s) & folder(s) from git. Based on different languages,
echo "temp/" >> .gitignore
echo "private_key" >> .gitignoreThere are different styles of gitignore file. reference: https://github.com/github/gitignore. For example, Python developers might consider using https://github.com/github/gitignore/blob/main/Python.gitignore.
You’ve been doing some work in your git repo, but you want to pull from the remote. Since you have uncommitted changes to some files, you are not able to run git pull. Instead, you can run git stash to save your changes onto a stack!
git stash       # Save uncommitted changes
git pull        # Pull latest changes
git status      # Checking if everything is okay
git stash list  # View stashed changes
git stash pop   # Apply the latest stash and remove it from the stash list
#or
git stash apply # Apply the latest stash but keep it in the stash listWhen we merge current branch to main branch, some conflicts might happen, like:
Auto-merging filename.txt
CONFLICT (content): Merge conflict in filename.txt
Automatic merge failed; fix conflicts and then commit the result.
This means that Git has identified conflicting changes in "filename" that need to be resolved.
Open the files with conflicts in your text editor or IDE. Conflicts sections shows your current branch, named "HEAD", and the branch you try to merge, named "branch-name".
<<<<<<< HEAD
This is a different line on main branch.
=======
This is the modified line on current branch.
>>>>>>> feature
Steps to resolve:
- Edit the file to resolve the conflict by choosing the right changes to keep.
- Stage the resolved file. Once you have resolved the conflicts, you need to stage the changes:
git add filename.txt
- After staging the resolved files, commit the merge:
git commit -m "Resolved merge conflict in filename.txt" - After committing, the merge conflict resolution is complete. There are some good visual tools to help with dealing conlicts like VSCodes, IntelliJ. To minimize the chance of conflicts, pull changes from the upstream branches regularly and resolve smaller conflicts incrementally. When working in a team, communicate about major changes or rebase regularly to reduce the chances of conflicts.
In Git, "reverse" typically refers to undoing changes or reverting a commit. There are several ways to reverse changes in Git:
Creates a new commit that undoes the changes made by a previous commit without rewriting history. This is useful when you want to keep the history intact and record the fact that a commit was reverted.
git revert <commit-hash>But if you have merged a branch into your main branch, but later realized that you need to undo this merge. To revert a **merge commit**, specify the parent branch:
    #find the commit hash of the merge that you want to reverse
    git log --oneline
    #use "-m" option to specify the parent of the merge you want to keep. The "-m 1" option typically specifies that you want to keep the changes from the first parent (usually the main branch before the merge).
git revert -m 1 <merge-commit-hash>Moves the HEAD pointer and potentially the branch pointer to a previous commit, effectively "erasing" commits from the history. This can be destructive as it changes the commit history, making it as though certain commits never happened.
The git reset command is used to undo commits by moving the HEAD and the current branch to a specified commit.
Types of Reset:
--soft: Moves HEAD, but keeps changes staged.--mixed(default): Moves the HEAD to a specified commit, unstages changes (moves them to the working directory), but doesn't touch the working directory.--hard: Moves the HEAD to a specified commit and deletes all changes in the working directory and index.
git reset --soft <commit-hash>
git reset --mixed <commit-hash>
git reset --hard <commit-hash>
⚠ Warning: --hard deletes all uncommitted changes permanently!
Reverts changes made to files in the working directory that haven't been staged or committed yet.
If you want to undo changes to a file that haven't been staged or committed yet, you can use the "git checkout" (in older versions) or "git restore" (in newer versions) command.
sh git restore <file> #or for older version git checkout -- <file>
If you've added changes to the staging area (using "git add") and want to unstage them without losing changes in the working directory:
sh git reset HEAD <file>
If you accidentally use "git reset --hard" or otherwise lose commits, you can often recover them using the Git reflog, which tracks all movements of HEAD.
sh git reflog
Find the commit hash of the desired state, and then reset or checkout to that commit.
git checkout <commit-hash>YouTube video: Learn git in 15 mins Interacting git learning website: Learn Git Branch
Note: For the homework, we will be looking for evidence that you completed these tasks in your commit log.
-
Create a PDF file containing:
- Your repository link
- Screenshot for each group member showing your "resolve conflicts"(You solve conflicts if you have them. Just don't forget to document your work.) for Steps 8.
- Screenshots of your terminal for each group member showing your Git commands and terminal output for Steps 9 - 10.
- Group number
- Names of all participants (Name - github user id)
-
Only one group member submits the work. It should contain each team member's screenshot (Steps 8-10).
-
Submit the PDF file.
-
Create a new directory called
git-homework2. -
Initialize a Git repository in this directory.
For the initial setup, pushing directly to the main is acceptable since it establishes the repository structure. After setup, all changes should follow the branch-based workflow outlined in the assignment. If your team prefers, you can use a setup branch and merge it into the main before proceeding. Make sure to use terminal commands as much as possible.
-
Create a file called
README.mdand write a brief description of the repository. -
Add the following standard files to your repo:
LICENSE.md.gitignoreINSTALL.mdFor example, you can add "Getting-Started-Installing-Git" instruction.CONTRIBUTING.mdYou can check ideas here.CODE-OF-CONDUCT.mdIdeas- (Reference: Standard Files, Choose a License)
-
Add at least four badges to
README.md. -
Create a simple webpage (
.htmlfile) describing your team. Include:- Team number
- All team members' names
- Emails
- Add footer .html can be "bare bone," but it should meet requirements. If you use a template, don't forget to add a source.
-
Stage and commit the changes with an appropriate commit message.
## 📝 Introduction# Stage all changes for commit
git add .
# Commit the staged changes with a message
git commit -m "Add changes"
# Push to the remote repository
git push origin YOUR_BRANCH- Task 1: Complete Git Tutorial
- Task 2: Add Screenshots to
README.md - Task 3: Modify
.htmlFile - Task 4: Merge latest changes
- Task 5: Review pull requests
##Example
- [ ] Task 1
- [x] Task 2- Create a new branch named
your_unity_id.
Each group member should create 5 issues:
- Complete the following topics in the Git Tutorial:
- "Main" Topics:
- Introduction Sequence
- Ramping Up
- Moving Work Around
- "Remote" Topics:
- Push & Pull -- Git Remotes!
- "Main" Topics:
- Add an appropriate label.
- Add a screenshot to
README.mdshowing your Git tutorial progress. - Replace "Example" with your name in the screenshot.
- Add an appropriate label.


- Add an appropriate label.
- Modify the
.htmlfile to include email links. - Commit and push changes with a descriptive commit message.
- Verify the commit history and check the differences between commits.
- Add an appropriate label.
- Modify the
.htmlfile to change a footer section. - Ensure the footer follows the website’s design style.
- Commit and push changes with an appropriate message.
- Assign Issue 5 to another group member.
- Label it as "Help Wanted".
- Make sure no two group members are assigned the same task.
(To resolve the issue, you need to complete Step 8.)
You specify issues by assigning them to you or you can try other options.
Each team member should create total 5 issues, we expect to see 15 closed issues for team of 3.
- Work on and complete Issues 1 to 4.
- Once completed, close the corresponding issues.
- Switch to the branch where you were assigned to help.
All your changes need to be on GitHub. You should work with your local branch, but you will need to push it to GitHub before you merge the branches. Next, you will need to merge it with the origin/main. You will also need to fetch the changes to have an updated version locally.
- Merge the branch into the main branch.
- Resolve conflicts by including all changes or creating a consolidated version.
- After resolving, stage, commit, and complete the merge.
- Once completed, close the issues.
- Make a new commit by adding a line to the
.htmlfile. - Undo the most recent commit using Git.
- Create a new branch named
"temp". - Make some changes but do not commit them.
- Use
git stashto save the changes. - Switch to the main branch and make another commit.
- Switch back to
"temp"and apply the stashed changes usinggit stash apply.
Only after all group members have completed the previous steps.
- Delete all the branches.
- Each step is worth 0.09 points.
- Total: 1 point.
- Ensure all steps are completed to receive full credit.