First of all, you need an account on https://ifttt.com . If you do not already have one, create it first by using the 'Sign up' link.
Second, see INSTALL.md if you have not installed IFTTT2YNAB yet. You will need the URL for your installation in the last step.
Next, you need to setup a development organization on the IFTTT platform (don't worry, the free account is enough):
- Go to https://platform.ifttt.com
- Login to your IFTTT account
- Click on 'Try now'
- Enter an organization name (you can make up one if you want)
Next, you can configure your service. As you develop a private service, most of the values don't matter that much, as only you see them.
- Service name: pick a name you want, e.g. ynab_yourname
- Description: anything goes
- Category: Finance & Payments
- IFTTT service ID: pick anything you want, but it must be unique, e.g. ynab_yourname
For a better visual experience, it is suggested to add the bunq logo's on the 'Branding' page
- Brand logo -> suggest to use ynab.svg here
- Brand color -> #71C0E5 is the YNAB blue color
- Applet logo -> suggest to use ynab_white.svg here
- Works with icon -> suggest to use ynab_white.svg here
Finally you need to configure the service URL and note the service key. Click on the API tab, which brings you to the General page, where you see two fields:
- IFTTT API URL: fill in the URL of your installation of the IFTTT2YNAB app. If you use google appengine, then your URL will look something like https://yourprojectid.appspot.com (don't forget to use https:// not http:// )
- Service Key: copy this key by clicking on it, you need it in the next step when you configure the IFTTT2YNAB app
Go to your IFTTT2YNAB page and configure it:
- Pick a password and enter it
- Set the IFTTT service key obtained in the previous step
- Set a YNAB personal access token (you can find it in YNAB after logging in, then Account -> Developer settings)
Now go back to IFTTT Platform, API -> Endpoint tests. Click on 'Begin test'. While you haven't setup the action yet, the 'status' and 'test setup' endpoints should already return a green/successful status.
Next, we need to create the action on your IFTTT service to actually be able to create a transaction in YNAB.
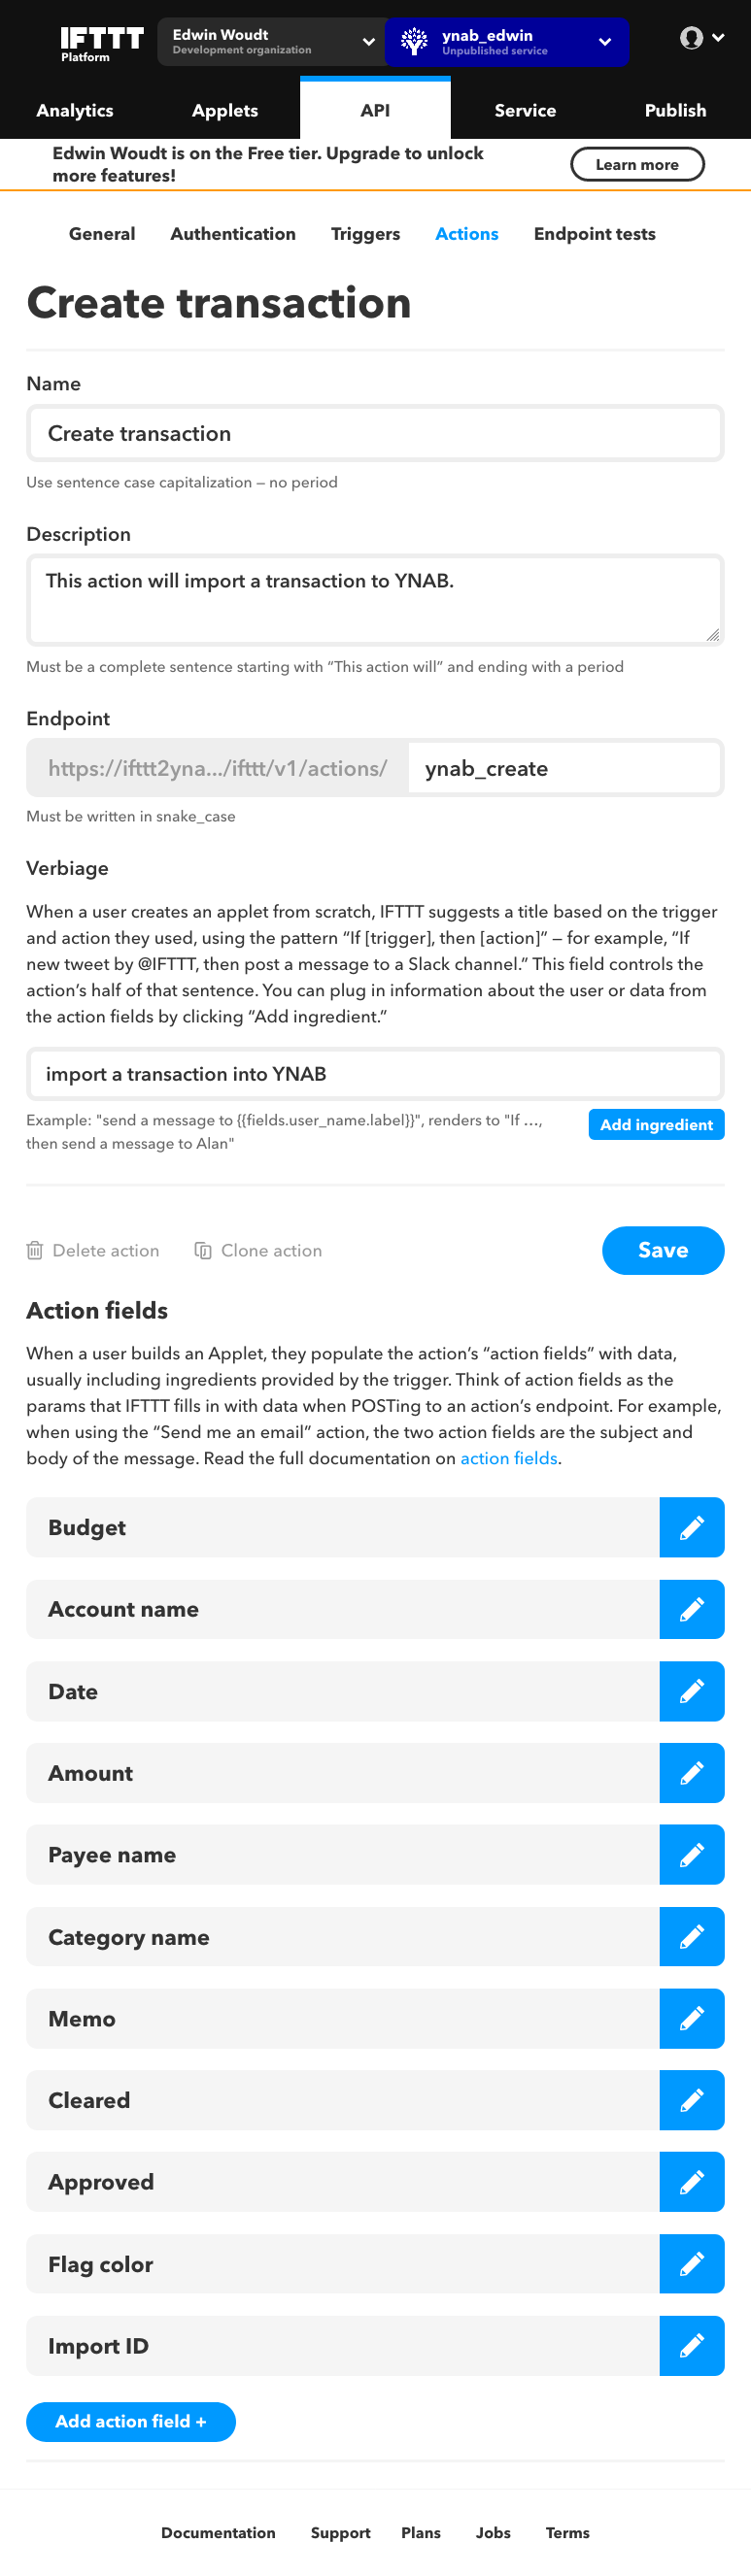
In IFTTT platform, go to API -> Actions and click on the New action button. You can then enter the following details:
- Name:
create transaction(can be changed to anything you like) - Description:
This action will import a transaction to YNAB.(can be changed to anything you like) - Verbiage:
import a transaction into YNAB(can be changed to anything you like) - Endpoint:
ynab_createNote: this must match exactly!
Once the action is created, you need to add the following action fields: (See the screenshot to give an idea of how the final result should look like)
| Budget | |
|---|---|
| Label: | Budget |
| Optional helper text: | Select the budget on which to import the transaction |
| Key name: | budget |
| Required: | yes (This action field is required for Applets to work) |
| Action field type: | Dropdown list / Retrieve list items from my service |
| Account name | |
| Label: | Account name |
| Optional helper text: | The name of the account on which to import the transaction |
| Key name: | account |
| Required: | yes (This action field is required for Applets to work) |
| Action field type: | Text input / Other / none of the above |
| Date | |
| Label: | Date |
| Optional helper text: | Use YYYY-MM-DD format. Or use ISO8601, in which case any time provided will be ignored. |
| Key name: | date |
| Required: | yes (This action field is required for Applets to work) |
| Action field type: | Text input / Other / none of the above |
| Amount | |
| Label: | Amount |
| Optional helper text: | The amount of the transaction. Positive for inflow, negative for outflow |
| Key name: | amount |
| Required: | yes (This action field is required for Applets to work) |
| Action field type: | Text input / Other / none of the above |
| Payee name | |
| Label: | Payee name |
| Optional helper text: | The name of the payee |
| Key name: | date |
| Required: | no (This action field is optional) |
| Action field type: | Text input / Other / none of the above |
| Category name | |
| Label: | Category name |
| Optional helper text: | Leave blank for automatic categorisation based on payee name. Use an explicit category or 'Uncategorized' to disable automatic categorisation. |
| Key name: | category |
| Required: | no (This action field is optional) |
| Action field type: | Text input / Other / none of the above |
| Memo | |
| Label: | Memo |
| Optional helper text: | Description of the transaction |
| Key name: | memo |
| Required: | no (This action field is optional) |
| Action field type: | Text input / Messages / Short text |
| Cleared | |
| Label: | Cleared |
| Optional helper text: | Clearing status of the transaction after import |
| Key name: | cleared |
| Required: | yes (This action field is required for Applets to work)) |
| Action field type: | Dropdown list / Populate with the items specified here |
| Fill the following values in Label/Value: | |
| - cleared / cleared | |
| - uncleared / uncleared | |
| - reconciled / reconciled | |
| Approved | |
| Label: | Approved |
| Optional helper text: | Whether the transaction is approved after import |
| Key name: | approved |
| Required: | yes (This action field is required for Applets to work)) |
| Action field type: | Dropdown list / Populate with the items specified here |
| Fill the following values in Label/Value: | |
| - true / true | |
| - false / false | |
| Approved | |
| Label: | Flag color |
| Optional helper text: | Optional flag on the transaction |
| Key name: | flag_color |
| Required: | yes (This action field is required for Applets to work)) |
| Action field type: | Dropdown list / Populate with the items specified here |
| Fill the following values in Label/Value: | |
| - none / none | |
| - red / red | |
| - orange / orange | |
| - yellow / yellow | |
| - green / green | |
| - blue / blue | |
| - purple / purple | |
| Import ID | |
| Label: | Import ID |
| Optional helper text: | A unique ID to prevent importing the same transaction twice |
| Key name: | import_id |
| Required: | no (This action field is optional) |
| Action field type: | Text input / Other / none of the above |
See the screenshot to give an idea of how the final result should look like.
IFTTT2YNAB supports a second action, which allows you to create an adjustment booking to change the balance of an account. This is useful e.g. to capture any profit/loss on an investment account.
In IFTTT platform, go to API -> Actions and click on the New action button. You can then enter the following details:
- Name:
adjust balance(can be changed to anything you like) - Description:
This action will adjust the balance of an account to the given amount.(can be changed to anything you like) - Verbiage:
adjust the balance in YNAB(can be changed to anything you like) - Endpoint:
ynab_adjust_balanceNote: this must match exactly!
Once the action is created, you need to add the following action fields:
| Budget | |
|---|---|
| Label: | Budget |
| Optional helper text: | Select the budget on which to adjust the balance |
| Key name: | budget |
| Required: | yes (This action field is required for Applets to work) |
| Action field type: | Dropdown list / Retrieve list items from my service |
| Account name | |
| Label: | Account name |
| Optional helper text: | The name of the account on which to adjust the balance |
| Key name: | account |
| Required: | yes (This action field is required for Applets to work) |
| Action field type: | Text input / Other / none of the above |
| Date | |
| Label: | Date |
| Optional helper text: | Use YYYY-MM-DD format. Or use ISO8601, in which case any time provided will be ignored. |
| Key name: | date |
| Required: | yes (This action field is required for Applets to work) |
| Action field type: | Text input / Other / none of the above |
| New balance | |
| Label: | New balance |
| Optional helper text: | The target balance on the account |
| Key name: | new_balance |
| Required: | yes (This action field is required for Applets to work) |
| Action field type: | Text input / Other / none of the above |
| Payee name | |
| Label: | Payee name |
| Optional helper text: | The name of the payee on the adjustment transaction |
| Key name: | date |
| Required: | no (This action field is optional) |
| Action field type: | Text input / Other / none of the above |
| Category name | |
| Label: | Category name |
| Optional helper text: | Leave blank for automatic categorisation based on payee name. Use an explicit category or 'Uncategorized' to disable automatic categorisation. |
| Key name: | category |
| Required: | no (This action field is optional) |
| Action field type: | Text input / Other / none of the above |
| Memo | |
| Label: | Memo |
| Optional helper text: | Description of the adjustment transaction |
| Key name: | memo |
| Required: | no (This action field is optional) |
| Action field type: | Text input / Messages / Short text |
| Cleared | |
| Label: | Cleared |
| Optional helper text: | Clearing status of the adjustment transaction after import |
| Key name: | cleared |
| Required: | yes (This action field is required for Applets to work)) |
| Action field type: | Dropdown list / Populate with the items specified here |
| Fill the following values in Label/Value: | |
| - cleared / cleared | |
| - uncleared / uncleared | |
| - reconciled / reconciled | |
| Approved | |
| Label: | Approved |
| Optional helper text: | Whether the adjustment transaction is approved after import |
| Key name: | approved |
| Required: | yes (This action field is required for Applets to work)) |
| Action field type: | Dropdown list / Populate with the items specified here |
| Fill the following values in Label/Value: | |
| - true / true | |
| - false / false | |
| Approved | |
| Label: | Flag color |
| Optional helper text: | Optional flag on the adjustment transaction |
| Key name: | flag_color |
| Required: | yes (This action field is required for Applets to work)) |
| Action field type: | Dropdown list / Populate with the items specified here |
| Fill the following values in Label/Value: | |
| - none / none | |
| - red / red | |
| - orange / orange | |
| - yellow / yellow | |
| - green / green | |
| - blue / blue | |
| - purple / purple |
Now go back to IFTTT Platform, API -> Endpoint tests. Click on 'Begin test'. If all the tests succeed: congratulations!