
Considering the big change that the world is facing, as well as our lives due to the COVID-19, we provide to people and companies a complete open-source tool to analyze the social distancing for streets, parks, offices, and even crowded places like malls, train stations, and others.
Here you have the code and everything that you'll need to perform your own intrinsic and extrinsic calibration, and run a YOLOv4 based object detection model to track the people in a warped space and analyze how far or close they are to each other (Social Distancing).
The current pipeline only supports videos, but you can use the base classes, and methods to extend the application to video streamings, pictures and adapt it to your own project or application. Here, we will explain the dependencies, the code, and everything that you need to rock and roll!
Status: Archive (code is provided as-is, no updates expected)

#computer-vision #Ai #object-detection #yolo #yolo4 #python3 #Docker #covid19 #extrinsic #intrinsic #calibration #social-distancing #OpenCV #OpenSource #image-processing #deep-learning
Anaconda is the preferred method of installing SafeDistanceDetector dependencies on Linux Systems (Only for Extrinsic and Intrinsic calibration process). Anaconda is a data science platform for scientific computing and makes managing machine learning libraries significantly easier. Native installation of these libraries is possible, but native un-installation of these libraries can be significantly painful and introduce significantly much more bloat. which is why We DO not will not be supporting that method of installation.
To download the installer, follow this link and download the Anaconda platform for Linux x64. https://www.anaconda.com/distribution/#linux.
After installing the platform, you might need to add conda command into your path for further usage of the platform. You can do this with the following commands.
export PATH=~/anaconda3/bin:$PATH
conda init bash
# Restart your shell
You will now need to create the social distancing analyser environment with the required dependencies and libraries (provided in requirements.txt).
To create and to activate the environment, run:
conda create -n distancing_analyser -c main python=3.6.8
conda activate distancing_analyser
python -m pip install -r ./Safe-Distance-Detector/requirements.txt
After this, fork this repo and make sure that your environment is activated and you are in the root path. Again, this environment is only for Intrinsic (If needed) and Extrinsic calibration scripts, you can not run nothing related to object detection on this environment.
The object detection model pipeline is based on YOLOv4 and its dependencies, compilation, and configuration are packaged in a Docker Image. Before continuing, make sure you have Docker, Nvidia Docker, and Nvidia GPU cluster access given to our system.
To run the Social Distancing Analyser Docker Image, just run the bash script start.sh. If it's the first time probably is going to take a while, so, go for a soda and watch a series chapter or have a look at the meme zone for fun.
you can also try by hand every command line, specially if the image is already built.
xhost +

docker build -t working_mage .

docker run -it -v `pwd`/configs:/usr/src/app/configs -v `pwd`/media:/usr/src/app/media -v `pwd`/python_utils:/usr/src/app/python_utils --rm --gpus all -e DISPLAY=$DISPLAY -e QT_X11_NO_MITSHM=1  -v /tmp/.X11-unix:/tmp/.X11-unix working_mage bash
The process of geometric camera calibration is a fundamental step for any machine vision and robotics applications. The intrinsic parameters, also known as internal parameters, are the parameters intrinsic to the camera itself, such as the focal length and lens distortion. This distortion should be corrected to operate mathematically easier the image on a warped space or in a affine transformation. Unfortunately, the result of the calibration process can vary a lot depending on many factors.

With the script calibrate_instirnsic.py located in ./calibration path you can calculate the correct camera matrix and distortion coefficients of your camera using a calibration chessboard pattern (6x4). The distortion matrix is used to undistort the video, images or the camera streaming for extrinsic calibration and warped space operations.
Chessboard for Calibration: The pattern size and quality is of extreme importance. Let’s consider the case of a chessboard pattern. The calibration process requires to detect the inner corner of the chessboard and the assumption of the algorithm is that every chessboard square is a perfect square. Another assumption is, hence, that the pattern is perfectly planar. So, DO NOT print the pattern at home. Seriously. Go to a professional print shop and ask them to create the pattern for you. They have the right software to create the chessboard with squares with the real desired square size with an extremely high accuracy. More than everything, they can print the pattern on a white opaque, rigid and planar material. Stress the print shop to print on some extremely rigid opaque white material. You should read Camera calibration guidelines.
If you are making your calibration videos, or taking pictures from the camera that you are gonna use. remember move the chessboard across through all the camera view, apply a pitch, roll and yaw angle, and move the pattern in all directions.When you run the script, you'll get a help menu. Use between 15 to 25 pictures of your chess board pattern following the previous instructions and recommendations.
| 1 - Move the pattern along the camera view | 2 - Apply a pitch, roll and yaw angle |
|---|---|
 |
 |
You can calibrate taking snapshots from your camera, or from pictures or from videos just run:
python3 calibration/calibrate_intrinsic -i <<your input: video name, imgs path or video device>>
Remember pass -i argument as absolute path for videos, if input argument is an image, it should be located in the ./calibration/chess_board.
If the calibrations succeed you get a intrinsic.yaml file in the ./configs folder. This yaml file has the next data:
- distortion_coefficients: vector of distortion coefficients
- rectification_matrix: camera distortion matrix
- camera_matrix: 3x3 floating-point camera matrix
- image_height: images source height
- image_width: images source width
You can use the scripts for the next sections to validate how well your calibration result is. However, if you'll use camera surveillance streamings or security cameras is possible than these already give you an undistorted image, so the intrinsic calibration process is not needed, and you just lost your time reading this section.
The extrinsic parameters, also known as external parameters or camera pose, are the parameters used to describe the transformation between the camera and its external world. What you are gonna do here is use a dirty trick to transform the 3D image view space in a 2D warped space.
run in the parent folder the script calibrate_extrinsic.py with the command:
python3 calibration/calibrate_extrinsic.py -v <<your video input located in Media folder>>
If you don't pass the argument -v, --video a random video source will be taken from the Media folder. When you start the script you'll a menu, take a moment to read it and press the TAB key to continue.
When you run the script you get a window where you have to use the mouse to select four points, these points should correspond to the warped perspective, try to replicate from the camera view an imaginary perfect square as shown in the gif below. you can rotate your points, navigate them, remove them, or even modify them. A second window shows you a sky-view or bird-view of your selected warped space.

The social distancing analyzer has a radar window, so, to have the sense in the radar area with the orientation of your video, you should rotate the points until the point P1 is the point on the left superior corner, P2 on the right superior corner, P3 on the right bottom corner, and finally P4 on the left bottom corner.

Other important issue is that some perspectives can be really difficult due to the camera perspective to the surface, because they are very inclined, so the warped space only will be shown in a small proportion in the radar, to avoid this you can use two extrinsic options, (1) full warped space, or (2) partial warped space. The difference between these, it's that in (1) you are using the whole original image/frame to get the spacial transformation (warped space) in the radar, and in (2) you're not. to switch between these mods, press I key.
| Full Warped Space... | Partial Warped Space |
|---|---|
 |
 |
Here you can get some video streamings from surveillance cameras if you don't have nothing to play with. Just remember allocate all your videos in the Media folder.
| Original image view with surface projection drawn | warped space from surface projection (Affine transformation) |
|---|---|
 |
 |
Once you have the warped space or projection selected, automatically the bird_view window will be drawn and shown, here and now you have to use the cursor to select a vertical and horizontal measure range, objects can be used as a reference. If you don't know the real-world object's measures you have to use your intuition. When you are measuring a vertical or horizontal measure the real value of these in meters is asked in prompt, type the values and continue.
| Horizontal measure | Vertical measure |
|---|---|
 |
 |
Once you have your pixels per meter relation measures, and your warped space press S key to save you extrinsic calibration and press Q key to quit, and follow the next steps, run the social distancing analyzer.
We are using YOLOv4 object detector model, here we are not going to explain what is it, or how does it work, there's tons of information to read about it. The only thing that you have to know is that everything is really simple with the docker image, you don't have to download, set and modify any file, or compile Darknet by yourself to use Yolo in your applications, just follow the previous instructions and run the bash start.sh, this will do everything for you, and of course, you can use it for other proposes and your own object detections based project.
The social distancing for now is not real time due to the object detection model that we are using, we get in an Helios Predator 300 laptop with a GTX1060 GPU almost 8FPS (quite slow), other models or approaches can be explored and better of course, but the propose of this project is only test the computer vision processes to approximate the people location in the space where they are, and get the distances to others, the threshold of distance can vary, as well other parameters in the whole vision process. The information obtained from the analyser is not used, depends on you what are you going to do with the data.
To build your image run:
docker build -t working_mage .
if you areal ready have the image build run:
docker run -it -v `pwd`/configs:/usr/src/app/configs -v `pwd`/media:/usr/src/app/media -v `pwd`/python_utils:/usr/src/app/python_utils --rm --gpus all -e DISPLAY=$DISPLAY -e QT_X11_NO_MITSHM=1 -v /tmp/.X11-unix:/tmp/.X11-unix working_mage bash
and don't forget run xhost command to visualize user interfaces:
xhost +
The social distancing analyzer uses a video media player class, which loads all the videos and gives to the analyzer the extrinsic and intrinsic parameter for every media source specified in the file media/data_src.yaml which uses the next format:
- file_name: Shopping-People-Commerce.mp4
  extrinsic: extrinsic-"random_video_name".yaml
  intrinsic: intrinsic-"random_video_name".yaml [can be false when not calibration]
The media player class will load the video media sources and you can navigate through all these media, using at the same time the social distancing analyzer. The code is well documented, so if you want to modify any parameter like distancing or object confidence thresholds, feel free and proceed.
When you run the analyzer you and there's extrinsic calibration for that media you get three windows:
-
Social_Distancing: here you can see object detections bounding boxes, their confidences, distances to other bounding boxes if the distance is under distancing threshold if using partial warped and box is out from warped space, won't be analyzed and it will be drawn on gray.
-
Warped_space(Radar): Warped space drawn with style, show detections, and linked to others if applicable.
-
Warped_space: Original image drawn in warped space with detections.

In this tutorial, we’ll discuss our two-phase COVID-19 face mask detector, detailing how our computer vision/deep learning pipeline will be implemented. From there, we’ll review the dataset we’ll be using to train our custom face mask detector. I’ll then show you how to implement a Python script to train a face mask detector on our dataset using Keras and TensorFlow. We’ll use the Python script within mask_classifier folder to train a face mask detector and review the results.
Given the trained COVID-19 face mask detector, we’ll proceed to implement two more additional Python scripts used to:
Detect face masks in real-time video streams We’ll wrap up the post by looking at the results of applying our face mask detector.
I’ll also provide some additional suggestions for further improvement.
Phases and individual steps for building a COVID-19 face mask detector with computer vision and deep learning using Python, OpenCV, and TensorFlow/Keras. In order to train a custom face mask detector, we need to break our project into two distinct phases, each with its own respective sub-steps (as shown by Figure 1 above):
Training: Here we’ll focus on loading our face mask detection dataset from disk, training a model (using Keras/TensorFlow) on this dataset, and then serializing the face mask detector to disk Deployment: Once the face mask detector is trained, we can then move on to loading the mask detector, performing face detection, and then classifying each face as with_mask or without_mask We’ll review each of these phases and associated subsets in detail in the remainder of this tutorial, but in the meantime, let’s take a look at the dataset we’ll be using to train our COVID-19 face mask detector.
Our COVID-19 face mask detection dataset
A face mask detection dataset consists of “with mask” and “without mask” images. We will use the dataset to build a COVID-19 face mask detector with computer vision and deep learning using Python, OpenCV, and TensorFlow/Keras.
This dataset consists of 194 images belonging to two classes:
with_mask: 97 images without_mask: 97 images Our goal is to train a custom deep learning model to detect whether a person is or is not wearing a mask.
Note: For convenience, I have included the dataset created by Prajna in the “Downloads” section of this tutorial.
How was our face mask dataset created? To create this dataset, we had the ingenious solution of:
Taking normal images of faces Then creating a custom computer vision Python script to add face masks to them, thereby creating an artificial (but still real-world applicable) dataset This method is actually a lot easier than it sounds once you apply facial landmarks to the problem.
Facial landmarks allow us to automatically infer the location of facial structures, including:
Eyes Eyebrows Nose Mouth Jawline
To use facial landmarks to build a dataset of faces wearing face masks, we need to first start with an image of a person not wearing a face mask:
To build a COVID-19/Coronavirus pandemic face mask dataset, we’ll first start with a photograph of someone not wearing a face. From there, we apply face detection to compute the bounding box location of the face in the image:
The next step is to apply face detection. Here we’ve used a deep learning method to perform face detection with OpenCV. Once we know where in the image the face is, we can extract the face Region of Interest (ROI):
The next step is to extract the face ROI with OpenCV and NumPy slicing. And from there, we apply facial landmarks, allowing us to localize the eyes, nose, mouth, etc.:
Then, we detect facial landmarks using dlib so that we know where to place a mask on the face. Next, we need an image of a mask (with a transparent background) such as the one below:
An example of a COVID-19/Coronavirus face mask/shield. This face mask will be overlaid on the original face ROI automatically since we know the face landmark locations.This mask will be automatically applied to the face by using the facial landmarks (namely the points along the chin and nose) to compute where the mask will be placed.The mask is then resized and rotated, placing it on the face:
In this figure, the face mask is placed on the person’s face in the original frame. It is difficult to tell at a glance that the COVID-19 mask has been applied with computer vision by way of OpenCV and dlib face landmarks. We can then repeat this process for all of our input images, thereby creating our artificial face mask dataset:
An artificial set of COVID-19 face mask images is shown. This set will be part of our “with mask” / “without mask” dataset for COVID-19 face mask detection with computer vision and deep learning using Python, OpenCV, and TensorFlow/Keras. However, there is a caveat you should be aware of when using this method to artificially create a dataset!
If you use a set of images to create an artificial dataset of people wearing masks, you cannot “re-use” the images without masks in your training set — you still need to gather non-face mask images that were not used in the artificial generation process!
If you include the original images used to generate face mask samples as non-face mask samples, your model will become heavily biased and fail to generalize well. Avoid that at all costs by taking the time to gather new examples of faces without masks.
| Social_Distancing_Analyzer-Shopping_Mall | Social_Distancing_Analyzer-Asakusa_Ka... | Social_Distancing_Analyzer-Shibuya_Sc... |
|---|---|---|
 |
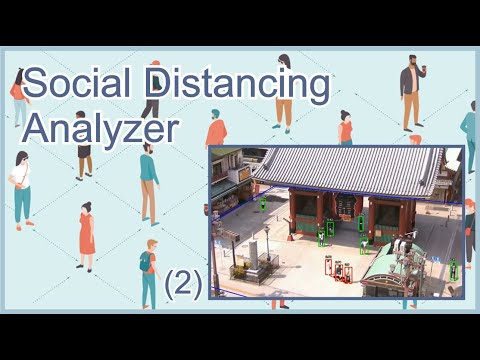 |
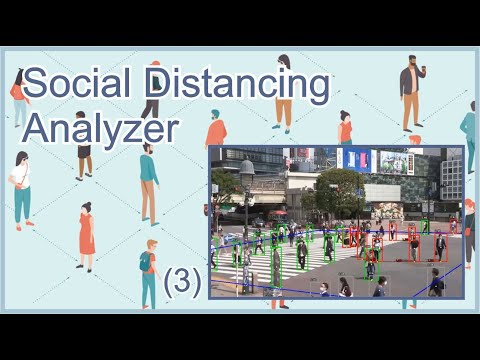 |
- Customize, perform or improve object detection model to detect better the people under different and harder scenarios.
- Object detection pipelines or models could have better performance.
- Object tracker combined with detector when it loses objects in some frame.
- General gui code optimizations and improvements
- Fork the Project
- Create your Feature Branch (
git checkout -b feature/AmazingFeature) - Commit your Changes (
git commit -m 'Add some AmazingFeature') - Push to the Branch (
git push origin feature/AmazingFeature) - Open a Pull Request
Do whatever you want!
Give a ⭐️ if this project helped you!
💀 Abhinav Chandra, GitHub, Email: abhinavchandra0526@gmail.com
💉 Omkar Chandorkar , GitHub, Email: forumomkar@gmail.com
Keep save and don't forget ...
| Wash your hands |
|---|
 |
| Use face mask | Keep your distance |
|---|---|
 |
 |
We appreciate the chance to help the world, thank you China! ...