Remote control and monitoring for Claude Code CLI - code from anywhere.
Control Claude Code sessions from any device on your network. Built for mobile-first development workflows with auto-tunneling, persistent sessions, and real-time terminal streaming.
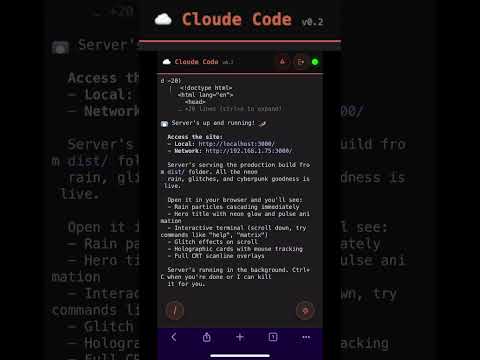
Quick Demo: Watch Cloude Code in action - mobile control, auto-tunneling, and real-time terminal streaming.
Runs Claude Code in a persistent pseudo-terminal on your Mac and exposes a web-based control interface. Access your coding session from your phone, tablet, or another computer. When Claude spins up a dev server, it automatically creates a public Cloudflare tunnel and broadcasts the URL to all connected clients.
Perfect for developers who want to code on the couch, monitor long-running tasks from their phone, or quickly share dev environments without manual tunnel setup.

Live Terminal: Full xterm.js terminal with WebSocket streaming, mobile D-pad controls, and slash command shortcuts.
- PTY-Based Persistent Sessions - Claude Code runs in an isolated pseudo-terminal that survives server restarts
- Real-Time WebSocket Terminal - Full bidirectional terminal I/O with xterm.js rendering and Unicode support
- Intelligent Auto-Tunneling - Pattern detection automatically creates Cloudflare tunnels when dev servers start
- Hybrid Tunnel Strategy - Choose between quick tunnels (instant, random URLs) or named tunnels (persistent custom domains)
- Web Launchpad Interface - Terminal-aesthetic UI for project management and session control
- TOTP Authentication - Secure access with Google Authenticator/Authy 2FA and JWT tokens
- Project Management - Quick-launch predefined projects with template file copying
- Mobile-Optimized - D-pad controls, special keyboard shortcuts (¥=Enter, €=Tab), and responsive design
- Pattern Detection Engine - Monitors terminal output for
localhost:PORTand "Server ready" signals - Session Recovery - Automatically validates and reconnects to existing sessions on startup
Quick-access modal for all Claude Code slash commands with one-click insertion.

How to use:
- Click the floating slash (/) button in the bottom-right of the terminal
- Select from common commands (top section) or browse all 49+ commands (bottom section)
- Commands are inserted into terminal without executing - customize before pressing Enter
- ESC key or click outside to close
Command categories:
- Workflow: /clear, /compact, /rewind, /resume
- Configuration: /config, /model, /permissions, /settings
- Account: /login, /logout, /status
- Development: /sandbox, /review, /cost, /usage, /help
- Project Setup: /init, /add-dir, /agents
- Utilities: /doctor, /mcp, /memory, /vim, /bug, /context, /hooks
Customization:
Edit config.json to customize "common commands" shown at the top:
{
  "common_slash_commands": [
    "/agents", "/clear", "/compact", "/context",
    "/hooks", "/mcp", "/resume", "/rewind", "/usage"
  ]
}Virtual D-pad overlay for mobile terminal navigation (auto-appears on touch devices).

Button mappings:
- Arrow Keys: UP, DOWN, LEFT, RIGHT navigation
- Center Button: ENTER/Return
- ESC: Escape key
- TAB: Tab key (🐛 icon)
- ⇧TAB: Shift+Tab for reverse navigation (✨ icon)
- ⬇SCROLL: Force scroll to bottom and re-enable auto-scroll
Usage:
- Tap floating D-pad button to open/close
- Touch-optimized with visual feedback
- Desktop-compatible for testing
Mobile keyboards often lack terminal control keys. Use these shortcuts:
| Symbol | Function | Why |
|---|---|---|
¥ (Yen) |
Enter/Newline | iOS international keyboard |
€ (Euro) |
Tab | Easy access on mobile |
£ (Pound) |
Shift+Tab | Reverse tab navigation |
These appear in the terminal startup message as a reminder.
Intelligent scrolling that follows terminal output but doesn't fight you:
- Auto-scrolls when at bottom of terminal
- Auto-disables when you scroll up to read history
- Re-enables when you scroll back to bottom
- Force enable with D-pad scroll button
Prevents the annoying "fighting with auto-scroll" experience when reading logs.

Launchpad Interface: Project management with quick-launch, descriptions, and emoji icons in a terminal-aesthetic UI.
New projects automatically copy from a template directory (optional).
Configuration:
{
  "template_path": "~/my-templates"
}
Behavior:
- Only copies for new projects (not existing ones)
- Triggered by
copy_templates: trueflag when creating session - Smart exclusions:
.git,node_modules,venv,__pycache__,.env,.DS_Store, etc.
- Auto-reordering: Projects automatically sort by most recently used
- Descriptions: Add descriptions when creating projects
- Quick Delete: × button on each project with confirmation
- No-delete guarantee: Deleting from launcher never deletes actual files
Monitors terminal output for intelligent automation triggers:
| Pattern | Detects | Action |
|---|---|---|
| localhost_server | localhost:PORT, 127.0.0.1:PORT, 0.0.0.0:PORT, [::]:PORT |
Create tunnel |
| server_ready | "server running", "development server started" | Create tunnel |
| listening_on_port | "listening on port 3000", "running on :8080" | Create tunnel |
| error | ERROR, Error, FAIL, Failed | Log detection |
| warning | WARNING, WARN | Log detection |
| file_created | "Created file:", "Saved file:" | Log detection |
| build_complete | "build successful", "compilation finished" | Log detection |
| test_result | "tests passed", "specs failed" | Log detection |
- WebSocket automatically reconnects if connection drops
- Exponential backoff: 1s → 2s → 4s → 8s → 16s
- Max 5 attempts with status shown in terminal
- Ping sent every 30 seconds
- Prevents timeout on mobile networks
- Automatic pong response
- Detects if session already running when creating new one
- Prompts: Connect to existing OR destroy and create new
- Prevents orphaned sessions
Additional config.json options:
{
  "jwt_expiry_minutes": 30,           // JWT token lifetime (default: 30)
  "template_path": "~/my-templates",  // Template directory for new projects
  "common_slash_commands": [          // Quick-access slash commands
    "/agents", "/clear", "/usage"
  ]
}- Mobile Development: Start Claude Code on your Mac, control it from your phone while away from your desk
- Remote Pair Programming: Share tunnel URLs so others can see your Claude Code session in real-time
- Auto-Share Dev Servers: Claude detects when you spin up a server and automatically creates a public URL
- Multi-Device Workflows: Start coding on your desktop, continue on the couch with your tablet
- Live Demos: Share live coding sessions and dev servers via public tunnel links
- Python 3.11+
- Claude CLI - Installed and configured (
claudecommand in PATH) - cloudflared - Cloudflare tunnel CLI (install)
- macOS/Linux - Tested on macOS, should work on Linux
Install system dependencies:
# macOS
brew install cloudflared

# Ensure Claude CLI is installed
which claude # Should return a path# Clone and navigate to project
cd "Cloude Code"
# Create virtual environment and install Python packages
python3 -m venv venv
source venv/bin/activate
pip install -r requirements.txtIMPORTANT: Do this BEFORE running setup or auth scripts.
# Copy environment template
cp .env.example .env

# Edit .env and configure required settings:
nano .env  # or use your preferred editor
Required settings:
DEFAULT_WORKING_DIR- Where new projects are created (e.g.,~/cloude-projects)LOG_DIRECTORY- Where logs are stored (e.g.,/tmp/cloude-code-logs)
Optional settings:
CLOUDFLARE_API_TOKEN- For named tunnels (can skip for now)CLOUDFLARE_ZONE_ID- For named tunnelsCLOUDFLARE_DOMAIN- Your custom domain (e.g.,cloude.yourdomain.com)CLOUDFLARE_TUNNEL_NAME- Tunnel name (e.g.,cloude-controller)
# Generate TOTP secret and JWT key
python3 setup_auth.py
This will:
- Generate a TOTP secret for 2FA
- Create JWT secret for token auth
- Display a QR code for Google Authenticator/Authy
- Save secrets to
.env(TOTP_SECRET, JWT_SECRET) - Save configuration to
./config.json(projects, template_path, etc.) - Save QR image to
./totp-qr.png
Scan the QR code with your authenticator app.

Secure Access: TOTP 2FA login screen - scan QR with Google Authenticator or Authy.
# Run setup script to check all dependencies
./setup.sh
This validates that cloudflared, claude, Python, and all configuration is properly set up.
# Start API server
./start.sh

# Or manually:
source venv/bin/activate
python3 -m src.main
Server runs on http://0.0.0.0:8000
Open http://localhost:8000 in your browser (or http://YOUR_IP:8000 from phone).
- Enter your TOTP code to authenticate
- Create a new project or select existing
- Terminal loads with Claude Code running
Key settings you might want to change:
# Server
HOST=0.0.0.0              # Bind to all interfaces for network access
PORT=8000                 # API server port

# Sessions
DEFAULT_WORKING_DIR=~/cloude-projects  # Where new projects are created
SESSION_TIMEOUT=3600                   # Session idle timeout (seconds)

# Authentication (generated by setup_auth.py - don't edit manually)
TOTP_SECRET=              # TOTP secret for 2FA
JWT_SECRET=               # JWT signing secret
AUTH_CONFIG_FILE=./config.json  # Path to config.json

# Tunnels
AUTO_CREATE_TUNNELS=true               # Auto-create tunnels when ports detected
USE_NAMED_TUNNELS=false                # Use named tunnels (requires Cloudflare config)

# Cloudflare (for named tunnels only)
CLOUDFLARE_API_TOKEN=your_token        # API token with DNS edit + Tunnel edit perms
CLOUDFLARE_ZONE_ID=your_zone_id        # Zone ID for your domain
CLOUDFLARE_DOMAIN=cloude.yourdomain.com  # Your custom domain
CLOUDFLARE_TUNNEL_NAME=cloude-controller # Tunnel name
CLOUDFLARE_TUNNEL_ID= # Optional: Skip tunnel lookup, uses auto-discovery if emptyUses trycloudflare.com - no account required.
Pros:
- Zero config
- Instant creation
- Free
Cons:
- Random URLs that change on restart
- Less stable
- Subject to rate limits
Usage: Works out of the box, no setup needed.
Uses your Cloudflare account with persistent custom domains.
Pros:
- Stable URLs like
3000.cloude.yourdomain.com - Single persistent tunnel, multiple ports
- CNAMEs auto-created and reused
- More reliable
Cons:
- Requires Cloudflare account (free)
- Initial setup needed
Setup:
-
Authenticate cloudflared:
cloudflared login
Opens browser for OAuth flow.
-
Create Cloudflare API Token:
- Go to https://dash.cloudflare.com/profile/api-tokens
- "Create Token" → "Edit zone DNS" template
- Add permissions:
Zone.DNS:EditandAccount.Cloudflare Tunnel:Edit - Copy token
-
Get Zone ID:
- Go to your domain's overview in Cloudflare dashboard
- Scroll to "API" section → Copy "Zone ID"
-
Update
.env:USE_NAMED_TUNNELS=true CLOUDFLARE_API_TOKEN=your_token_here CLOUDFLARE_ZONE_ID=your_zone_id CLOUDFLARE_DOMAIN=cloude.yourdomain.com CLOUDFLARE_TUNNEL_NAME=cloude-code
-
Restart server - Named tunnel will auto-create and persist.
When dev servers start, CNAMEs like 3000.cloude.yourdomain.com are automatically created and reused across restarts.
┌─────────────────────────────────────┐
│   Browser/Mobile Client             │
│   ├── Auth (TOTP)                   │
│   ├── Launchpad (Project Manager)   │
│   └── xterm.js Terminal             │
└──────────────┬──────────────────────┘
               │ WebSocket + REST API
┌──────────────┴──────────────────────┐
│   FastAPI Server (Python)           │
│   ├── Session Manager (PTY)         │
│   ├── Log Monitor (Pattern Detect)  │
│   ├── Hybrid Tunnel Manager         │
│   ├── Auto-Tunnel Orchestrator      │
│   └── Cloudflare API Integration    │
└──────────────┬──────────────────────┘
               │
         ┌─────┴─────┐
         │           │
    ┌────┴───┐  ┌────┴─────────┐
    │ PTY    │  │ Cloudflared  │
    │ Process│  │ Tunnels      │
    │ (Claude│  │ (Public URLs)│
    │  Code) │  │              │
    └────────┘  └──────────────┘
Flow:
- User authenticates with TOTP code
- Launchpad creates/connects to PTY session running Claude Code
- Terminal streams bidirectional I/O via WebSocket
- Log monitor watches terminal output for port patterns
- Auto-tunnel creates Cloudflare tunnel when
localhost:PORTdetected - Tunnel URL broadcast to all connected clients
- Session persists across server restarts
CloudeCode/
├── src/
│   ├── main.py                      # FastAPI app entry
│   ├── config.py                    # Environment config
│   ├── models.py                    # Pydantic models
│   ├── core/                        # Business logic
│   │   ├── session_manager.py       # PTY session management
│   │   ├── log_monitor.py           # Pattern detection
│   │   ├── tunnel_manager.py        # Quick tunnels
│   │   ├── named_tunnel_manager.py  # Named tunnels
│   │   ├── hybrid_tunnel_manager.py # Tunnel strategy
│   │   ├── auto_tunnel.py           # Auto-tunnel orchestration
│   │   └── cloudflare_api.py        # Cloudflare DNS API
│   ├── api/                         # API layer
│   │   ├── routes.py                # REST endpoints
│   │   ├── websocket.py             # WebSocket handlers
│   │   └── auth.py                  # TOTP/JWT auth
│   └── utils/                       # Utilities
│       ├── pty_session.py           # PTY process wrapper
│       ├── patterns.py              # Regex pattern matcher
│       └── template_manager.py      # Project templates
├── client/                          # Frontend
│   ├── index.html                   # Single-page app
│   ├── css/styles.css               # Terminal aesthetic
│   └── js/
│       ├── api.js                   # API client
│       ├── auth.js                  # Auth module
│       ├── launchpad.js             # Project launcher
│       ├── terminal.js              # xterm.js integration
│       ├── dpad.js                  # Mobile controls
│       └── slash-commands.js        # Slash commands modal
├── .env.example                     # Environment template
├── .env                             # Secrets (TOTP, JWT) - gitignored
├── config.json                      # Configuration (projects, templates, etc.)
├── config.example.json              # Config template
├── requirements.txt                 # Python deps
├── setup.sh                         # Dependency checker
├── setup_auth.py                    # TOTP setup script
├── start.sh                         # Start server script
├── stop.sh                          # Stop server script
├── reset.sh                         # Restart server script
└── README.md                        # This file
Get TOTP Config:
GET /api/v1/auth/totp/configVerify TOTP:
POST /api/v1/auth/totp/verify
{"token": "123456"}
Returns JWT token.
Create Session:
POST /api/v1/sessions
{
  "working_directory": "~/my-project",
  "auto_start_claude": true
}
Get Session Info:
GET /api/v1/sessionsDestroy Session:
DELETE /api/v1/sessionsList Projects:
GET /api/v1/projectsCreate Project:
POST /api/v1/projects
{
  "name": "my-app",
  "path": "~/projects/my-app",
  "description": "My new project"
}
Delete Project:
DELETE /api/v1/projects/{name}List Active Tunnels:
GET /api/v1/tunnelsCreate Manual Tunnel:
POST /api/v1/tunnels
{"port": 3000}
Destroy Tunnel:
DELETE /api/v1/tunnels/{port}Connect to Terminal:
ws://localhost:8000/ws/terminal?token=YOUR_JWT_TOKEN
Receive messages:
- Terminal output:
{"type": "output", "data": "base64_encoded_data"} - Tunnel created:
{"type": "tunnel_created", "tunnel": {...}} - Keepalive:
{"type": "ping"}
Send messages:
- Terminal input:
{"type": "input", "data": "command text"} - Resize:
{"type": "resize", "cols": 80, "rows": 24} - Pong:
{"type": "pong"}
- Symptom: TOTP code rejected
- Fix: Run
python3 setup_auth.pyagain and re-scan QR code. Check system clock is synced (TOTP is time-based).
- Symptom: Dev servers start but no tunnel URL appears
- Check:
which cloudflaredreturns a pathAUTO_CREATE_TUNNELS=truein.env- Look for "Tunnel created" in terminal output
- Test manually:
cloudflared tunnel --url http://localhost:3000
- Symptom:
http://YOUR_IP:8000times out - Check:
- Phone on same WiFi network
- Mac firewall allows port 8000: System Preferences → Security → Firewall
- Find Mac IP:
ifconfig | grep inet(look for 192.168.x.x) - Try
http://localhost:8000/healthon Mac first
- Symptom: Session created but Claude doesn't launch
- Check:
which claudeorls ~/.claude/local/claudeworks- Claude CLI is authenticated:
claude --help - Check session logs via WebSocket or API
- Manual test: Run
claude --dangerously-skip-permissionsin terminal
- Symptom: Can't reconnect to session after Mac restart
- Cause: PTY processes don't survive reboots
- Fix: Create new session (old session auto-cleaned on server start)
- Symptom: Tunnel works but DNS records not created
- Check:
CLOUDFLARE_API_TOKENhasZone.DNS:EditpermissionCLOUDFLARE_ZONE_IDmatches your domain's Zone ID- Check API logs in terminal output
- Manual test: Use Cloudflare dashboard to create a test DNS record
# Activate virtual environment
source venv/bin/activate

# Run all tests
pytest tests/ -v

# Run specific test file
pytest tests/test_session_manager.py -vPull requests welcome. For major changes, open an issue first.
Development setup:
- Fork the repo
- Create feature branch (
git checkout -b feature/amazing-feature) - Make changes and test
- Commit (
git commit -m 'Add amazing feature') - Push (
git push origin feature/amazing-feature) - Open Pull Request
MIT
Built for developers who want to code from anywhere. No more being chained to your desk.