This repository contains the minimal example code for running an Edge Impulse designed neural network on an ESP32 dev kit using PlatformIO.
The project takes an existing Edge impulse Arduino standalone example, and adds the PlatformIO metadata required to compile it outside of the Arduino IDE. If you'd like to run this code on your ESP32 device within the Arduino IDE instead of PlatformIO, check out our existing guide on the topic
- You have an ESP32 dev kit
- You've created an Edge Impulse account, and followed one of the getting started tutorials to understand the platform, and train a machine learning model:
- You've set up PlatfomIO - the IDE, CLI, or vscode extension all work equally well here
The Edge Impulse standalone examples show the minimum amount of code required to run any machine learning model trained in Edge Impulse on a given platform, with no other dependencies like sensor drivers.
This means that rather than run the model on live sensor data, this example will test that a static input buffer of arbitrary sensor data performs identically between the Edge Impulse Studio and the end device. After implementing this, definitely check out Next Steps for some examples of providing live sensor data as input to the Impulse.
Head over to your Edge Impulse project (created in one of the tutorials linked above), and go to Deployment. From here you can create the full library which contains the impulse and all external required libraries. Select Arduino library and click Build to create the library. Then download the .zip file, and place it in the ./lib/ directory of this repository.
If you don't have an Edge Impulse project to test, you can use the .zip file library included in ./lib/. This is a pre-trained model that implements basic person detection. IE: is a person currently visible in an image.
Open the platformio.ini file in the root directory of this repository, and replace line 16 to point to your newly downloaded .zip file library:
15 lib_deps =
16 	./lib/edge-impulse-library.zip # change this line to the name of your edge-impulse library
Next, open src/main.cpp and on line 28, change the top level edge-impulse library header file to match the name of your Edge Impulse project:
25 // Modify the following line according to your project name
26 // Do not forget to update the platformio.ini file to point to the exported
27 // Edge Impulse Arduino library zip file
28 #include <Person_Detection_Classification__inferencing.h>
If you aren't sure what the header name for your project would be, peek inside the .zip file library and copy the name of the single header file in the root directory.
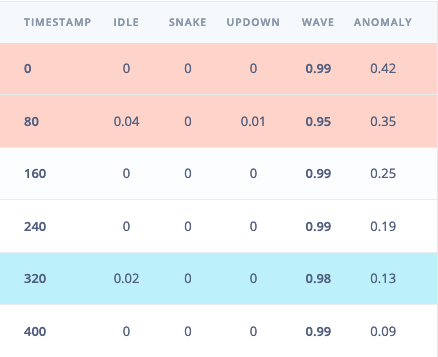
With the project ready it's time to verify that the application works. Head back to the Edge Impulse Studio and click on Live classification. Then load a validation sample, and click on a row under 'Detailed result'.
To verify that the local application classifies the same, we need the raw features for this timestamp. To do so click on the 'Copy to clipboard' button next to 'Raw features'. This will copy the raw values from this validation file, before any signal processing or inferencing happened.
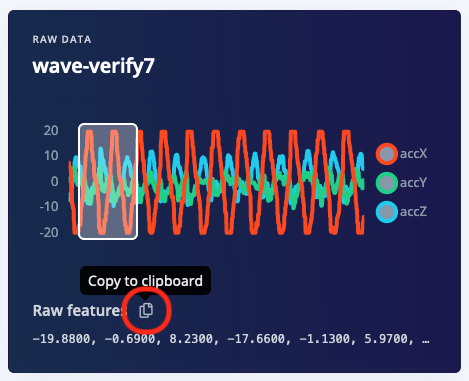
In main.cpp paste the raw features inside the static const float features[] definition, for example:
static const float features[] = {
    -19.8800, -0.6900, 8.2300, -17.6600, -1.1300, 5.9700, ...
};
Finally, build your example to check that everything compiles correctly. If you installed the PlatformIO command line, this is done via:
platformio run --environment esp32dev
All that is left is to test out the project. We want to use the 'Upload & Monitor' command in PlatformIO to see the serial output after we program the ESP32
From the CLI:
platformio run --target upload --target monitor --environment esp32dev
You may need to press the BOOT button on the ESP32 kit when you are prompted with
Connecting........_
to get the board to program. After the board is finished programming, the code will run the signal processing pipeline, and then classify the output:
Edge Impulse standalone inferencing (Arduino)
Running neural network...
Predictions (time: 0 ms.):
idle:   0.015319
snake:  0.000444
updown: 0.006182
wave:   0.978056
Anomaly score (time: 0 ms.): 0.133557
run_classifier_returned: 0
[0.01532, 0.00044, 0.00618, 0.97806, 0.134]
Check that this matches the values in the Live Classification tab in the Edge Impulse Studio.
You now have your impulse running on your ESP32 dev kit! but we don't have any connected sensors yet. From here, check out our existing ESP32 sensor integration examples:
As well as a sensor-generic demonstration on plugging values into the classifier within the arduino framework: