
- This is the project developed as part of the AWS course. The project is a simple Travel Guide application that gives information about various travel destinations.
- It utilizes various AWS services under free-tier limits, making it beginner-friendly.
- We faced a lot of challenges during development and deployment, so we've documented everything in detail to help others who might run into similar issues.
- Also, there are two versions of this project, it will be described in detail below.
- Project Details
- Steps to run
- To make changes
- Steps to deploy
- Important Instructions
- Cleanup
- Contributions
- License
- Contact
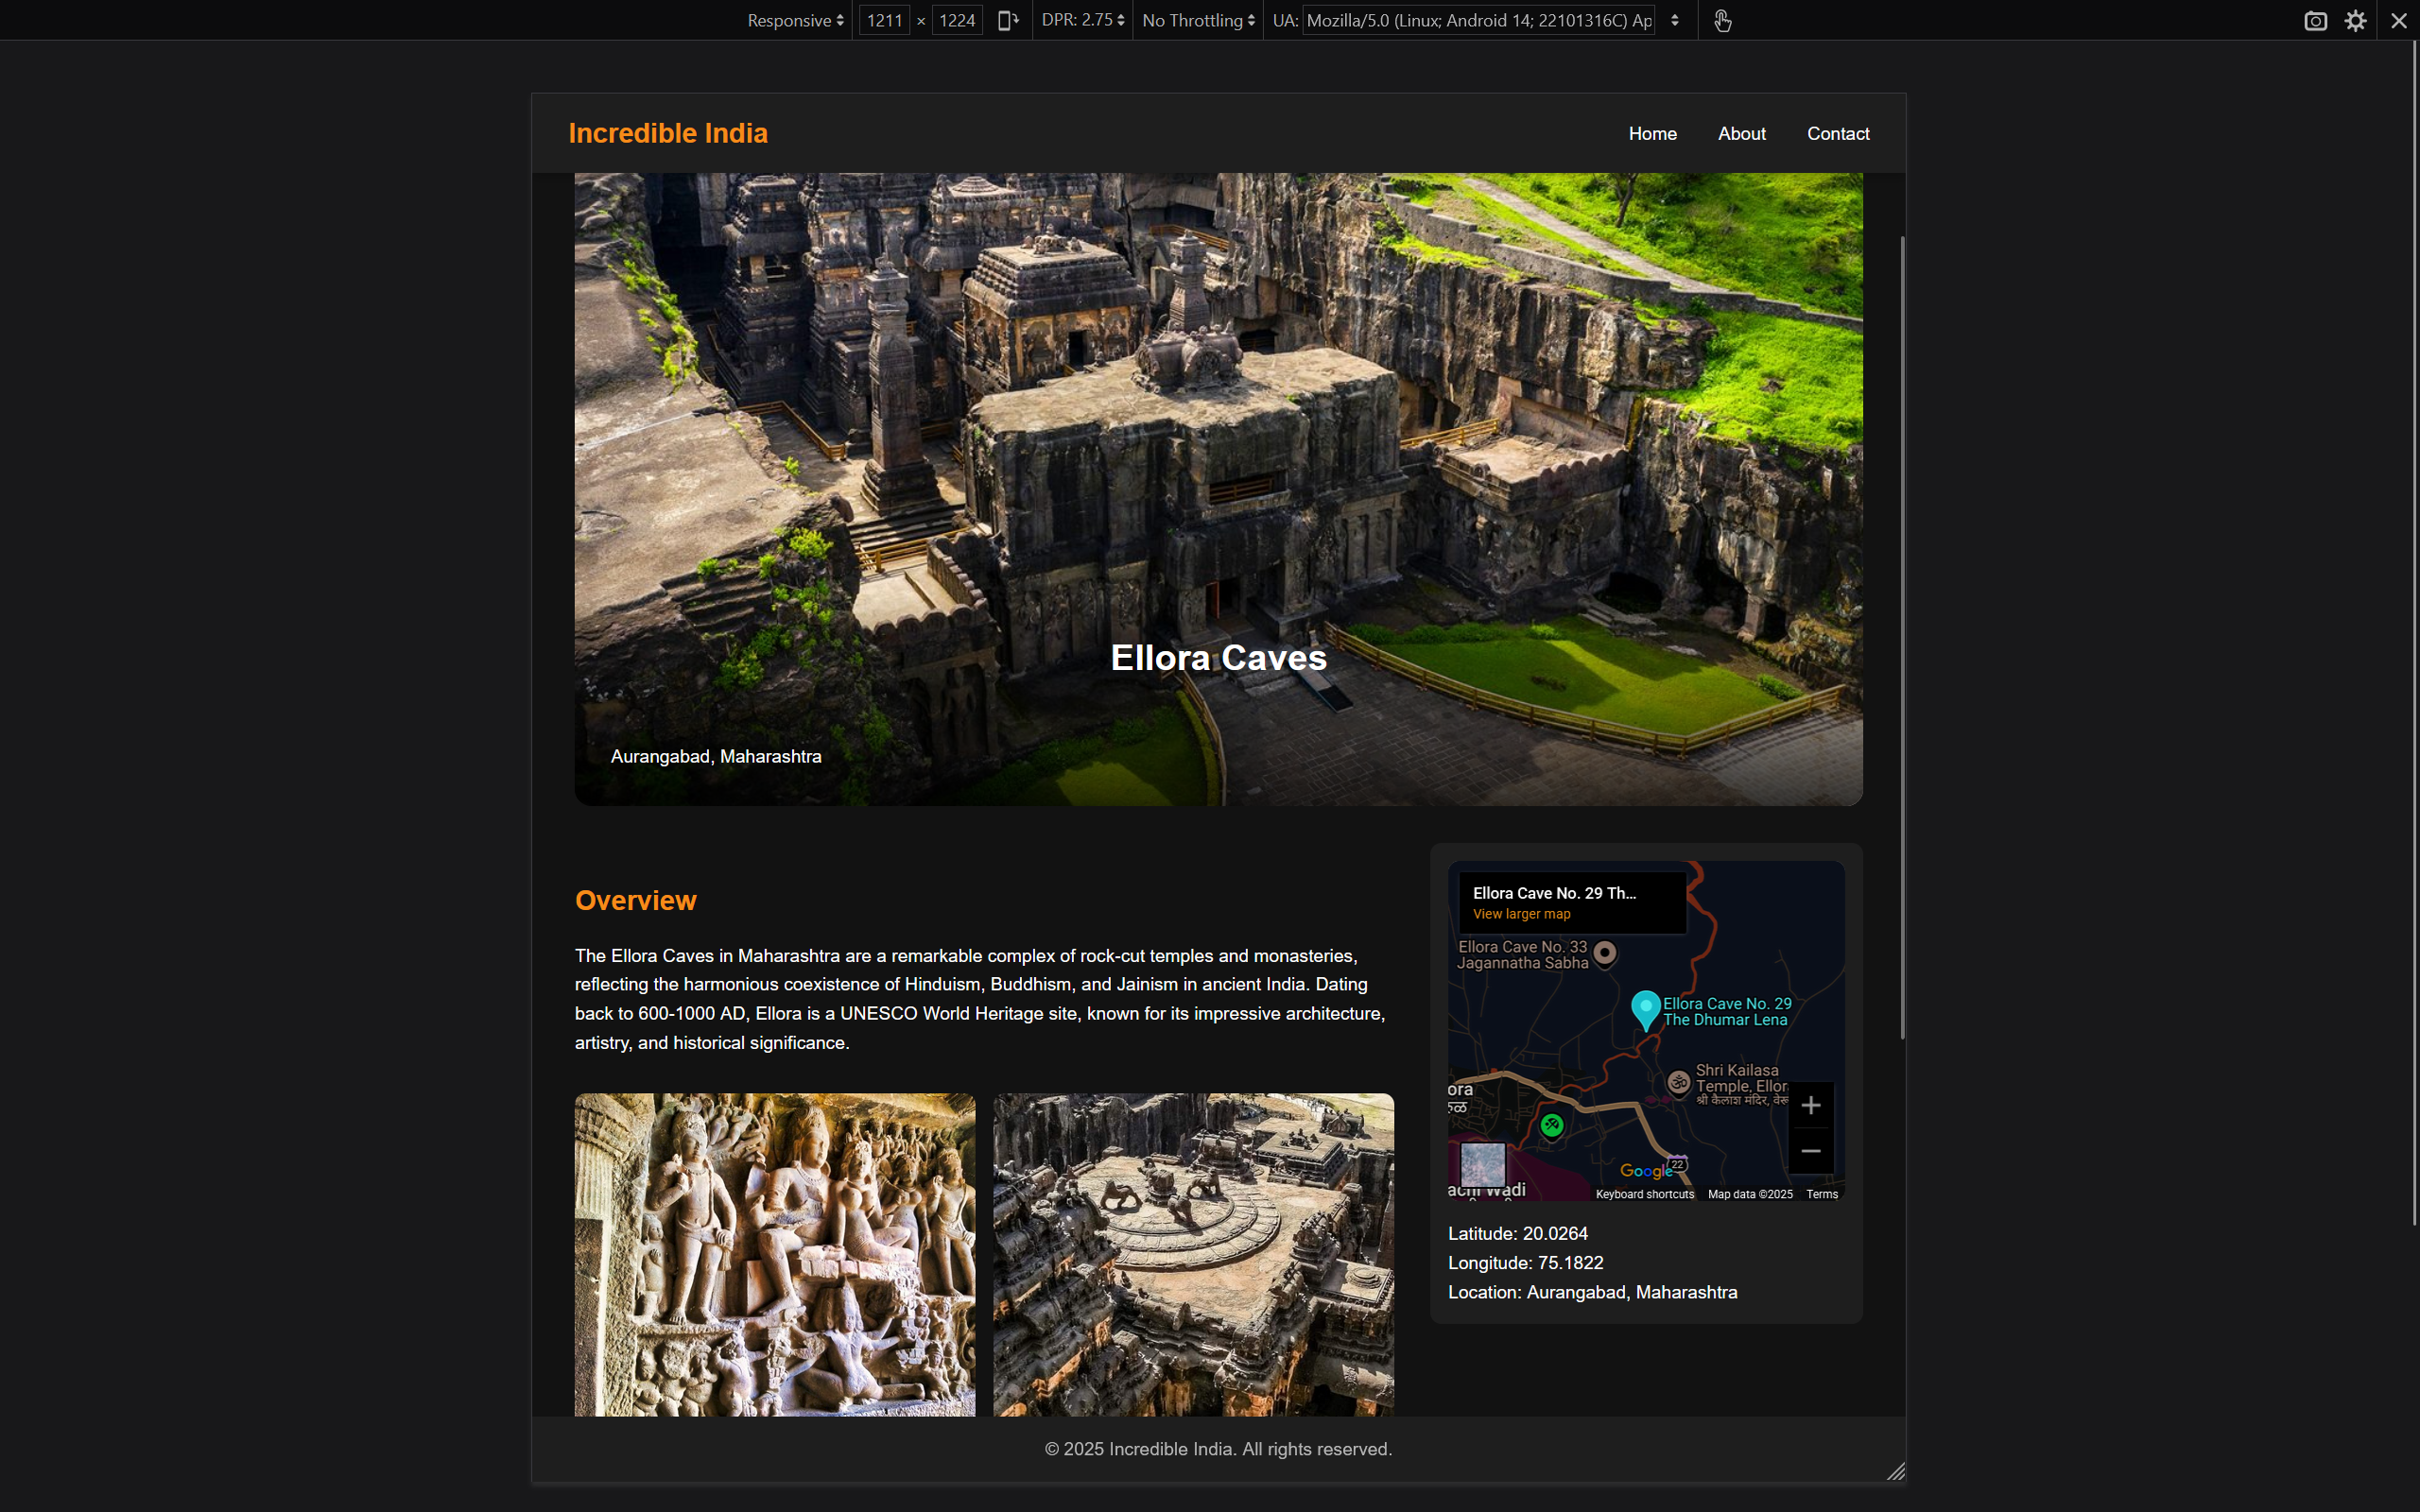
- Build a simple Travel Guide app that provides destination info using AWS services.
- Demonstrate how to easily deploy a project using common AWS components.
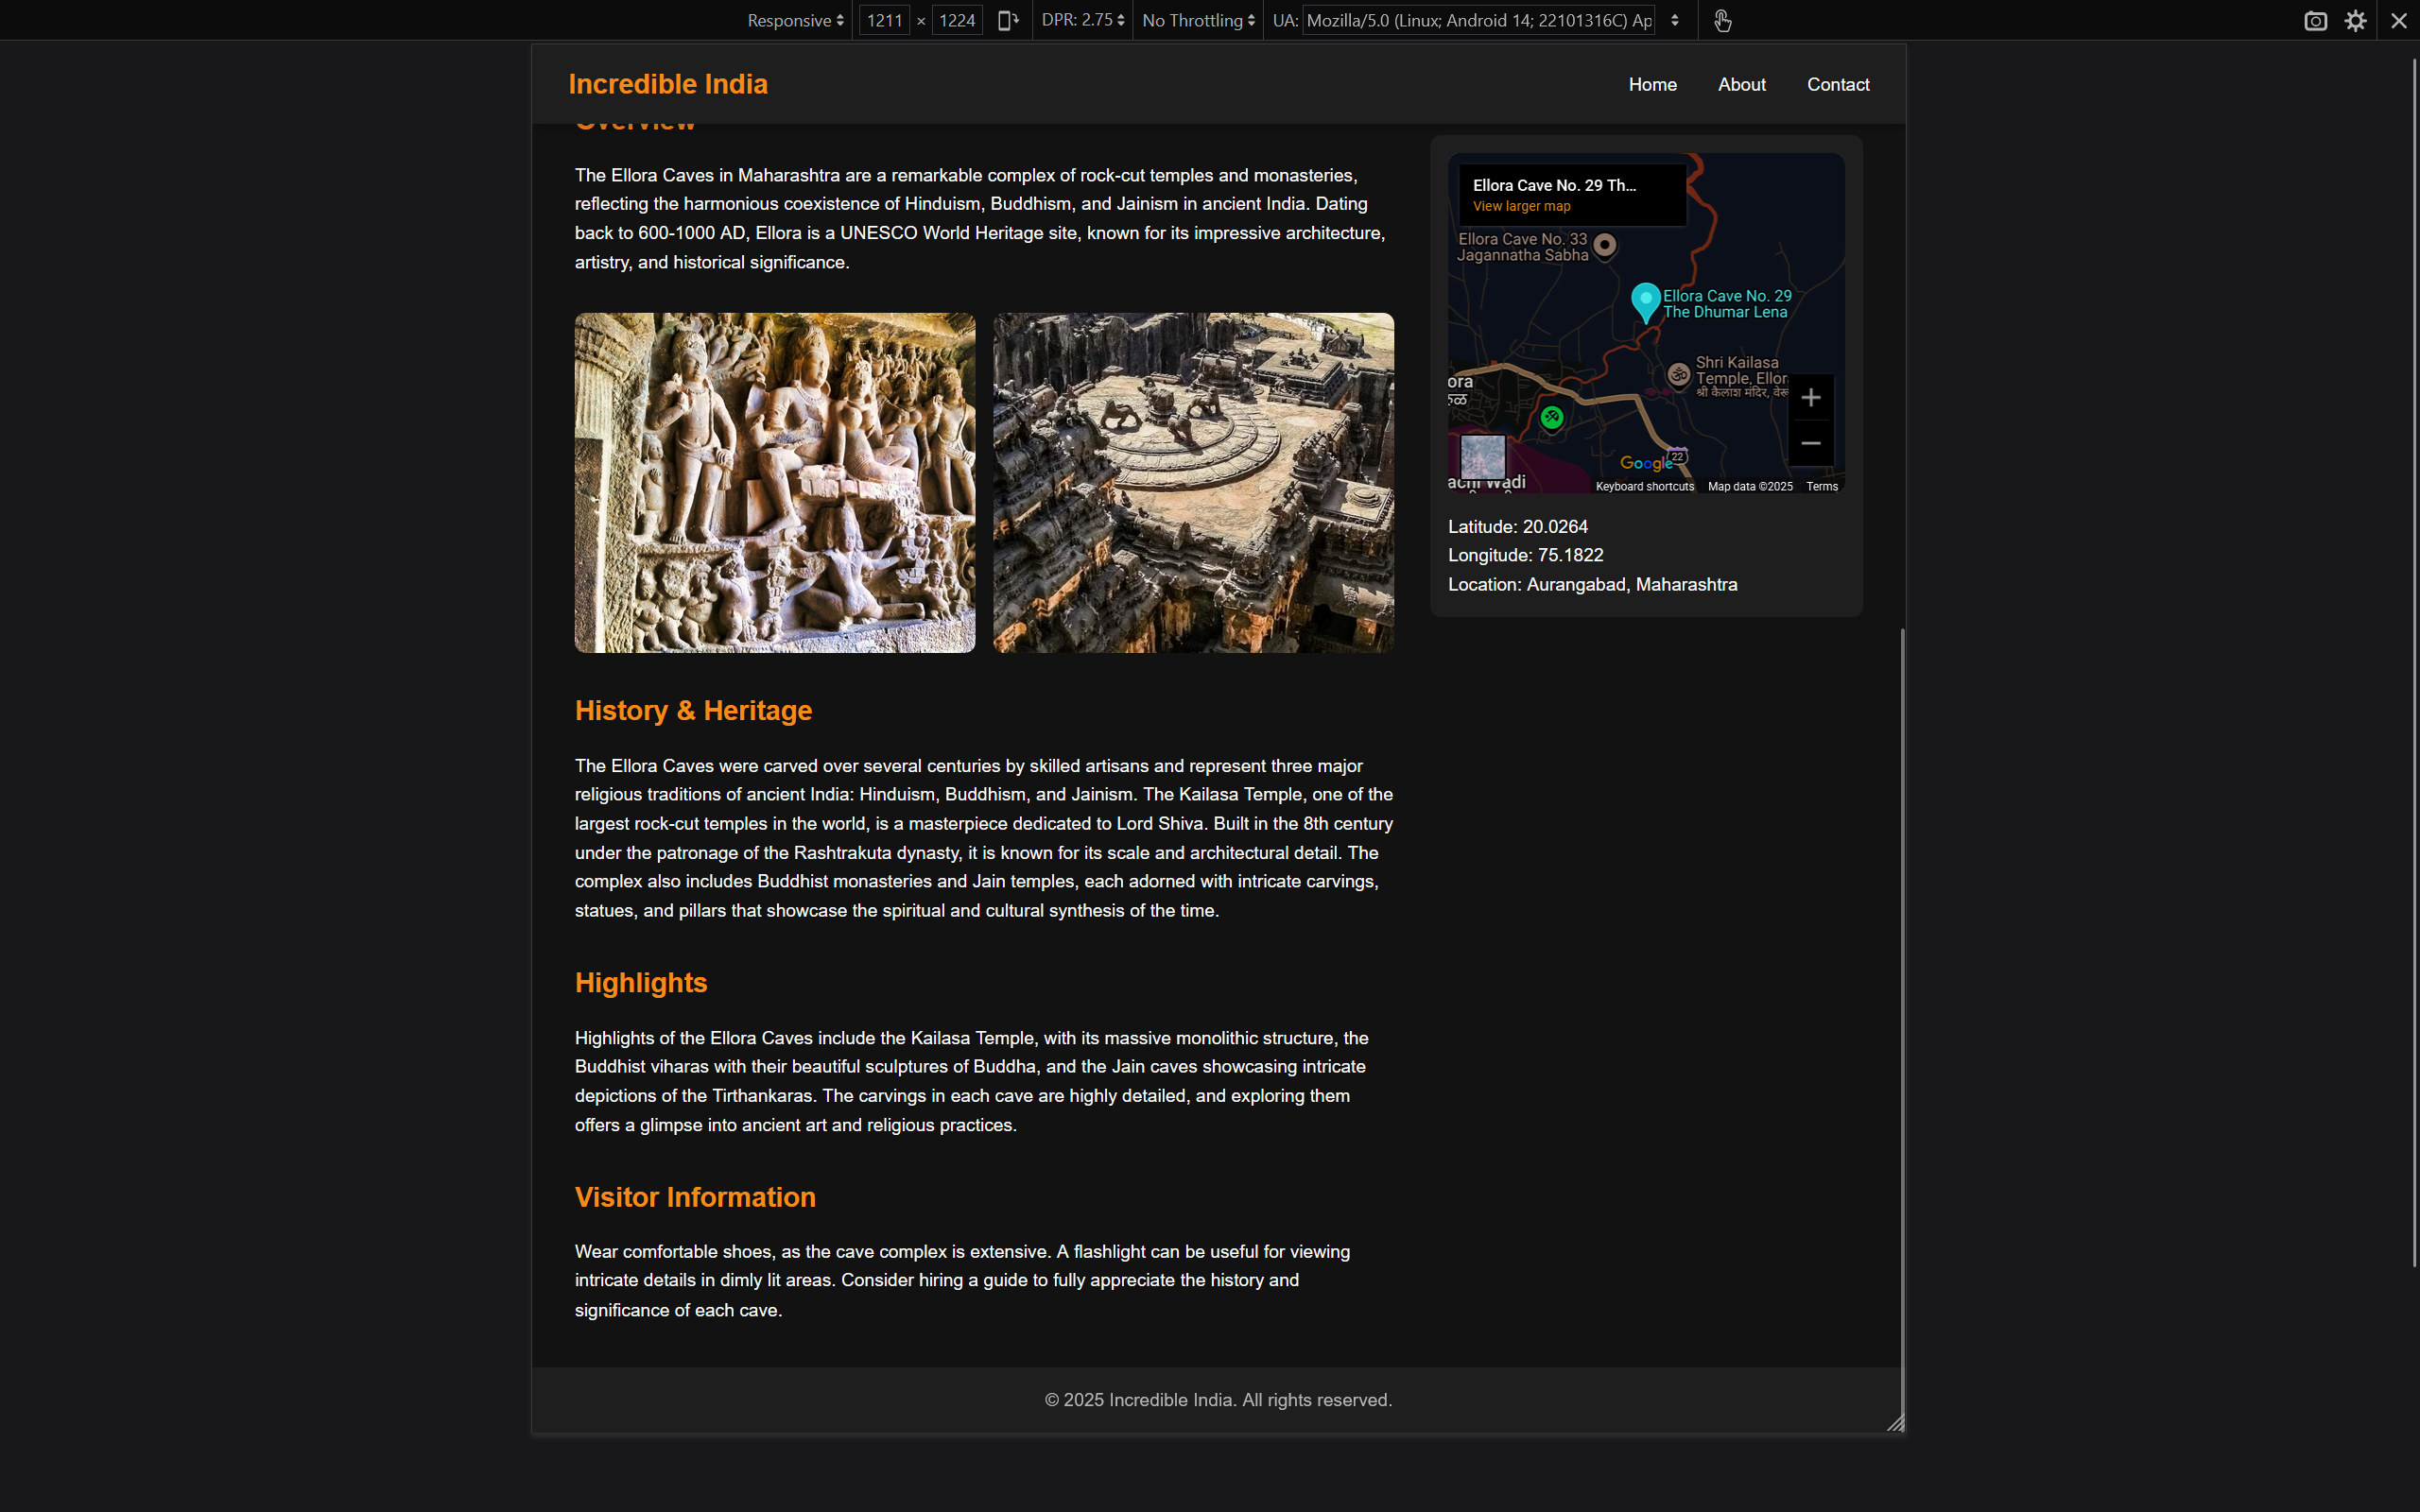
- Responsive web UI that works well on different screen sizes.
- Dynamic page rendering with data pulled from a database.
- Clean, user-friendly interface using just HTML, CSS, and JavaScript.
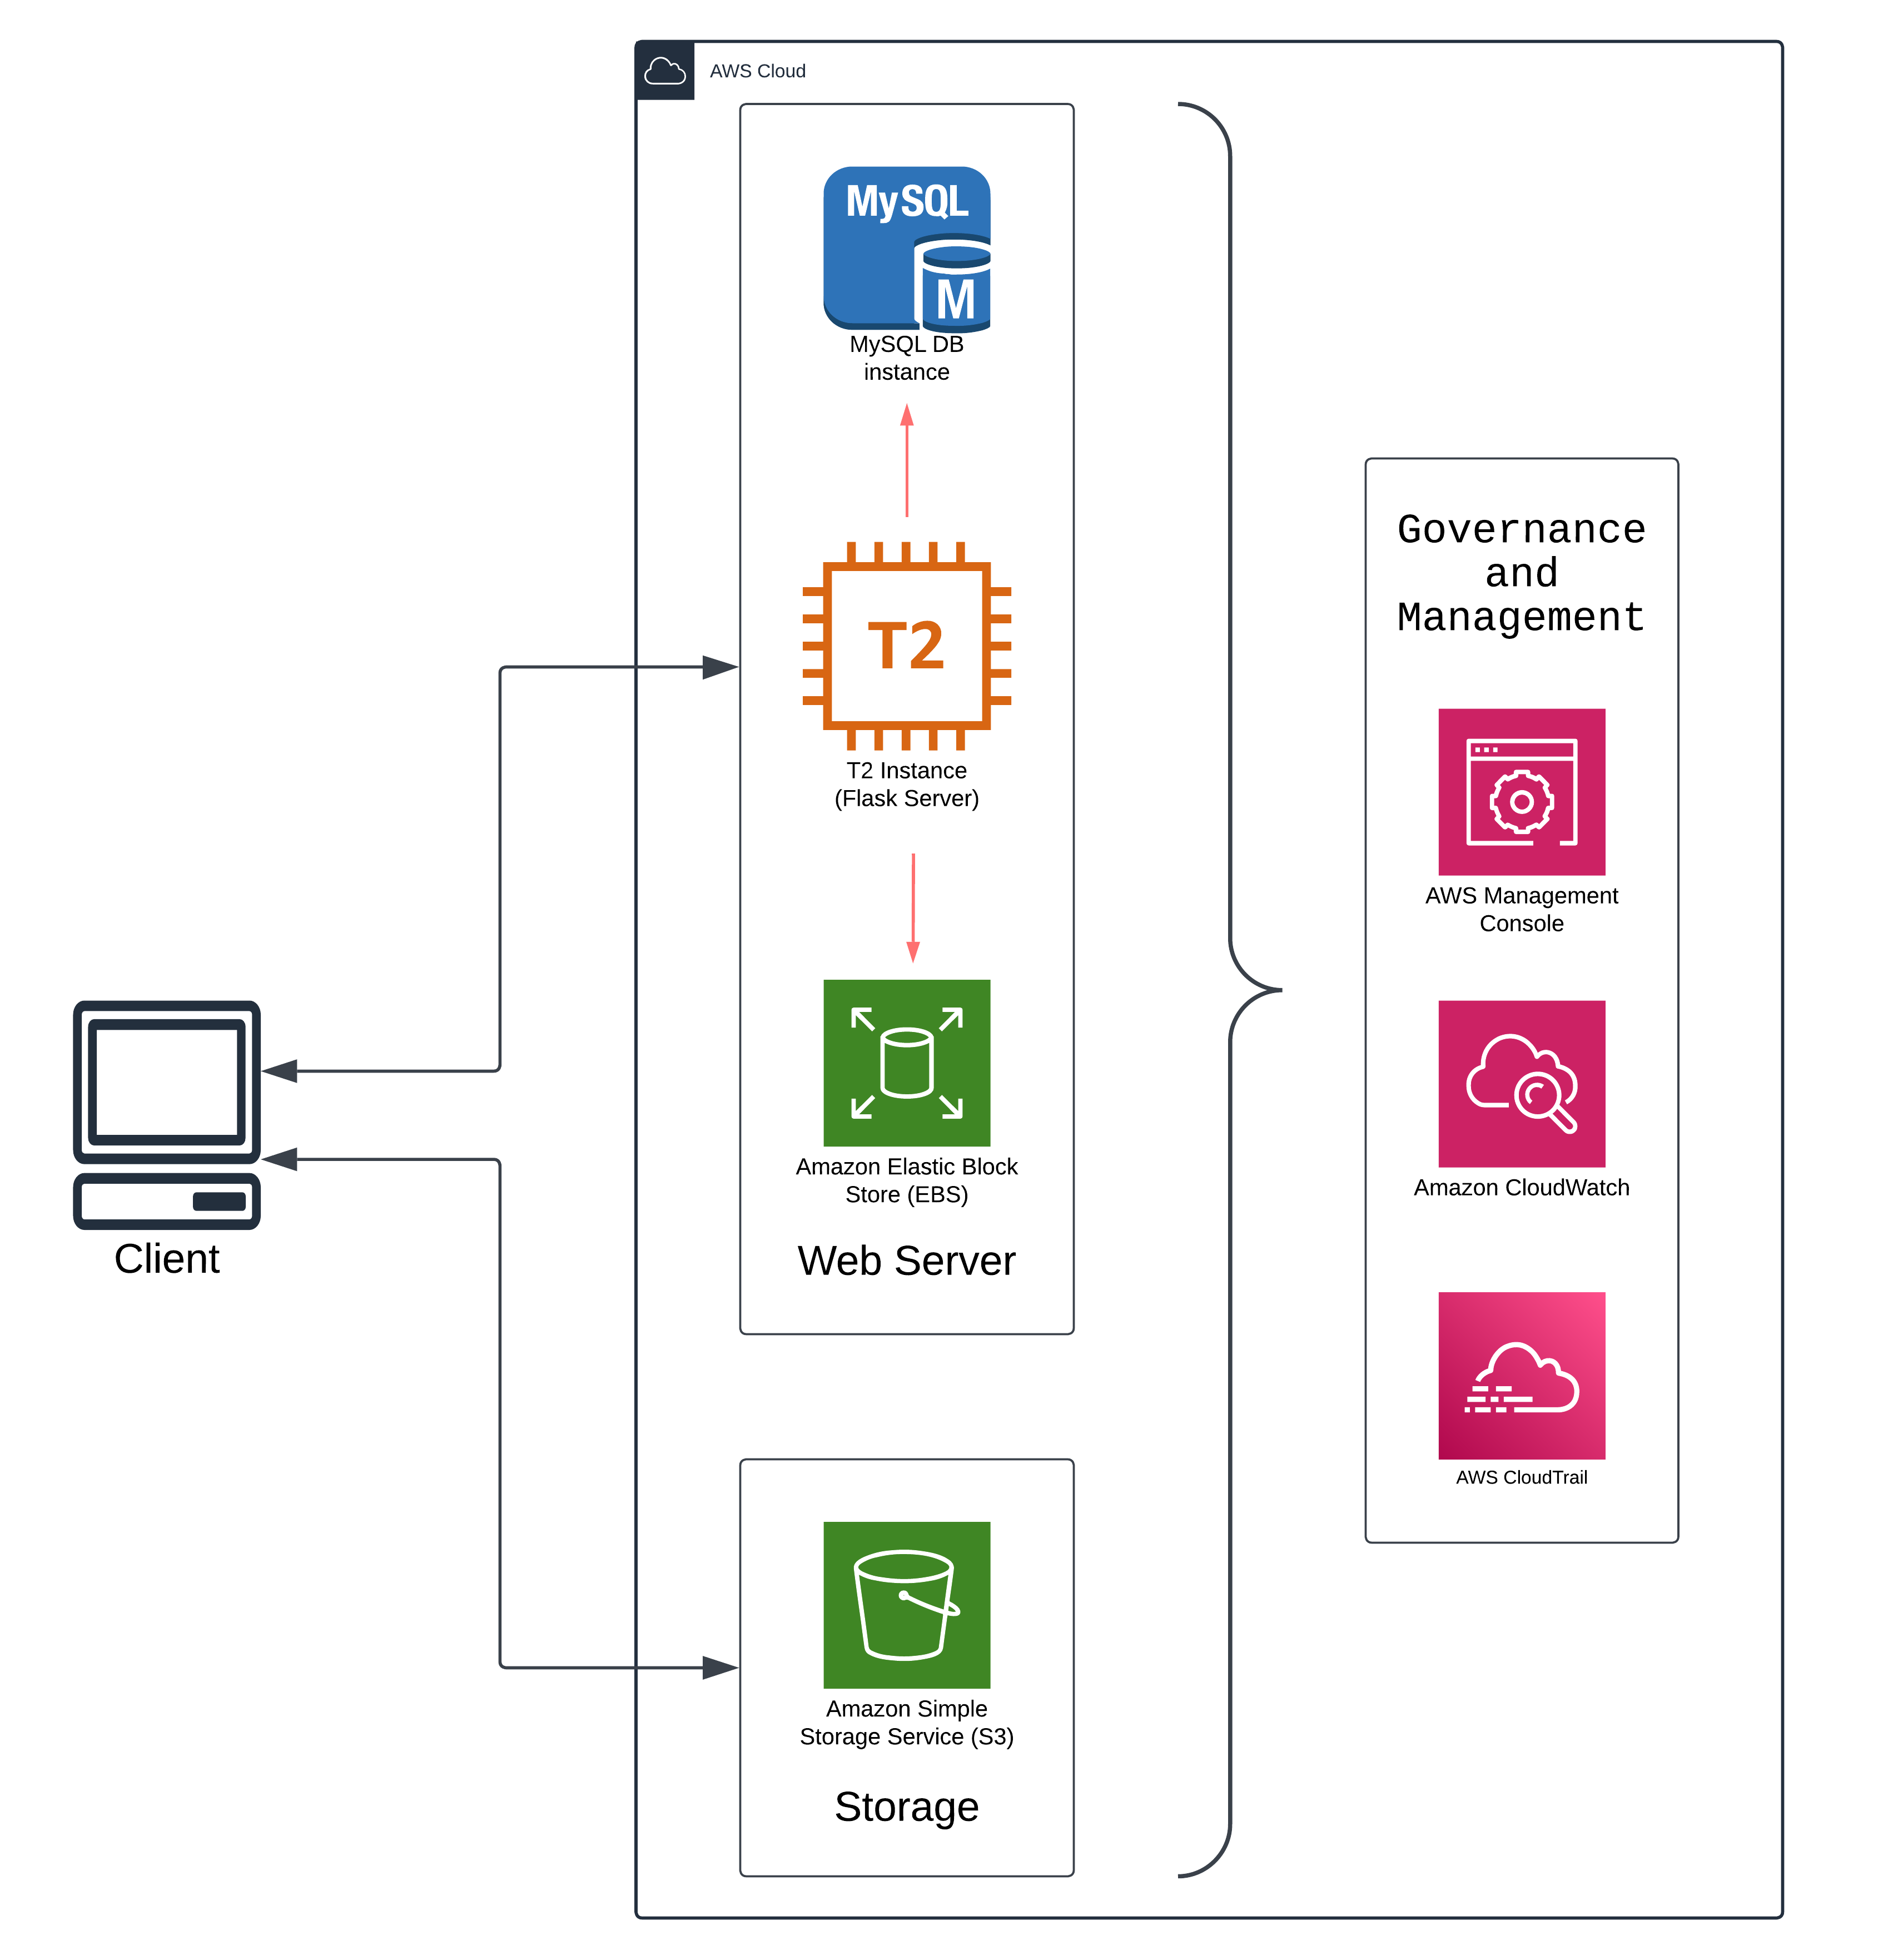
- Option to use either S3 or EBS for storing image assets.

- The project is not meant for real-world use or as an impactful solution. Its main purpose is to demonstrate how different AWS services can be used together in a beginner-friendly setup.
- So, following strict best practices or writing production-ready code wasn't the main focus.
| 🖼️ | Tech | Purpose |
|---|---|---|
| HTML/CSS/JS | Pretty obvious beginner-friendly web technologies for building the frontend. | |
 |
Flask | A lightweight Python web framework to serve the web application. |
| SQLite-3 | A simple file based database for storing travel destination data. | |
| AWS Services | ||
| AWS EC2 | For hosting the web application. | |
| AWS EBS | For persistent instance storage. | |
| AWS S3 | For hosting the static website assets. | |
| (Optional) You can add these services easily | ||
| AWS IAM | For managing access to AWS services with roles and policies. | |
| AWS CloudWatch | For monitoring instance performance and logs. | |
| AWS Budgets | For setting up cost and usage budgets to avoid unexpected charges. | |
| AWS CloudTrail | For tracking user activity and API usage. | |
-
There’s a more advanced version of this project that includes additional AWS services:
Service Description AWS RDS Replaces SQLite with a managed database. AWS Translate Translates destination descriptions to multiple languages. AWS Cognito Adds user authentication (register/login). AWS SNS Sends OTPs and notifications to users. AWS Bedrock Will be added later for AI features. -
You can check that version of the project:
To run the project locally on your device first, follow these steps:
-
Create fork of the repository:
- Click on the
Forkbutton at the top right corner of this page to create a copy of the repository in your GitHub account. - This will also help to easily deploy the project on AWS later.
- Now, you have your own copy of the project repository in your GitHub account.
- Click on the
-
Clone the repository from your GitHub account:
# Replace the <your-username> with your GitHub username
git clone https://github.com/<your-username>/aws_beginner_project
cd aws_beginner_project
-
Create a virtual environment (recommended):
python -m venv venv
-
Activate the virtual environment:
# Linux:
source venv/bin/activate
# Windows:
venv\Scripts\activate
-
Install the required packages:
pip install -r requirements.txt
After this, all the dependencies will be installed in your virtual environment.
-
Create the SQLite database:
python sq_db_entries.py
This will run the script to create the SQLite database file
lite.dband fill it with some initial data. -
Run the Flask application:
python app.py
-
Now, server is live and project can be accessed at
http://localhost:5000/in your browser.
- To make changes in UI, html files in templates/ and, scripts and styles in static/ directories can be modified.
- The script
sq_db.pyis used to create the SQLite database file. It provides all the necessary functions to insert the new data into the database. - To update the locations, you can modify data in
sq_db_entries.pyfile. This file is used to create the initial database entries and can be modified to add or update or remove locations. - Make sure that file names and corresponding data in the database are consistent, so that the images can be loaded correctly.
Caution
Avoid doing anything un-necessary in the AWS console, unless you know what you are doing.
It can lead to unexpected charges on your AWS account.
Don't forget to stop or terminate the resources after you are done with the project.
More details are here in Important Instructions and Cleanup sections.
- Assuming that you have already created a fork of the repository and cloned it to your local machine.
- If you have made any changes to the code, make sure to commit and push those changes to GitHub (to your own version of the project):
# make sure you are in the project directory `aws_beginner_project`
git add .
git commit -m "Update project files"
git push origin main
- After you make any new changes, make sure to
add > commit > pushthem to your GitHub repository. - If you get any errors or issues, ChatGPT is always a good friend to help you out 😅.
Tip
AWS resources can be used across various regions.
Make sure that you always select the same region for all the resources you create, to avoid any issues later. (Regions are visible in the top right corner of the AWS console.)
Default region is us-east-1, so you can use that for all the resources.
-
In the project code files, static assets are served from the EC2 instance itself.
-
Optionally, you can use S3 to serve the static assets.
-
Make the below mentioned changes first:
- Uncomment the S3 bucket code in the
static/script.jsandtemplates/place_detail.html. - Fill in the S3 URL in the
app.py. - Commit new changes to github.
- Uncomment the S3 bucket code in the
-
Now, you can follow these steps to create S3 bucket and upload the static assets with public access:
- Go to the AWS Console and log in to your AWS account.
- Navigate to the S3 service. (You can search for "S3" in the search bar.)
- Click on "Create bucket".
- Name you bucket something like
travel-guide-project(or any unique name) - Keeping other settings to their defaults, scroll down to Block Public Access settings for this bucket section and uncheck the Block all public access option. Acknowledge the warning and click on Create bucket button.
- If name is already taken, you can try with a different name.
-
Add
Bucket Policyto allow public access to the bucket:- Click on the bucket name you just created.
- Go to the Permissions tab.
- Scroll down to the Bucket policy section and click on Edit.
- Add the following policy, replacing
travel-guide-projectwith your actual bucket name:{ "Version": "2012-10-17", "Statement": [ { "Sid": "PublicReadGetObject", "Effect": "Allow", "Principal": "*", "Action": "s3:GetObject", "Resource": "arn:aws:s3:::travel-guide-project/*" } ] } - Click on Save changes.
-
Test the bucket:
- Go to the bucket you just created.
- Click on the Upload button and upload some test image file to the bucket.
- Once uploaded, click on the file name to view its details.
- On the page, you will see the Object URL. This is the public URL of the file you just uploaded.
- Try checking file url on another browser or in incognito mode. It should be accessible publicly.
-
Now, you can add all the assets from static/images directory to the S3 bucket using same file upload method.
- To serve our application, we need a compute instance that can run the Flask application.
- But, before setting up the EC2 instance, we need to create a security group that allows incoming traffic on port 5000 (or any other port you want to use).
- Follow these steps to create a security group:
- Go to the AWS Console and log in to your AWS account.
- Navigate to the EC2 service. (You can search for "EC2" in the search bar.)
- In the left sidebar, click on Security Groups under Network & Security.
- Click on the Create security group button.
- Name your security group something like
travel-guide-sg. - Add a description like
Security group for travel guide application. - Under Inbound rules, click on Add rule.
- Type: Custom TCP Rule
- Protocol: TCP
- Port Range: 5000
- Source: Anywhere-IPv4
- Click on Create security group button to create the security group.
- Now, you have a security group that allows incoming traffic on port 5000 from anywhere (IPv4).
- You can also add rules for IPv6 if you want to allow traffic from IPv6 addresses as well.
- Also, you can add rules for SSH (port 22) if you want to access the instance via SSH later.
- Now, we can set up an EC2 instance to run our Flask application.
- Follow these steps to create an EC2 instance:
- Go to the AWS Console and log in to your AWS account.
- Navigate to the EC2 service. (You can search for "EC2" in the search bar.)
- Click on the Launch Instance button.
- Then, under various sections as shown below, configure the instance settings as per your requirements (else, default settings are fine for this project):
- Names and tags:
- Enter some name for the instance, like
travel-guide-server.
- Enter some name for the instance, like
- Application and OS Images (Amazon Machine Image):
- Select Amazon Linux image with aws logo.
- Instance Type:
- Select t2.micro (this is free-tier eligible).
- Do not select any other instance type, as it may incur charges.
- Key Pair (login):
- Create a new key pair, with default settings.
- Name it something like
travel-guide-key. - Once created, it will be automatically downloaded.
- In this version of the project, we will not use it, but keep it saved in order to access the instance later if needed via SSH.
- Network Settings:
- Under firewall settings, you will see the security group section.
- Click on Select an existing security group and select the security group you created earlier (
travel-guide-sg). - Make sure to allow incoming traffic on port 5000.
- You can also add rules for SSH (port 22) if you want to access the instance via SSH later.
- Configure Storage:
- You can leave the default settings as they are.
- Click on Launch Instances button to launch the instance.
- After the instance is launched, you can see the success message with the instance ID (i-xxxxxx).
- Now the instance can be checked in the Instances section in the left sidebar of the EC2 service page.
Finally, we can deploy the Flask application on the EC2 instance.
-
Connect to the EC2 instance:
- In the Instances section, select the instance you just created.
- Click on the Connect button at the top right corner and click Connect once again.
- If you see a ASCII bird art, it means you are connected to the instance.
- Run the following commands:
# Update the package manager
sudo yum update -y
# Install Python 3 and git
sudo yum install python3 git -y
-
Clone the project repository:
- Run the following command to clone the project repository:
git clone https://github.com/<your-username>/aws_beginner_project.git
cd aws_beginner_project
- If you want to use S3, make sure that updated code files are already pushed to your GitHub repository.
- Run the following command to clone the project repository:
-
Install the required packages in virtual environment:
python3 -m venv venv source venv/bin/activate pip install -r requirements.txt -
Create the SQLite database:
python sq_db_entries.py
-
Run the Flask application:
python app.py &
- Check
http://<your-ec2-public-ip>:5000in your browser to see the deployed application. - IP can be found in the Instances section of the EC2 service page.
- Don't worry if you get security warning, its only because we are using http instead of https.
- You can create self-signed certificate to use https, but its not necessary for this project.
- Keep instance running as long as you want to access the application.
- To delete the S3 bucket, go to the S3 service in the AWS console.
- First you need to clear all the objects in the bucket before deleting it.
- Click on the bucket name you created, then go to the Objects tab.
- Select all the objects in the bucket and press Delete button.
- Follow any extra steps on the screen to confirm deletion of objects.
- Now go back to the Buckets tab, select the bucket you want to delete, and click on the Delete button.
- Confirm the deletion by typing the bucket name when prompted.
- To delete the security group, go to the EC2 service in the AWS console.
- In the left sidebar, click on Security Groups under Network & Security.
- Select the security group you created for the project.
- Click on the Actions button and select Delete security group.
- To delete the EC2 instance, go to the EC2 service in the AWS console.
- In the left sidebar, click on Instances.
- Select the instance you created for the project.
- Click on the Actions button, then select Instance State > Terminate instance.
- Confirm the termination by clicking on the Terminate button in the dialog box.
- This will properly stop and delete the instance.
- EBS volumes are assigned to the EC2 instance when you created it.
- To delete the EBS volume, go to the EC2 service in the AWS console.
- In the left sidebar, click on Volumes under Elastic Block Store.
- Select the volume that was created for the instance.
- Click on the Actions button and select Delete volume.
-
Free-tier limits: Make sure to stay within the free-tier limits of AWS services to avoid unexpected charges.
-
Instance type: Use only
free-tier eligibleinstance types liket2.microto avoid charges. -
Stop vs Terminate EC2:
- Stop: Stopping the instance will not delete it, and you will still be charged for the EBS volume attached to it.
- Terminate: Terminating the instance will delete it and you will not be charged for the instance or the EBS volume.
-
Region:
- Make sure to select the same region for all AWS services to avoid any billing surprises.
- It is visible in the top right corner of the AWS console.
-
Billing alerts:
- Set up billing alerts in the AWS console to get notified if your usage exceeds the free-tier limits.
- You can do this by going to the Billing and Cost Management section in the AWS console and setting up a budget.

|

|
| Bhushan Songire | Ujjawal Kumar |
- If you want to contribute to this project, please feel free to fork the repository and create a pull request.
- Project is licensed under the GNU General Public License v3.0 (GPL-3.0).
- See the LICENSE file for details.
- You are allowed to use code with same license and proper attribution to the original author(s).
- Email : bhushanbsongire@gmail.com
- Email : Ujjawal