Between Layer Item Pinning
Note: This manual page and VTube Studio's UI uses the words "layer" and "ArtMesh" (technical Live2D term for model layers) interchangeably.
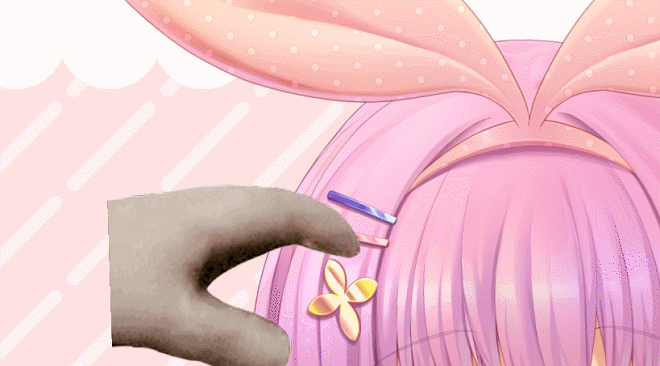
VTube Studio lets you put items in between the layers of your loaded main Live2D model. First, make sure you have a Live2D model loaded and load any item. This works with Live2D items or image items like PNGs or GIFs. Then, click and hold the item for 1 second.
This menu should appear:
Alternatively, open the "loaded items list" menu using this button and select your item:

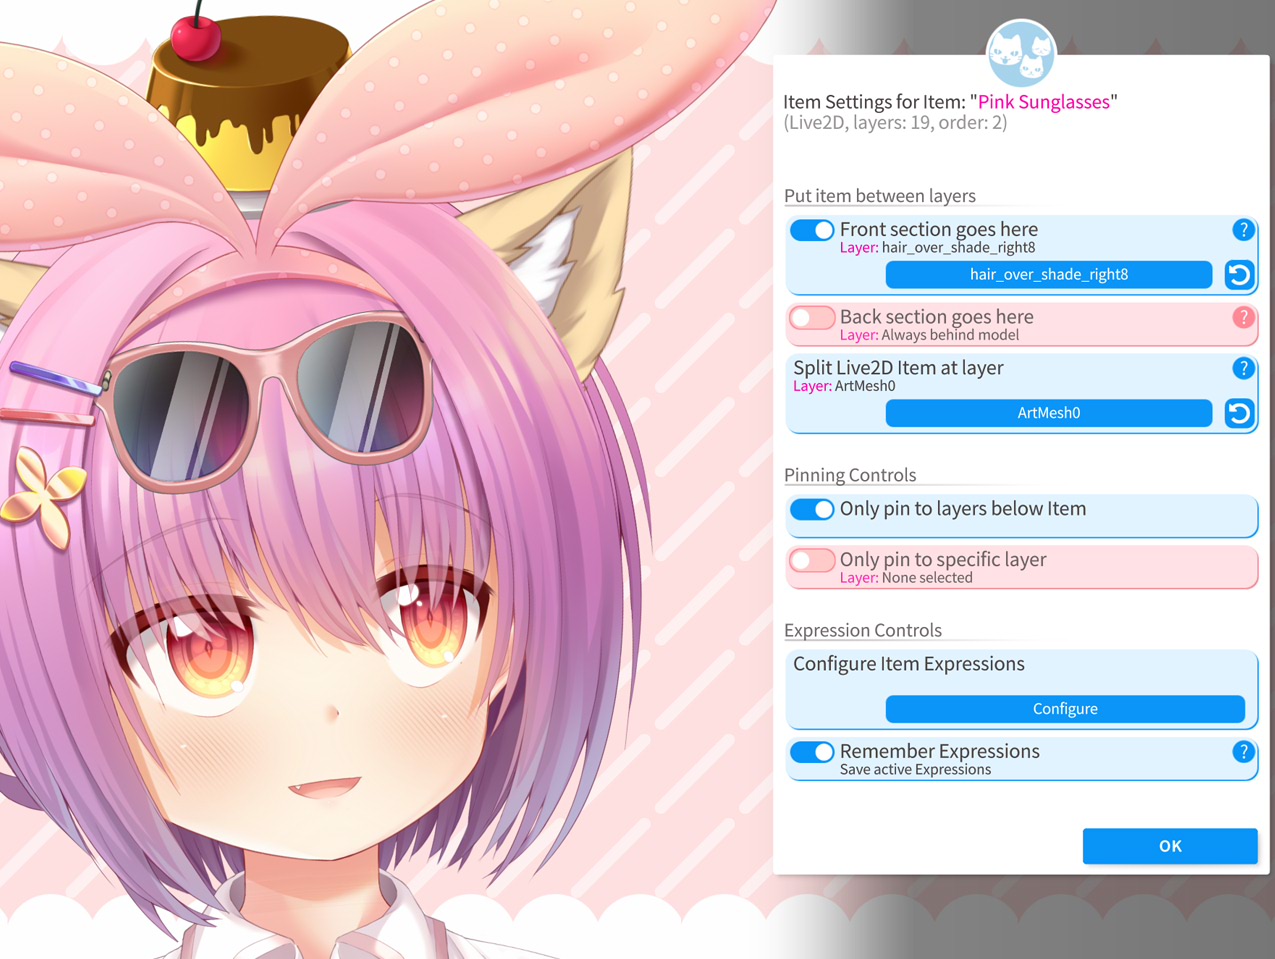
From this menu for your item, you can configure various options for it. To put the item between the model layers, turn on "Put item in model" and select the layer you want to put the item on. The item will be inserted above the selected layer. The actual "item order" of the item in relation to other items in the scene will be ignored when this is active.

Live2D model layers (ArtMeshes) can change orders over time. For example, a piece of hair can move to the front/back based on tracking or active animations/expressions. VTube Studio tracks these changes and accurately adjusts the item insertion point within the model based on ArtMesh order changes every frame.

Generally, items are put in between model layers based on the selected layer ID. However, there are also two special values you can select in the layer selector:
- Front: Always in front of model.
- Back: Always behind model.
If two items are put above the same model layer, their main order is used to determine which one is in front.
The item order within the model is determined using selected layer IDs (unless always in front/back of model is used).
As long as the loaded model has a layer with the selected ID, it will be sorted above that layer. If the model doesn't have a layer with that ID, the item will be sorted using its normal order and won't be put within the model. If you open the the item config, you'll see a warning shown next to the layer name.
This is also the behavior you'll see during VNet collabs when you pin items to other people and the items have "put item in model" active.
Live2D items can also be pinned between model layers, just like regular items.
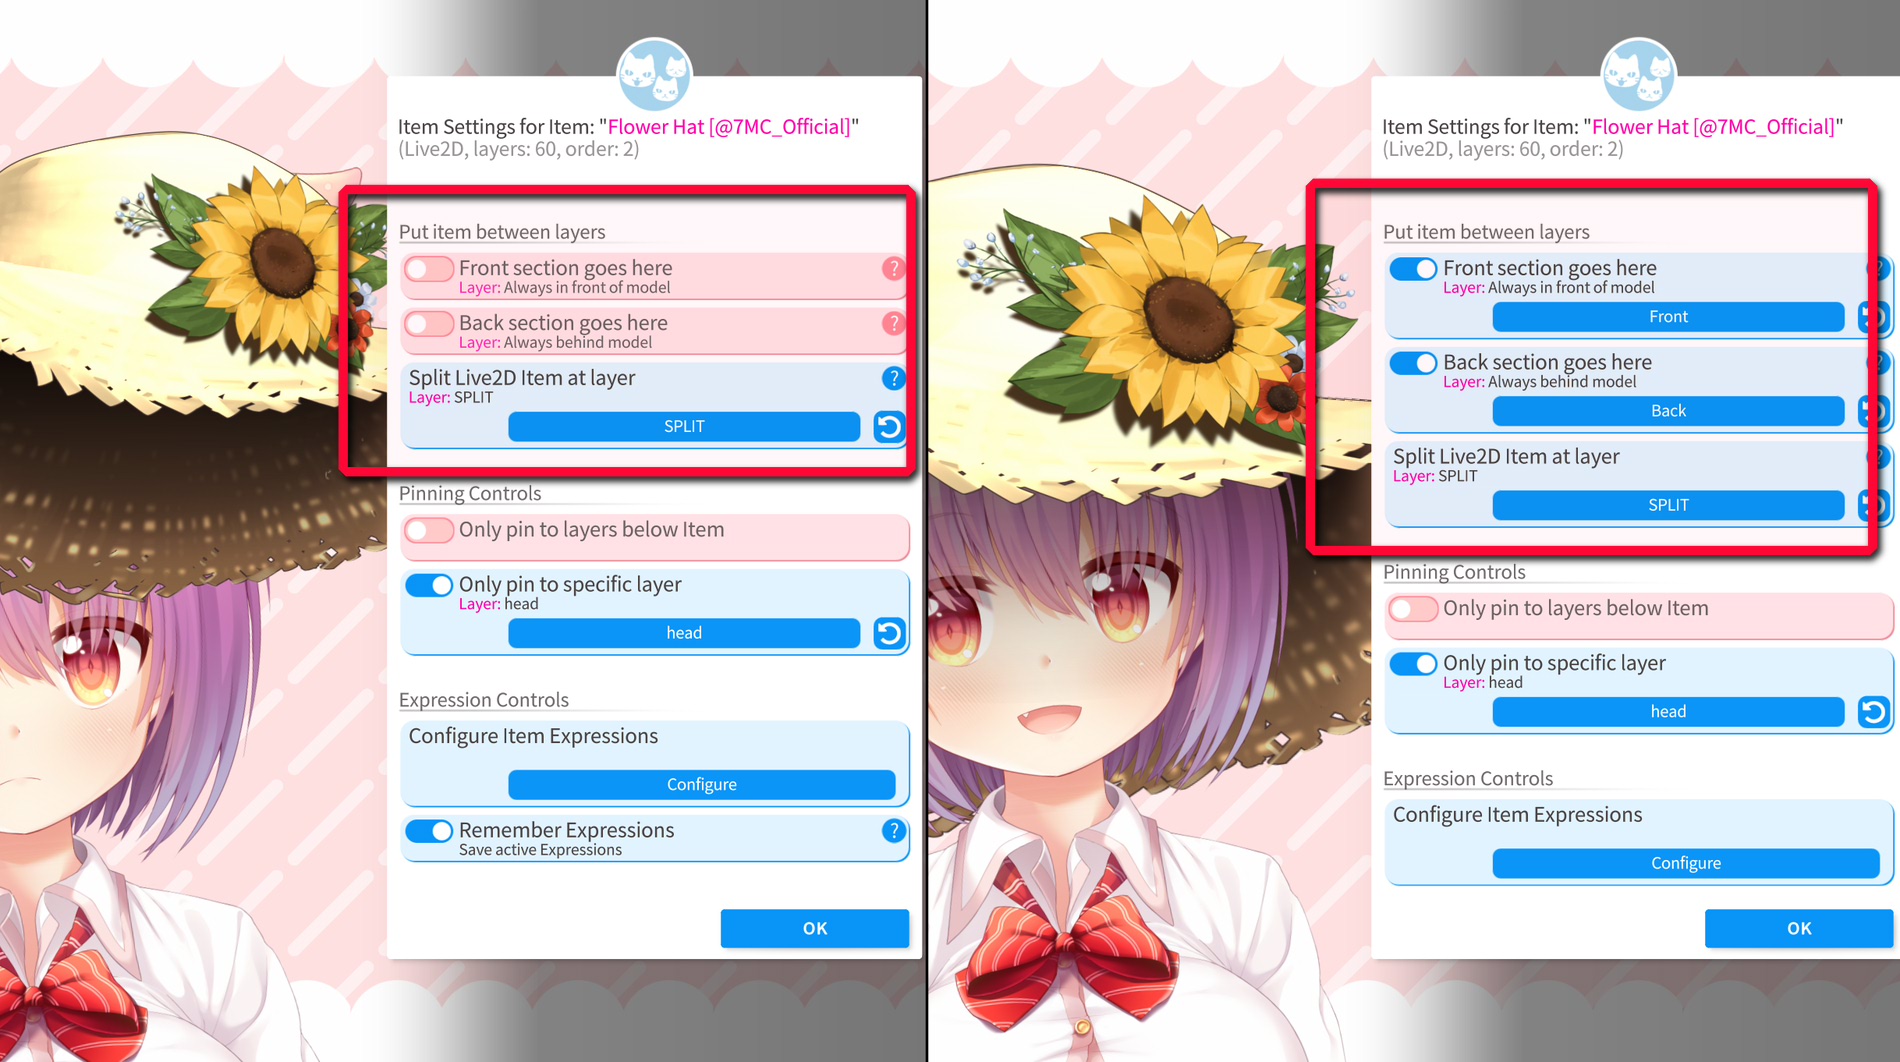
However, there are more options for Live2D items and the item config menu looks a bit different:

Live2D items can be split in two parts, front and back, by selecting a layer ID to split the item at. Then, the front and back part can be inserted into the model separately. For example, you could set the front part to always be in front of the model and the back part to always be behind the model.
That way, you can create assets that "wrap around" the model, for example to make it look like the model is really wearing a hat, blanket, etc.
It's worth noting that just like with normal items, VTube Studio will automatically adjust the front/back part orders every frame when the layer orders of the main model change while the model is loaded. However, VTube Studio ensures that the front part doesn't move behind the back part.
The split point (front/back) for Live2D items can be set up in VTube Studio before you send the item to your clients. Any layer can be used as split point, but if you want VTube Studio to automatically set a default split point for the item, just include "split" (case-inseisitive) in a layer name. VTube Studio will use the first layer with split in the name as the default split point.
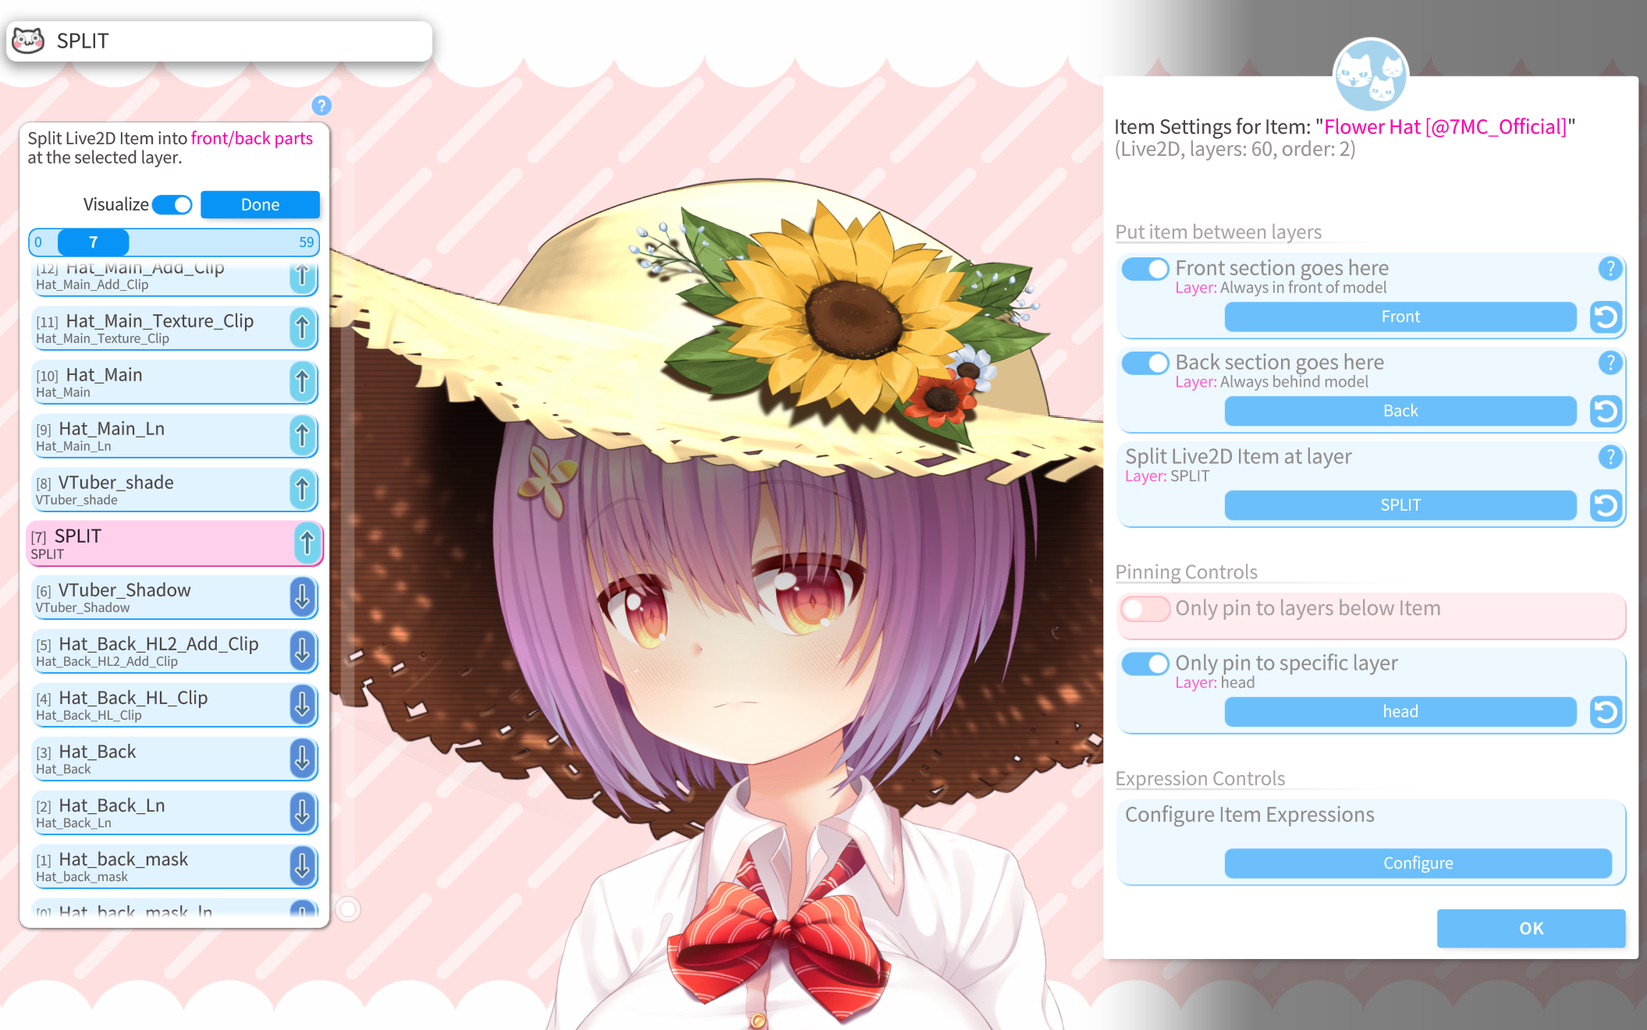
From the item config menu, you can also customize how pinning works for this item. The following options are available:
- Only pin to layers below item: Item will only be able to pin to model layers below it.
- Only pin to specific layer: Item will only be able to pin to the single layer specified here.
- Show pin notifications: If this is on, notifications will be shown whenever you pin/unpin an item with the name of the layer the item is pinned to. This can be helpful if your item is pinning to the wrong layer: Find out which layer it is and turn off pinning for that layer (can be done in Model ArtMesh Customization Settings).
There are some other options that can be accessed from the item config menu, such as:
- Colorize front/back: Visualize the selected layers when the layer selector is active. This will be visible in your OBS capture.
- Configure Item Expressions: Lets you set up expressions for your item, turn them on/off and set hotkeys for them. See also: Expressions
- Flip item
- Delete item
- Lock item
- Open Live2D item settings: From here, you can customize how the Live2D parameters of a Live2D item will behave based on tracking.
- Open global item settings: From here, you can turn on/off drag and drop, enable/disable certain file types from being loaded and more.
In a VNet collab, the order of items within participant models is fully synchronized.
If you pin an item to another participant, it will also be inserted into their model as long as they have the respective layer ID in their model or as long as the special "always in front" or "always in back" options are used.
![]() If you have any questions that this manual doesn't answer, please ask in the VTube Studio Discord
If you have any questions that this manual doesn't answer, please ask in the VTube Studio Discord![]() !!
!!
![]()
- Android vs. iPhone vs. Webcam
- Getting Started
- Introduction & Requirements
- Preparing your model for VTube Studio
- Where to get models?
- Restore old VTS Versions
- Controlling multiple models with one device
- Copy config between models
- Loading your own Backgrounds
- Recoloring Models and Items
- Record Animations
- Recording/Streaming with OBS
- Sending data to VSeeFace
- Starting as Admin
- Starting without Steam
- Streaming to Mac/PC
- VNet Multiplayer Overview
- Steam Workshop
- Taking/Sharing Screenshots
- Live2D Cubism Editor Communication
- Lag Troubleshooting
- Connection Troubleshooting
- Webcam Troubleshooting
- Crash Troubleshooting
- Known Issues
- FAQ
- VTube Studio Settings
- VTS Model Settings
- VTube Studio Model File
- Visual Effects
- Twitch Interaction
- Twitch Hotkey Triggers
- Spout2 Background
- Expressions ("Stickers"/"Emotes")
- Animations
- Interaction between Animations, Tracking, Physics, etc.
- Google Mediapipe Face Tracker
- NVIDIA Broadcast Face Tracker
- Tobii Eye-Tracker
- Sony mocopi trackers
- Hand-Tracking
- Lipsync
- Item System
- Live2D-Items
- Between-Layer Item Pinning
- Item Scenes & Item Hotkeys
- Add Special ArtMesh Functionality
- Display Light Overlay
- VNet Security
- Plugins (YouTube, Twitch, etc.)
- Web-Items
- Web-Item Plugins