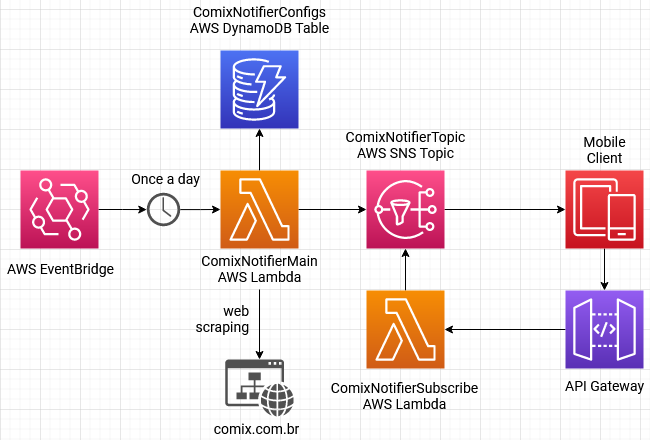
This application scrapes the Comix Book Shop website, it finds the last volume of each mangá configured in the database and it sends push notifications to the mobile application (inside app folder) through a topic to users that subscribed to it.
- Node.js ^16.6.1
- Serveless Framework
- AWS Account
- Firebase Account
Easy peasy lemon squeezy:
$ yarn
Or:
$ npm install
Was installed and configured the
eslintandprettierto keep the code clean and patterned.
The application sends and receives notifications (API and mobile application, respectively), to configure it properly you need to do some configurations.
-
First, create a project into Firebase, then download
google-services.jsonfile inside theappfolder from the project configuration page (General Tab) and copy the API Cloud Messaging Token (or create one if not exists) from Cloud Messaging Tab. -
Access your AWS account, open the SNS panel and create a platform application with the following name
Comix-Notifier, selectFirebase Cloud Messaging (FCM)as the platform and paste the API Cloud Messaging Token that you copied previously.
If you would like to use another name just remember to update the platform's ARN key in the
serverless.ts(custom.platformApplicationArn).
Install the AWS Layers before to deploy:
$ cd layers/nodejs
$ npm install
Or:
$ cd layers/nodejs
$ yarn
Now you are ready to deploy the API, just run:
$ sls deploy
After the deploy concludes, configure the lambda's URL outputed by the deploy process into the .env file.
Rename the .env.example in the app directory to .env and configure the URL for the subscription lambda, it should be outputed at the end of the deploy process.
| key | description | default |
|---|---|---|
| SUBSCRIPTION_URL | Subscription lambda URL. | - |
In order to be able to subscribe to the topic and start to receive push notifications you will need to:
- Create an API Key, then create and configure a usage plan to it. Copy the key, this will be necessary in the next steps and don't forget to associate the API's stage to the created plan! .
Install the mobile app, the first build must be through USB connection, so connect your device (or just open your emulator) and run:
$ cd app
$ npx react-native run-android
For iOS use
iosinstead ofandroid, but this app was tested only with Android through USB connection and Android Studio Emulator, is strongly recommended to use the same system.
In the next times you can just start the Metro Bundler server:
$ yarn start
Or:
$ npx expo run:android
After install the app, follow the instructions on the screen.
You'll use the API Key here.
The /subscribe route expect an API Key in the x-api-key request header.
You can see more about this route in the routes section.
POST https://kj1q0nigu8.execute-api.us-east-1.amazonaws.com/dev/subscribe x-api-key: rJvz2XWV611PycVISNd2T43pCB4X1g5n7E8iyT58
To get one API Key you need to generate one in API Gateway.
| route | HTTP Method | params | description | auth method |
|---|---|---|---|---|
/subscribe |
POST | Body with device FCM (Firebase Cloud Messaging) token |
Subscribe the device for push notifications. | API Key |
POST /subscribe
Request body:
{
  "token": "ff7XgLfwSGaVFS05iayn58:APA91bEJ508hqz8hr2EZttm845wn9plsRdJTArMDukr4xTUwdKq_G9qYZCnRIi7lK0M5OeMrnws-DKNNd__TNvnOLmekSNNcBXg3I08oAxT_wksoONXJVz0S12joypaq0-w7IEY6q7Pc"
}Jest was the choice to test the app, to run:
$ yarn test
Or:
$ npm run test
Run the command in the root folder
You can see the coverage report inside tests/coverage. They are automatically created after the tests run.


