Example
In game development, you'd want to have some action. So, for example, there could be objects that move and ones that don't. You may remember in physics class that mobiles have a position vector, a velocity vector, etc.
As a result, you may want to change the position of an object continously, except computers are not really that good at doing continous calculations. Instead, they rely on discrete frames in order to display things, and frames get generated on the aforementioned update() loop. One idea is to simply increment position by velocity, with something like this (note that incrementing a vector by a vector means component-wise addition):
position += velocity
Except how fast the app is updating depends on something called frames per second (FPS), and FPS are volatile! What? They are constantly changing, because your PC is doing things in the background, like running other programs, doing OS scheduling, etc. that may slow down your CPU. This is really bad if you want to have consistent physics.
The solution is to find the length of the interval between the previous frame and the current frame, that we'll call delta time (∆t). To determine the distance travelled, we have to calculate the area under the curve (integral) from 0 to the current frame. There is a simple way to approximate this surface, and it is via Euler's method. It's basically summing up areas of vertical rectangles, and the following picture shows how it works (keep in mind that this is done for all the coordinates of your choosen vector):

Essentially, the dt factor corrects for the variations in the runtime speed, and the approximation becomes more accurate as it approaches 0. However, in most graphs, you're dealing with derivatives that are changing. Because of this, Euler's method is simply not very accurate, as there are still some regions where it overestimates or underestimates the area, and so more complicated methods are used, but for our application, it's relatively okay.
We'll start off from the previous example. In order to visualize things, you'd need some way to write pixels to the screen, except Icosahedron doesn't do this directly, via a draw_pixel() command in ic::Application. You see, Icosahedron uses OpenGL as the graphics library, and in order to draw something, it sends geometric data to the GPU. The programs that run on the GPU are known as "shaders", and the graphics card can then use these shaders to generate large amounts of pixels in parallel, which makes the work easier for the CPU.
In OpenGL, shaders are coded via GLSL, and fortunately, Icosahedron has a list of preset shaders that come as source code.
So, let's declare a shader like this:
ic::Shader *testShader;

public:
   bool load() override {
       testShader = ic::ShaderLoader::get().load(shaders.meshShaderVertex2D, shaders.meshShaderFrag2D);

       return true;
   }
As you can see, we're loading a shader that has both vertex and fragment code. This shader doesn't do anything graphics by itself, so let's declare a 2D mesh, which is a wrapper for 2D geometric data. The following code shows the usage:
ic::Shader *testShader;
ic::Mesh2D *testMesh;

public:
   bool load() override {
       testShader = ic::ShaderLoader::get().load(shaders.meshShaderVertex2D, shaders.meshShaderFrag2D);
       testMesh = ic::GeometryGenerator::get().generate_regular_polygon_mesh(7, 0.3f);

       return true;
   }

   bool update(float dt) override {
       clear_color(ic::Colors::blue);

       testShader->use();
       testMesh->draw(testShader);

       return true;
   }
This creates a heptagon with a circumcircle radius of 0.3, being rendered with a test shader. After compiling and running the app, this is the result:
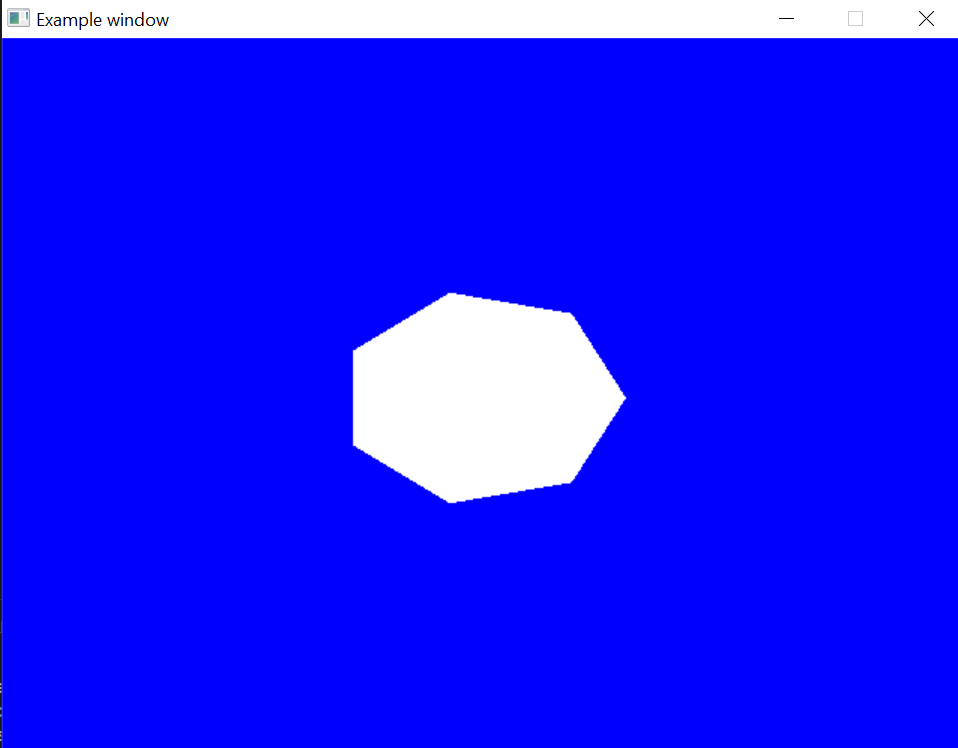
Now, this isn't what you might have expected, because the heptagon looks stretched. This is because OpenGL attempts to fill the viewport based on the size of the image. A window that's mostly vertical will present a vertically-stretched image and vice-versa, and a window that's square will show equal stretching (i.e. a correct image). This fact can be shown more clearly if the window is resized (scaling = ic::WindowScaling::resizeable).
To understand this problem better, let's look at something else. A useful characteristic of a viewport is its aspect ratio. It is defined as the width of an image divided by its height. Icosahedron uses this ratio to calculate the orthographic projection that reverses this stretching. Such thing is avaiable inside the ic::Camera2D class. To use this structure, simply create an object as usual, and bind it to the shader in the game loop:
ic::Camera2D *camera = new ic::Camera2D();
camera->use(testShader);
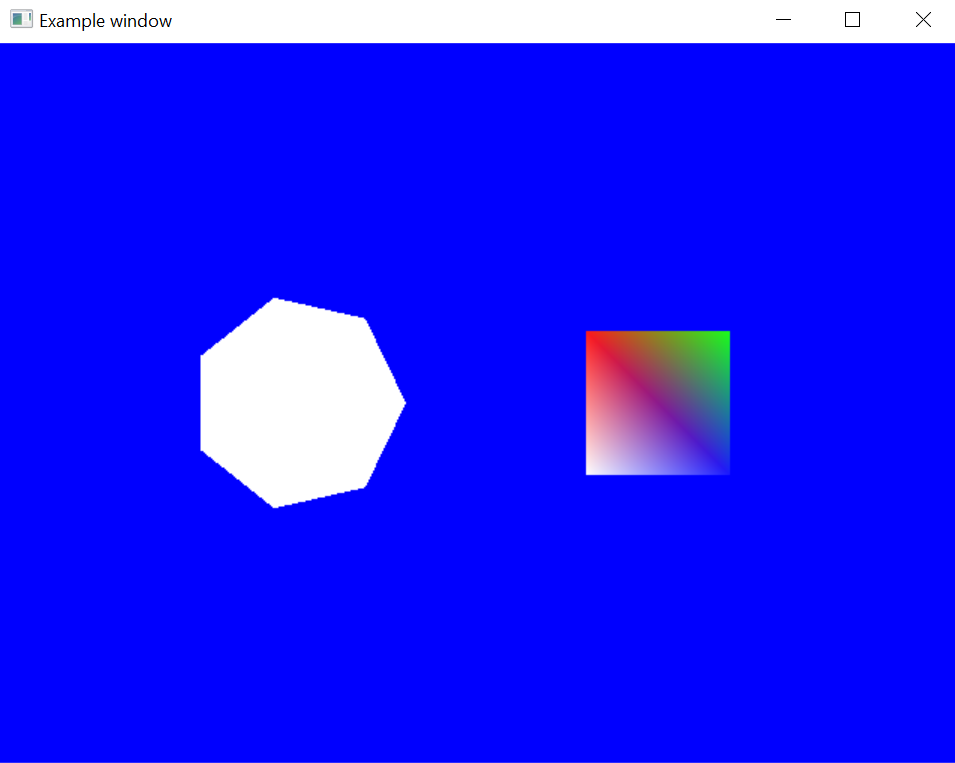
Running the code again will show correct results:

What is a vertex attribute? It is read-only data that's commonly passed in to a vertex shader. The fragment shader can then interpolate this data across the mesh. For example, positions are used to build the geometry of an object, texture coordinates are used to locate the points needed for sampling a texture (later).
One attribute that we'll talk about is the color attribute. It is mostly used to "tint" an object, and 16.777.216 (256^3) possible colors in the visible light spectrum can be encoded in RGB space. We usually think of RGB as the three components of a 3D vector.
To begin, let's add another mesh to the scene. This time, it will be a square, and to differentiate it better from the other shape, let's use something called the transformation matrix, and nope, I'm not talking about the movie series, but about linear algebra. This type of matrix is used for linear transformations, and one of them is the translation of a shape.
ic::Mesh2D *testSquare;
testSquare = ic::GeometryGenerator::get().generate_rectangle_mesh(0.2f, 0.2f);

// Moves the shape 0.5 units to the right
testSquare->set_transformation(ic::Mat4x4().set_translation<2>({ 0.5f, 0.0f }));
Nothing here's too interesting, right? We are simply moving a shape, but these can be used to do way more things, like scaling, rotating, shearing, etc. Anyways, to add the attribute, we'll use the mesh->add_attribute(index, dimensions, content) function. index is used to locate the attribute number inside the shader, and in this case, it will be 1. dimensions is the number of coordinates of each attribute vector. content can be colors, floats, or integers, stored inside an std::vector:
std::vector<ic::Color> colors = {
    ic::Colors::red,
    ic::Colors::green,
    ic::Colors::blue,
    ic::Colors::white
};

testSquare->add_attribute(1, 3, colors);
testSquare->set_material(ic::MeshMaterial2D(ic::Colors::white, 0.1f));
#include <Icosahedron/Application.h>
#include <Icosahedron/util/GeometryGenerator.h>

#include <Icosahedron/graphics/Colors.h>
#include <Icosahedron/graphics/gl/Shaders.h>
#include <Icosahedron/graphics/gl/Shader.h>

#include <Icosahedron/scene/2d/Camera2D.h>
#include <Icosahedron/scene/2d/Mesh2D.h>

#include <Icosahedron/assets/loaders/ShaderLoader.h>


class Example : public ic::Application {
    ic::Shader *testShader;
    ic::Mesh2D *testMesh;
    ic::Mesh2D *testSquare;
    ic::Camera2D *camera;

    public:
        bool init() override {
            displayName = "Example window";
            scaling = ic::WindowScaling::resizeable;

            return true;
        }

        bool load() override {
            testShader = ic::ShaderLoader::get().load(shaders.meshShaderVertex2D, shaders.meshShaderFrag2D);
            testMesh = ic::GeometryGenerator::get().generate_regular_polygon_mesh(7, 0.3f);
            testMesh->set_material(ic::MeshMaterial2D(ic::Colors::white, 1.0f));

            testMesh->set_transformation(ic::Mat4x4().set_translation<2>({ -0.5f, 0.0f }));

            std::vector<ic::Color> colors = {
                ic::Colors::red,
                ic::Colors::green,
                ic::Colors::blue,
                ic::Colors::white
            };

            testSquare = ic::GeometryGenerator::get().generate_rectangle_mesh(0.2f, 0.2f);
            testSquare->add_attribute(1, 3, colors);
            testSquare->set_material(ic::MeshMaterial2D(ic::Colors::white, 0.1f));

            testSquare->set_transformation(ic::Mat4x4().set_translation<2>({ 0.5f, 0.0f }));

            camera = new ic::Camera2D();

            return true;
        }

        bool update(float dt) override {
            clear_color(ic::Colors::blue);

            testShader->use();
            camera->use(testShader);
            testMesh->draw(testShader);
            testSquare->draw(testShader);

            return true;
        }
};
Running the new code yields this result:
In some scenarios, you may not just deal with shapes that have solid colors or gradients. You may also deal with shapes that are detailed, but how do you get that "detail"? You might say that adding extra geometry would help solve this problem, but complex objects may require thousands of triangles to render. By adding more extra geometry, just for that "detail", you would soon end up with an object that has a tremendously large amount of triangles, especially in 3D. One approach might be to use a texture.
A texture is a 2D image (even 1D or 3D textures exist) but we'll focus more on the 2D case. As stated before, to sample a texture on different parts of a mesh, you need texture coordinates, and the two meshes that were in our program all had them. To start, let's load an image from the disk, and use it as the texture:

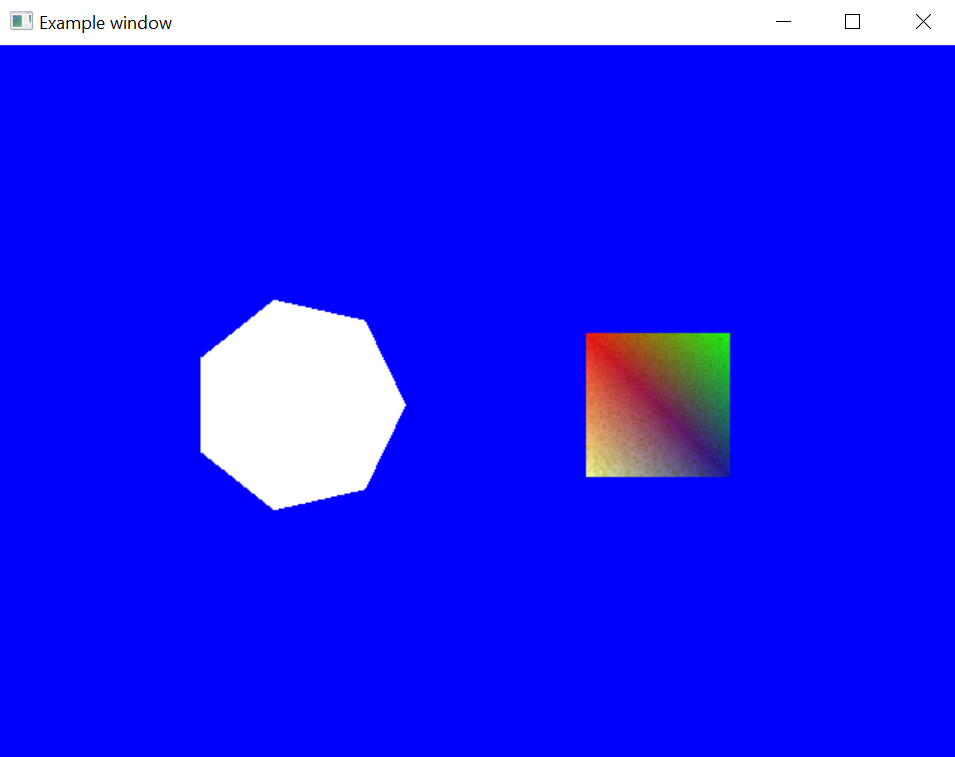
Here, we have a 64x64 sand image. To use it, we'd load it via load_png(filePath, parameters), and then bind it to the shader. filePath is, of course, the path to the file, and the parameters are optional, but contain information about texture wrapping, filtering and mipmapping.
// When loading
ic::Texture *squareTexture;
squareTexture = ic::TextureLoader::get().load_png("resources/textures/sand.png");
// In the application loop
testShader->use();
camera->use(testShader);
testMesh->draw(testShader);

squareTexture->use();
testSquare->draw(testShader);
squareTexture->unuse();
The sand texture gets unused after drawing the square, because, if not, the other mesh would have the same texture. The result might not be that different at a first glance, but look at the graininess on the right mesh:
And the full source code (don't forget to also free the resources when the application exits):
#include <Icosahedron/Core.h>

class Example : public ic::Application {
    ic::Shader *testShader;
    ic::Mesh2D *testMesh;
    ic::Mesh2D *testSquare;
    ic::Camera2D *camera;

    ic::Texture *squareTexture;

    public:
        bool init() override {
            displayName = "Example window";
            scaling = ic::WindowScaling::resizeable;

            return true;
        }

        bool load() override {
            squareTexture = ic::TextureLoader::get().load_png("resources/textures/sand.png");

            testShader = ic::ShaderLoader::get().load(shaders.meshShaderVertex2D, shaders.meshShaderFrag2D);
            testMesh = ic::GeometryGenerator::get().generate_regular_polygon_mesh(7, 0.3f);
            testMesh->set_transformation(ic::Mat4x4().set_translation<2>({ -0.5f, 0.0f }));

            std::vector<ic::Color> colors = {
                ic::Colors::red,
                ic::Colors::green,
                ic::Colors::blue,
                ic::Colors::white
            };

            testSquare = ic::GeometryGenerator::get().generate_rectangle_mesh(0.2f, 0.2f);
            testSquare->add_attribute("colors", 1, 3, colors);
            testSquare->set_material(ic::MeshMaterial2D(ic::Colors::white, 0.1f));

            testSquare->set_transformation(ic::Mat4x4().set_translation<2>({ 0.5f, 0.0f }));

            camera = new ic::Camera2D();

            return true;
        }

        bool update(float dt) override {
            clear_color(ic::Colors::blue);

            testShader->use();
            camera->use(testShader);
            testMesh->draw(testShader);

            squareTexture->use();
            testSquare->draw(testShader);
            squareTexture->unuse();

            return true;
        }

        void dispose() override {
            testShader->clear();

            squareTexture->dispose();

            testMesh->dispose();
            testSquare->dispose();
        }
};

int main(int argc, char *argv[]) {
    Example application;

    if (application.construct(640, 480)) {
        application.start();
    }

    return 0;
}
At this point, you can experiment with different shape combinations, and maybe get familiarized with Icosahedron's renderer.
Next up, we are gonna show you how to make a Sokoban game clone.