Home
This plugin is useful for users transitioning from Vera to Indigo or for people that have remote buildings on their property that need a few lights to be controlled but where Z-Wave and/or Insteon won’t reach.
So, if you're a switcher you can keep the following device types connected to your Vera while transitioning them to direct Indigo control: on/off devices (relay), dimmers, locks and thermostats. You will also be able to execute Vera scenes from Indigo. All other device types will need to be moved to direct Indigo control. We have no plans to expand the supported device type list, see the Vera vs Serial Interface section below for details.
When you first enable the plugin (select the Plugins->Vera Bridge->Enable menu item) or select the Plugins->Vera Bridge->Configure... menu item, you will see the Configure Vera Bridge dialog:
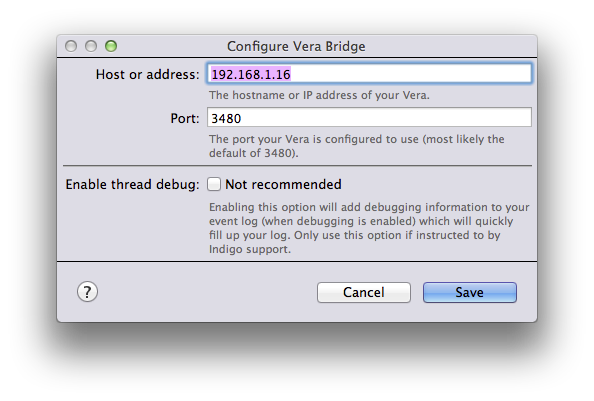
In this dialog you'll enter the IP address (or hostname) of your Vera and enter the port (though for most everyone the default of 3480 will be fine). There's also an option to enable thread debugging: you really only want to do this if instructed by someone from Indigo Support - enabling it then toggling debugging will very quickly fill up your event log with relatively useless information.
Adding devices is simple:
-
Select DEVICES or a subfolder under DEVICES in the Outline View of the Home Window
-
Click the New button above the device list
-
Select Vera Bridge from the Type: popup
-
In the resulting Synchronize Vera Device... dialog (if you're editing an existing device you should click the Define and Sync… button after selecting Vera Bridge), select the device you want to add from the Vera Device list. This list shows all the supported devices that are configured in the Vera. If you switch to the Vera UI and create a new device, just click on the Refresh List button and we'll rebuild the list.
-
Click the Sync button. We will query the device to find out it's type and name.
-
Close the Configure New Device dialog and begin using the device.
Once created, all devices behave as you would expect. Locks are implemented as a standard On/Off device. On means locked, Off means unlocked. You use the same standard controls for a lock that you use for an On/Off device.
The lock device will show it's battery-level in the Device Details tile (as will any thermostat that's battery powered).
Performing a Status Request on any device will actually instruct the plugin to refresh the status of all devices. This happens because of how the Vera API provides updates. We have to poll the Vera for device updates and it's hard-coded to poll every 3 seconds so as to not completely overwhelm your network. Most polls will only ask for any changes since the last update so the returned data is small, but when you do a status refresh we will ask for a full update with every device and state.
Executing Vera scenes is even easier. Just add an action and select the Vera Bridge Actions->Run Scene menu item from the Type: menu and select the scene from the popup in the resulting dialog. You can also run scenes interactively by selecting the Plugin->Vera Bridge->Run Scene menu item.
There are several performance issues with the Vera that you should be aware of. First, Lock devices are relatively slow. In our testing, the Vera Lite controlled locks usually take 3-4 seconds to respond to a command when it's issued from the Vera UI, and the UI updates a second or two after that.
Second, we often don't see state changes through the API very quickly. Often times the update for a lock change will come as long as 18 seconds later (again with the locks, right?). There doesn't appear to be anything we can do about this unfortunately. Fortunately, on/off devices and dimmers seem to respond to commands much faster and if there are no lock changes their status changes come through at a reasonable rate.
We've done quite a bit of work trying to optimize the performance of the plugin, and it's performance may vary because of other issues as well, but we think the solution is usable given the primary tasks it was created to handle.
You may be asking yourself why use the Z-Stick or UZB (or any future serial-type interfaces) at all since the Vera can already control my Z-Wave devices? There are actually several reasons:
-
Managing devices in the Indigo/Vera combination requires you to use 2 user interfaces: you have to use the Vera UI to add the device to the Vera's network (which in our experience is a pretty confusing experience) and then you have to add the device in Indigo. With a serial interface, you only need to do the network inclusion with the interface (which is really easy) and then add the device in Indigo.
-
Indigo can manage associations, scenes, etc., directly (and automatically in some cases), making the experience much more seamless.
-
Communication from Indigo->serial interface->Device is significantly faster than Indigo->Vera->Device because the Vera hardware is trying to do much more than the serial interface. We've seen consistent delays in the 1-3 second range when controlling devices through the Vera.
-
We can create easy to understand UI for special configuration options for the more popular Z-Wave devices.
All of these factors, combined, mean that the overall Indigo experience is significantly better and makes the UI significantly easier to use than the Vera. And ease of use and speed is why you wanted to use Indigo in the first place, right?
So, how exactly does it work then? It's actually rather simple: Z-Wave networks require one primary controller - which has it's own unique network id. When a device is included by the primary controller, it is assigned a unique node id and given the network ID. So, when using both Indigo/serial interface and the Vera, you're creating two distinct Z-Wave networks. One is managed by Indigo/serial interface and the other is managed by the Vera (and Indigo is just a 3rd party controller). Having two different Z-Wave networks in the same physical location is not a problem - a device is either on one network or the other and they won't get confused or interfere with each other. In fact, for large Z-Wave networks (over 232 devices) it is the only way it can work.
So, bottom line: using Vera to control locks or other simple devices while Indigo's Z-Wave network does everything else (through the serial interface) will not cause any issues but we recommend migrating your devices over to Indigo for optimal performance and reliability.
As stated above, we have no plans to add more device types to the Vera Bridge plugin because we believe that it is a significantly better experience to have Indigo directly control devices.
Here's the plugin ID in case you need to programmatically restart the plugin:
Plugin ID: com.perceptiveautomation.indigoplugin.vera
For usage or troubleshooting tips, join the plugin discussion on our forum.