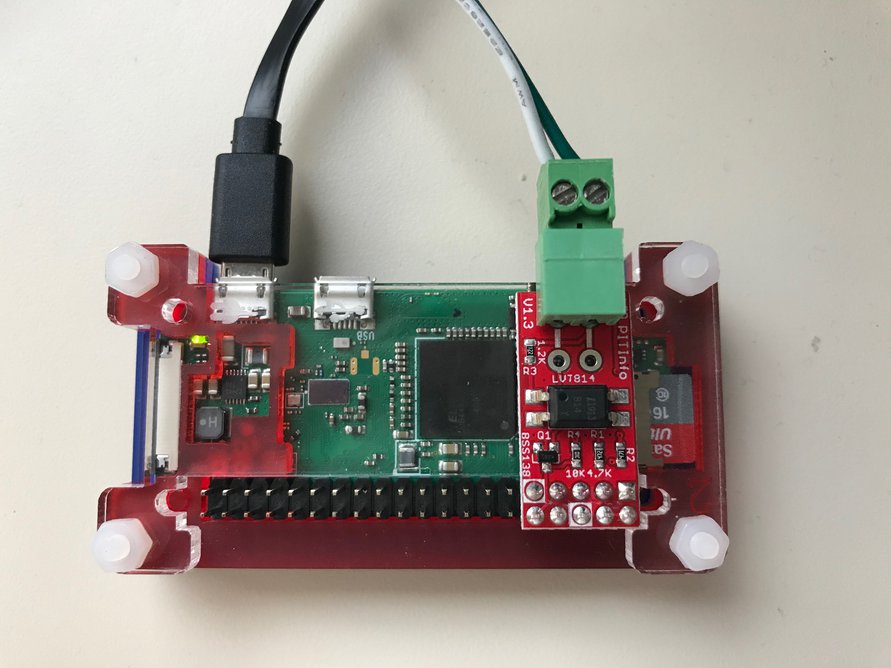
Monitor your home's power consumption with a Raspberry Pi. The Raspberry Pi shield PiTInfo is directly connected to a 'french' electricity meter. The shield PiTInfo (~15€) can be found on tindie with a dedicated package teleinfo developed by C. Hallard here: https://github.com/hallard/teleinfo. In this repository, three different methods to display informations (and how to install them) are summarized : via php based on the BmdOnline repository https://github.com/BmdOnline/Teleinfo, via Domoticz package and finally via Grafana/InfluxDB repository developed by S. Reuiller https://github.com/SebastienReuiller/teleinfo-linky-with-raspberry and https://sebastienreuiller.fr/blog/monitorer-son-compteur-linky-avec-grafana-cest-possible-et-ca-tourne-sur-un-raspberry-pi. Special thanks to them.

Using Grafana/InfluxDB repository developed by S. Reuiller [https://github.com/SebastienReuiller/teleinfo-linky-with-raspberry](https://github.com/SebastienReuiller/teleinfo-linky-with-raspberry)

Based on the BmdOnline repository [https://github.com/BmdOnline/Teleinfo](https://github.com/BmdOnline/Teleinfo)
First, install Raspberry Pi OS:
With rpi-imager:
sudo apt install snapd
sudo snap install rpi-imager
rpi-imager
With terminal:
wget https://downloads.raspberrypi.org/raspios_armhf/images/raspios_armhf-2022-01-28/2022-01-28-raspios-bullseye-armhf.zip
unzip raspios_armhf-2022-01-28/2022-01-28-raspios-bullseye-armhf.zip
unmount SD card:
sudo umount /dev/mmcblk0
Locate the right device:
sudo fdisk -l
You might see:
/dev/mmcblk0
The name of your card should appear in the latest results. It will probably start with the letters mm.
To install Raspbian on the card, we will use the command dd, which perform a copy of a file at the binary level:
sudo dd bs=1M if=2022-01-28-raspios-bullseye-armhf.img of=/dev/mmcblk0 status=progress conv=fsync
Navigate on your SD card to the /boot directory and add a empty file with:
touch ssh
In boot directory, create a new file called wpa_supplicant.conf, which will hold the necessary credentials required to connect to the WIFI network. Open a new file (wpa_supplicant.conf) with your text editor and paste the contents below. Don't forget to change #Box_name and #Password.
ctrl_interface=DIR=/var/run/wpa_supplicant GROUP=netdev
update_config=1
country=FR

network={
    ssid="#Box_name"
    psk="#Password"
    scan_ssid=1
}
ping raspberrypi.local
ssh pi@raspberrypi.local
To interact with our network device, we need to find your Pi's IP address with:
ifconfig
wlo1: flags=4163<UP,BROADCAST,RUNNING,MULTICAST>  mtu 1500
        inet 192.168.a.bb  netmask XXX.XXX.XXX.X  broadcast 192.168.a.bb
Or, from your laptop, scan the network:
sudo nmap 192.168.*.*
You can monitor the progress of scanning, by hitting a key on your keyboard. Finally, you should see your raspberry in the list.
Nmap scan report for raspberrypi.home (192.168.a.bb)
Host is up (0.017s latency).
Not shown: 999 closed ports
PORT   STATE SERVICE
22/tcp open  ssh
If the raspberry is connected to the wifi, you should see him with an ip's address: 192.168.a.bb, where a and b are numbers. Make a ssh to be connected with the raspberry:
ssh pi@192.168.a.bb
Check the distribution you have:
uname -a
Linux raspberrypi 5.10.103-v7l+ #1530 SMP Tue Mar 8 13:05:01 GMT 2022 armv7l GNU/Linux
To shutdown/reboot your raspberry:
sudo shutdown -h now
sudo reboot
Execute the command:
sudo raspi-config
Go to "Interfacing Options/Remote GPIO", choose "Yes" and then activate serial port.
Be sure, the remote GPIO feature is already installed:
sudo apt install pigpio
To automate running the daemon at boot time, run:
sudo systemctl enable pigpiod
To run the daemon once using systemctl, run:
sudo systemctl start pigpiod
In the folder /boot/cmdline.txt, add at the end:
enable_uart=1
delete
console=serial0,115200
To display the GPIO header diagram:
pinout

In our case:
PiTInfo - Raspberry
------    -------
    VCC - (1) 3V3
    LED - (7) GPIO4
    GND - (9) GND
    GND - (6) GND
    TXD - (10) GPIO15
Use the command picocom to test the connection with PiTInfo:
picocom -b 1200 -d 7 -p e -f n /dev/ttyS0
You should see:
picocom v3.1

port is        : /dev/ttyS0
flowcontrol    : none
baudrate is    : 1200
parity is      : even
databits are   : 7
stopbits are   : 1
escape is      : C-a
local echo is  : no
noinit is      : no
noreset is     : no
hangup is      : no
nolock is      : no
send_cmd is    : sz -vv
receive_cmd is : rz -vv -E
imap is        :
omap is        :
emap is        : crcrlf,delbs,
logfile is     : none
initstring     : none
exit_after is  : not set
exit is        : no
To quit picocom, CTRL+A and CTRL+Q.
You can also read data with the cat command.
sudo cat /dev/ttyS0
You should see data on your console, now.
Source: https://www.magdiblog.fr/gpio/teleinfo-edf-suivi-conso-de-votre-compteur-electrique/
Données de la téléinfo EDF

Comme indiqué dans le document « Sorties de télé-information client des appareils de comptage électroniques utilisés par ERDF« , publié par EDF et disponible ici : ERDF-NOI-CPT_02E.pdf, et selon votre type d’abonnement EDF, vous pouvez récupérer les informations suivantes :

    ADCO : Identifiant du compteur
    OPTARIF : Option tarifaire (type d’abonnement)
    ISOUSC : Intensité souscrite
    BASE : Index si option = base (en Wh)
    HCHC : Index heures creuses si option = heures creuses (en Wh)
    HCHP : Index heures pleines si option = heures creuses (en Wh)
    EJP HN : Index heures normales si option = EJP (en Wh)
    EJP HPM : Index heures de pointe mobile si option = EJP (en Wh)
    BBR HC JB : Index heures creuses jours bleus si option = tempo (en Wh)
    BBR HP JB : Index heures pleines jours bleus si option = tempo (en Wh)
    BBR HC JW : Index heures creuses jours blancs si option = tempo (en Wh)
    BBR HC JW : Index heures pleines jours blancs si option = tempo (en Wh)
    BBR HC JR : Index heures creuses jours rouges si option = tempo  (en Wh)
    BBR HP JR : Index heures pleines jours rouges si option = tempo (en Wh)
    PEJP : Préavis EJP si option = EJP 30mn avant période EJP
    PTEC : Période tarifaire en cours
    DEMAIN : Couleur du lendemain si option = tempo
    IINST : Intensité instantanée (en ampères)
    ADPS : Avertissement de dépassement de puissance souscrite (en ampères)
    IMAX : Intensité maximale (en ampères)
    PAPP : Puissance apparente (en Volt.ampères)
    HHPHC : Groupe horaire si option = heures creuses ou tempo
    MOTDETAT : Mot d’état (autocontrôle)

Une trame commence toujours par l’étiquette ADCO et se termine par le MOTDETAT.

Chaque message, ou ligne, d’une trame est formé de la manière suivante :

ETIQUETTE espace VALEUR espace CHECKSUM

Seules l’ETIQUETTE et la VALEUR nous seront utiles. La CHEKSUM, ou somme de contrôle sert uniquement à vérifier l’intégrité que la trame.
Source https://www.journaldulapin.com/2016/02/25/raspberry-pi-teleinfo/.
sudo apt update
sudo apt upgrade
sudo apt install git-core libmysqlclient-dev libcurl4-openssl-dev
sudo apt install libmariadb-dev-compat libmariadb-dev mariadb-server
sudo apt install imagemagick php7.4 php7.4-cli php7.4-imagick php7.4-gd xplanet unclutter mingetty x11-xserver-utils
sudo apt install apache2 openbox xinit
sudo apt install sqlite3
sudo apt-get install postfix
Clone the repository of C. Hallard with:
git clone https://github.com/hallard/teleinfo/
cd teleinfo
make
sudo make install
To test it:
teleinfo -m test
To kill the daemon if needed:
killall teleinfo
And for help:
teleinfo --help
To create a SQL database for #User (update this):
mysql -u #User -p
and then complete as:
Welcome to the MariaDB monitor.  Commands end with ; or \g.
Your MariaDB connection id is 229
Server version: 10.5.12-MariaDB-0+deb11u1 Raspbian 11

Copyright (c) 2000, 2018, Oracle, MariaDB Corporation Ab and others.

Type 'help;' or '\h' for help. Type '\c' to clear the current input statement.

MariaDB [(none)]> CREATE DATABASE dbs_teleinfo;
Query OK, 1 row affected (0.002 sec)

MariaDB [(none)]> show databases
    -> ;
+--------------------+
| Database           |
+--------------------+
| dbs_teleinfo       |
| information_schema |
| mysql              |
| performance_schema |
+--------------------+
5 rows in set (0.001 sec)

MariaDB [(none)]> USE dbs_teleinfo;
Database changed
MariaDB [dbs_teleinfo]> CREATE TABLE tbl_teleinfo;
ERROR 1113 (42000): A table must have at least 1 column
MariaDB [dbs_teleinfo]> CREATE TABLE tbl_teleinfo(
    ->   id int(11) NOT NULL AUTO_INCREMENT,
    ->   DATE datetime DEFAULT NULL,
    ->   ADCO varchar(12) DEFAULT NULL,
    ->   OPTARIF varchar(4) DEFAULT NULL,
    ->   ISOUSC decimal(2,0) DEFAULT NULL,
    ->   BASE decimal(9,0) DEFAULT NULL,
    ->   HCHC decimal(9,0) DEFAULT NULL,
    ->   HCHP decimal(9,0) DEFAULT NULL,
    ->   BBRHCJB decimal(9,0) DEFAULT NULL,
    ->   BBRHPJB decimal(9,0) DEFAULT NULL,
    ->   BBRHCJW decimal(9,0) DEFAULT NULL,
    ->   BBRHPJW decimal(9,0) DEFAULT NULL,
    ->   BBRHCJR decimal(9,0) DEFAULT NULL,
    ->   BBRHPJR decimal(9,0) DEFAULT NULL,
    ->   DEMAIN varchar(4) DEFAULT NULL,
    ->   EJPHN decimal(9,0) DEFAULT NULL,
    ->   EJPHPM decimal(9,0) DEFAULT NULL,
    ->   PEJP varchar(2) DEFAULT NULL,
    ->   PTEC varchar(4) DEFAULT NULL,
    ->   IINST1 decimal(3,0) DEFAULT NULL,
    ->   IINST2 decimal(3,0) DEFAULT NULL,
    ->   IINST3 decimal(3,0) DEFAULT NULL,
    ->   IMAX1 decimal(3,0) DEFAULT NULL,
    ->   IMAX2 decimal(3,0) DEFAULT NULL,
    ->   IMAX3 decimal(3,0) DEFAULT NULL,
    ->   HHPHC varchar(1) DEFAULT NULL,
    ->   PMAX decimal(5,0) DEFAULT NULL,
    ->   PAPP decimal(5,0) DEFAULT NULL,
    ->   ADPS decimal(3,0) DEFAULT NULL,
    ->   MOTDETAT varchar(6) DEFAULT NULL,
    ->   TENSION decimal(3,0) DEFAULT NULL,
    ->   PRIMARY KEY (id),
    ->   KEY SEARCH_INDEX (ADCO,DATE)
    -> ) ENGINE=MyISAM DEFAULT CHARSET=utf8;
Query OK, 0 rows affected (0.015 sec)

MariaDB [dbs_teleinfo]> exit
Bye
via phpMyAdmin:
sudo apt install phpmyadmin
Warning: When the prompt appears, “apache2” is highlighted, but not selected. If you do not hit SPACE to select Apache, the installer will not move the necessary files during installation. Hit SPACE, TAB, and then ENTER to select Apache. Define a password #Password.
On your laptop:
http://192.168.a.bb/phpmyadmin
the password #Password defined previously will be asked.
On your computer, test if apache is installed, type in firefox the ip's address of your raspberry:
http://192.168.a.bb
On your raspberry, catch error if needed with:
tail -2 /var/log/apache2/error.log
First, we need to complete informations of the database where the data will be send as mentioned here ch2i.eu. Don't forget to update #User and #Password. In the folder teleinfo, edit/update teleinfo.conf.
nano teleinfo.conf
mysql = 0
server = localhost
user = #User
password = #Password
database = dbs_teleinfo
table = tbl_teleinfo
mysql_port = 3306
sudo cp teleinfo.conf /etc/
Send 1 frame on database to check connection:
teleinfo -m r -q
teleinfo 1.0.8 Statistics
==========================
Frames Sent         : 0
Frames checked      : 1
Frames OK           : 1
Checksum errors     : 0
Frame format Errors : 0
Frame size Errors   : 0
MySQL init OK       : 1
MySQL init errors   : 0
MySQL connect OK    : 1
MySQL connect errors: 0
MySQL queries OK    : 1
MySQL queries errors: 0
EmonCMS total post  : 0
EmonCMS post OK     : 0
EmonCMS post errors : 0
EmonCMS timeout     : 0
--------------------------
No errors are reported with MySQL in this case.
Clone the repositories
git clone https://github.com/BmdOnline/Teleinfo.git
Update the config.php, specially about the MySQL database:
/***********************/
/*    Données MySQL    */
/***********************/
$db_connect = array (
    "serveur" => "localhost",
    "base"    => "dbs_teleinfo",
    "table"   => "tbl_teleinfo",
    "login"   => "#User",
    "pass"    => "#Password"
);
copy all the folder in var/www/html/.
cp -r Teleinfo/  /var/www/html/
sudo chown -R pi:www-data /var/www/html/
sudo chmod -R 770 /var/www/html/
Now, we will schedule the teleinfo script every X times to fill the database. See cron job:
crontab -l
Then, with:
crontabl -e
Add the task (*/5 = every 5 minutes):
*/5 * * * * sudo teleinfo -m r -q
Check cron excecution:
grep CRON /var/log/syslog
On your laptop, visit:
http://192.168.a.bb/Teleinfo/teleinfo.php
Install with domoticz:
curl -sSL install.domoticz.com | sudo bash
Just point your browser to the IP address of your Raspberry Pi, and use the port specified during the installation script.
http://192.168.a.bb:8080/#/Utility
Source: https://grafana.com/tutorials/install-grafana-on-raspberry-pi/ Add the APT key used to authenticate packages:
wget -q -O - https://packages.grafana.com/gpg.key | sudo apt-key add -
Add the Grafana APT repository:
echo "deb https://packages.grafana.com/oss/deb stable main" | sudo tee -a /etc/apt/sources.list.d/grafana.list
sudo apt-get update
sudo apt-get install -y grafana
To make sure Grafana starts up even if the Raspberry Pi is restarted, we need to enable and start the Grafana Systemctl service.
sudo /bin/systemctl enable grafana-server
Start the Grafana server:
sudo /bin/systemctl start grafana-server
sudo apt install python3-pip
sudo pip3 install pySerial influxdb
wget https://raw.githubusercontent.com/SebastienReuiller/teleinfo-linky-with-raspberry/master/teleinfo.py
Try it:
python3 teleinfo.py
After few minutes, stop the script. Now check the influxdb:
 pi@raspberrypi:~ $ influx
 Connected to http://localhost:8086 version 1.7.9
 InfluxDB shell version: 1.7.9
 > show DATABASES;
 name: databases
 name
 ----
 teleinfo
 _internal
 > USE teleinfo
 Using database teleinfo
 > SHOW SERIES;
 key
 ---
 HCHC,host=raspberry,region=linky
 HCHP,host=raspberry,region=linky
 HHPHC,host=raspberry,region=linky
 IINST,host=raspberry,region=linky
 IMAX,host=raspberry,region=linky
 ISOUSC,host=raspberry,region=linky
 MOTDETAT,host=raspberry,region=linky
 OPTARIF,host=raspberry,region=linky
 PAPP,host=raspberry,region=linky
 PTEC,host=raspberry,region=linky
Log on graphana on your computer:
http://192.168.a.bb:3000
During the first connection, the login/password are admin and admin. Possibly, an error occurred
FileNotFoundError: [Errno 2] No such file or directory: ‘/var/log/teleinfo/releve.log’
In this case, simply create a folder teleinfo.
mkdir /var/log/teleinfo/
Click Add data source 'InfluxDB'.
Can be found here https://github.com/SebastienReuiller/teleinfo-linky-with-raspberry/blob/master/grafana_dashboard_teleinfo.json.
TODO