This project is an end-to-end Data science project where you can find all the core steps required to satisfy a data science objective. Steps involving Data Extraction, Data Cleaning, Exploratory Data Analysis, Modelling and the Variable selection methods to evaluate how good our model is before and after selecting best features from the raw data using Exclusive Variable Selection algorithm. Statistical analysis has also been performed in order to clean the data and extract some insights which helped us to make a better model.
- https://www.researchgate.net/publication/315869006_Machine_Learning_in_Transportation_Data_Analytics
- https://www.sciencedirect.com/science/article/pii/S235214651830262X
- https://www.researchgate.net/publication/338336513_Transportation_network_model_and_Network_analysis_of_road_networks
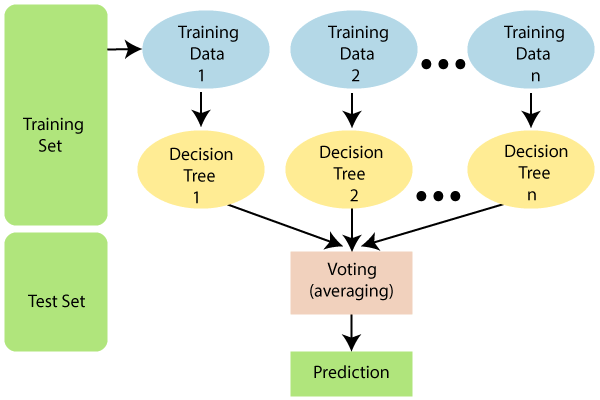
Random Forest Classifier: Random Forest Classifier is an ensemble algorithm which works with multiple algorithms parallelly. This is a supervised algorithm and it can be used with both classification and regression problems. The output of the new data is estimated either by using majority voting or average voting technique. Since the algorithm works with bagging technique, multiple decision trees are used to provide the output for the specific input. This is a key difference between decision trees and random forests. While decision trees consider all the possible feature splits, random forests only select a subset of those features. Random forest works best with large datasets and high dimensional.
Reference
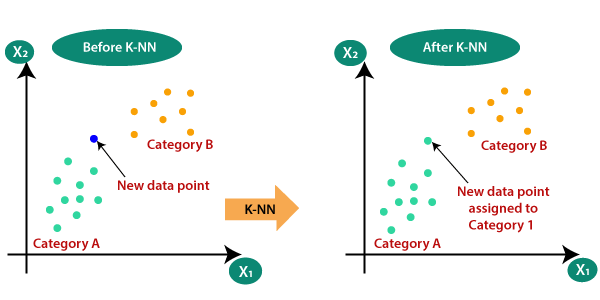
K-Nearest Neigbour: KNN or K Nearest neighbours is a basic yet an efficient algorithm which is being used in most of the Machine learning application. Since it is a non-parametric i.e. This algorithm doesn’t make any underlying assumption like other algorithms do, such as having specify distribution of data to work with. So, this makes it very easy and understandable to all the users who are using it. The Technique KNN applies in predicting on new data is where it finds the nearest neighbours for the given point and takes a majority voting, whichever class is resided near to the new point, it will be considered as the new class for the new data point.
Reference
Sequential Feature Selector: Sequential feature selector is a feature selection method which allows us to add or remove features from the dataset. The features are selected based on the cross validation score achieved by training on the estimator. Sequential feature works best with supervised learning algorithms, but in the case of unsupervised, the algorithm just looks at the independent variables rather not he desired output.

Reference
So, before execution we have some pre-requisites that we need to download or install i.e., anaconda environment, python and a code editor. Anaconda: Anaconda is like a package of libraries and offers a great deal of information which allows a data engineer to create multiple environments and install required libraries easy and neat.
Download link:

Python: Python is a most popular interpreter programming language, which is used in almost every field. Its syntax is very similar to English language and even children and learning it nowadays, due to its readability and easy syntax and large community of users to help you whenever you face any issues.
Download link:

https://www.python.org/downloads/
Code editor: Code editor is like a notepad for a programming language which allows user to write, run and execute program which we have written. Along with these some code editors also allows us to debug, which usually allows users to execute the code line by line and allows them to see where and how to solve the errors. But I personally feel visual code is very good to work with any programming language and makes a great deal of attachment with user.
Download links:

Let us define an environment and why we need different environments. An environment is a collection of libraries that are required to run our project. When we already have an environment with the necessary libraries, why do we need a new environment? To avoid version mismatches, we create a new environment for each project. For example, in your previous project, you used "tf env" with tensorflow 2.4 and keras 2.4, but in your current project, you must use tensorflow 2.6 and keras 2.6. If you continue your project in the "tf env" environment, there will be a version mismatch and you will need to update tensorflow and keras, but this will cause problems with the previous project's execution. To avoid this, we create a new environment with tensorflow 2.6 and keras 2.6 and resume our project.
Let us now see how to create an environment in anaconda.
- Type “conda create –n <<name_of_your_env>>” example: conda create -n env
- It will ask to proceed with the environment location, type ‘y’ and press enter.
- When you press ‘y’, the environment will be created. To activate your environment type conda activate <<your_env_name>> . E.g., conda activate myenv.
- You can see that the environment got changed after conda activate myenv line. It changed from “base” to “myenv” which means you are now working in “myenv” environment.
- To install a library in your virtual environment type pip install <library_name>. e.g., pip install pandas
- Instead of installing libraries one by one you can even install by bunch, i.e., we have a txt file called requirements.tx which consists of all the libraries required to proceed with the project, so we can use it.
- so, before installing requirements.txt, make sure you are in the specific path where your requirements.txt is located, basically this file is located in the folder where our executable files are located, so we need to move to that directory by following command. cd C:\folder_name
- Here A -> drive, folder name -> path where your executable file is saved
- I go to that file path in anaconda using cd command
- Go to drive where your project file is.
- Go to the path of your project using cd
- Type pip install –r requirements.txt
- And all your required libraries will be downloaded and you can start your project.
- But if you want to use jupyter notebook on the new environment you have to set it up for the new environment.
- After you have installed all the libraries and created an environment, you need an editor to run the code, that is starting jupyter notebook, as soon as you enter jupyter notebook in the terminal you will definitely get this error. “Jupiter” is not recognized as an internal or external command. So, to solve it it we have 2 commands.
- conda install –c conda-forge jupyterlab
- conda install –c anaconda python Now you are ready to use jupyter on this environment and start with your project!

Note: Make sure you have added path while installing the software’s.
- Install the prerequisites/software’s required to execute the code.
- Press windows key and type in anaconda prompt a terminal opens up.
- Before executing the code, we need to create a specific environment which allows us to install the required libraries necessary for our project. • Type conda create -name “env_name”, e.g.: conda create -name project_1 • Type conda activate “env_name, e.g.: conda activate project_1
- Make sure you are in the correct path in your terminal, where you have saved your executable file/folder. E.g.: cd A:\project\AI\Completed\project_name, then press enter.
- Install necessary libraries from requirements.txt file provided.
- Run pip install -r requirements.txt or conda install requirements.txt (Requirements.txt is a text file consisting of all the necessary libraries required for executing this python file. If it gives any error while installing libraries, you might need to install them individually.)
- Also, pipwin install scikit-learn
- Download the Dataset from the below link, Copy the Files & Paste them along with all other files(Don't Keep It in a Folder).
- Preprocess.ipynb consists of all the data cleaning steps, which are necessary to build a clean and efficient model.
- main.ipynb consist of major steps and exploratory data analysis which allow us to understand more about the data and behavior of it.
- Variable_Selction.ipynb consists of data reduction/dimensionality reduction techniques such as Sequential feature selector method to reduce the dimensions in the data and compare the model scores before and after dimensionality reduction.
- Combined_main_var.ipynb consists of combination of main.ipynb and variable_selection.ipynb to make it more clear and understable for the audience.
**Note:**Please follow the above sequence if you would like to execute and the files require good system requirements to run.
The dataset was downloaded from a kaggle data repository. The dataset has been pre-processed and cleaned to remove any bias while training. Dataset consists of more than 2 lakh data entries and around47 columns. Some of the important features present in the dataset, Severity, street, city, weather_timestamp, Country, Start_lat, Start_Log, End_lat, End_Lon and etc. These features help us to know which state or country had most number of accidents over the span of years. This analysis gives and overview of how the traffic in the state or country is like and necessary actions to be taken in future.

- We might face an issue while installing specific libraries.
- Make sure you have the latest version of python or 3.8, since sometimes it might cause version mismatch.
- Adding path to environment variables in order to run python files and anaconda environment in code editor, specifically in visual studio code.
All the required data hasn't been provided over here. Please feel free to contact me for any issues. You can also download the dataset from the given link below.