An autohotkey program to create custom profiles extra virtual keyboards and change key binds.
Extend layer is an autohotkey program created to improve the functionality of your keyboard. The program allows you to:
- Create multiple custom virtual keyboards 💻
- Choose between predefined virtual keyboards 📚
- Switch between different profiles of virtual keyboards 🔄
- Rebind keys to other keys or special actions ⚙️
To run this script, do the following:
- If you don't already have it, download Autohotkey v2.0
- Download and excecute the script
- If you want to, Run the script on startup
- Alternatives to downloading and installing Autohotkey v2.0 are:
- Run this .exe file.
- Download from autohotkeys download page.
- Go to the official autohotkey website, click the download button and then choose Download v2.0.
- Go to Releases.
- Download the source code for the latest version found under "Assets".
- After downloading the source code, unzip it to an appropriate location on your computer.
- To run the program, open the unzipped project, then naviage to and run the Run_this.ahk file by double clicking it.
- If you want, you can right click Run_this.ahk and create a shortcut which you can drag to your desktop.
On Windows:
- Use the shortcut Win+R to run windows utility, and then write shell:startup and press enter.
- Create a shortcut of the Run_this.ahk file and drag it to the file explorer tab you just opened with shell:startup
- Create custom profiles which have different virtual keyboards
- Switch between different profiles of virtual keyboards 🔄
- Create multiple custom virtual keyboards 💻
- Choose between predefined virtual keyboards 📚
- Rebind keys to other keys or special actions ⚙️
Below is an example of a predefined virtual keyboard, found in the Default profile. The image shows the layout of the second virtual keyboard of this profile, which is activated by hitting CapsLock.

This profile moves the keys used for text navigation, text editing, browser navigation, and such, often found far from the center of the keyboard, to the center of the keyboard.
The program has multiple of these predefined profiles with predefined virtual keyboards, and you can create your own custom profiles with virtual keyboards.

This shows the main window of the program. Here you can add profiles, edit profiles, add keybinds, edit keybinds, delete keybinds, and switch between different profiles. For information on how to actually do this, follow the guides in "How to use this program?"
Extend layer allows you to create multiple virtual keyboards, and different profiles each containing different virtual keyboards. This is useful if you have a keyboard with a limited amount of keys, or if you want to create a keyboard for a specific program. For example, you can create a profile containing keyboards for a game, keyboards for coding, keyboards for browsing, etc. You can switch between the different keyboard in a profile using a chosen keybind. By default the keybind is CapsLock to switch to a second keyboard layer and Capslock + Shift to switch to a third keyboard layer. You can change these keybinds however you want.
An example of one of the predefined keyboards, found in the Default profile, is shown below. The default profile is created when you first download and run the application. The image shows the layout of the second virtual keyboard of this profile, which is activated by hitting CapsLock
As you can see this keyboard moves the keys used for text navigation, text editing, browser navigation, and such, often found far from the center of the keyboard, to the center of the keyboard.
The Arrows keys, Home, End, Page up, Page down, Del, Backspace, Undo, Cut, Copy, Paste and the modifier keys are especially useful. These keys are found far from the center of the keyboard, but this keyboard layer moves them to the center. This is especially useful if, lets say, you work in a code editor, which often requires you to navigate a lot, either by mouse or keyboard. By moving the navigation keys to a more ergonomic position, you can navigate faster and more comfortably. It's very easy to just press "o" (End) to reach the end of a line, instead of clicking it using the mouse, or reaching a far distance with your right hand to press the end key.
!WARNING! If you start using the Extend Layer, you will NEVER go back. The extend layer makes navigation a lot more ergonomic and fast. I highly reccomend learning the shortcuts from the extend layer webpage.
My favorite use for the extend layer, is coding in an IDE, for example VsCode. The extend layer really complements the existing shortcuts of VsCode and makes coding a lot faster, more ergonomic and more satisfying.
The program allows you to rebind keys to other keys or special actions. For example, you can rebind the [I, J, K, L] keys to [Up, Left, Down, Right] to easily switch to navigating without having to move your right hand across half the universe to reach the arrow keys.
Additionally, you can rebind the keys, for example a to a special action like changing screen brightness, traveling to a url, excecuting a script, and much more.
After following the getting started guide. Run ExtraKeyboardsApp.ahk. This will open a gui where you can add some premade profiles, or create your own profile, and edit keybinds.
- Click the Add Profile button.

- A dialog will open where you can select a predefined profile and choose a name for the profile.

- After selecting a profile, and giving it a unique name, click Add Profile.
There are some predefined profiles to choose between, but if you want to create your own profile from scratch you can select EmptyProfile.
Some profiles have a suffix like _en or _no which means that the profile is created for a specific keyboard layout. For example, _en is for the english keyboard layout and _no is for the norwegian keyboard layout.

- All done! You have created a new profile. You can now edit the keybinds and add new keybinds to your liking for this profile.
- Select the profile you want to edit.

- Click on the Keyboards tab. This will show all the keyboard layers for the selected profile.

- Click on the keyboard layer you want to edit. This will show all the keybinds for the selected keyboard layer. From here you can add, edit or delete keybinds.
If you haven't selected an existing keybind, only the add keybind button is enabled. If you select an existing keybind, the edit and delete keybind buttons are enabled.

- Add, edit or delete a keybind by clicking the corresponding button.
-
After following the steps above, click the above highlighted Add button. (Alternatively you can press enter if the focused element is the different layers section (left side with GlobalLayer-Hotkeys and such))
-
A dialog will open where you have to have to set the hotkey and the action. The hotkey is the key you want to bind to a new action. The action is what you want the hotkey to do. Action can be a special action or a new key.

-
Click the Set Hotkey button.
-
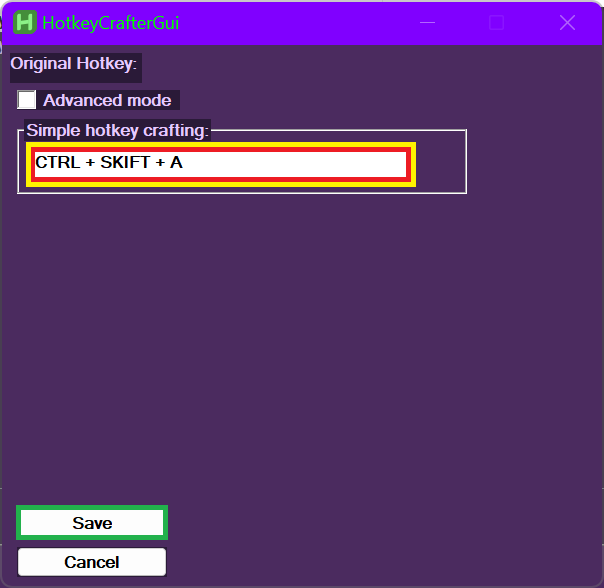
A dialog will open where you can set the hotkey. There are two different modes to this. Simple and advanced, which can be switched between by clicking the Advanced mode button.
-
Remember to also set an action!
To set the hotkey you want, simply select the highlighted input field and press the key you want to bind to the action. You can also press key modifiers like shift, alt and ctrl, however not Win.
After choosing a keybind, press the save button.
To create a hotkey you need to:
- Select the modifier keys you want to use.
- Select the key you want to from the dropdown menu.
- If you want, change if the keybind should activate when the key is pressed down, or released.
- Save!

-
Click the Set Action button.
-
A dialog will open where you can set the Action. You can either set the action to a new key, or a special action.
-
Follow the guide Special Action or follow parts of the Set Hotkey guide. When setting the new action to be a new key it is pretty much the same as the guide for setting a new hotkey (the image below is for setting a new key)

To set the action to a special action, you need to select the action you want from the dropdown menu. After selecting the action, press the save button.
After selecting an action you will get an some information:
- Action description: describes what the selected action does.
- Action to do: what the action does.
- Action parameters: what parameters the action takes. For example, if the action is to change screen brightness, the parameter could be a number between 0 and 100, where 0 is the lowest brightness and 100 is the highest brightness. You yourself must fill out the parameters for an action to your liking.
After you have selected an action an filled out it's parameters, save!

- Follow first the general steps for adding/editing/deleting a keybind, which is just finding which key you want to edit.
- After having selected the keybind you want to delete, click the Edit button.
- A dialog will open where you can edit the hotkey and the action. Follow the guide for adding a keybind to set the hotkey and the action.
- Follow first the general steps for adding/editing/deleting a keybind, which is just finding which key you want to delete.
- After having selected the keybind you want to delete, click the Delete button.
- The keybind will be deleted!
The preset profiles are HEAVILY inspired by the extend layer created by DreymaR. Check it out.
To create images of the keyboard layouts I used a great online Keyboard Layout Editor.