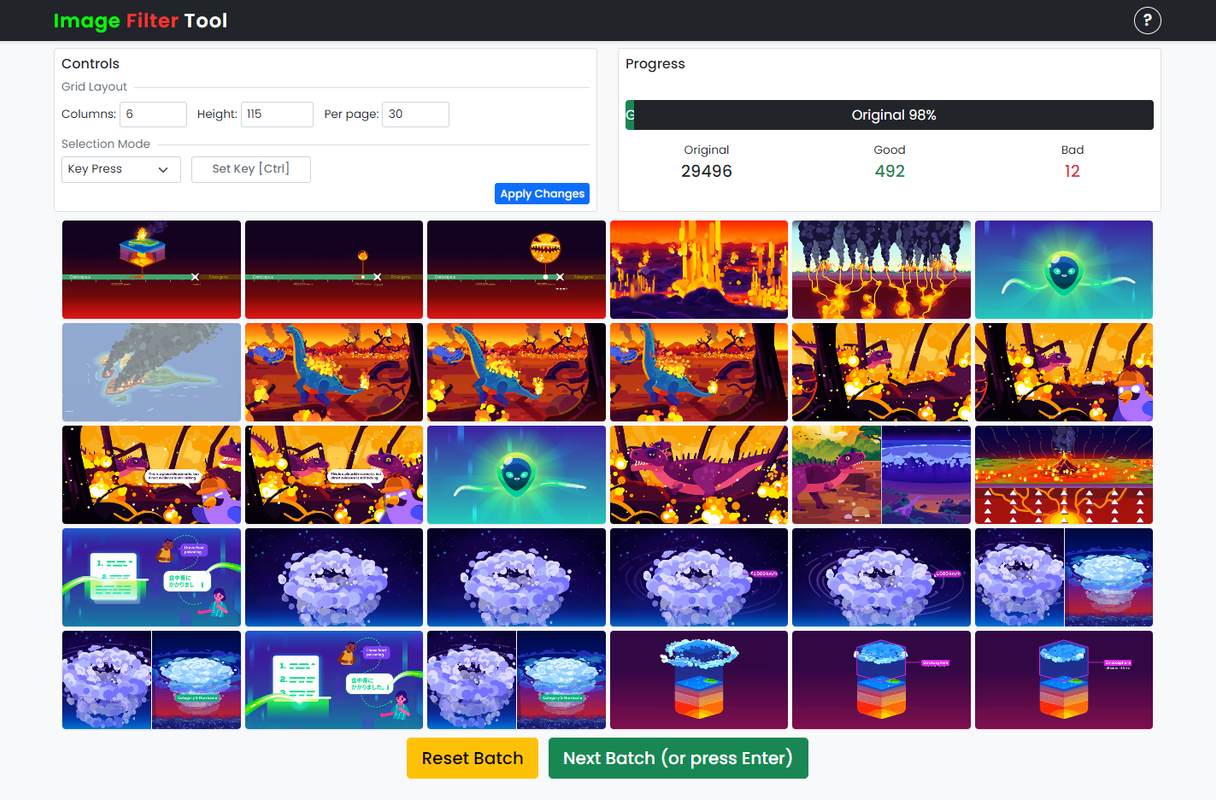
A web-based tool designed for efficiently filtering and categorizing large image datasets. Perfect for dataset cleaning, image curation, and rapid visual sorting tasks.
- Dynamic Grid Layout
- 🔹 Adjustable columns (1-24): Customize grid width to match your screen size
- 🔹 Configurable image height (40-400px): Balance between detail visibility and overview
- 🔹 Variable images per page (1-72): Adjust batch size based on your workflow
- 🔹 Real-time layout updates: Instant visual feedback for all adjustments
- Multiple Selection Methods
- 🔸 Hover Mode: Hold the cursor over images to mark them (adjustable timing)
- 🔸 Key Press Mode: Hover over images and press your chosen key (fully customizable)
- 🔸 Click Mode: Click to toggle for precise control
- 🔸 Visual feedback: Animations and opacity changes for clear marking status
- Progress Tracking
- ✔️ Real-time progress visualization: See your progress as you work
- ✔️ Stacked progress bar: Color-coded sections for good (green), bad (red), and remaining (black) images
- ✔️ Numerical statistics: Exact counts for each category
- ✔️ Persistent progress: Automatically saves your work between sessions
-
Clone the repository:
git clone https://github.com/ameencaslam/Filter-V2 cd Filter-V2 -
Create a virtual environment:
python -m venv venv
-
Activate the virtual environment:
# Windows:
venv\Scripts\activate
# Linux/Mac:
source venv/bin/activate
-
Install the requirements:
pip install -r requirements.txt
-
Configure your image directory:
Update theIMAGE_DIRconstant inapp.pyto point to your image directory:IMAGE_DIR = 'your_image_directory'
The directory should contain your
.jpg,.jpeg, or.pngimages.
- Place your images in the directory you specified in
IMAGE_DIR(supports.jpg,.jpeg,.png). - Run the application:
python app.py
- Open your browser and navigate to: http://127.0.0.1:5000/.
- Use the built-in tutorial (
?button) for detailed usage instructions.
- Columns: Adjust the number of images per row.
- Height: Set image height in pixels for optimal viewing.
- Per Page: Control how many images load in each batch.
- Apply Changes: Instantly update the layout.
- Hover Time: Configure how long to hover before marking (100-2000ms).
- Key Press: Set any key (e.g., Ctrl, Alt) for marking images.
- Click: Simply click anywhere on the image to toggle its status.
- Reset Batch: Clear all markings in the current view.
- Next Batch: Save markings and load new images.
- Enter Key: Quick shortcut for loading the next batch.
The repository follows this structure for easy navigation and organization:
Filter-V2/
├── app.py              # Flask application
├── templates/          # HTML templates
│   └── index.html       # Main interface
├── your_image_dir/        # Image directory
│   └── (your images)   # Place your images here
├── images.csv          # Progress tracking file
├── requirements.txt    # Python dependencies
├── README.md           # Project documentation
└── LICENSE             # License file (if applicable)
app.py: The entry point for the application. This script runs the server.templates/: Contains HTML templates used for rendering the UI.your_image_dir/: Directory for storing your images (can be customized).images.csv: Tracks user progress automatically.requirements.txt: Lists Python dependencies required to run the application.README.md: A comprehensive guide for the project, including setup, usage, and contribution guidelines.LICENSE: Specifies the terms and conditions for using, copying, and distributing the project.
- Python 3.6 or higher
- Flask (web framework)
- Pandas (data management)
- A modern web browser with JavaScript enabled
- Minimum screen resolution: 1024x768
We welcome contributions from developers of all experience levels! Here's how you can get involved:
- Fork this repository to your GitHub account by clicking the Fork button.
- Clone your forked repository to your local machine:
git clone https://github.com/ameencaslam/Filter-V2
cd Filter-V2
- Create a new branch for your feature or bug fix:
git checkout -b your-branch-name
- Make your changes and commit them:
git add .
git commit -m "Your descriptive commit message"
- Push your branch to your forked repository:
git push origin your-branch-name
- Open a pull request from your branch on GitHub. Provide a clear description of your changes and why they should be merged.
- Ensure your code follows best practices and includes comments where necessary.
- Test your changes thoroughly before submitting.
This project is licensed under the MIT License. You are free to use, modify, and distribute this software, provided that proper attribution is given. See the LICENSE file for more details.