Home
![]()
As embedded systems become more complex, the need for efficient and automated testing solutions has grown. One approach is embedded systems board farming, a technique that involves using multiple microcontroller boards to automate the testing process. Board farming refers to using a cluster of test devices or development boards to perform automated testing and development tasks. This setup allows developers to run multiple tests simultaneously, drastically reducing the time required for testing and development cycles. It also helps maintain consistency and accuracy across various tests.
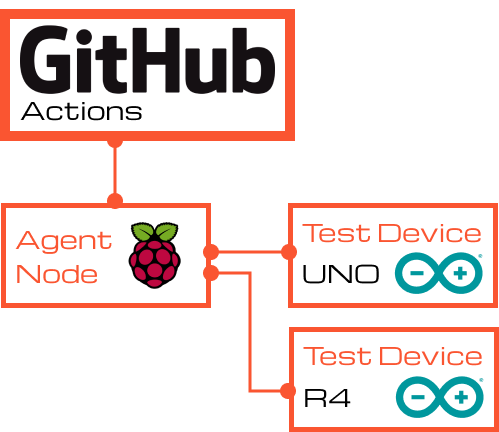
In this tutorial, you’ll explore how you can set up your board farm using Raspberry Pis as Agents and Arduino boards as device under test.
Topics covered:
- GitHub Actions: to automated the build and test process.
- Self-hosted GitHub runners: Use Raspberry Pis to flash and test.
- GitHub CLI: To check GitHub runners
- Arduino CLI: To compile sketches, find and flash boards
- PyTest: Use Python for system tests
Note: This tutorial is the first one of a serial about board farming.
- A Linux or macOS based host machine
- Arduino Uno & Arduino Uno R4 Minima
- Raspberry Pi >= 3
- Basic shell experience
- Basic software development experience
This step-by-step guid will guide you through, setting up a self-hosted GitHub runner on a Raspberry Pi, develop a CI by using GitHub Actions and finally run tests with PyTest agains two different Arduinos.
To set up your Arduino board farm, you’ll need the following hardware components:
- Arduino Boards: Arduino Uno & Arduino Uno R4 Minima
- Raspberry Pi: Including power supply and micro SD-Card
- Cables: Sufficient USB cables to connect the Arduino boards.
Connect each Arduino's USB port to the Raspberry Pi. It does not matter which Raspberry Pi USB port you use. Prepare the Raspberry Pi power supply, but dont yet power on the Pi.
Fork the board_farm_tutorial_1 repository and clone it to your host machine:
gh repo fork bitcrushtesting/board_farm_tutorial_1
gh repo clone board_farm_tutorial_1
cd board_farm_tutorial_1
How to install GitHub cli: GitHub
Execute the start_tutorial.sh shell script. It will purge the files you will create yourself and does some checks on your operating system.
./start_tutorial.shCommit the changes:
git add *
git commit -am "Starting the tutorial"
git push originAn agent node is a server that executes on behalf of a control node. In this case GitHub is the control node and the Raspberry Pi is the agent node hosting a GitHub runner.
1.0 Flash the operating system
Get the Raspberry Pi Imager application from raspberrypi.com
Install and start the application.
Flash the SD-Card with Raspberry Pi OS (other) -> Raspberry Pi OS Lite (64-bit)
- Edit settings
- Set hostname: 'agent-node'
- Enable SSH
- Configure wireless LAN
Eject the SD-Card and insert it into the Raspberry Pi.
1.1 SSH into the Raspberr Pi
Connect the Raspberry Pi to your local area network and power it on.
ssh pi@agent-node.localTIP: Use 'ssh-copy-id' to copy your id to the Rasperry Pi and you wont be asked for a password again.
1.2 Install dependencies
- Arduino CLI: A command-line interface tool for managing Arduino projects and boards.
- GitHub Runner: An application that runs GitHub Actions workflows.
- Python: Install Python to write and run automation scripts. Python is preferred due to its extensive libraries and ease of integration with various tools.
- PyTest: A Python based testing framework that simplifies writing and running tests.
- Systemd Service: Enables auto start of the GitHub runner at boot time
An install script is prepared, which installs the required software and enables auto-start for the GitHub runner.
File: install_agent_node_dependencies.sh
Copy the install script to the agent node:
scp ./board_farm_tutorial_1/scripts/install_agent_node_dependencies.sh pi@agent-node.local:~/Execute the install script:
ssh pi@agent-node.local
./install_agent_node_dependencies.sh
exit
You will be asked for a GitHub runner token.
To gather the token, follow this guide: Add self hosted runners
1.3 Check if the runner is online
gh api -H "Accept: application/vnd.github+json" -H "X-GitHub-Api-Version: 2022-11-28" /orgs/<ORG>/actions/runnersGitHub Workflows are automated processes configured in a repository that define the steps to build, test, and deploy code using GitHub Actions. They use YAML syntax to specify events that trigger the workflow, jobs that run in parallel or sequentially, and the specific actions or commands to execute.
Create a file named ci.yaml inside the .github/workflows/ directory, and add the sections as descibed.
Note: The file name of the workflow does not matter as long as it is a *.yml or *.yaml file inside the folder '/.github/workflows/' GitHub will recognize it as a workflow.
Action Name
On the top of the file start with the YAML document start "---" and afterwards define the workflow name.
---
name: Arduino CI
The name will be used in future steps. If you change this name those example commands will not work as intended.
Trigger
This defines which actions will trigger the workflow. This workflow is only triggered on pushes on the main branch:
on:
  push:
    branches:
      - main
Note: Be carefull with public repositories and self-hosted runners. If everybody can trigger the workflow, harmfull code may be injected and executed.
Build Job
The build job is supposed to run on a GitHub-hosted runner. ubuntu-latest uses the latest available Linux runner.
jobs:
  build:
    runs-on: ubuntu-latest
Because the firmware is beeing build for two different boards, even two different instruction sets, a strategy matrix is defined. By having this in place, the steps defined after are executed for each item defined in this strategy.
    strategy:
      matrix:
        board:
          - {fqbn: "arduino:avr:uno", path: "arduino.avr.uno", name: "arduino_uno"}
          - {fqbn: "arduino:renesas_uno:minima", path: "arduino.renesas_uno.minima", name: "arduino_uno_r4_minima"}
The steps for this job:
- Get the source code
- Ensure the dependency path
- Install the build tools
- Build the firmware
- Upload the binary
   steps:
      - name: Checkout code
        uses: actions/checkout@v4
The Ensure path step is required to make arduino-cli find the required binaries:
      - name: Ensure path
        run: |
          mkdir -p $HOME/.local/bin
          echo "$HOME/.local/bin" >> $GITHUB_PATH
Arduino provides compile-sketches, a GitHub Action ready to be used in the workflow to build the firmware. The target hardware fqbn defined in the board matrix. The sketch-paths defines the location of the source code. The cli-compile-flag --export-binaries tells arduino-cli to store the binaries not in the usual temp folders but whithin the sketch directory.
     - name: Compile
        uses: arduino/compile-sketches@v1
        with:
          fqbn: ${{ matrix.board.fqbn }}
          sketch-paths: |
            - ./firmware/
          libraries: |
            - name: ArduinoJson
              version: 6.21.4
          cli-compile-flags: |
            - --export-binaries
The upload-artifacts step uploads the binary to a storage that is associated with the workflow run. The name is the artifact name in the GitHub storage, the path is the directory with the files to include. With it-no-files-found being set to error, the workflow aborts if no files have been found in the specified path.
      - name: Upload build artifacts
        uses: actions/upload-artifact@v4
        with:
          name: firmware-${{ matrix.board.name }}
          path: ./firmware/build/${{ matrix.board.path }}/
          if-no-files-found: error
With the firmware binaries beeing uploaded the build step is done.
Test the changes before pushing it to GitHub.
First test for YAML formatting issues with yamllint.
yamllint .github/workflows/ci.ymlHow to install
yamllint: readthedocs.io
Use the act tool to test your workflow locally. This tool requires Docker.
List the available jobs:
act --list How to install
act: nektosact.com
Test the build job with:
act -j buildCommit the changes and push it to GitHub:
git add .github/workclows/ci.yml
git commit -am "Add workflow file"
git push origin
The first run has been triggered by adding the workflow to the GitHub repository and pushing to the main branch. Check the status with this command:
gh run list --workflow "Arduino CI"The test shall ensure that the right board is used and the correct firmware version is flashed. To ensure the correct firmware not only the version, but also the git hash is checked. The firmware sketch is doing nothing but blinking an LED. The second test is checking the LED status. Using PyTest for system tests is advantageous because it provides a robust framework for writing and organizing tests, with extensive support for fixtures, parameterized tests, and plugins that enhance functionality. Additionally, PytTst's powerful assertion mechanisms and detailed reporting help in efficiently diagnosing and debugging issues.
5.1 Develop the test scipt
Create the file test_arduino.py:
touch tests/test_arduino.pyThe Arduino firmware has a JSON-RPC interface. It has two methods, getVersion and getStateLed.
The getVersion is important for configuration management, it is to ensure that the right firmware has been flashed.
Define the entry point of this Python script:
if __name__ == "__main__":
    sys.exit(pytest.main([__file__]))
Parse the command line arguments for the Arduino port:
def parse_args():
    parser = argparse.ArgumentParser(description='Test Arduino JSON-RPC over serial')
    parser.add_argument('--port', required=True, help='Serial port of the Arduino (e.g., /dev/ttyUSB0')
    return parser.parse_args()
Setup and helper functions for the serial communication:
@pytest.fixture(scope="module")
def serial_connection(request):
    # Setup the serial connection
    args = parse_args()
    ser = serial.Serial(args.port, args.baud, timeout=TIMEOUT)
    time.sleep(2)  # Wait for Arduino to reset
    yield ser
    ser.close()

def send_json_rpc_request(ser, method, params=None, id=1):
    request = {
        "jsonrpc": "2.0",
        "method": method,
        "id": id
    }
    if params:
        request["params"] = params
    ser.write((json.dumps(request) + '\n').encode('utf-8'))

def read_serial_response(ser):
    response = ser.readline().decode('utf-8').strip()
    return json.loads(response)
PyTest will execute every functions that starts with test_.
This is the test for the firmware version:
def test_get_version(serial_connection):
    ser = serial_connection
    send_json_rpc_request(ser, "getVersion")
    response = read_serial_response(ser)

    assert response["jsonrpc"] == "2.0"
    assert "result" in response
    assert "version" in response["result"]
    assert "gitHash" in response["result"]
    assert response["result"]["version"] == "1.0.0"
    assert response["result"]["gitHash"] == "abc123"  # Replace with the actual hash you set
The firmware is just toggeling a led. The status of the led can be requested with getStateLed, which replies either ON or OFF.
def test_get_led_state(serial_connection):
    ser = serial_connection
    send_json_rpc_request(ser, "getLedState")
    response = read_serial_response(ser)

    assert response["jsonrpc"] == "2.0"
    assert "result" in response
    assert "state" in response["result"]
    assert response["result"]["state"] in ["ON", "OFF"]
Last, add the imports to the top of the file:
import argparse
import json
import serial
import sys
import time
import pytest
The file should look like this: test_arduino.py
5.2 Test the test script
Get the pre-built binary:
mkdir -p ./build && cd build
gh run download
cd ..
When asked by gh which artifact to download, select the file firmware-arduino_uno.
Copy the project to the agent-node, and ssh into it afterwards.
scp -r ../board_farm_tutorial_1 pi@agent-node.local:~/board_farm_tutorial_1Flash the pre-built binary to the Arduino UNO board.
PORT=$(python3 scripts/find_board_port.py arduino:avr:uno)
arduino-cli upload -p ${PORT} --fqbn arduino:avr:uno --input-dir . --verify --verbose
Run the test script:
python3 ./tests/test_arduino.py --port $PORT 5.3 Commit the changes
git add tests/test.py
git commit -am "Add test script"
git push originTest Job
The test job is supposed to run on the Raspberry Pi, with the runs-on property the runner is defined. The value can be any label assigned to the target runner. Default labels are created during runner installation, but custom labels may be added to better identify the runner. For this example the default label self-hosted is sufficient, since there is only one runner present.
A dependency to the build job is defined with needs: <job>. The test jobs needs the build job to provide the firmware binaries.
  test:
    runs-on: self-hosted
    needs: build
The test is supposed to be executed for each board. Similar to the build job a strategy is defined:
    strategy:
      matrix:
        board:
          - { fqbn: "arduino:avr:uno", path: "arduino.avr.uno", name: "arduino_uno"}
          - { fqbn: "arduino:renesas_uno:minima", path: "arduino.renesas_uno.minima", name: "arduino_uno_r4_minima" }
The steps for this job:
- Get the pre-built binary
- Get the source code
- Detect the connected board
- Flash the board
- Run the test script
The first step is to download the source code, same as with the build job. This time the test and helper scripts are needed, that are also included in the same repository.
   steps:
      - name: Checkout code
        uses: actions/checkout@v4
Download the firmware binary, which has been uploaded in the last step of the build job. The name (in with) must be the same as specified at upload. The path is the directory where the files will be stored.
      - name: Download build artifacts
        uses: actions/download-artifact@v4
        with:
          name: firmware-${{ matrix.board.name }}
          path: ${{ github.workspace }}/build
The Python script find_board_port.py returns the serial port of the targeted Arduino board.
      - name: Set Board Port
        run: |
          echo "PORT=$(python scripts/find_board_port.py ${{ matrix.board.fqbn }})" >> $GITHUB_ENV
arduino-cli has been installed in STEP 2. Now, it is used to upload the firmware to the target Arduino:
      - name: Upload Sketch
        run: |
          arduino-cli upload -p ${PORT} --fqbn ${{ matrix.board.fqbn }} --input-dir ${{ github.workspace }}/build/ --verify --verbose
After flashing the board, it is time for the last step, running the actual test:
      - name: Test Sketch
        run: |
          python3 tests/test_arduino.py --port ${PORT}
The workflow is ready and should look similar to the original file: ci.yml
You may check the differences with this command:
diff .github/workflows/ci.yml <(curl -s https://raw.githubusercontent.com/bitcrushtesting/board_farm_tutorial_1/main/.github/workflows/ci.yml)Test the workflow file with yamllint, and as soon as the test is successfull commit the changes and push it to GitHub.
yamllint .github/workclows/ci.yml
git add .github/workclows/ci.yml
git commit -am "Add test step to workflow"
git push origin
Check the GitHub Action status:
gh run list --workflow "Arduino CI"See the runner debug output on the agent node with:
journalctl -f -u github-runnerRegularly monitor the health and status of your board farm.
Add the CI badge to your README by adding this line (replace <username> with your username):
[](https://github.com/<username>/board_farm_tutorial_1/actions/workflows/ci.yml)
The badge will look like this:
![]()
By setting up a board farm, you can improve the reliability of your projects, and accelerate your development cycles. Try it with your own project! Start small, experiment with different configurations, and gradually expand your farm.
Start the next tutorial: Board farm tutorial 2
Happy farming!
We would love to hear back from you. Helps us improve our turorials and file the evaluation form:
If you find this tutorial helpful, please consider ⭐️ring or sharing it! Star this repository

Email: contact@bitcrushtesting.com
LinkedIn: Bitcrush Testing