![]()


- Description
- Project structure
- Build environment
- Software Test
- Flashing board
- Update Arduino CLI
- Continuous Integration
- Dev Container
- Release package
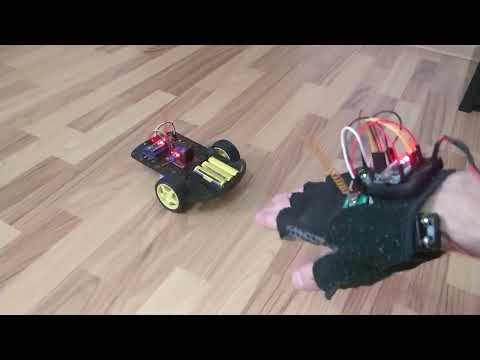
- Demo
The operation of the robot, consists in taking over the data from the accelerometer by the Arduino board of the controller according to its orientation, and this data will be transmitted to the robot through the radio transmitter module.
The data is taken over by the radio receiver and will be sent to the Arduino board of the robot, then through the connecting wires will be sent electrical signals to the H-bridge circuit to operate the two DC motors.
This small project is structured in several folders and files as following:
.
├── .github/
│       ├── workflows/
│       │       ├── build.yml
│       │       ├── nightly.yml
│       │       ├── release.yml
│       │       └── update_arduino_cli.yml
│       └── CODEOWNERS
├── doc/
│       ├── circuit_controler_tx.jpg
│       ├── circuit_robot_rx.jpg
│       ├── demo.mp4
│       └── proiect.pdf
├── lib/
│       ├── MPU6050_tockn.zip
│       └── VirtualWire.zip
├── src/
│       ├── controller/
│       │       └── controller.ino
│       └── robot/
│               └── robot.ino
├── test/
├── tools/
│       ├── 7-zip/
│       │       ├── 7z.exe
│       │       └── License.txt
│       └── arduino-cli/
│               ├── arduino-cli.exe
│               └── License.txt
├── .gitignore
├── binary_files.zip
├── config.yml
├── README.md
├── start_console.bat
├── update_arduino_cli.bat
└── LICENSE
MPU6050_tockn and VirtualWire open-source libraries are used in this project to send information from controller to robot and to calculate gyroscope position.
Arduino CLI tool is used for the build process and it represents the most important tool from this project.
The archive that contains binary files generated during release process is created using 7-Zip tool.
The main program used for mainly action on this project is start_console.bat script that can be found on root folder.
This program can be executed in silent mode (no user interaction) by openig a terminal in root folder of repository and run the following command:
start_console.bat <PARAMETER>
where the <PARAMETER> represents the argument for specific action.
The log files for each action can be found on logs folder which is automatically created.
start_console.bat a
After this step, the arduino15 new foder is created on root folder that contains all necessary arduino dependencies used during build process.
By default, the arduino:avr@1.8.6 platform is installed.
start_console.bat l
The libraries mentioned before are installed in specific folder from arduino15 folder to be visible and integrated during software compilation
start_console.bat b
After compilation is done, a build folder is created and tis will contains binary files.
This table provides an overview of the binary files generated during the build process.
| File Type | Description |
|---|---|
.hex |
Compiled binary in Intel HEX format for uploading to the board. |
.elf |
Executable and Linkable format file, includes debugging information. |
.bin |
Raw binary file for flashing. |
.eep |
EEPROM file containing data for EEPROM memory. |
.map |
Memory map file showing detailed memory usage. |
For more details on how to configure and use Arduino CLI, refer to the Arduino CLI documentation.
Create some unit test if it's possible. To be done.
For the moment, Arduino IDE had to be used for this actions but the goal is to use Arduino CLI.
To be done.
As it's mentioned before, this tool is the heart of build process. If a new version of this tool is released in order to solve a discovered bug in the previous one, a script was developed to be easier for user to achive this goal.
From root folder of this repository, open update_arduino_cli.bat script and enter the new version.
This process can be done in silent mode by opening a terminal in root folder and run the following command
update_arduino_cli.bat <NEW_VERSION>
where the <NEW_VERSION> argument represents the new version of Arduino CLI.
To simplify the working process, some workflows were developed as following:
-
Build
- It's automatically triggered when a Pull Request is created in order to test the new implementation.
- It's automatically triggered when a Pull Request is created in order to test the new implementation.
-
Nightly
- A build job automatically triggered on monday, wednesday and friday at midnight that compile all files to check consistency.
- A build job automatically triggered on monday, wednesday and friday at midnight that compile all files to check consistency.
-
Release
- This worflow is triggered manually by user and he will enter the desired version for this release (e.g. 1.0).
- A new branch that will contains the new binary files archive is created on Git
- The generated archive will be uploaded as artifact on this workflow in order to be downloaded by user.
-
Update Arduino CLI
- In order to keep this tool updated, a workflow was developed to do this job automaticaly.
- This worflow is triggered manually by user that will enter the new version for Arduino CLI tool.
- A new branch will be created on Git after this tool is installed.
The mentioned workflows can be found on Actions section from this project.
To be done.
At the moment it's a ZIP archive.
To be created a package as Docker image and to be uploaded on DockerHub or GitHub Packages Repository.