Your first LML application
This tutorial will walk you through setting up a simple application using LML to create its GUI.
Make sure you have all the necessary software to create and run a LibGDX project (Java runtime environment 7+, official gdx-setup application). Installing Gradle locally can be also helpful.
Run gdx-setup application. Fill the usual project data. Click the Show Third Party Extensions button and choose gdx-lml-vis from the list. gdx-lml-vis is an extension that brings VisUI support to basic gdx-lml library, which handles only standard Scene2D widgets by default. We're using gdx-lml-vis for simplicity: LML syntax is pretty much the same, but Scene2D does not feature a default skin. VisUI does.
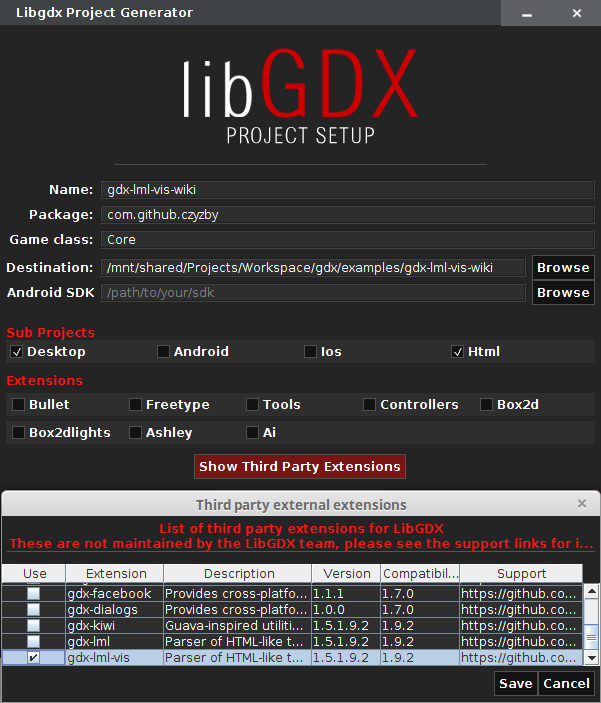
As you can see, we do not generate projects for mobile platforms. This is not because gdx-lml does not support them: we're going for simplicity and running an Android/iOS project is out of scope of this tutorial.
After you click the Generate button, the project structure will be created with the libraries already included.
This step is optional, but worth the time.
You'll quickly notice that gdx-setup "hard-coded" library versions. This is not a very good solution, as you might want to change all occurrences of library version in the Gradle script. Apparently third party extensions do not get their own version variable like official ones do - but we can easily change that.
Find allproject.ext setting and add the following line:
        ext {
            appName = "gdx-lml-vis-wiki"
            gdxVersion = '1.9.2'
            roboVMVersion = '1.12.0'
            box2DLightsVersion = '1.4'
            ashleyVersion = '1.7.0'
            aiVersion = '1.8.0'
            // LML library version:
            lmlVersion = '1.6.1.9.2'
        }
Now you can find-and-replace all occurrences of 1.6.1.9.2 (or whatever version was LML in gdx-setup when you generated the project) with $lmlVersion.
gdx-setup "forgets" to link core/assets directory as resources source in desktop project. Adding this line will make sure that your assets folder is properly recognized by your IDE:
sourceSets.main.resources.srcDirs = [ project(":core").file("assets") ](Note: this sometimes causes issues when you import it as Gradle project, but idea and eclipse tasks should be fine.)
You can also optionally add Maven Local to allprojects.repositories. This will allow you to build install your versions of libraries and choose them over the default ones from Maven Central.
        repositories {
            mavenLocal()
            mavenCentral()
            maven { url "https://oss.sonatype.org/content/repositories/snapshots/" }
            maven { url "https://oss.sonatype.org/content/repositories/releases/" }
        }
If you're using Eclipse, you might want to modify tasks.eclipse.doLast. While the implementation generated by gdx-setup removes project description in root folder (making it "invisible" for Eclipse importing mechanism), it leaves other Eclipse meta-data that could be removed after eclipse task. To properly clean your root folder after eclipse task, use this:
        tasks.eclipse.doLast {
            delete ".project"
            delete ".classpath"
            delete ".settings/"
        }
Now you're ready to run gradle idea or gradle eclipse task to generate projects for your IDE - or simply load the whole thing as a Gradle project.
The official gdx-setup application has its flaws, it's not a secret. Fortunately, there's an alternative unofficial gdx-setup application that I heavily contributed to. Not only is its Gradle setup correct, but also you can choose among multiple project templates - including basic LML applications examples. For the needs of this tutorial though, so-called "classic" template is enough, as it will show how to include LML in your project step by step.
Writing HTML-like templates should be natural for you, but you might be asking yourself how to actually use them in your Java code. LML gives you several options to do so - we'll explore the one that requires the least work on your part.
Open your ApplicationListener class in core project. It should look similarly to this:
        public class Core extends ApplicationAdapter {
          SpriteBatch batch;
          Texture img;

          @Override
          public void create () {
            batch = new SpriteBatch();
            img = new Texture("badlogic.jpg");
          }

          @Override
          public void render () {
            Gdx.gl.glClearColor(1, 0, 0, 1);
            Gdx.gl.glClear(GL20.GL_COLOR_BUFFER_BIT);
            batch.begin();
            batch.draw(img, 0, 0);
            batch.end();
          }
        }
Remove everything, including ApplicationAdapter extension. While there are more subtle ways of using LML in your project, we'll allow LML to handle our views and implement ApplicationListener for us. Without the need to manage your screens manually, you can focus on the screens themselves and their content.
Extend LmlApplicationListener. This class allows you to manage multiple AbstractLmlView instances to display your screens. It ensures that the views are properly loaded and filled with LmlParser. Basically, LmlApplicationListener is the same thing to AbstractLmlView that LibGDX Game is to Screen - only it's packed with more features.
You can create your LmlParser using static VisLml utility:
        public class Core extends LmlApplicationListener {
            @Override
            protected LmlParser createParser() {
                return VisLml.parser().build();
            }
        }
And that's it! Well, you have no views yet, but that's pretty much the most basic setup that would allow you to run your application. Obviously, without any views the application currently displays a black screen, but at least it works. That's something, right?
When using plain gdx-lml, Lml is a similar static utility class to VisLml which will allow you to create your LmlParser. You should know that VisUI features its own skin, while plain Scene2D doesn't - so you have to register one on your own. LmlParser building with plain gdx-lml would look like this: Lml.parser(new Skin(Gdx.files.internal("skin.json"))).build();. Anyway, back to the point.
Create views package. LML uses some reflection you make your life easier, so if you plan on targeting GWT platform (as we do in this example), open your gwt.xml definition file. In our case, this is the Core.gwt.xml file in core project. Include views package in GWT reflection:
<extend-configuration-property name="gdx.reflect.include" value="com.github.czyzby.views" />I'm afraid this is how GWT works and we just have to deal with it. If you get any "Couldn't find Type for class" exceptions in runtime, this is 99.9% because some class was not included in reflection pool and it should have been. When extensively using reflection, prepare to get this kind of error for the most unexpected classes.
Anyway, back to Java. Create a FirstView class in your views package. Make it extend AbstractLmlView. You'll notice that you need to pass a Stage instance to AbstractLmlView constructor - for now, we can use the default no-argument Stage constructor to create one. Override getTemplateFile() method with path to the .lml file representing this view. Your view should look like this:
        public class FirstView extends AbstractLmlView {
            public FirstView() {
                super(new Stage());
            }

            @Override
            public FileHandle getTemplateFile() {
                return Gdx.files.internal("views/first.lml");
            }

            @Override
            public String getViewId() {
                return "first";
            }
        }
(Side note: it's better to keep view IDs unique. While collisions will not crush your application, you won't be able to use some certain features. A good rule of thumb: whether you choose an ID for action container, view or an actor, keep try to keep it unique across the application.)
We referenced a file with views/first.lml path, but it doesn't exist yet. We should change that.
Create views directory in your assets folder. (You can go ahead and delete badlogic logo while you're there.) Create first.lml file. If you want some basic syntax coloring and content assist, make sure that your IDE opens .lml files with XML editor.
LML tags usually correspond to Scene2d (or VisUI in this case) actors with the same name. For example, there's a Window actor class, so you can safely assume that <window> tag will create its instance. Attributes allow to set up your actors and are mostly mapped to Java methods with the same name (with "set" stripped). Constructor parameters are also supported. For example, since Window class has String title constructor parameter, you can use <window title="Title."> to set it. Let's create a simple window with some text:
<window title="My first view.">
Hello world!
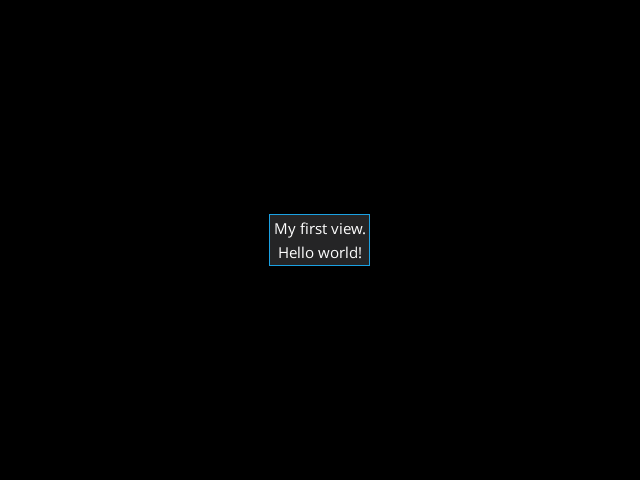
</window>Now, we need to set our first view to make sure that it's rendered. Override create() method in your LmlApplicationListener extension:
        public class Core extends LmlApplicationListener {
            @Override
            public void create() {
                super.create();
                setView(FirstView.class);
            }
            // (...)
When you run the application now, as expected, you'll see a simple window displaying some text.
There are several things we can do to make this code more maintainable.
First of all, we used default Stage constructor, which creates a new Batch instance. Batch is a relatively heavy object and should be shared across all stages in the application. Additionally, we're using the default Viewport. We still want to keep view constructors as simple as possible, so let's create a utility method in our LmlApplicationListener to provide our custom stages:
        public class Core extends LmlApplicationListener {
            public static final int WIDTH = 480, HEIGHT = 340;
            private Batch batch;

            @Override
            public void create() {
                batch = new SpriteBatch();
                super.create();
                setView(FirstView.class);
            }

            /** @return application's only {@link Batch}. */
            public Batch getBatch() {
                return batch;
            }

            /** @return a new customized {@link Stage} instance. */
            public static Stage newStage() {
                // Getting our Core instance:
                Core core = (Core) Gdx.app.getApplicationListener();
                return new Stage(new FitViewport(WIDTH, HEIGHT), core.getBatch());
            }

            @Override
            public void dispose() {
                super.dispose();
                Disposables.disposeOf(batch);
                VisUI.dispose(); // Disposing of default VisUI skin.
            }

            @Override
            protected LmlParser createParser() {
                return VisLml.parser().build();
            }
        }
You can also load your custom skin data or different VisUI skin scale. Let's use the resized VisUI skin version in our example:
        @Override
        public void create() {
            VisUI.load(SkinScale.X2);
            batch = new SpriteBatch();
            super.create();
            setView(FirstView.class);
        }
Now we should modify our view to actually use the static Stage utility:
        public class FirstView extends AbstractLmlView {
            public FirstView() {
                super(Core.newStage());
            }
            (...)
All that's left is modifying DesktopLauncher to use our default width and height from Core:
        public class DesktopLauncher {
            public static void main(final String[] arg) {
                createApplication();
            }

            private static Application createApplication() {
                final LwjglApplicationConfiguration config = new LwjglApplicationConfiguration();
                config.width = Core.WIDTH;
                config.height = Core.HEIGHT;
                return new LwjglApplication(new Core(), config);
            }
}first.lml in the current state would be hard to localize. After all, using plain text in .lml files is no better than magic strings in Java code. Needless to say, creating a separate view template for each language would quickly get us nowhere. Fortunately, LibGDX comes with its i18n utility: I18NBundle - and LML makes it easier to use than ever. First of all, create i18n directory in assets folder and add bundle_en.properties file:
firstTitle=My first view.
helloWorld=Hello world!
Translating a bunch of properties is much easier than going through all views and replacing all plain text by hand. Now we just have to load the bundle and make it accessible from LML templates. Modify your parser building method to include the I18NBundle instance:
        @Override
        protected LmlParser createParser() {
            return VisLml.parser()
                    // Adding localization support:
                    .i18nBundle(I18NBundle.createBundle(Gdx.files.internal("i18n/bundle"))).build();
        }
Now, instead of plain text in first.lml, we can easily reference lines from our i18n bundle by proceeding them with @:
        <window title="@firstTitle">
          @helloWorld
        </window>
Running the application now, with our resized skin and localized text, should display pretty much the same window, but slightly bigger:
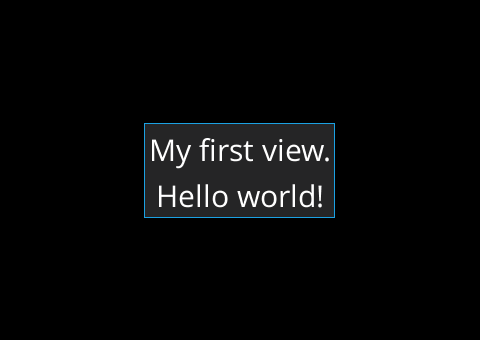
Now our views efficiently reuse Batch instance, application is easy to translate and we know how to customize the skin. Still, an application without any user interaction is pretty dull, isn't it? Time to change that.
It would be perfect if you could just fully implement your views in LML, but - unfortunately - some stuff has to be done in Java. Namely: actions. Sooner or later you'll want to attach a listener to a widget or simply have direct access to some actor instance created with LML. Fortunately, LML makes it very easy with its annotations.
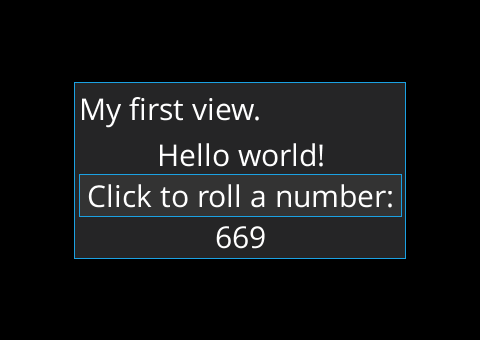
Let's say we want to create a button that rolls a random number when clicked. The number should be displayed on another actor - a separate label. This "problem" requires us to implement 2 things: an event listener for the button and some way to access and modify the label. First, start with adding these widgets to first.lml and the required text to bundle_en.properties:
        <window title="@firstTitle" onecolumn="true">
          @helloWorld
          <textbutton onclick="roll">@randomPrompt</textbutton>
          <label id="random"/>
        </window>
firstTitle=My first view.
helloWorld=Hello world!
randomPrompt=Click to roll a number:
Thanks to the fact that we used id attribute in the label, we'll be able to easily find this actor in our code. onclick attaches a ClickListener to the button - an action mapped to roll will be found and invoked each time we click the button. All that's left to do is actually implementing the action.
Now, let's go back to our FirstView class. @LmlActor annotation allows us to find actors by their IDs and inject them to our view class. Getting a reference to our label is as simple as:
@LmlActor("random") private Label result;Once the view is parsed, result will hold the Label instance that had id="random" attribute. When injecting actors, make sure that the fields have correct types, otherwise an exception will be thrown.
All FirstView methods can be invoked from within first.lml by passing their method. To create the roll action for our button, all we have to do is create a roll() method:
        public void roll() {
            result.setText(String.valueOf((int) (MathUtils.random() * 1000)));
        }
This would already work, but is also prone to errors: as soon as you refactor roll() method (or obfuscate your application, changing all method names, which is much more probable), your template will stop working. The prevent that, you can annotate the listener method with @LmlAction and pass action aliases. This is the preferred way of creating listener methods in Java.
        @LmlAction("roll")
        public void rollNumber() {
            result.setText(String.valueOf((int) (MathUtils.random() * 1000)));
        }
You might want to attach the same action to multiple actors. This is when method arguments are very handy - every method can consume a parameter, which should match any class extended by the actor that invokes it. For example, our rollNumber method is attached to a VisTextButton, so could have a VisTextButton, TextButton, Button, Table, WidgetGroup, Group or Actor parameter (yes, this is the actual class tree - not counting interfaces). You can try adding the parameter and invoking the method to see how it works.
If you run the application now, you'll finally be able to interact with the GUI. Try clicking the button to see your action... well, in action!
The tutorial suggested that LmlApplicationListener manages plural views, but so far we've got just one. Adding new views is trivial, so let's just create one - because we can (TM).
We should start with the Java class. As you can imagine, writing this tutorial fills me with excitement (every programmer loves creating documentation), so I'm going to name my class YetAnotherView. You're free to name yours however you like.
        public class YetAnotherView extends AbstractLmlView {
            public YetAnotherView() {
                super(Core.newStage());
            }

            @Override
            public FileHandle getTemplateFile() {
                return Gdx.files.internal("views/another.lml");
            }

            @Override
            public String getViewId() {
                return "another";
            }
        }
Now create the template at views/another.lml in the assets folder:
<window>
</window>
It will display an empty window, but this is pretty much all we need to prove that changing screens works.
You can change the current screen in a few ways. If you want to do it in Java (in a listener method, for example), you can call LmlApplicationListener#setView(Class) method. This will create an instance of the view - if one isn't already constructed, - hide current screen and begin showing the next one. This is very convenient if you want to switch current screen in your regular Java code.
However, creating a new LML listener method for transition to each screen can quickly get tedious - that's why LmlApplicationListener adds some default actions that you can use in your LML templates. One of them is setView - as soon as the event occurs, actor's ID will be extracted and the referenced view will be displayed. We're going to use that mechanism to go from first.lml to another.lml.
Add this button in first.lml:
        <textbutton onclick="setView" id="com.github.czyzby.views.YetAnotherView">
          @changeScreen
        </textbutton>
Add this line to bundle_en.properties - this will be displayed as button's text:
changeScreen=Onward!
When you click on the Onward! button, it should transfer you to the empty YetAnotherView.

id="com.github.czyzby.views.YetAnotherView" is a little verbose and can lead to errors when you decide to refactor your code. Fortunately, you can register an alias which reference to the correct class. In our example, we want to map YetAnotherView to "another". In case you're wondering "why the hell would I have to manually register an alias, when AbstractLmlView forced me to override getViewId()?" - that's a very good question. In fact, the alias is already created using getViewId(), but it happens after the view is parsed. You can either load views in the correct order before showing the first one (eager view loading) or register aliases manually and let the LmlApplicationListener create views when they are needed, rather than all at once (lazy view loading). Note that you can mix between the two - preload some views that are always displayed, but leave some obscure ones to be lazily loaded.
We'll go with the second (lazy) solution, as it generally requires less work. Modify your create() method to include an alias for YetAnotherView:
        @Override
        public void create() {
            VisUI.load(SkinScale.X2);
            batch = new SpriteBatch();
            super.create();
            addClassAlias("another", YetAnotherView.class);
            setView(FirstView.class);
        }
Pro tip: to avoid magic strings and possible typos, you can add a public static final String ID = "another" in YetAnotherView .
Now we can refactor the button to use class alias rather than full class name:
<textbutton onclick="setView" id="another">@changeScreen</textbutton>Much more readable, don't you think?
FirstView features @LmlAction-annotated method that can be attached as listener or simply invoked in first.lml template. This method, however, will not be available in another.lml. There are times when you want to share some global actions across all views - examples of such actions could be sound set up, view changing or locale reload. While you could create your abstract class (extending AbstractLmlView) packed with these methods and make all your views extend it, there is a simpler solution: using an ActionContainer.
Now we're going to create our class that implements the ActionContainer interface. It can be located anywhere, but since we use reflection to access its methods, it has to be included in GWT reflection pool. Our views package is already included in gwt.xml, let's just stick with that and create actions package inside views.
Now create a class (for example, Global) inside actions package:
        public class Global implements ActionContainer {
        }
By implementing ActionContainer interface, you tell the parser that this methods of this class should be available in the LML templates. Now Global can use the @LmlAction annotation, similarly to your view classes. But before you use it, we have to let the LmlParser know that this class exists:
        @Override
        protected LmlParser createParser() {
            return VisLml.parser()
                    // Registering global action container:
                    .actions("global", Global.class)
                    // Adding localization support:
                    .i18nBundle(I18NBundle.createBundle(Gdx.files.internal("i18n/bundle"))).build();
        }
Thanks to the fact that we mapped Global.class to "global", now every LML template can use actions from Global class. When both the view class and global action container contain the same method name, you can proceed it with global. or viewId. to choose the appropriate one. For example, if we added roll() method to Global, using onclick="global.roll" in first.lml would invoke the method from Global.
Anyway, let's create a useful method for once - something that you could use in an actual project. setLocale method will extract id from the actor that invoked it and try to change the current locale:
        public class Global implements ActionContainer {
            private final Core core = (Core) Gdx.app.getApplicationListener();

            @LmlAction("setLocale")
            public void setLocale(final Actor actor) {
                final String localeId = LmlUtilities.getActorId(actor);
                final I18NBundle currentBundle = core.getParser().getData().getDefaultI18nBundle();
                if (currentBundle.getLocale().getLanguage().equalsIgnoreCase(localeId)) {
                    // Same language.
                    return;
                }
                core.getParser().getData()
                        .setDefaultI18nBundle(I18NBundle.createBundle(Gdx.files.internal("i18n/bundle"), new Locale(localeId)));
                core.reloadViews();
            }
        }
Add some more lines to bundle_en.properties for another.lml:
changeLanguage=Change language!
back=Go back
exit=Exit
Now we need to provide another bundle.properties file for our alternative language. Since Polish and English are the only languages that the humble author of this tutorial currently speaks fluently, you can use this bundle_pl.properties and trust him that it's well-translated. More or less:
firstTitle=M\u00F3j pierwszy widok.
helloWorld=Witaj \u015Bwiecie!
randomPrompt=Kliknij, aby wylosowa\u0107 numer:
changeScreen=Dalej!

changeLanguage=Zmie\u0144 j\u0119zyk!
back=Wr\u00F3\u0107
exit=Zamknij
It looks awful due to UTF characters usage, but it will print nicely. It would probably work if you used "native" characters, but it's safer to use UTF codes directly. (Note that it isn't LML's fault, that's how LibGDX works.) Anyway, Eclipse will automatically convert problematic characters to their UTF codes if you set file encoding to UTF-8, and IntelliJ can do it under the hood if you check Transparent native-to-ascii conversion option in Settings to true.
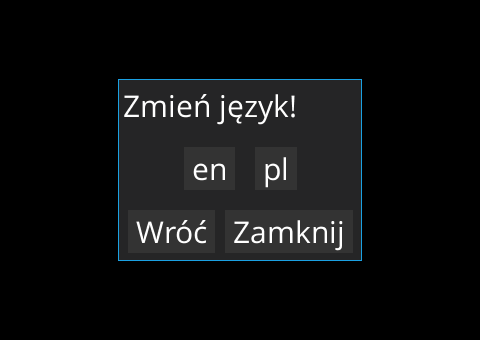
Now, let's go back to another.lml and fill its window:
        <window title="@changeLanguage" defaultpad="5">
          <table colspan="2" row="true">
            <:for element="en;pl">
              <!-- {element} will be replaced with values from the "en;pl"
                   array on each iteration. Basically, it creates two buttons:
                   "en" and "pl", which allow to change locales. -->
              <textButton onchange="setLocale" id="{element}" pad="10">
                {element}
              </textButton>
            </:for>
          </table>
          <textButton onchange="setView" id="first">
            @back
          </textButton>
          <textButton onchange="exit">
            @exit
          </textButton>
        </window>
If you're familiar with Scene2d API, you should have no problem understanding the used attributes. In case you're worried about plain numbers usage, don't: these are not pixels (unless you want them to be). These numbers represent units in your viewport - in our example the FitViewport that we create in Core class.
You might have noticed that onchange="exit" action was used. exit, like setView, is one of the default actions registered by LmlApplicationListener. It closes the application after smooth screen hiding. Running the application now will allow you to change its language:
Your IDE might be smart enough to automatically end tags or even suggest you some of the values that you used previously in current .lml file, but this is nothing compared to the content assist in Java. Fortunately, LML supports generation of DTD schema based on your customized parser. When you hook up DTD file to .lml and open it with XML editor, your IDE should properly assist you with your templates.
If you're really lazy, you can use pre-generated DTD files from gdx-lml repository, but generating custom DTD - with any new tags, macros and attributes you added - is awfully simple. You can either use Dtd class API or LmlApplicationListener#saveDtdSchema(FileHandler) method. Try modifying your create() method:
        @Override
        public void create() {
            VisUI.load(SkinScale.X2);
            batch = new SpriteBatch();
            super.create();
            addClassAlias(YetAnotherView.ID, YetAnotherView.class);
            setView(FirstView.class);

            // Generating DTD:
            saveDtdSchema(Gdx.files.local("lml.dtd"));
        }
This will generate lml.dtd file in the working directory of your desktop application. This might vary depending on how you run it - it might be the desktop project folder, core project folder or even the whole project root folder. Locate the generated file and move it to the core folder. Do not put it in the assets folder - DTD file is not needed at runtime, only during development. Assuming your assets folder is in core and lml.dtd is directly in core directory, this is how you can include the DTD in assets/views/first.lml:
<?xml version="1.0"?>
<!DOCTYPE window SYSTEM "../../lml.dtd">
The second argument after !DOCTYPE is always the root tag name - in our case, first.lml uses <window>. Some IDEs (I'm looking at you, Eclipse) are a bit rusty when it comes to DTD, but IntelliJ should have no problem with that:

Knowing the API is one thing, but understanding it is something entirely different. While there is no XML Javadoc equivalent, you can use CRTL click in IDEs that properly support DTD to jump into the tag or attribute definition inside .dtd file. By default, every tag and attribute definition is proceeded with the class that handles it - you can find it in your IDE and read its documentation for more info.

I hope you enjoyed this little tutorial. The sources of this project are available in examples/gdx-lml-vis-wiki folder in the main repository. Make sure to check out other LML sample projects for more advanced features - especially gdx-lml-tests and gdx-lml-vis-tests, which explain usage of all existing tags. Check out this application on-line. Now consider going through other tutorials - see the table of contents.