Client Installation and Configuration
Bison Wallet can be installed in one of the following ways. Download the application from just one of the following locations:
- Download standalone Bison Wallet for your operating system for the latest
release on GitHub. Extract the
"bw" executable from the archive and run it. Open any web browser to the
link shown by the application. You may also put the bisonw executable's
folder on your
PATH. - Use Decrediton, the official graphical Decred wallet, which integrates Bison Wallet, and go to the DEX tab.
- (Legacy users) Use the Decred command line application installer, dcrinstall. This is no longer recommended.
- Build the standalone client from source.
WARNING: If you decide to build from source, use the latest release branch,
not master.
If using external wallet software (e.g. dcrd+dcrwallet, bitcoind, Electrum, etc.), they must remain running while Bison Wallet is running. Do not shut down, lock, unlock, or otherwise modify your wallet settings while the client is running. Also, only send funds from within the DEX application, not directly from the external wallet's own controls. Finally, do not manually lock or unlock any coins while Bison Wallet is running.
These instructions assume you've obtained Bison Wallet as described in the Wallet Quick Start Installation section.
If you use the standalone Bison Wallet, you will need a web browser to open Bison Wallett user interface as described in the next section.
Most users will use the native wallets that are already built into the DEX client. Depending on the asset, you may be able to choose from: (1) a native wallet, (2) an external full node wallet, or (3) an Electrum-based wallet. Consult the following table for a summary of wallet support. If there is a checkmark in the "native" column, no external software is required.
| Coin | native | full node | Electrum | notes |
|---|---|---|---|---|
| Bitcoin | ✓ | v27.0 | v4.5.5 | |
| Decred | ✓ | v2.0.3 | x | |
| Ethereum | ✓ | geth IPC/http/ws | N/A | see https://github.com/decred/dcrdex/wiki/Ethereum |
| Litecoin | ✓ | v0.21.2.1 | v4.2.2 | |
| Bitcoin Cash | ✓ | v27.0.0 | x | use only Bitcoin Cash Node for full node |
| Dogecoin | x | v1.14.7.0 | x | |
| Zcash | x | v5.4.2 | x | |
| Dash | x | v20.1.1 | x | |
| Firo | x | v0.14.13.3 | v4.1.5.5 |
NOTE: The Electrum option is less mature and provides less privacy than the other wallet types. Some manual configuration of the Electrum wallet's RPC server is also necessary (example).
If using the native wallets that are integrated with Bison Wallet (see above), you can skip this section.
If you choose to use an external wallet (full node or Electrum), you must start and synchronize them with their networks before running Bison Wallet.
Note that Bitcoin Core and most "clones" support block pruning, which can keep your blockchain storage down to a few GB, not the size of the full blockchain, but a large size should be used to avoid full reindexing if used infrequently. Also, for good network fee estimates, the full node should be running for several blocks.
-
Start the client. For installed versions, open through your system applications menu. For standalone Bison Wallet (bisonw), open a command prompt in the folder containing the bisonw application and run it. e.g.
./bisonwon Mac and Linux, orbisonw.exeon Windows. To avoid the command prompt on Windows,bisonw-tray.exemay be run instead. If using Decrediton instead of bisonw, just click the "DEX" tab and skip to step 3.Note: You can start bisonw with another network via a command line flag:
--testnetor--simnet, the default ismainnet. -
In your web browser, navigate to http://localhost:5758. Skip this step if using Decrediton.

-
Set your new client application password. You will use this password to perform all future security-sensitive client operations.

NOTE: Checking the "Remember my password" box only applies to the current session. It is easiest for most users to have it checked.
-
After creating your app password, you'll be taken to the
Quick Configurationform: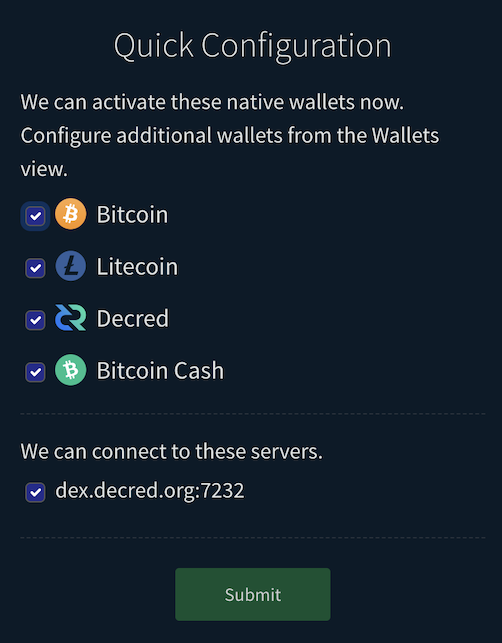
The selected native wallets will be created for you and you'll be connected to the selected DEX server when you submit the form.
Note: If you encounter an error about not being able to connect to the selected DEX server during the quick configuration, you can manually add the DEX server. You will see a list of known DEX server(s) you can choose from.
-
Backup your app seed. This seed is used to restore your DEX accounts and any native wallets, so keep it safe.
If you skip this step now (not recommended), you can go to the Settings view via the "gears" icon in the top navigation bar to retrieve your application seed later.

-
That's it! You'll be redirected to the wallets page after step 4 above.
-
To start trading, follow the guide to Setting Up Your DEX Trading Account.
- Go 1.19 or 1.20
- (optional) Node 18 or 20 is used to bundle resources for the browser interface. It's important to note that Bison Wallet has no external JavaScript dependencies. The client doesn't import any Node packages. We only use Node to lint and compile our own JavaScript and css resources. This build step is not required if building from a release branch such as
release-v0.6. - At least 2 GB of available system memory.
Build the web assets from client/webserver/site/.
If building from the master branch, bundle the CSS and JavaScript with Webpack:
npm clean-install && npm run buildBuild and run the client from client/cmd/bisonw.
go build
./bisonw
Connect to the client from your browser at localhost:5758.
While bisonw may be run from within the git workspace as described above, the
bisonw binary executable generated with go build can be copied into a
different folder (e.g. /opt/dcrdex/bisonw).
docker build -t user/dcrdex -f client/Dockerfile .docker volume create --name=dcrdex_datadocker run -d --rm -p 127.0.0.1:5758:5758 -v dcrdex_data:/root/.bisonw user/dcrdex