A DIY Raspberry Pi-powered robot car controlled through a web browser interface with real-time video streaming. Built using Flask, WebSockets, GPIO, and Picamera2 — no external controllers or apps needed!
This project runs on a Raspberry Pi Zero 2 W with Raspberry Pi OS 64-bit installed. Despite its small size and low power usage, this Pi packs enough performance to handle a basic video stream and control a 4WD robotic car.
 To ensure a smooth and steady video feed, I don't rely on the Pi's internal Wi-Fi. Instead, I use a TP-Link AC1300 USB Wi-Fi adapter, which supports 5GHz networks. This allows a faster and more stable connection between the Raspberry Pi and my home network.

The Raspberry Pi connects to my home Wi-Fi using the TP-Link adapter, not the built-in one. I initially used the desktop GUI to set it up, but later switched to CLI-only mode to improve performance by freeing up resources.
Here are the packages required to run this script
sudo apt update && sudo apt install -y \
python3 \
python3-flask \
python3-picamera2 \
libcamera-dev \
python3-pil \
python3-numpy \
python3-gpiozero \
python3-rpi.gpio
With Raspberry Pi OS Bookworm or later, the "enable camera" option in raspi-config has been removed, so make sure you have a working camera that you can access via
rpicam-hello
The video feed isn’t technically a live stream. Here's what happens: the camera captures raw frames, which are not natively web-compatible. Each frame is converted to MJPEG format and served in sequence through a browser. So you're actually watching a rapid slideshow of JPEGs, not a continuous video.

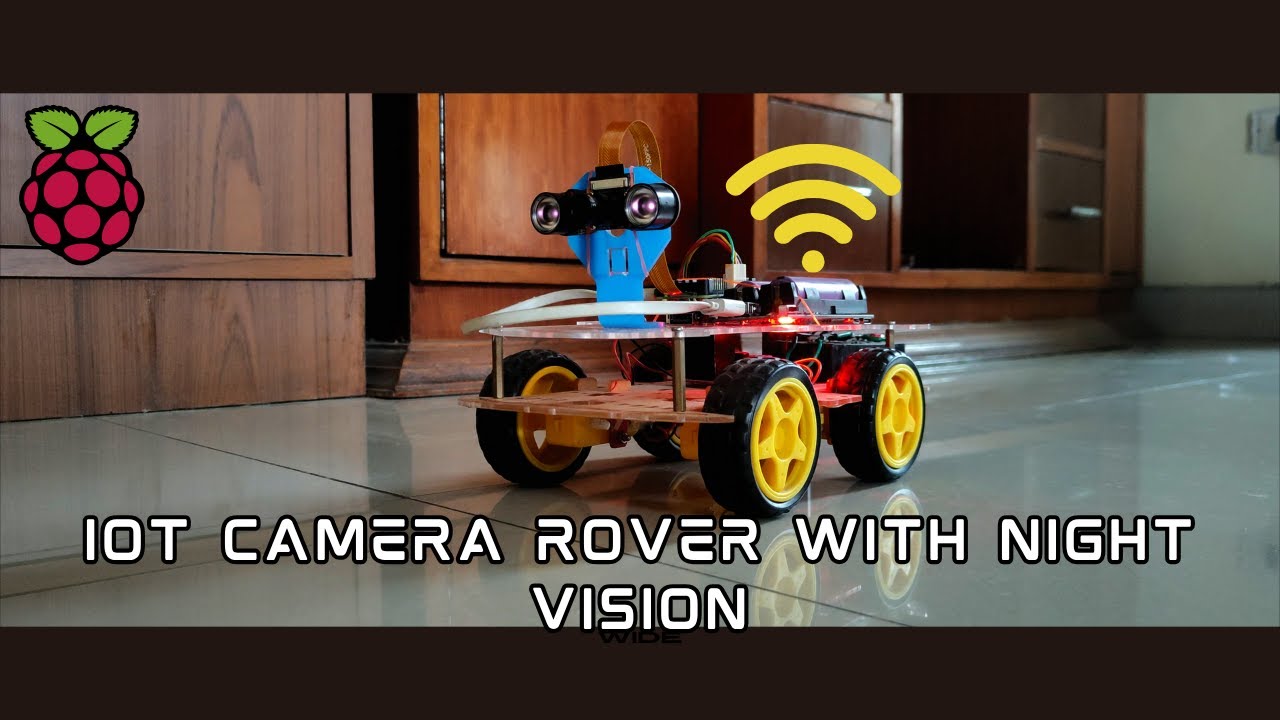
The bot uses a night vision camera, but any standard Pi-compatible cam should work. I'm using an L298N motor driver to drive a 4WD chassis. Motors on the left and right sides are paired for control simplicity. Power comes from a 2S 18650 battery pack, providing 8.4V. Due to voltage drop (~2V) across the BJT-based L298N, a higher input voltage helps maintain motor speed. If you're prioritizing efficiency, consider switching to a MOSFET-based H-bridge. The Pi itself draws power from a separate 5V power bank module to keep things stable.
To make the project plug-and-play, I created a systemd service that automatically starts the main control script at boot. This way, the Pi is ready to go without needing SSH or manual intervention every time.
Create a service file
sudo nano /etc/systemd/system/remote.service
Paste this template and replace the path for your case
[Unit]
Description=Bot Script
After=network.target

[Service]
WorkingDirectory=/path/to/your/clone
ExecStart=/usr/bin/python3 /path/to/your/clone/remote.py
User=root
Restart=always

[Install]
WantedBy=multi-user.target
Reload systemctl and enable the service
sudo systemctl daemon-reload && sudo systemctl enable remote.service
Finally, start the script
sudo systemctl start remote
The script hosts web server on port 80 by default but if you want to change it, you can set that in line 78 in remote.py