Note
This project is part of the DevOpsTheHardWay course.
Tip
The project builds upon the concepts covered in our previous Python project. We recommend completing the Python project first.
In the previous Python project, you developed a chatbot application which applies filters to images sent by users to a Telegram bot.
In this project, you extend the service to detect objects in images, and send the results to clients. You'll design, develop and deploy a service consisted by multiple containerized microservices, as follows:
polybot: Telegram Bot app.yolo5: Image object detection container based on the Yolo5 pre-train deep learning model.mongo: MongoDB cluster to store data.
- Fork this repo by clicking Fork in the top-right corner of the page.
- Clone your forked repository by:
Change
git clone https://github.com/<your-username>/<your-project-repo-name>
<your-username>and<your-project-repo-name>according to your GitHub username and the name you gave to your fork. E.g.git clone https://github.com/johndoe/PolybotServiceDocker. - It is a good practice to create an isolated Python virtual environment specifically for your project. Configure a new Python virtual environment in PyCharm.
- This project involves working with virtual machines in AWS. You must have access to an AWS account to complete the project.
Note that you are responsible for the costs of any resources you create. You'll mainly pay for 1 running
mediumvirtual machine with 8GB disk and small amount of stored data in S3. If you work properly, the cost estimation is 10 USD, assuming your instance is running for 8 hours a day for a whole month (the project can be completed in much less than a month. You can, and must, stop you instances at the end of usage to avoid additional charges).
Later on, you are encouraged to change the README.md file content to provide relevant information about your service project, e.g. how to launch the app, main features, etc.
Let's get started...
MongoDB is a document, NoSQL database, offers high availability deployment using multiple replica sets. High availability (HA) indicates a system designed for durability and redundancy. A replica set is a group of MongoDB servers, called nodes, containing an identical copy of the data. If one of the servers fails, the other two will pick up the load while the crashed one restarts, without any data loss.
Follow the official docs to deploy containerized MongoDB cluster on your local machine. Please note that the mongo deployment should be configured to persist the data that was stored in it.
https://www.mongodb.com/compatibility/deploying-a-mongodb-cluster-with-docker
Got HA mongo deployment? great, let's move on...
YoloV5 is a state-of-the-art object detection AI model. It is known for its high accuracy object detection in images and videos. You'll work with a lightweight model that can detect 80 objects while it's running on your old, poor, CPU machine.
The service files can be found under the yolo5 directory.
The yolo5/app.py file is a Flask-based webserver, with an endpoint /predict, which can be used to predict objects in a given image, as follows:
localhost:8081/predict?imgName=street.jpeg
The imgName query parameter value (street.jpeg in the above example) represents an image name stored in an S3 bucket.
The yolo5 service then downloads the image from the S3 bucket and detects objects in it.
Take a look on the code, and complete the # TODOs. Feel free to change/add any functionality as you wish!
Note
If you attempt to run the yolo5 service locally, not as a Docker container, you'll encounter errors since the app depends on many files that don't exist on your local machine, but do exist in the ultralytics/yolov5 Docker image.
Thus, it's recommended first to containerize the app then run it as a container. Read here if you still want to work hard and run it uncontainerized.
To containerize the app, take a look at the provided Dockerfile, it's already implemented for you, no need to touch.
When running the container on your local machine, you may need to mount the directory containing the AWS credentials on your local machine ($HOME/.aws/credentials) to allow the container communicate with S3.
Note: Never build a docker image with AWS credentials stored in it! Never commit AWS credentials in your source code! Never!
Once the image was built and run successfully, you can communicate with it directly by:
curl -X POST localhost:8081/predict?imgName=street.jpegFor example, here is an image and the corresponding results summary:
{
    "prediction_id": "9a95126c-f222-4c34-ada0-8686709f6432",
    "original_img_path": "data/images/street.jpeg",
    "predicted_img_path": "static/data/9a95126c-f222-4c34-ada0-8686709f6432/street.jpeg",
    "labels": [
      {
        "class": "person",
        "cx": 0.0770833,
        "cy": 0.673675,
        "height": 0.0603291,
        "width": 0.0145833
      },
      {
        "class": "traffic light",
        "cx": 0.134375,
        "cy": 0.577697,
        "height": 0.0329068,
        "width": 0.0104167
      },
      {
        "class": "potted plant",
        "cx": 0.984375,
        "cy": 0.778793,
        "height": 0.095064,
        "width": 0.03125
      },
      {
        "class": "stop sign",
        "cx": 0.159896,
        "cy": 0.481718,
        "height": 0.0859232,
        "width": 0.053125
      },
      {
        "class": "car",
        "cx": 0.130208,
        "cy": 0.734918,
        "height": 0.201097,
        "width": 0.108333
      },
      {
        "class": "bus",
        "cx": 0.285417,
        "cy": 0.675503,
        "height": 0.140768,
        "width": 0.0729167
      }
    ],
    "time": 1692016473.2343626
}
The model detected a person, traffic light, potted plant, stop sign, car, and a bus. Try it yourself with different images.
Now let's integrate the polybot microservice with the yolo5. The integration is done as follows:
- Clients send images to the Telegram bot.
- The
polybotmicroservice receives the message, downloads the image to the local file system, and uploads it to an S3 bucket. - The
polybotmicroservice then initiates an HTTP request to theyolo5microservice, and waits for the response. - Once the response arrived, the
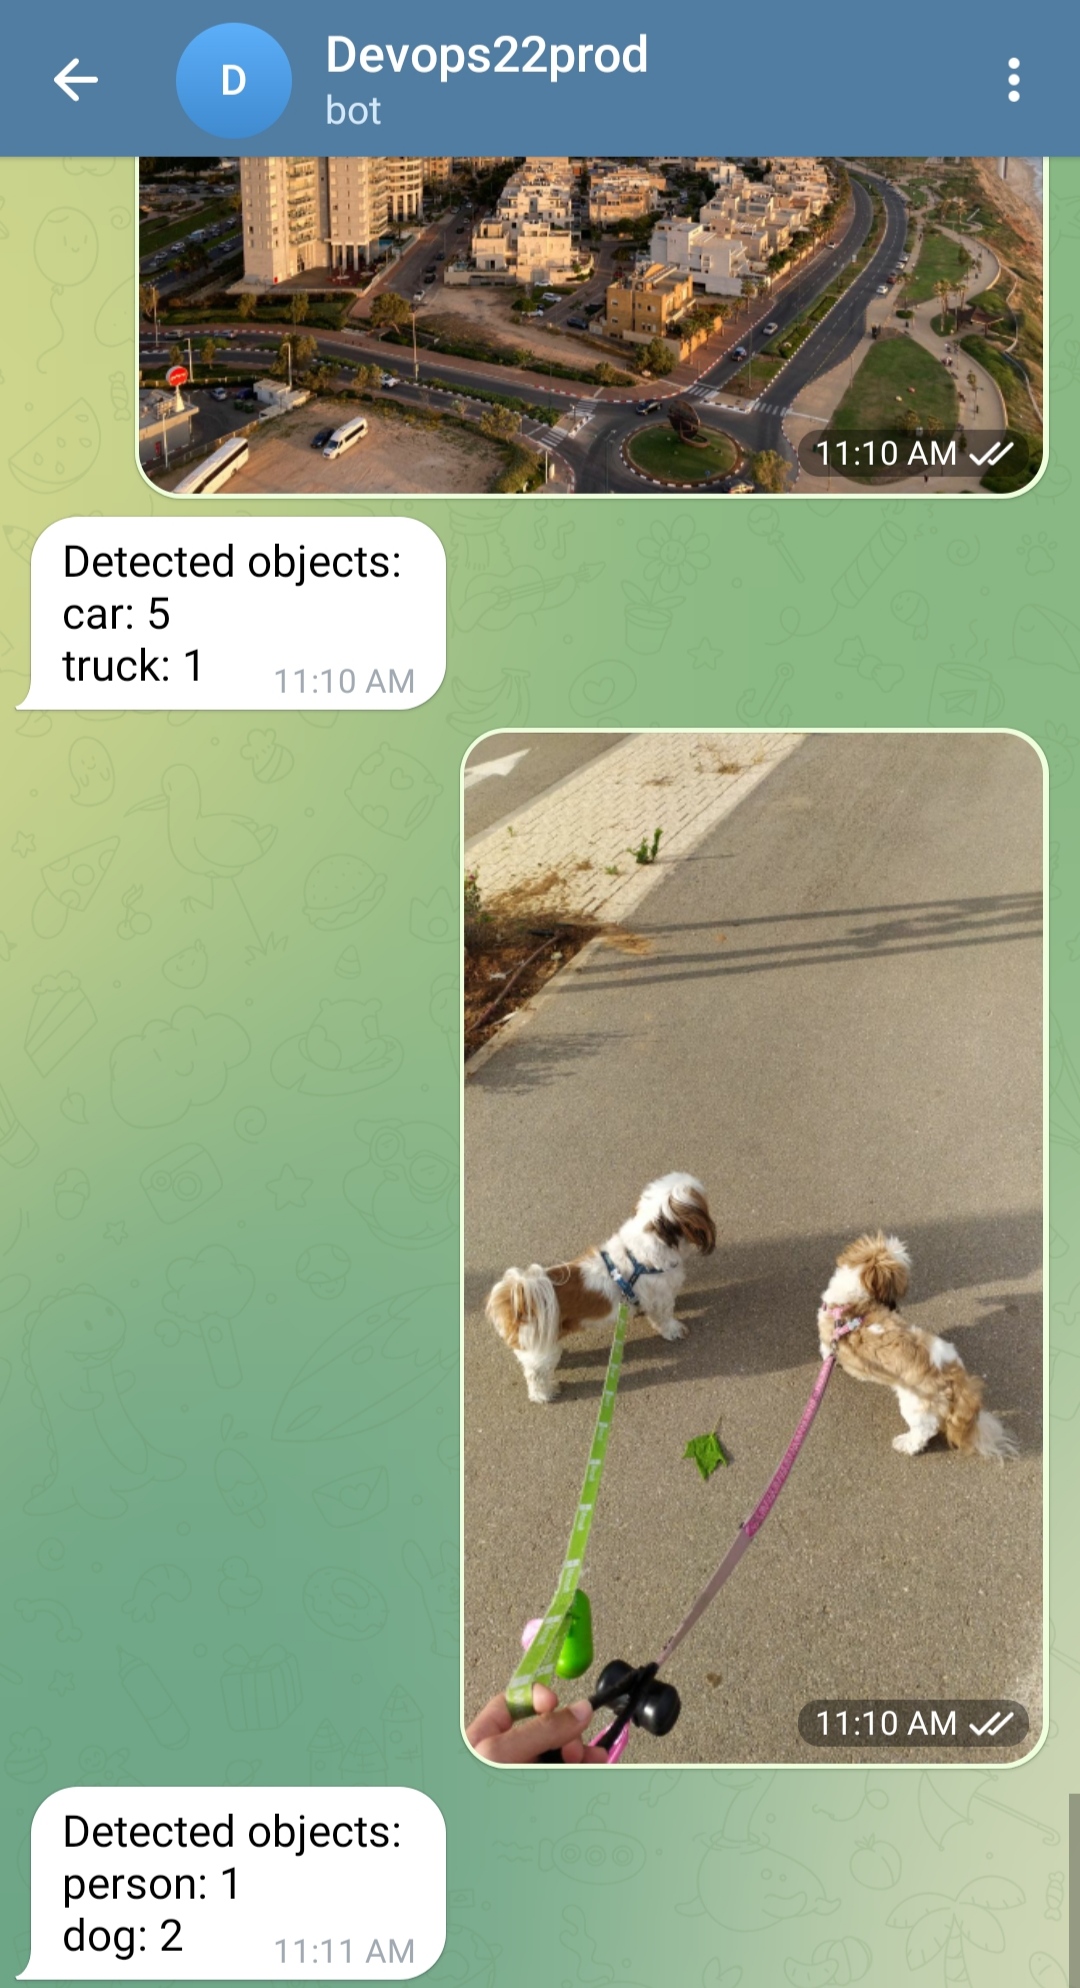
polybotmicroservice parse the returned JSON and sends the results to the client, in any form you like.
Here is an end-to-end example of how it may look like:
You are highly encouraged to leverage your code implementation from the previous Python project, or alternatively, to use the code sample given to you under polybot/ directory.
To get some guidance on how to implement the code, take a look at the # TODOs in polybot/bot.py file.
To simplify the deployment process, we'll create a Docker Compose project in the docker-compose.yaml file.
This file will enable you to launch all 3 microservices with a single command: docker compose up.
To ensure flexibility and avoid manual editing of the docker-compose.yaml file each time you build new version of your images,
we'll specify the values that change frequently as environment variables for the Docker Compose project via a .env file.
An .env file in Docker Compose is a text file used to define environment variables that available when running docker compose up.
Here's an example of how your .env file should look:
# .env file

POLYBOT_IMG_NAME=polybot:v123
YOLO5_IMG_NAME=yolo5:v123
TELEGRAM_APP_URL=https://f176-2a06-c701-4cdc-a500-49d5-ae2b-1cd1-61d1.ngrok-free.app
And here's how you use it in the compose file:
# docker-compose.yaml

services:
  polybot:
    image: ${POLYBOT_IMG_NAME}
That way you won't need to directly edit your docker-compose.yaml file each time you build a new version of your images.
Finally, deploy the compose project in a single medium Ubuntu EC2 instance with 20GB disk.
- You can expose the polybot to Telegram servers using Ngrok, as done in the previous project (install and launch ngrok on the EC2 instance).
- Don't configure your compose file to build the images. Instead, push the
yolo5andpolybotimages to a public DockerHub or ECR repo and use these images. - Attach an IAM role to your EC2 instance with the relevant permissions (E.g. read/write access to S3). Don't manage AWS credentials yourself, and never hard-code AWS credentials in the
docker-compose.yamlfile. - Don't hard-code your telegram token in the compose file, this is a sensitive data. Read here how to do it properly.
- Build a robust code. Implement retry and timeout mechanism when needed, handle error properly. Test your app under failure - does the polybot keep work even if the yolo5 is down? Is yolo5 crashing when the mongo cluster is not initialize? etc...
- Strive to create your Docker images as small as possible.
- Try to automate the Mongo cluster initialization, so you don't need to manually connect to the container and initialize the cluster.
- Use
snykto search (and potentially clean) for anyHIGHandCRITICALsecurity vulnerabilities.
CI/CD (Continuous integration and continuous deployment) is a methodology which automates the deployment process of software project. We'll spend fairly amount of time to discuss this topic. But for now we want to achieve a simple outcome:
When you make changes to your code locally, commit, and push them, a new GitHub Actions workflow is automatically triggered. This workflow builds new versions of Docker images and deploys them to Docker Compose project in your EC2 instance.
Note
A workflow is an automated process defined in a YAML file that helps automate tasks, such as building, testing, and deploying code, in a GitHub repository.
No need to manually build images, no need to manually connect to EC2 instance, or launch the Docker Compose project - everything from code changes to deployment is seamlessly done by an automatic process. This is why it is called continuous deployment, because on every code change, a new version of the app is being deployed automatically.
-
First, get yourself familiar with how GitHub Actions works: https://docs.github.com/en/actions/learn-github-actions/understanding-github-actions.
-
The GitHub Actions workflow is already written for you and available under
.github/workflows/service-deploy.yaml. Take a moment to review it, and customize it according to your specific requirements.The workflow expects some secrets to be available:
- Go to your project repository on GitHub, navigate to Settings > Secrets and variables > Actions.
- Click on New repository secret.
- Define the following secret values:
DOCKERHUB_USERNAMEandDOCKERHUB_PASSWORD- Only if you use DockerHub to store images.AWS_ACCESS_KEY_IDandAWS_SECRET_ACCESS_KEY- Only if you use ECR to store images.EC2_SSH_PRIVATE_KEY- The private key value to connect to your EC2.TELEGRAM_BOT_TOKEN- The Telegram bot token.
-
Make some changes to your bot code, then commit and push it. Notice how the Polybot Service Deployment workflow automatically kicked in. Once the workflow completes successfully, your new application version should be automatically built and deployed in your EC2 instance. Make sure the service is working properly and reflects the code changes you've made.
Once the Polybot Service Deployment workflow is completed, the Project auto-testing workflow would be triggered automatically and test your project.
So no further step should be taken to pass the automated testing :-)
As always, if there are any failures, click on the failed job and read the test logs carefully. Fix your solution, commit and push again.
Note: Your EC2 instances should be running while the automated test is performed. Don't forget to turn off the machines when you're done.
You are highly encourages to share your project with others by creating a Pull Request.
Create a Pull Request from your repo, branch main (e.g. johndoe/PolybotServiceDocker) into our project repo (i.e. exit-zero-academy/PolybotServiceDocker), branch main.
Feel free to explore other's pull requests to discover different solution approaches.
As it's only an exercise, we may not approve your pull request (approval would lead your changes to be merged into our original project).

