
NOTE: The LEDs on animated git are swapped (fastest one should be LD0, slowest one LD3). It was because I missed that Pin assignment table lists MSB and LSB in reverse order (higher bits are first in that table)
This bug is fixed in current Design. I will someday update that picture too...
It is ideal project for Verilog starters.
What it does?
- It outputs 4-bit binary counter to LD0 to LD3 at 5Hz.
- It also outputs copy of LED signals to Pmod J1 pins 1-4 (IO1-IO4) (for monitoring)
- It also outputs internal
internal_cesignal (short pulse with 10 Hz frequency for chained counters) to Pmod J1 Pin 7 (IO7)
WARNING! It is currently one evening project - so please be patient and tolerant :-)
Required Hardware:
- Digilent CoolRunner-II CPLD Starter Board:
- A-Male to Mini-B USB cable
- NOT included
- It is NOT Micro-B!
Required Software:
- Xilinx ISE Webpack 14.7
- I tested "plain" (NOT Windows 10) version under Windows 7 SP1
- the "Win 10" actually contains OVA archive for VirtualBox. The advantage is that there is ISE already installed with valid license. So it maybe sometimes useful
- the reason is that plain ISE will crash under Win10:
- 64-bit ISE will crash under Win10 every time is File Dialog invoked
- workaround: use 32-bit ISE (it is installed alongside with 64-bit version)
- NOTE: iMPACT 64-bit works fine somehow
- Free Xilinx ISE WebPack license
- License manager will show on "Acquire a License" Tab, choice "Get Free Vivado/ISE WebPack License"
- in my case there is slight issue that all LAN cards (including from VirtualBox) networks are included in request.
- Browser window will appear and you will be redirected to URL like
http://license.xilinx.com/getLicense?.... - next you will be prompted to enter AMD account credentials.
- after login check on
ISE WebPack License - click on
Generate Node-Locked License - confirm defaults and click on Next
- in my case it offered Host-ID
Anyso I used it - click on Next
- new license will be send to your account-s e-mail
- WARNING! If you installed ISE under Win10 (not supported) than you may not used
Load license..- it will crash because all File Dialogs crashes on 64-bit ISE running under Win10
- I rather filled in
XILINXD_LICENSE_FILEbox with my path to license:c:\Xilinx\14.7\ISE_DS\Xilinx.lic - and clicked on
Setbutton. - there should appear many green licenses on list, including
WebPACKPermanent.
There are only two Verilog files:
-
top.v- master - thetopmodule inputs and outputs are mapped to real pins on CPLD. It uses following modules:CLK_DIV8- on-chip clock divider by 8x, 1 MHz output is connected to internal variableclk_1mhzCD100_000- synchronous cascadable decimal counter, used to "divide" 1 Mhz to 10 Hz. Please note that all counters in cascade further useclk_1mhz. The "clock division" is realised by pulseCE(Counter Enable), that is active on every 100_000 Clock tick.- CB4CE - 4-Bit Cascadable Binary Counter with Clock Enable and Asynchronous Clear` from Xilinx macro library
-
CB4CE.v- contains above CB4CE module from Xilinx macro library
- There is only input called
PCLK(onGCK2pin of CoolRunner-II) which is on-board 8MHz clock. - This clock is divided by embedded CoolRunner-II divider by 8 to get 1 MHz internal clock signal
- There is then internal counter to 100_000 (to get 10 Hz on
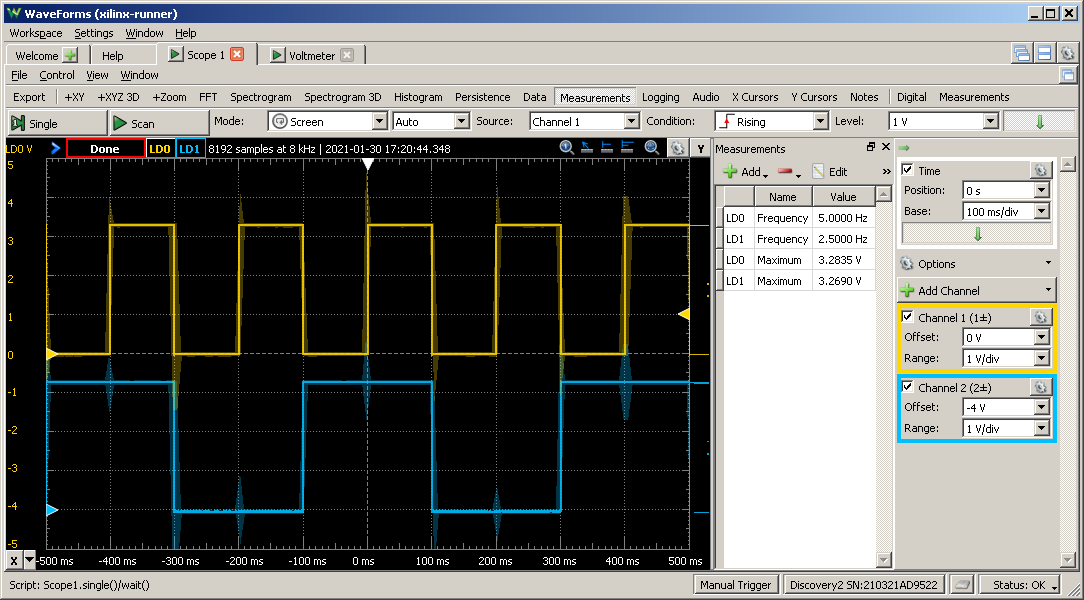
CEO- Counter enable output) - and there finaly 4-bit counter CB4CE - it's output drives 4 dedicated LEDs on board... Please note that the fastest output Q0 divides frequency by two(!). So the output LED LD0 does blink at rate 5 Hz instead of 10 Hz. See scope results for verification...
- Open project
crnr-ii-intro.xiseinISE Project Navigator - ensure that file
top (top.v)is selectedHierarchy- that one right underxc2c256-7TQ144item. - Double-click on
Implement Designof Processes Window in Design tab - it should generate new
top.jed(JEDEC file) to be programmed into your CoolRunner-II CPLD.
WARNING! I have no luck opening provided
prog-crnrii.ipf- the iMPACT always crashed without any notice. Therefore please keep "Default" inManage Configuration Propertiesand always configure iMPACT from scratch as shown below:
Ensure that top (top.v) node is selected in Implementation view and
- double click on Processes -> Implement Design -> Configure Target Device -> Manage Configuration Project (iMPACT)
- now click on Edit -> Launch Wizard...
- select 1st option
Configure devices using Boundery-Scan (JTAG)with default listboxAutomatically connect to.... - confirm Auto Assign pop-up
- select
top.jedas input file - click
OKonDevice Programming Properties
Now the real stuff:
- click on menu
Operations->Program - after few seconds device should be programmed and automatically run (so LEDs LD0 to LD3 should blink - each one 2 times slower)
I have started with two channel scope Digilent Analog Discovery 2 to:
- verify used logic (it should be 3.3V TTL)
- verify frequencies
- verify noise (high noise means risks of glitches and unexpected behaviour of CPLD).
Scope Results are on picture below:
Here are decoded LD0 to LD3 outputs (from CB4CE counter) using Digilent Analog Discovery 2 in Logic mode:
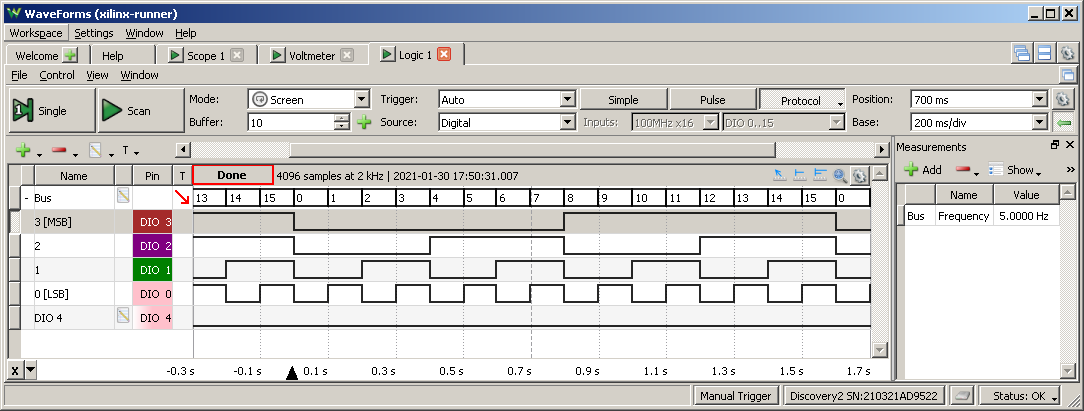
The DIO 0 (LD0) to DIO 3 (LD3) is decoded as bus so you can nicely read
total value of CB4CE 4-bit counter.
NOTE: It is tricky to see internal_ce signal (shown as DIO 4), because:
- it is only 1 us (micro-second) wide, but period is 5Hz (200ms)
- so the analyzer must run in great detail to catch such pulse at all
- but it will not run long enough to see whole period...
Where to start? Go to
There are all imoprtant files:
- Board Schematic
- Digilent's demo source code:
- Board Reference manual
TODO: important Xilinx pages
Pins are assigned using Processes -> User Constraints -> Floorplan
IO - Pre-Synthesis. They are stored in file top.ucf.
How to know mappings on Starter Board?
Best way is to download Digilent's example source from:
And look into file Source\netio.ucf - which is like:
; 8 MHz on-board clock generator
NET 	"CLK"			LOC = "P38"; #PCLK

; on-board LEDs
NET	"LD<0>"		LOC = "P69"; #LD0
NET	"LD<1>"		LOC = "P68"; #LD1
NET	"LD<2>"		LOC = "P66"; #LD2
NET	"LD<3>"		LOC = "P64"; #LD3

; on-board push-buttons
NET 	"BTN<0>" 	LOC = "P143"; #BTN0
NET 	"BTN<1>" 	LOC = "P94"; #BTN1

; on-board switches
NET	"SW<0>"		LOC = "P39";	#SW0
NET	"SW<1>"		LOC = "P124";	#SW1

; segments of 4-digit LED display (+ decimal point?)
NET	"CAT<0>"		LOC = "P56";
NET	"CAT<1>"		LOC = "P53";
NET	"CAT<2>"		LOC = "P60";
NET	"CAT<3>"		LOC = "P58";
NET	"CAT<4>"		LOC = "P57";
NET	"CAT<5>"		LOC = "P54";
NET	"CAT<6>"		LOC = "P61";
NET	"CAT<7>"		LOC = "P59";

; multiplexed common anode for every digit on LED display
NET	"ANO<3>"		LOC = "P130";
NET	"ANO<2>"		LOC = "P129";
NET	"ANO<1>"		LOC = "P128";
NET	"ANO<0>"		LOC = "P126";
You can then enter specific pin name (for example P38)
to "Loc" cell of Floorplan editor table. After changing focus
to other row it will automatically fill few other columns (Bank, Function
Block, etc.)