🚀 Start |
🏰 Features |
👩🏫 Examples |
🖥️ Options |
🧙 Scripts |
📱 Mobile |
🖼️ Visual
📚 API |
🔵 Dashboard |
🔴 Recorder |
🔠 Syntaxes |
🗾 Locales |
🌐 Grid |
🕹️ JSMgr
🤖 CI |
♻️ Templates |
🎞️ Presenter |
🌏 Translator |
📊 Charts |
🗺️ Tours |
🛂 Dialog
One of many examples: test_demo_site.py
cd examples/
pytest test_demo_site.py🔵 Add Python and Git to your System PATH.
🔵 Using a Python virtual env is recommended.
You can install seleniumbase from GitHub or PyPI:
🔵 Installing seleniumbase from a GitHub clone:
git clone https://github.com/seleniumbase/SeleniumBase.git
cd SeleniumBase/
pip install .  # Normal installation
pip install -e .  # Editable install
(When using a virtual env, the Editable install is faster.)
🔵 Installing seleniumbase from PyPI:
pip install seleniumbase(Add
--upgradeOR-Uto install the latestseleniumbase.) (Add--force-reinstallto also install the latest dependencies.) (Usepip3if multiple versions of Python are installed.)
🔵 Type seleniumbase or sbase to verify that SeleniumBase was installed successfully:
   ______     __           _                 ____
  / ____/__  / /__  ____  (_)_  ______ ___  / _  \____  ________
  \__ \/ _ \/ / _ \/ __ \/ / / / / __ `__ \/ /_) / __ \/ ___/ _ \
 ___/ /  __/ /  __/ / / / / /_/ / / / / / / /_) / (_/ /__  /  __/
/____/\___/_/\___/_/ /_/_/\__,_/_/ /_/ /_/_____/\__,_/____/\___/
-----------------------------------------------------------------

 * USAGE: "seleniumbase [COMMAND] [PARAMETERS]"
 *    OR:        "sbase [COMMAND] [PARAMETERS]"

COMMANDS:
      install          [DRIVER] [OPTIONS]
      methods          (List common Python methods)
      options          (List common pytest options)
      mkdir            [DIRECTORY] [OPTIONS]
      mkfile           [FILE.py] [OPTIONS]
      mkrec / codegen  [FILE.py] [OPTIONS]
      mkpres           [FILE.py] [LANG]
      mkchart          [FILE.py] [LANG]
      print            [FILE] [OPTIONS]
      translate        [SB_FILE.py] [LANG] [ACTION]
      convert          [WEBDRIVER_UNITTEST_FILE.py]
      extract-objects  [SB_FILE.py]
      inject-objects   [SB_FILE.py] [OPTIONS]
      objectify        [SB_FILE.py] [OPTIONS]
      revert-objects   [SB_FILE.py] [OPTIONS]
      encrypt / obfuscate
      decrypt / unobfuscate
      download server  (Get Selenium Grid JAR file)
      grid-hub         [start|stop] [OPTIONS]
      grid-node        [start|stop] --hub=[HOST/IP]
 * (EXAMPLE: "sbase install chromedriver latest") *

    Type "sbase help [COMMAND]" for specific command info.
    For info on all commands, type: "seleniumbase --help".
Use "pytest" for running tests.✅ SeleniumBase automatically downloads web drivers as needed, such as chromedriver and geckodriver (Firefox).
✅ To manually download a webdriver, see Console Scripts OR Webdriver Installation.
🔵 If you've cloned SeleniumBase, you can run tests from the examples/ folder.
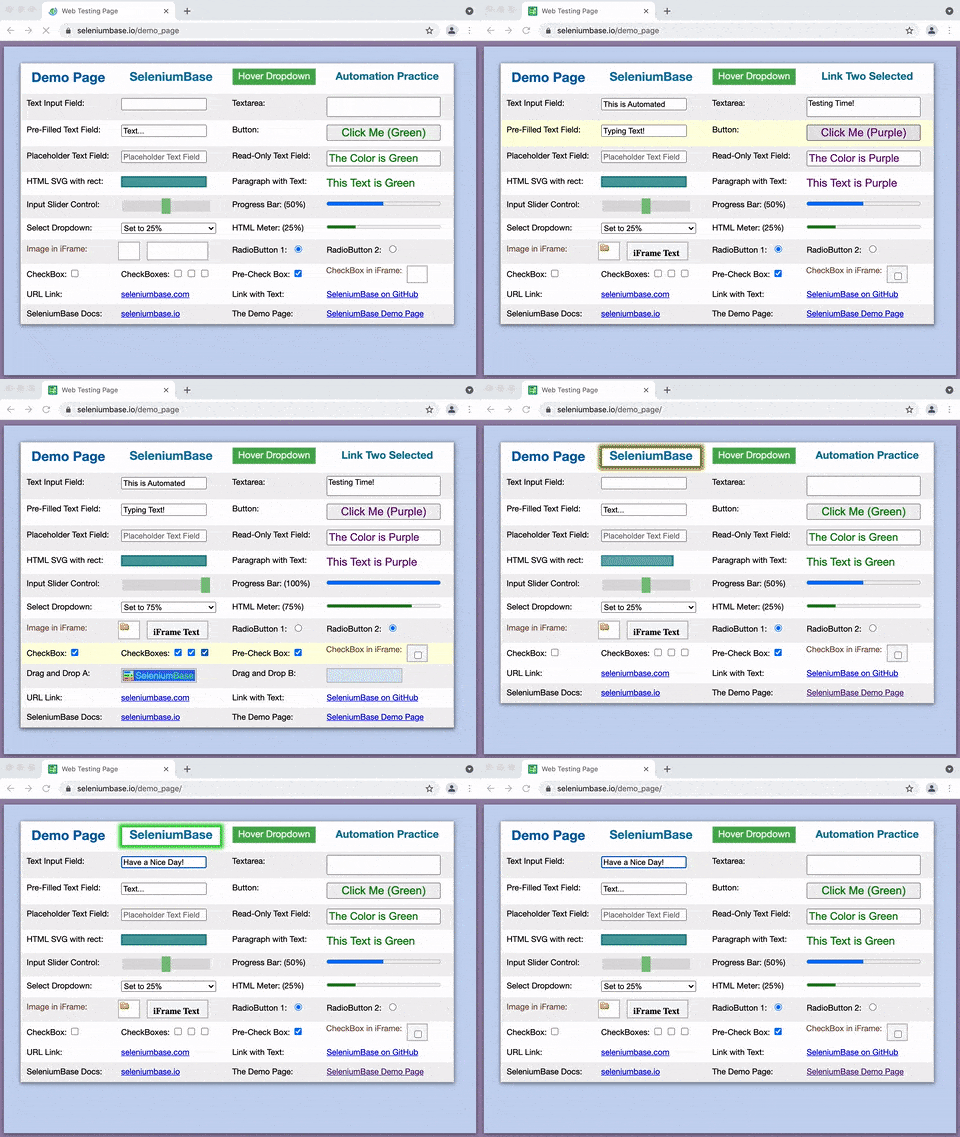
Here's my_first_test.py in --demo mode:
cd examples/
pytest my_first_test.py --demo
(Chrome is the default browser if not specified with
--browser. On Linux,--headlessis the default behavior.)
- By default, CSS Selectors are used for finding page elements.
- If you're new to CSS Selectors, games like CSS Diner can help you learn.
- Here are some common
SeleniumBasemethods that you might find in tests:
self.open(url)  # Navigate the browser window to the URL.
self.type(selector, text)  # Update the field with the text.
self.click(selector)  # Click the element with the selector.
self.click_link(link_text)  # Click the link containing text.
self.go_back()  # Navigate back to the previous URL.
self.select_option_by_text(dropdown_selector, option)
self.hover_and_click(hover_selector, click_selector)
self.drag_and_drop(drag_selector, drop_selector)
self.get_text(selector)  # Get the text from the element.
self.get_current_url()  # Get the URL of the current page.
self.get_page_source()  # Get the HTML of the current page.
self.get_attribute(selector, attribute)  # Get element attribute.
self.get_title()  # Get the title of the current page.
self.switch_to_frame(frame)  # Switch into the iframe container.
self.switch_to_default_content()  # Leave the iframe container.
self.open_new_window()  # Open a new window in the same browser.
self.switch_to_window(window)  # Switch to the browser window.
self.switch_to_default_window()  # Switch to the original window.
self.get_new_driver(OPTIONS)  # Open a new driver with OPTIONS.
self.switch_to_driver(driver)  # Switch to the browser driver.
self.switch_to_default_driver()  # Switch to the original driver.
self.wait_for_element(selector)  # Wait until element is visible.
self.is_element_visible(selector)  # Return element visibility.
self.is_text_visible(text, selector)  # Return text visibility.
self.sleep(seconds)  # Do nothing for the given amount of time.
self.save_screenshot(name)  # Save a screenshot in .png format.
self.assert_element(selector)  # Verify the element is visible.
self.assert_text(text, selector)  # Verify text in the element.
self.assert_title(title)  # Verify the title of the web page.
self.assert_downloaded_file(file)  # Verify file was downloaded.
self.assert_no_404_errors()  # Verify there are no broken links.
self.assert_no_js_errors()  # Verify there are no JS errors.
🔵 For the complete list of SeleniumBase methods, see: Method Summary
✅ Automatic WebDriver Abilities:
SeleniumBase automatically handles common WebDriver actions such as spinning up web browsers and saving screenshots during test failures. (Read more about customizing test runs.)
✅ Simplified Code:
SeleniumBase uses simple syntax for commands. Example:
self.type("input", "dogs\n")SeleniumBase tests can be run with both pytest and nosetests, but using pytest is recommended. (chrome is the default browser if not specified.)
pytest my_first_test.py --browser=chrome

nosetests test_suite.py --browser=firefox
✅ Automatic Test Discovery:
All Python methods that start with test_ will be run automatically when running pytest or nosetests on Python files. You can also be more specific on what to run within a file by using the following: (Note that the syntax is different for pytest vs nosetests.)
pytest [FILE_NAME.py]::[CLASS_NAME]::[METHOD_NAME]

nosetests [FILE_NAME.py]:[CLASS_NAME].[METHOD_NAME]
✅ No More Flaky Tests:
SeleniumBase methods automatically wait for page elements to finish loading before interacting with them (up to a timeout limit). This means you no longer need random time.sleep() statements in your scripts.
✅ Automated/Manual Hybrid Mode:
SeleniumBase includes a solution called MasterQA, which speeds up manual testing by having automation perform all the browser actions while the manual tester handles validation.
✅ Feature-Rich:
For a full list of SeleniumBase features, Click Here.
🔵 You can use Demo Mode to help you see what a test is doing: If a test is moving too fast for your eyes, run it in Demo Mode by adding --demo on the command-line, which pauses the browser briefly between actions, highlights page elements being acted on, and displays assertions:
pytest my_first_test.py --demo🔵 Pytest includes test discovery. If you don't specify a specific file or folder to run from, pytest will search all subdirectories automatically for tests to run based on the following matching criteria:
Python filenames that start with test_ or end with _test.py.
Python methods that start with test_.
The Python class name can be anything since SeleniumBase's BaseCase class inherits from the unittest.TestCase class.
You can see which tests are getting discovered by pytest by using:
pytest --collect-only -q🔵 You can use the following calls in your scripts to help you debug issues:
import time; time.sleep(5)  # Makes the test wait and do nothing for 5 seconds.
import ipdb; ipdb.set_trace()  # Enter debugging mode. n = next, c = continue, s = step.
import pytest; pytest.set_trace()  # Enter debugging mode. n = next, c = continue, s = step.
🔵 To pause an active test that throws an exception or error, add --pdb:
pytest my_first_test.py --pdbThe code above will leave your browser window open in case there's a failure. (ipdb commands: 'n', 'c', 's' => next, continue, step).
🔵 Here are some useful command-line options that come with pytest:
-v  # Verbose mode. Prints the full name of each test run.
-q  # Quiet mode. Print fewer details in the console output when running tests.
-x  # Stop running the tests after the first failure is reached.
--html=report.html  # Creates a detailed pytest-html report after tests finish.
--collect-only | --co  # Show what tests would get run. (Without running them)
-n=NUM  # Multithread the tests using that many threads. (Speed up test runs!)
-s  # See print statements. (Should be on by default with pytest.ini present.)
--junit-xml=report.xml  # Creates a junit-xml report after tests finish.
--pdb  # If a test fails, pause run and enter debug mode. (Don't use with CI!)
-m=MARKER  # Run tests with the specified pytest marker.
🔵 SeleniumBase provides additional pytest command-line options for tests:
--browser=BROWSER  # (The web browser to use. Default: "chrome".)
--chrome  # (Shortcut for "--browser=chrome". On by default.)
--edge  # (Shortcut for "--browser=edge".)
--firefox  # (Shortcut for "--browser=firefox".)
--ie  # (Shortcut for "--browser=ie".)
--opera  # (Shortcut for "--browser=opera".)
--safari  # (Shortcut for "--browser=safari".)
--cap-file=FILE  # (The web browser's desired capabilities to use.)
--cap-string=STRING  # (The web browser's desired capabilities to use.)
--settings-file=FILE  # (Override default SeleniumBase settings.)
--env=ENV  # (Set a test environment. Use "self.env" to use this in tests.)
--data=DATA  # (Extra test data. Access with "self.data" in tests.)
--var1=DATA  # (Extra test data. Access with "self.var1" in tests.)
--var2=DATA  # (Extra test data. Access with "self.var2" in tests.)
--var3=DATA  # (Extra test data. Access with "self.var3" in tests.)
--user-data-dir=DIR  # (Set the Chrome user data directory to use.)
--protocol=PROTOCOL  # (The Selenium Grid protocol: http|https.)
--server=SERVER  # (The Selenium Grid server/IP used for tests.)
--port=PORT  # (The Selenium Grid port used by the test server.)
--proxy=SERVER:PORT  # (Connect to a proxy server:port for tests.)
--proxy=USERNAME:PASSWORD@SERVER:PORT  # (Use authenticated proxy server.)
--agent=STRING  # (Modify the web browser's User-Agent string.)
--mobile  # (Use the mobile device emulator while running tests.)
--metrics=STRING  # (Set mobile metrics: "CSSWidth,CSSHeight,PixelRatio".)
--chromium-arg=ARG  # (Add a Chromium arg for Chrome/Edge, comma-separated.)
--firefox-arg=ARG  # (Add a Firefox arg for Firefox, comma-separated.)
--firefox-pref=SET  # (Set a Firefox preference:value set, comma-separated.)
--extension-zip=ZIP  # (Load a Chrome Extension .zip|.crx, comma-separated.)
--extension-dir=DIR  # (Load a Chrome Extension directory, comma-separated.)
--headless  # (Run tests in headless mode. The default arg on Linux OS.)
--headed  # (Run tests in headed/GUI mode on Linux OS.)
--xvfb  # (Run tests using the Xvfb virtual display server on Linux OS.)
--locale=LOCALE_CODE  # (Set the Language Locale Code for the web browser.)
--interval=SECONDS  # (The autoplay interval for presentations & tour steps)
--start-page=URL  # (The starting URL for the web browser when tests begin.)
--archive-logs  #  (Archive existing log files instead of deleting them.)
--archive-downloads  #  (Archive old downloads instead of deleting them.)
--time-limit=SECONDS  # (Safely fail any test that exceeds the time limit.)
--slow  # (Slow down the automation. Faster than using Demo Mode.)
--demo  # (Slow down and visually see test actions as they occur.)
--demo-sleep=SECONDS  # (Set the wait time after Demo Mode actions.)
--highlights=NUM  # (Number of highlight animations for Demo Mode actions.)
--message-duration=SECONDS  # (The time length for Messenger alerts.)
--check-js  # (Check for JavaScript errors after page loads.)
--ad-block  # (Block some types of display ads after page loads.)
--block-images  # (Block images from loading during tests.)
--verify-delay=SECONDS  # (The delay before MasterQA verification checks.)
--recorder  # (Enables the Recorder for turning browser actions into code.)
--disable-csp  # (Disable the Content Security Policy of websites.)
--disable-ws  # (Disable Web Security on Chromium-based browsers.)
--enable-ws  # (Enable Web Security on Chromium-based browsers.)
--enable-sync  # (Enable "Chrome Sync".)
--use-auto-ext  # (Use Chrome's automation extension.)
--remote-debug  # (Enable Chrome's Remote Debugger on http://localhost:9222)
--dashboard  # (Enable the SeleniumBase Dashboard. Saved at: dashboard.html)
--swiftshader  # (Use Chrome's "--use-gl=swiftshader" feature.)
--incognito  #  (Enable Chrome's Incognito mode.)
--guest  # (Enable Chrome's Guest mode.)
--devtools  # (Open Chrome's DevTools when the browser opens.)
--reuse-session | --rs  # (Reuse the browser session between tests.)
--crumbs  # (Delete all cookies between tests reusing a session.)
--maximize-window  # (Start tests with the web browser window maximized.)
--save-screenshot  # (Save a screenshot at the end of each test.)
--visual-baseline  # (Set the visual baseline for Visual/Layout tests.)
--timeout-multiplier=MULTIPLIER  # (Multiplies the default timeout values.)
(For more details, see the full list of command-line options here.)
🔵 During test failures, logs and screenshots from the most recent test run will get saved to the latest_logs/ folder. Those logs will get moved to archived_logs/ if you add --archive_logs to command-line options, or have ARCHIVE_EXISTING_LOGS set to True in settings.py, otherwise log files with be cleaned up at the start of the next test run. The test_suite.py collection contains tests that fail on purpose so that you can see how logging works.
cd examples/

pytest test_suite.py --browser=chrome

pytest test_suite.py --browser=firefox
An easy way to override seleniumbase/config/settings.py is by using a custom settings file.
Here's the command-line option to add to tests: (See examples/custom_settings.py)
--settings_file=custom_settings.py
(Settings include default timeout values, a two-factor auth key, DB credentials, S3 credentials, and other important settings used by tests.)
🔵 To pass additional data from the command-line to tests, add --data="ANY STRING".
Inside your tests, you can use self.data to access that.
🔵 When running tests with pytest, you'll want a copy of pytest.ini in your root folders. When running tests with nosetests, you'll want a copy of setup.cfg in your root folders. These files specify default configuration details for tests. Folders should also include a blank __init__.py file, which allows your tests to import files from that folder.
🔵 sbase mkdir DIR creates a folder with config files and sample tests:
sbase mkdir ui_testsThat new folder will have these files:
ui_tests/
├── __init__.py
├── my_first_test.py
├── parameterized_test.py
├── pytest.ini
├── requirements.txt
├── setup.cfg
├── test_demo_site.py
└── boilerplates/
    ├── __init__.py
    ├── base_test_case.py
    ├── boilerplate_test.py
    ├── classic_obj_test.py
    ├── page_objects.py
    ├── sb_fixture_test.py
    └── samples/
        ├── __init__.py
        ├── google_objects.py
        ├── google_test.py
        ├── sb_swag_test.py
        └── swag_labs_test.py
ProTip™: You can also create a boilerplate folder without any sample tests in it by adding -b or --basic to the sbase mkdir command:
sbase mkdir ui_tests --basicThat new folder will have these files:
ui_tests/
├── __init__.py
├── pytest.ini
├── requirements.txt
└── setup.cfg
Of those files, the pytest.ini config file is the most important, followed by a blank __init__.py file. There's also a setup.cfg file (only needed for nosetests). Finally, the requirements.txt file can be used to help you install seleniumbase into your environments (if it's not already installed).
Let's try an example of a test that fails:
""" test_fail.py """
from seleniumbase import BaseCase

class MyTestClass(BaseCase):

    def test_find_army_of_robots_on_xkcd_desert_island(self):
        self.open("https://xkcd.com/731/")
        self.assert_element("div#ARMY_OF_ROBOTS", timeout=1)  # This should fail
You can run it from the examples/ folder like this:
pytest test_fail.py🔵 You'll notice that a logs folder, "latest_logs", was created to hold information about the failing test, and screenshots. During test runs, past results get moved to the archived_logs folder if you have ARCHIVE_EXISTING_LOGS set to True in settings.py, or if your run tests with --archive-logs. If you choose not to archive existing logs, they will be deleted and replaced by the logs of the latest test run.
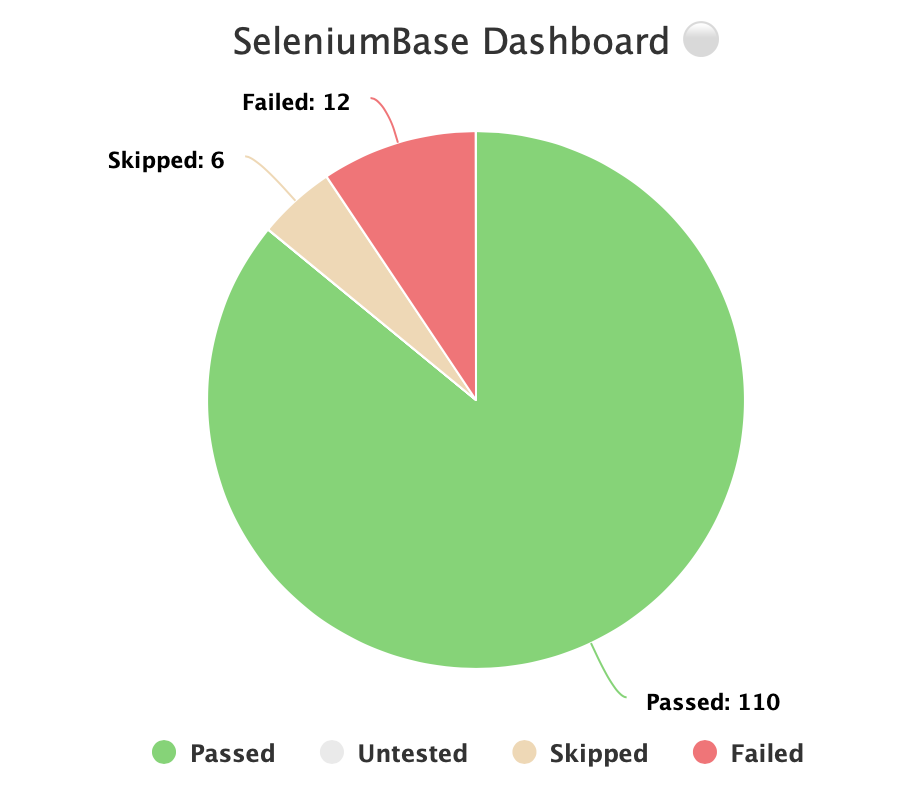
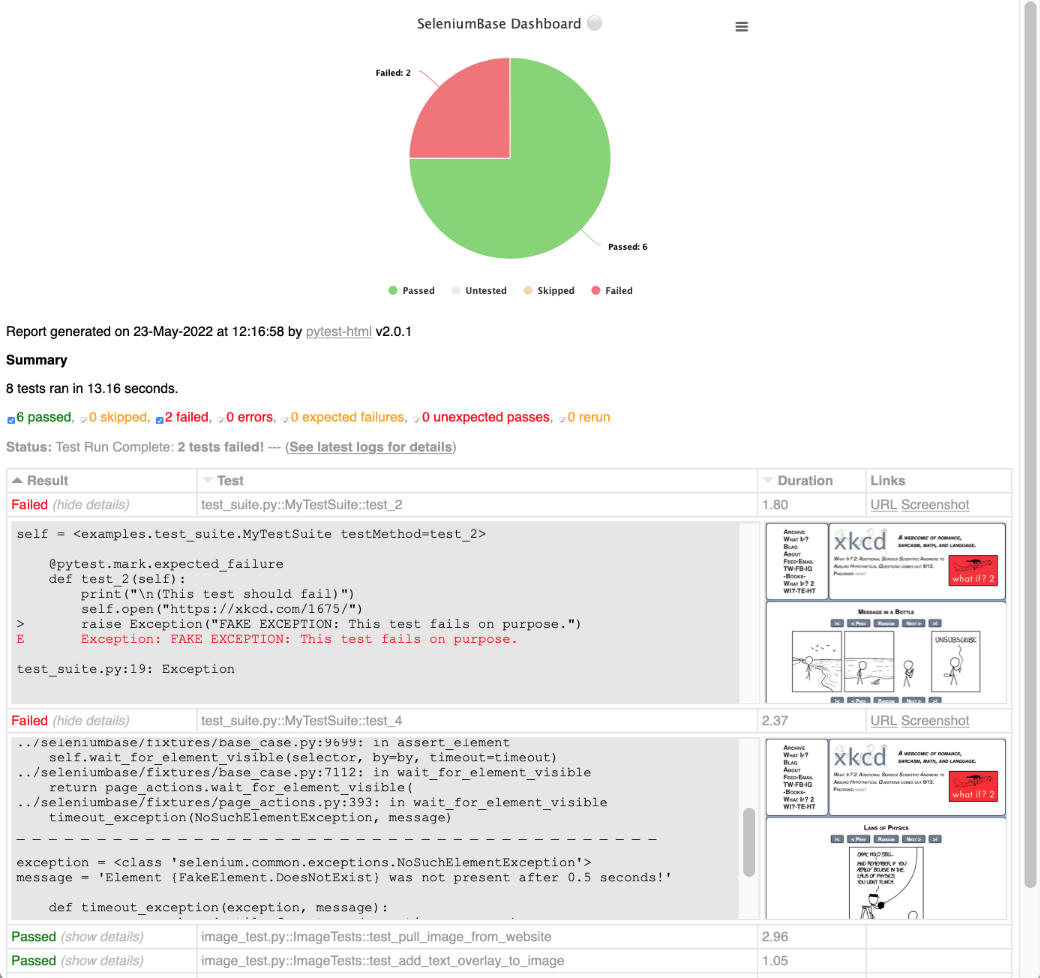
🔵 The --dashboard option for pytest generates a SeleniumBase Dashboard located at dashboard.html, which updates automatically as tests run and produce results. Example:
pytest --dashboard --rs --headless🔵 Additionally, you can host your own SeleniumBase Dashboard Server on a port of your choice. Here's an example of that using Python 3's http.server:
python -m http.server 1948🔵 Now you can navigate to http://localhost:1948/dashboard.html in order to view the dashboard as a web app. This requires two different terminal windows: one for running the server, and another for running the tests, which should be run from the same directory. (Use CTRL+C to stop the http server.)
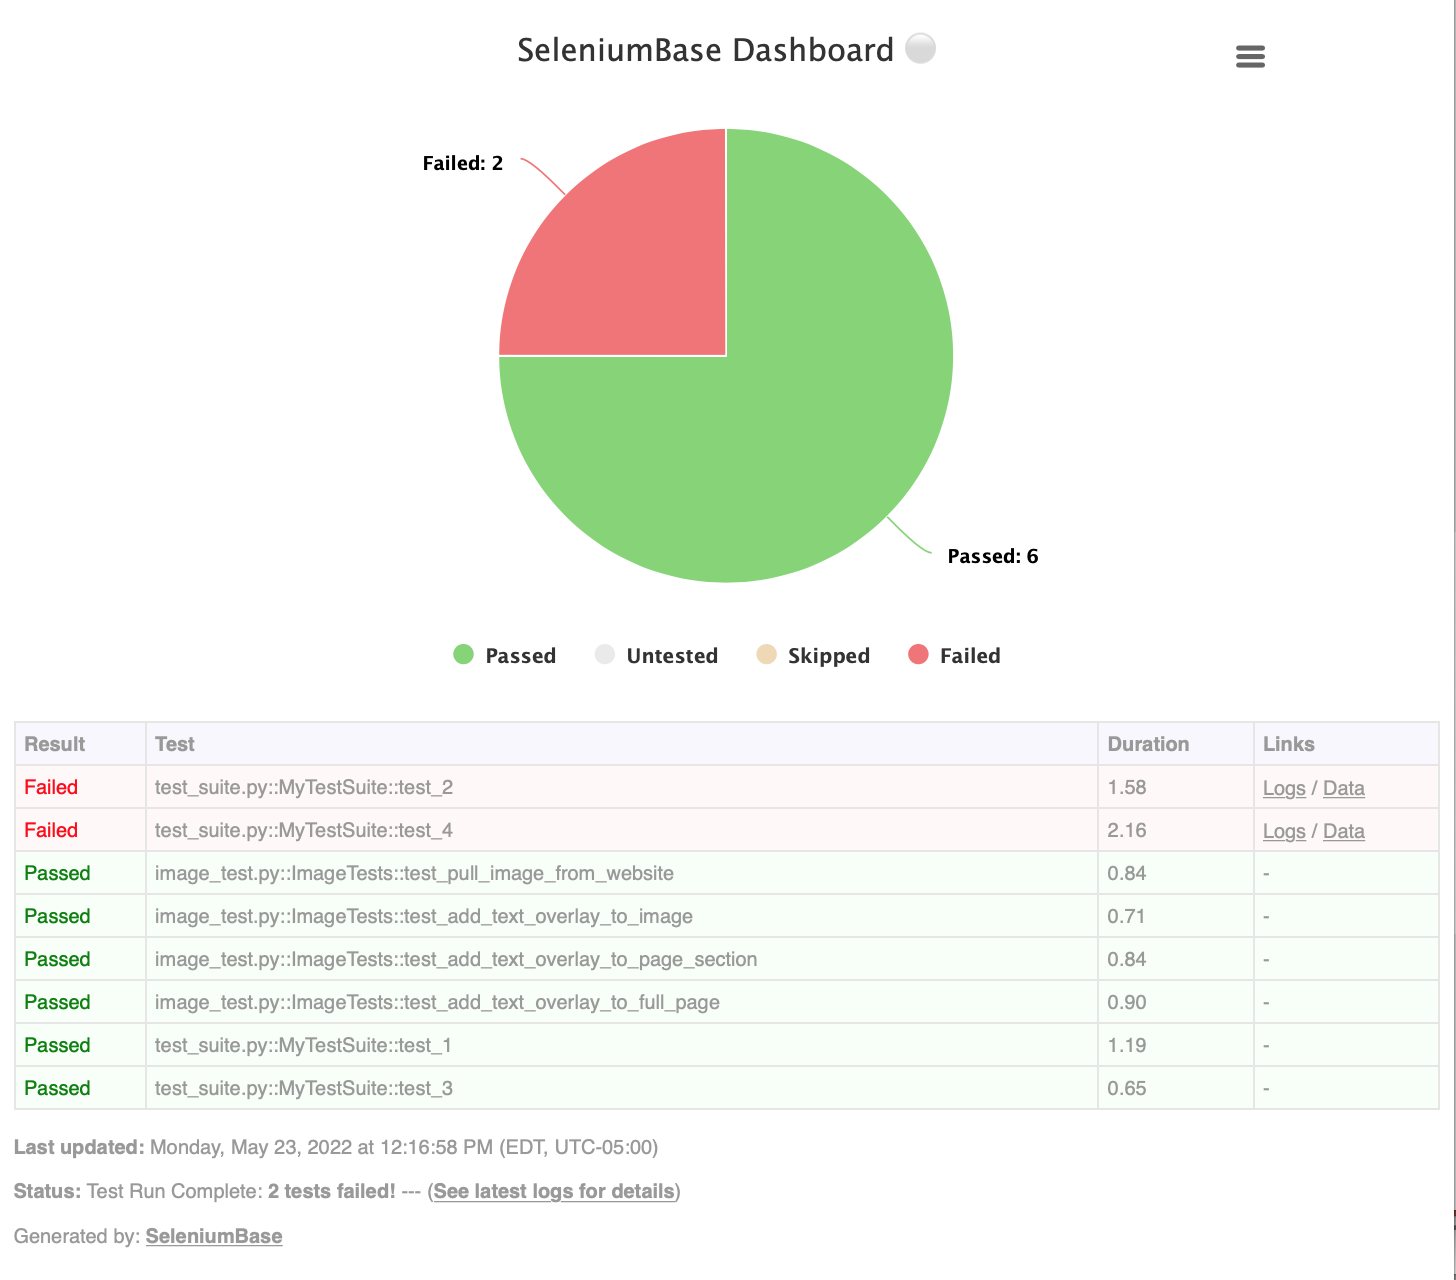
🔵 Here's a full example of what the SeleniumBase Dashboard may look like:
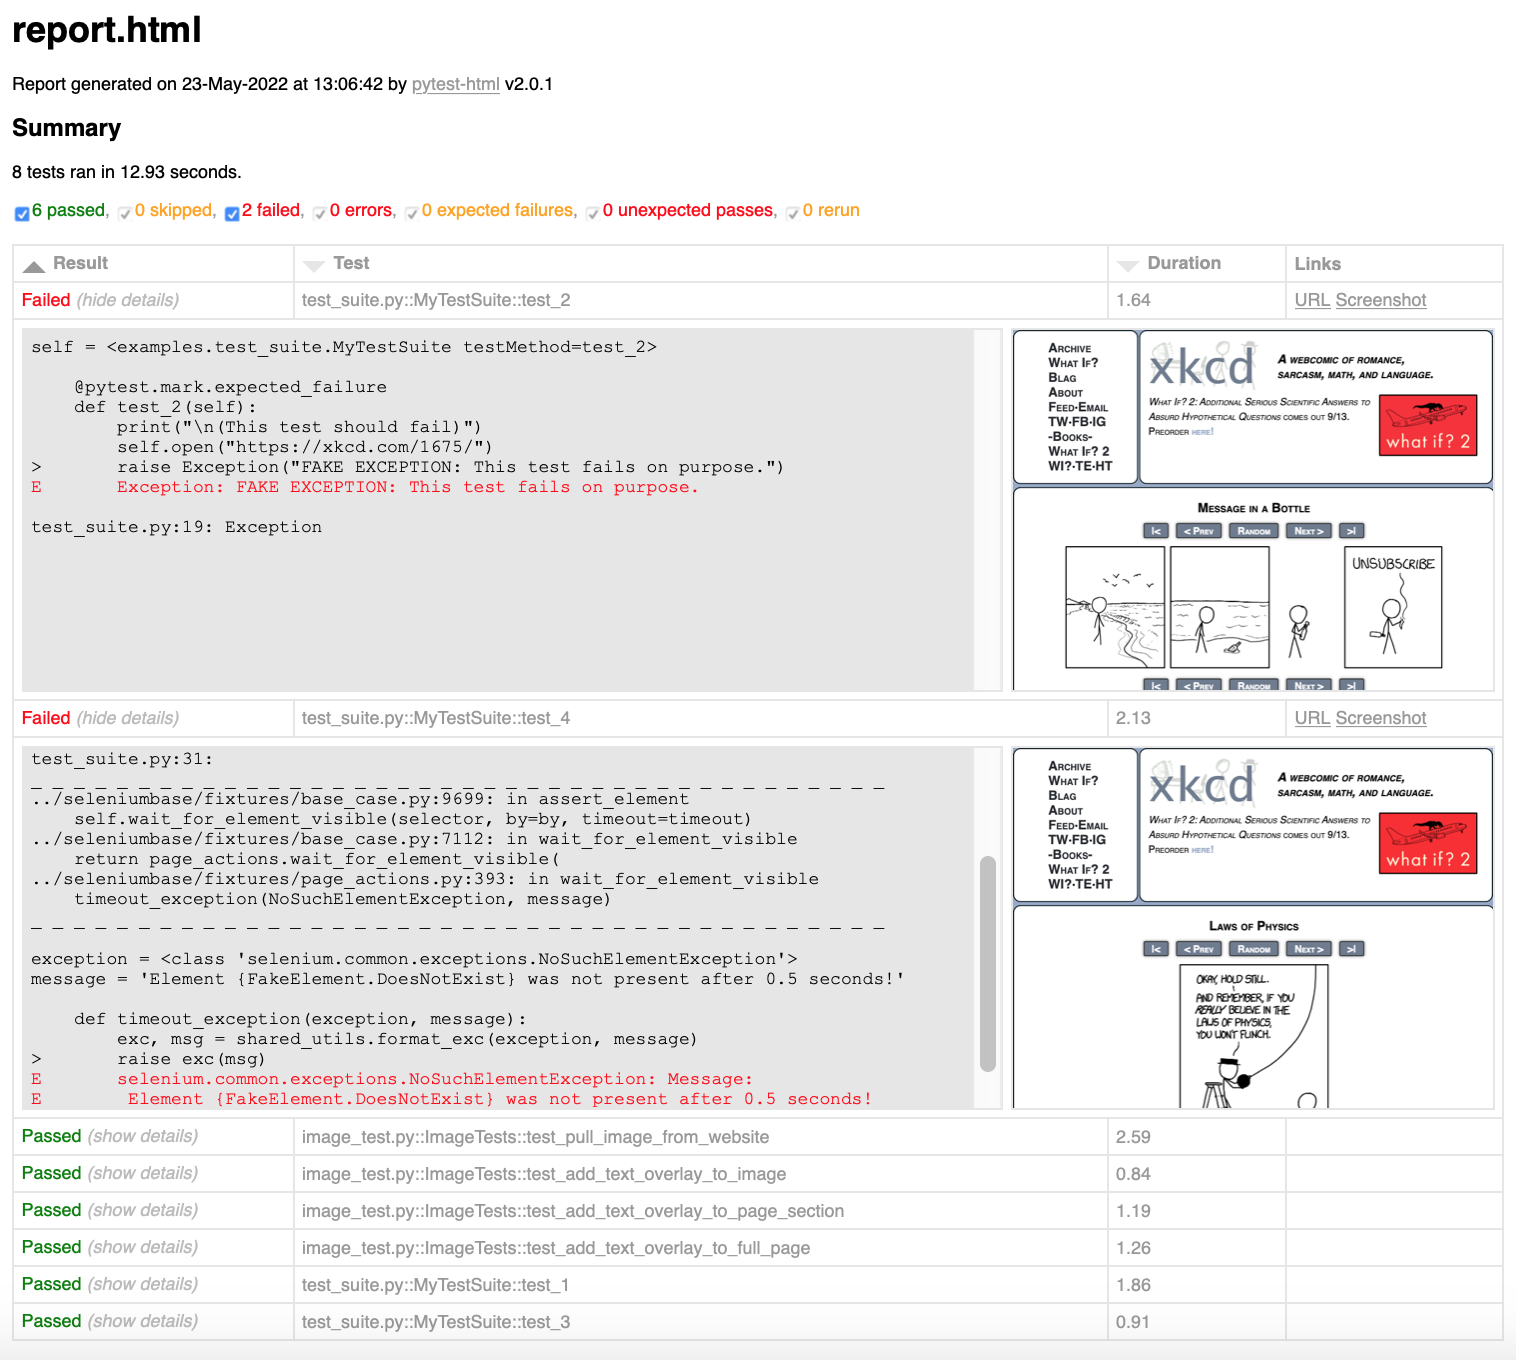
pytest test_suite.py --dashboard --rs --headless🔵 Using --html=report.html gives you a fancy report of the name specified after your test suite completes.
pytest test_suite.py --html=report.html🔵 When combining pytest html reports with SeleniumBase Dashboard usage, the pie chart from the Dashboard will get added to the html report. Additionally, if you set the html report URL to be the same as the Dashboard URL when also using the dashboard, (example: --dashboard --html=dashboard.html), then the Dashboard will become an advanced html report when all the tests complete.
🔵 Here's an example of an upgraded html report:
pytest test_suite.py --dashboard --html=report.htmlIf viewing pytest html reports in Jenkins, you may need to configure Jenkins settings for the html to render correctly. This is due to Jenkins CSP changes.
You can also use --junit-xml=report.xml to get an xml report instead. Jenkins can use this file to display better reporting for your tests.
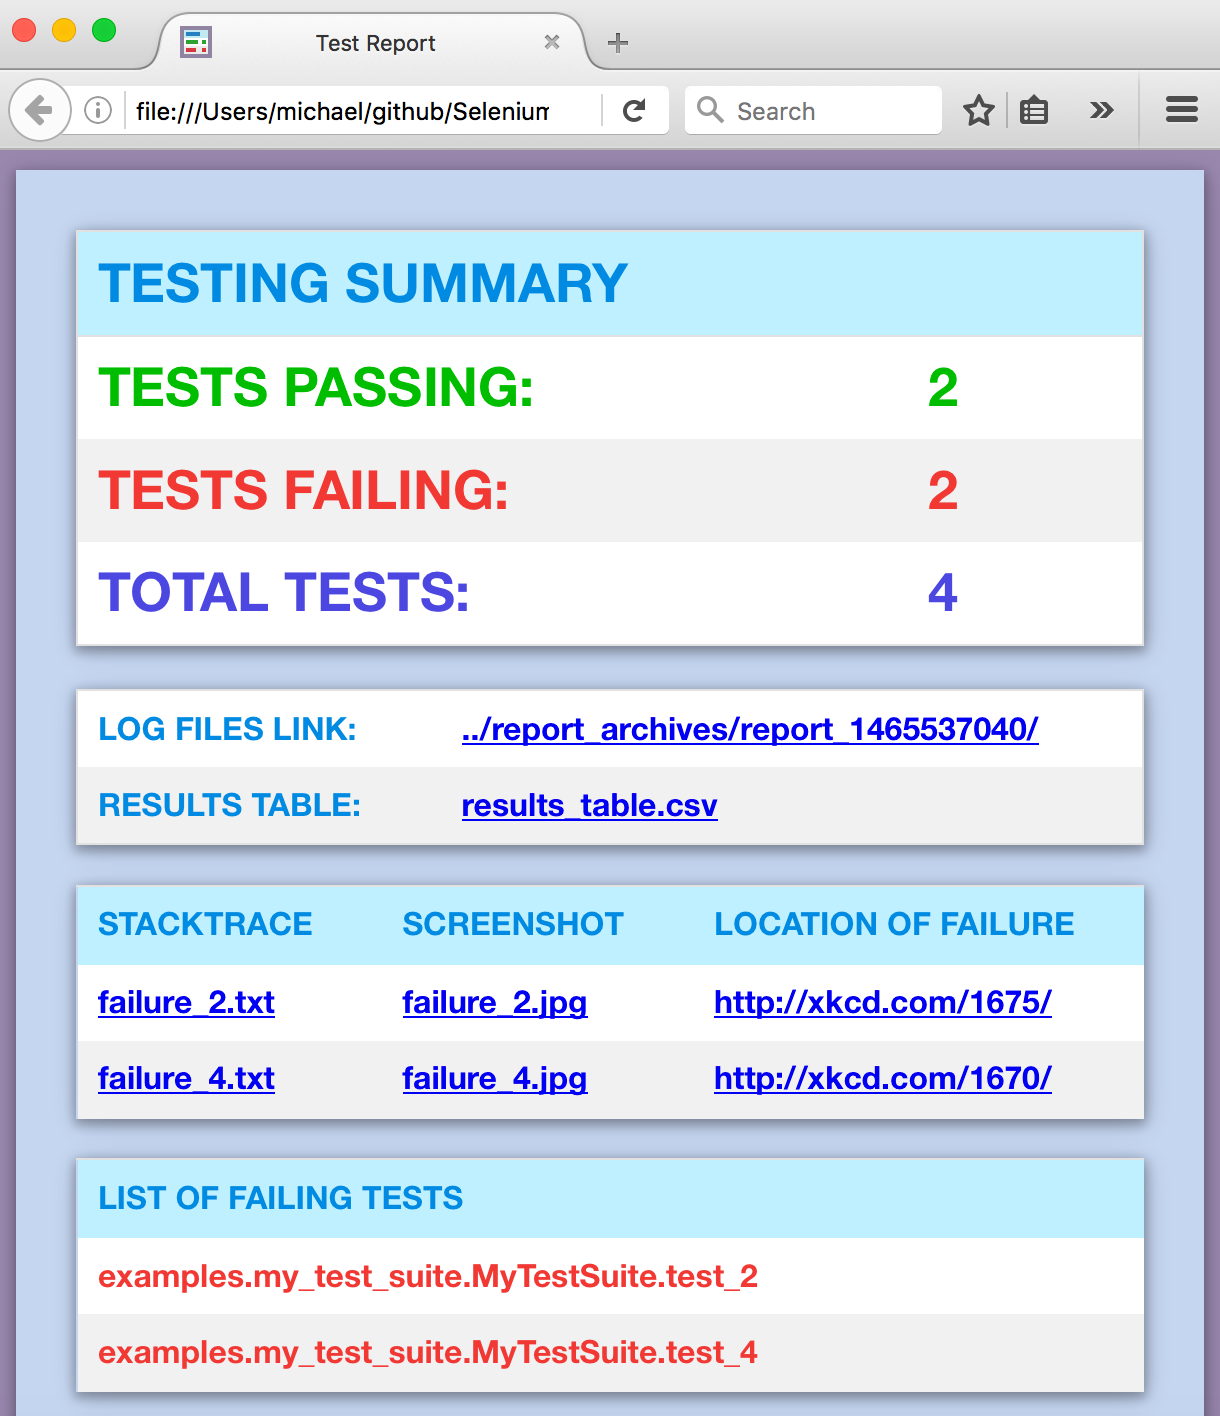
pytest test_suite.py --junit-xml=report.xmlThe --report option gives you a fancy report after your test suite completes.
nosetests test_suite.py --report(NOTE: You can add --show-report to immediately display Nosetest reports after the test suite completes. Only use --show-report when running tests locally because it pauses the test run.)
See: https://docs.qameta.io/allure/
SeleniumBase no longer includes allure-pytest as part of installed dependencies. If you want to use it, install it first:
pip install allure-pytestNow your tests can create Allure results files, which can be processed by Allure Reports.
pytest test_suite.py --alluredir=allure_resultsIf you wish to use a proxy server for your browser tests (Chromium or Firefox), you can add --proxy=IP_ADDRESS:PORT as an argument on the command line.
pytest proxy_test.py --proxy=IP_ADDRESS:PORTIf the proxy server that you wish to use requires authentication, you can do the following (Chromium only):
pytest proxy_test.py --proxy=USERNAME:PASSWORD@IP_ADDRESS:PORTSeleniumBase also supports SOCKS4 and SOCKS5 proxies:
pytest proxy_test.py --proxy="socks4://IP_ADDRESS:PORT"

pytest proxy_test.py --proxy="socks5://IP_ADDRESS:PORT"
To make things easier, you can add your frequently-used proxies to PROXY_LIST in proxy_list.py, and then use --proxy=KEY_FROM_PROXY_LIST to use the IP_ADDRESS:PORT of that key.
pytest proxy_test.py --proxy=proxy1🔵 If you wish to change the User-Agent for your browser tests (Chromium and Firefox only), you can add --agent="USER AGENT STRING" as an argument on the command-line.
pytest user_agent_test.py --agent="Mozilla/5.0 (Nintendo 3DS; U; ; en) Version/1.7412.EU"🔵 self.accept_alert() automatically waits for and accepts alert pop-ups. self.dismiss_alert() automatically waits for and dismisses alert pop-ups. On occasion, some methods like self.click(SELECTOR) might dismiss a pop-up on its own because they call JavaScript to make sure that the readyState of the page is complete before advancing. If you're trying to accept a pop-up that got dismissed this way, use this workaround: Call self.find_element(SELECTOR).click() instead, (which will let the pop-up remain on the screen), and then use self.accept_alert() to accept the pop-up (more on that here). If pop-ups are intermittent, wrap code in a try/except block.
🔵 Learn about SeleniumBase Interactive Walkthroughs (in the examples/tour_examples/ folder). It's great for prototyping a website onboarding experience.
🔵 Here are some things you can do to set up a production environment for your testing:
-
You can set up a Jenkins build server for running tests at regular intervals. For a real-world Jenkins example of headless browser automation in action, check out the SeleniumBase Jenkins example on Azure or the SeleniumBase Jenkins example on Google Cloud.
-
You can use the Selenium Grid to scale your testing by distributing tests on several machines with parallel execution. To do this, check out the SeleniumBase selenium_grid folder, which should have everything you need, including the Selenium Grid ReadMe, which will help you get started.
-
If you're using the SeleniumBase MySQL feature to save results from tests running on a server machine, you can install MySQL Workbench to help you read & write from your DB more easily.
-
If you use Slack, you can easily have your Jenkins jobs display results there by using the Jenkins Slack Plugin. Another way to send messages from your tests to Slack is by using Slack's Incoming Webhooks API.
-
If you're using AWS, you can set up an Amazon S3 account for saving log files and screenshots from your tests. To activate this feature, modify settings.py with connection details in the S3 section, and add "
--with-s3-logging" on the command-line when running your tests.
Here's an example of running tests with additional features enabled:
pytest [YOUR_TEST_FILE.py] --with-db-reporting --with-s3-logging🔵 Navigating to a web page: (and related commands)
self.open("https://xkcd.com/378/")  # This method opens the specified page.

self.go_back()  # This method navigates the browser to the previous page.

self.go_forward()  # This method navigates the browser forward in history.

self.refresh_page()  # This method reloads the current page.

self.get_current_url()  # This method returns the current page URL.

self.get_page_source()  # This method returns the current page source.
ProTip™: You may need to use the self.get_page_source() method along with Python's find() command to parse through the source to find something that Selenium wouldn't be able to. (You may want to brush up on your Python programming skills for that.)
source = self.get_page_source()
head_open_tag = source.find('<head>')
head_close_tag = source.find('</head>', head_open_tag)
everything_inside_head = source[head_open_tag+len('<head>'):head_close_tag]
🔵 Clicking:
To click an element on the page:
self.click("div#my_id")ProTip™: In most web browsers, you can right-click on a page and select Inspect Element to see the CSS selector details that you'll need to create your own scripts.
🔵 Typing Text:
self.type(selector, text) # updates the text from the specified element with the specified value. An exception is raised if the element is missing or if the text field is not editable. Example:
self.type("input#id_value", "2012")You can also use self.add_text() or the WebDriver .send_keys() command, but those won't clear the text box first if there's already text inside.
If you want to type in special keys, that's easy too. Here's an example:
from selenium.webdriver.common.keys import Keys
self.find_element("textarea").send_keys(Keys.SPACE + Keys.BACK_SPACE + '\n')  # The backspace should cancel out the space, leaving you with the newline
🔵 Getting the text from an element on a page:
text = self.get_text("header h2")🔵 Getting the attribute value from an element on a page:
attribute = self.get_attribute("#comic img", "title")🔵 Asserting existence of an element on a page within some number of seconds:
self.wait_for_element_present("div.my_class", timeout=10)(NOTE: You can also use: self.assert_element_present(ELEMENT))
🔵 Asserting visibility of an element on a page within some number of seconds:
self.wait_for_element_visible("a.my_class", timeout=5)(NOTE: The short versions of this are self.find_element(ELEMENT) and self.assert_element(ELEMENT). The find_element() version returns the element)
Since the line above returns the element, you can combine that with .click() as shown below:
self.find_element("a.my_class", timeout=5).click()

# But you're better off using the following statement, which does the same thing:

self.click("a.my_class")  # DO IT THIS WAY!
ProTip™: You can use dots to signify class names (Ex: div.class_name) as a simplified version of div[class="class_name"] within a CSS selector.
You can also use *= to search for any partial value in a CSS selector as shown below:
self.click('a[name*="partial_name"]')🔵 Asserting visibility of text inside an element on a page within some number of seconds:
self.assert_text("Make it so!", "div#trek div.picard div.quotes")
self.assert_text("Tea. Earl Grey. Hot.", "div#trek div.picard div.quotes", timeout=3)
(NOTE: self.find_text(TEXT, ELEMENT) and self.wait_for_text(TEXT, ELEMENT) also do this. For backwards compatibility, older method names were kept, but the default timeout may be different.)
🔵 Asserting Anything:
self.assert_true(myvar1 == something)

self.assert_equal(var1, var2)
🔵 Useful Conditional Statements: (with creative examples in action)
is_element_visible(selector) # is an element visible on a page
if self.is_element_visible('div#warning'):
    print("Red Alert: Something bad might be happening!")
is_element_present(selector) # is an element present on a page
if self.is_element_present('div#top_secret img.tracking_cookie'):
    self.contact_cookie_monster()  # Not a real SeleniumBase method
else:
    current_url = self.get_current_url()
    self.contact_the_nsa(url=current_url, message="Dark Zone Found")  # Not a real SeleniumBase method
Another example:
def is_there_a_cloaked_klingon_ship_on_this_page():
    if self.is_element_present("div.ships div.klingon"):
        return not self.is_element_visible("div.ships div.klingon")
    return False
is_text_visible(text, selector) # is text visible on a page
def get_mirror_universe_captain_picard_superbowl_ad(superbowl_year):
    selector = "div.superbowl_%s div.commercials div.transcript div.picard" % superbowl_year
    if self.is_text_visible("Yes, it was I who summoned you all here.", selector):
        return "Picard Paramount+ Superbowl Ad 2020"
    elif self.is_text_visible("Commander, signal the following: Our Network is Secure!"):
        return "Picard Mirror Universe iboss Superbowl Ad 2018"
    elif self.is_text_visible("For the Love of Marketing and Earl Grey Tea!", selector):
        return "Picard Mirror Universe HubSpot Superbowl Ad 2015"
    elif self.is_text_visible("Delivery Drones... Engage", selector):
        return "Picard Mirror Universe Amazon Superbowl Ad 2015"
    elif self.is_text_visible("Bing it on Screen!", selector):
        return "Picard Mirror Universe Microsoft Superbowl Ad 2015"
    elif self.is_text_visible("OK Glass, Make it So!", selector):
        return "Picard Mirror Universe Google Superbowl Ad 2015"
    elif self.is_text_visible("Number One, I've Never Seen Anything Like It.", selector):
        return "Picard Mirror Universe Tesla Superbowl Ad 2015"
    elif self.is_text_visible("Let us make sure history never forgets the name ... Facebook", selector):
        return "Picard Mirror Universe Facebook Superbowl Ad 2015"
    elif self.is_text_visible("""With the first link, the chain is forged.
                              The first speech censored, the first thought forbidden,
                              the first freedom denied, chains us all irrevocably.""", selector):
        return "Picard Mirror Universe Wikimedia Superbowl Ad 2015"
    else:
        raise Exception("Reports of my assimilation are greatly exaggerated.")
🔵 Switching Tabs:
If your test opens up a new tab/window, you can switch to it. (SeleniumBase automatically switches to new tabs that don't open to ``about:blank`` URLs.)
self.switch_to_window(1) # This switches to the new tab (0 is the first one)🔵 ProTip™: iFrames follow the same principle as new windows - you need to specify the iFrame if you want to take action on something in there
self.switch_to_frame('ContentManagerTextBody_ifr')
# Now you can act inside the iFrame
# .... Do something cool (here)
self.switch_to_default_content()  # Exit the iFrame when you're done
🔵 Executing Custom jQuery Scripts:
jQuery is a powerful JavaScript library that allows you to perform advanced actions in a web browser. If the web page you're on already has jQuery loaded, you can start executing jQuery scripts immediately. You'd know this because the web page would contain something like the following in the HTML:
<script src="https://ajax.googleapis.com/ajax/libs/jquery/3.4.1/jquery.min.js"></script>🔵 It's OK if you want to use jQuery on a page that doesn't have it loaded yet. To do so, run the following command first:
self.activate_jquery()🔵 Some websites have a restrictive Content Security Policy to prevent users from loading jQuery and other external libraries onto their websites. If you need to use jQuery or another JS library on such a website, add --disable-csp on the command-line.
🔵 Here are some examples of using jQuery in your scripts:
self.execute_script('jQuery, window.scrollTo(0, 600)')  # Scrolling the page

self.execute_script("jQuery('#annoying-widget').hide()")  # Hiding elements on a page

self.execute_script("jQuery('#hidden-widget').show(0)")  # Showing hidden elements on a page

self.execute_script("jQuery('#annoying-button a').remove()")  # Removing elements on a page

self.execute_script("jQuery('%s').mouseover()" % (mouse_over_item))  # Mouse-over elements on a page

self.execute_script("jQuery('input#the_id').val('my_text')")  # Fast text input on a page

self.execute_script("jQuery('div#dropdown a.link').click()")  # Click elements on a page

self.execute_script("return jQuery('div#amazing')[0].text")  # Returns the css "text" of the element given

self.execute_script("return jQuery('textarea')[2].value")  # Returns the css "value" of the 3rd textarea element on the page
(Most of the above commands can be done directly with built-in SeleniumBase methods.)
🔵 In the next example, JavaScript creates a referral button on a page, which is then clicked:
start_page = "https://xkcd.com/465/"
destination_page = "https://github.com/seleniumbase/SeleniumBase"
self.open(start_page)
referral_link = '''<a class='analytics test' href='%s'>Free-Referral Button!</a>''' % destination_page
self.execute_script('''document.body.innerHTML = \"%s\"''' % referral_link)
self.click("a.analytics")  # Clicks the generated button
(Due to popular demand, this traffic generation example has been included in SeleniumBase with the self.generate_referral(start_page, end_page) and the self.generate_traffic(start_page, end_page, loops) methods.)
🔵 Using deferred asserts:
Let's say you want to verify multiple different elements on a web page in a single test, but you don't want the test to fail until you verified several elements at once so that you don't have to rerun the test to find more missing elements on the same page. That's where deferred asserts come in. Here's the example:
from seleniumbase import BaseCase

class MyTestClass(BaseCase):

    def test_deferred_asserts(self):
        self.open('https://xkcd.com/993/')
        self.wait_for_element('#comic')
        self.deferred_assert_element('img[alt="Brand Identity"]')
        self.deferred_assert_element('img[alt="Rocket Ship"]')  # Will Fail
        self.deferred_assert_element('#comicmap')
        self.deferred_assert_text('Fake Item', '#middleContainer')  # Will Fail
        self.deferred_assert_text('Random', '#middleContainer')
        self.deferred_assert_element('a[name="Super Fake !!!"]')  # Will Fail
        self.process_deferred_asserts()
deferred_assert_element() and deferred_assert_text() will save any exceptions that would be raised.
To flush out all the failed deferred asserts into a single exception, make sure to call self.process_deferred_asserts() at the end of your test method. If your test hits multiple pages, you can call self.process_deferred_asserts() before navigating to a new page so that the screenshot from your log files matches the URL where the deferred asserts were made.
🔵 Accessing Raw WebDriver:
If you need access to any commands that come with standard WebDriver, you can call them directly like this:
self.driver.delete_all_cookies()
capabilities = self.driver.capabilities
self.driver.find_elements_by_partial_link_text("GitHub")
(In general, you'll want to use the SeleniumBase versions of methods when available.)
🔵 Retrying failing tests automatically:
You can use --reruns=NUM to retry failing tests that many times. Use --reruns-delay=SECONDS to wait that many seconds between retries. Example:
pytest --reruns=1 --reruns-delay=1Additionally, you can use the @retry_on_exception() decorator to specifically retry failing methods. (First import: from seleniumbase import decorators) To learn more about SeleniumBase decorators, [click here](https://github.com/seleniumbase/SeleniumBase/tree/master/seleniumbase/common).
Congratulations on getting started with SeleniumBase!
