Learning about Android with Big Nerd Ranch
Jetpack Compose is the future or Android development. There are many ways to write asynchronous code on Android, but in this book we focus exclusively using Kotlin coroutines as they are baked directly into Jetpack Compose's API as well as being excellent tools to interact with UI written with Android's existing UI toolkit.
Reworked projects to follow the UNIDIRECTIONAL data flow architecture pattern. The unidirectional data flow pattern is essential to building apps with Jetpack Compose- and it also helps organize code when building apps with Android's existing UI toolkit.
An activity is a class in the Android SDK. It is an entry point into your application and is responsible for managing user interaction with a screen of information.
- You write subclasses of Activity to implement the functionality your app requires. A simple application may need only one subclass; a complex application may have many.
- A layout defines a set of UI objects and the object's positions on the scren. A layout is made up of definitions written in XML. Each definition is used to create an object that appears onscreen, like a button or some text.

Notice that the package name uses a "reverse DNS" convention: the domain name of your organization is reversed and suffixed with further identifiers. This convention keeps package names unique and distinguishes applications from each other on a device and in the Google Play Store.
TAKE INTO ACCOUNT THAT CERTAIN TOOLS AND LIBRARIES ONLY SUPPORT KOTLIN -SUCH AS JETPACK COMPOSE
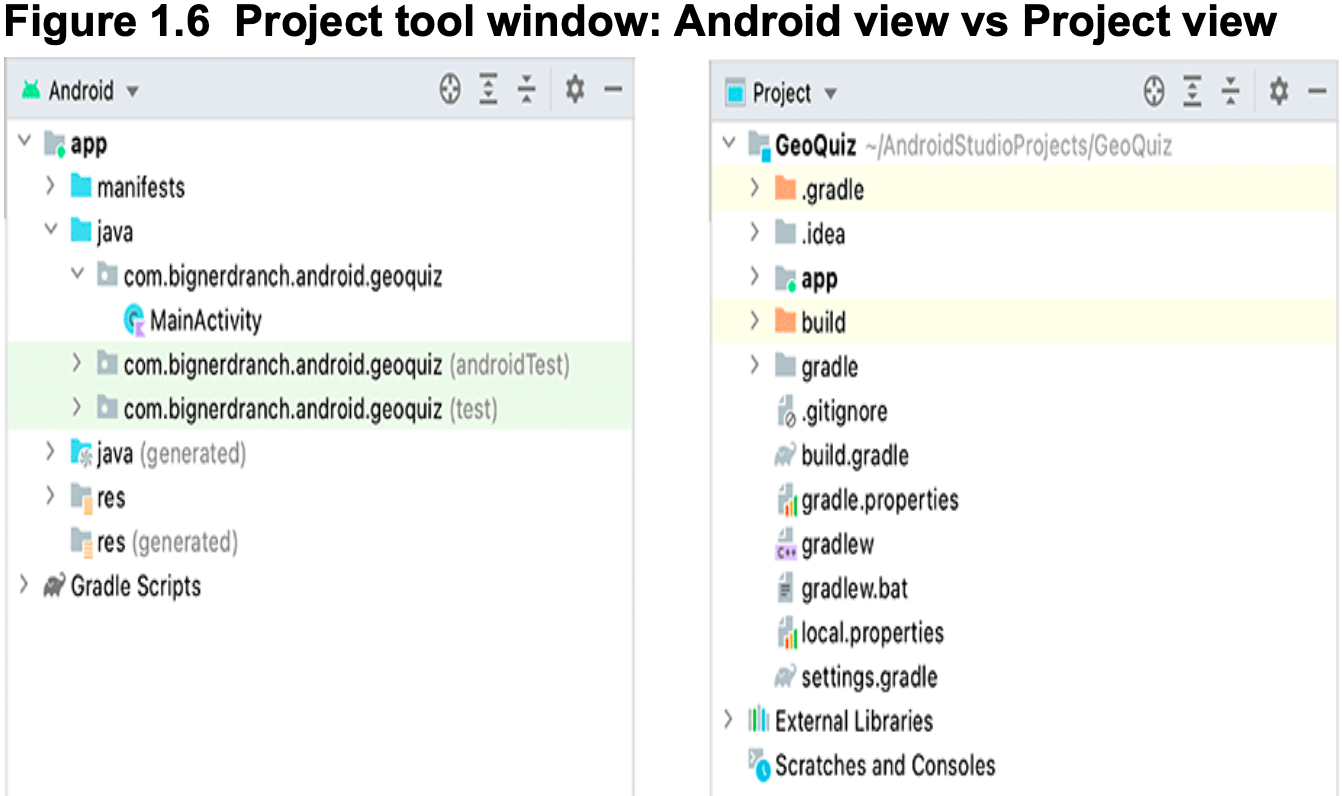
Project tool window: by default, Android Studio displays the Android project view in the project tool window. This view hides the true directory structure of your Android project so that you can focus on the files and folders that you need MOST OFTEN. To see the files and folders in your project as they actually are, locate the dropdown at the top of the project tool window and click to expand it.
Adding the suffix 'Activity' on the class name when it is an activity is not required, but IT IS AN EXCELLENT CONVENTION TO FOLLOW.
By convention, a layout file is named based on the activity it is associated with: its name begins with 'activity_', and the rest of the activity name folows in all lowercase, using underscores to separate words (a style called "snake_case"). So for example, your layout file's name is 'activity_main.xml', and the layout file for an activity called SplashScreenActivity would be named 'activity_splash_screen'. This naming style is recommended for layouts as well as other resources.
The Android SDK includes many views that you can configure to get the appearance and behavior you want. Each is an instance of the 'View' class or one of its subclasses (such as TextView or Button). Something has to tell the views where they belong onscreen. A 'ViewGroup' is kind of a 'View' that contains and arranges other views. A ViewGroup does not display content itself. Rather, it orchestrates where other views' content is displayed. ViewGroups are often referred to as layouts.
Each element in a layout has a set of XML 'attributes'. Each attribute is an instruction about how the view should be configured.
Your views exist in a hierarchy of View objects called the 'view hierarchy'.
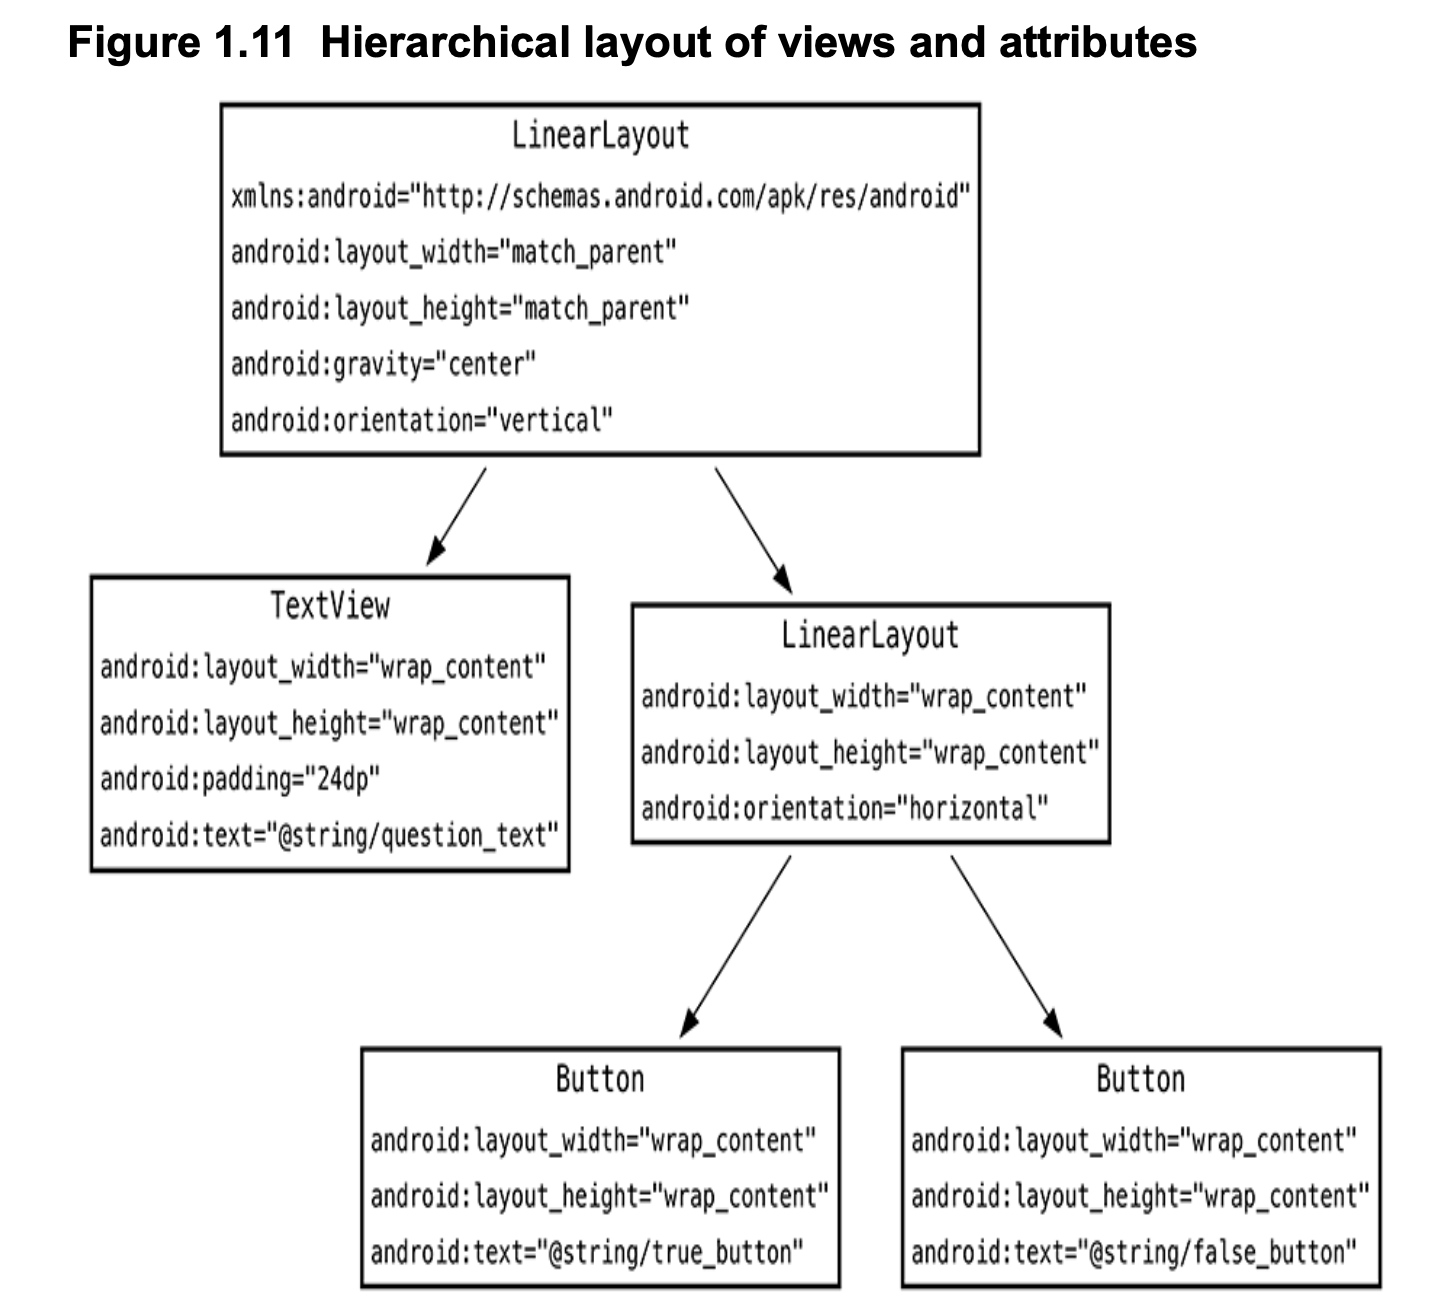
The root element of this layout's view hierarchy is a LinearLayout. As the root element, the 'LinearLayout' must specify the Android resource XML namespace at 'http://schemas.android.com/apk/res/android'. When a view is contained by a ViewGroup, that view is said to be a 'child' of the ViewGroup.
The LinearLayout is the root element, but it still has a parent - THE VIEW THAT ANDROID PROVIDES FOR YOUR APP'S VIEW HIERARCHY TO LIVE IN.
The android:orientation attribute on the LinearLayout views determines whether their children will appear vertically or horizontally. The order in which children are defined determines the order they appear onscreen. In a vertical LinearLayout, the first child defined will appear topmost. In a horizontal LinearLayout, the first child defined will be leftmost.
A string resource is a string that lives in a separate XML file called a 'strings file'. Although the default strings file is named 'strings.xml', you can name a strings file anything you want. You can also have multiple strings files in a project. As long as the file is located in 'res/values/', has a 'resources' root element, and contains child 'string' elements, your strings will be found and used.
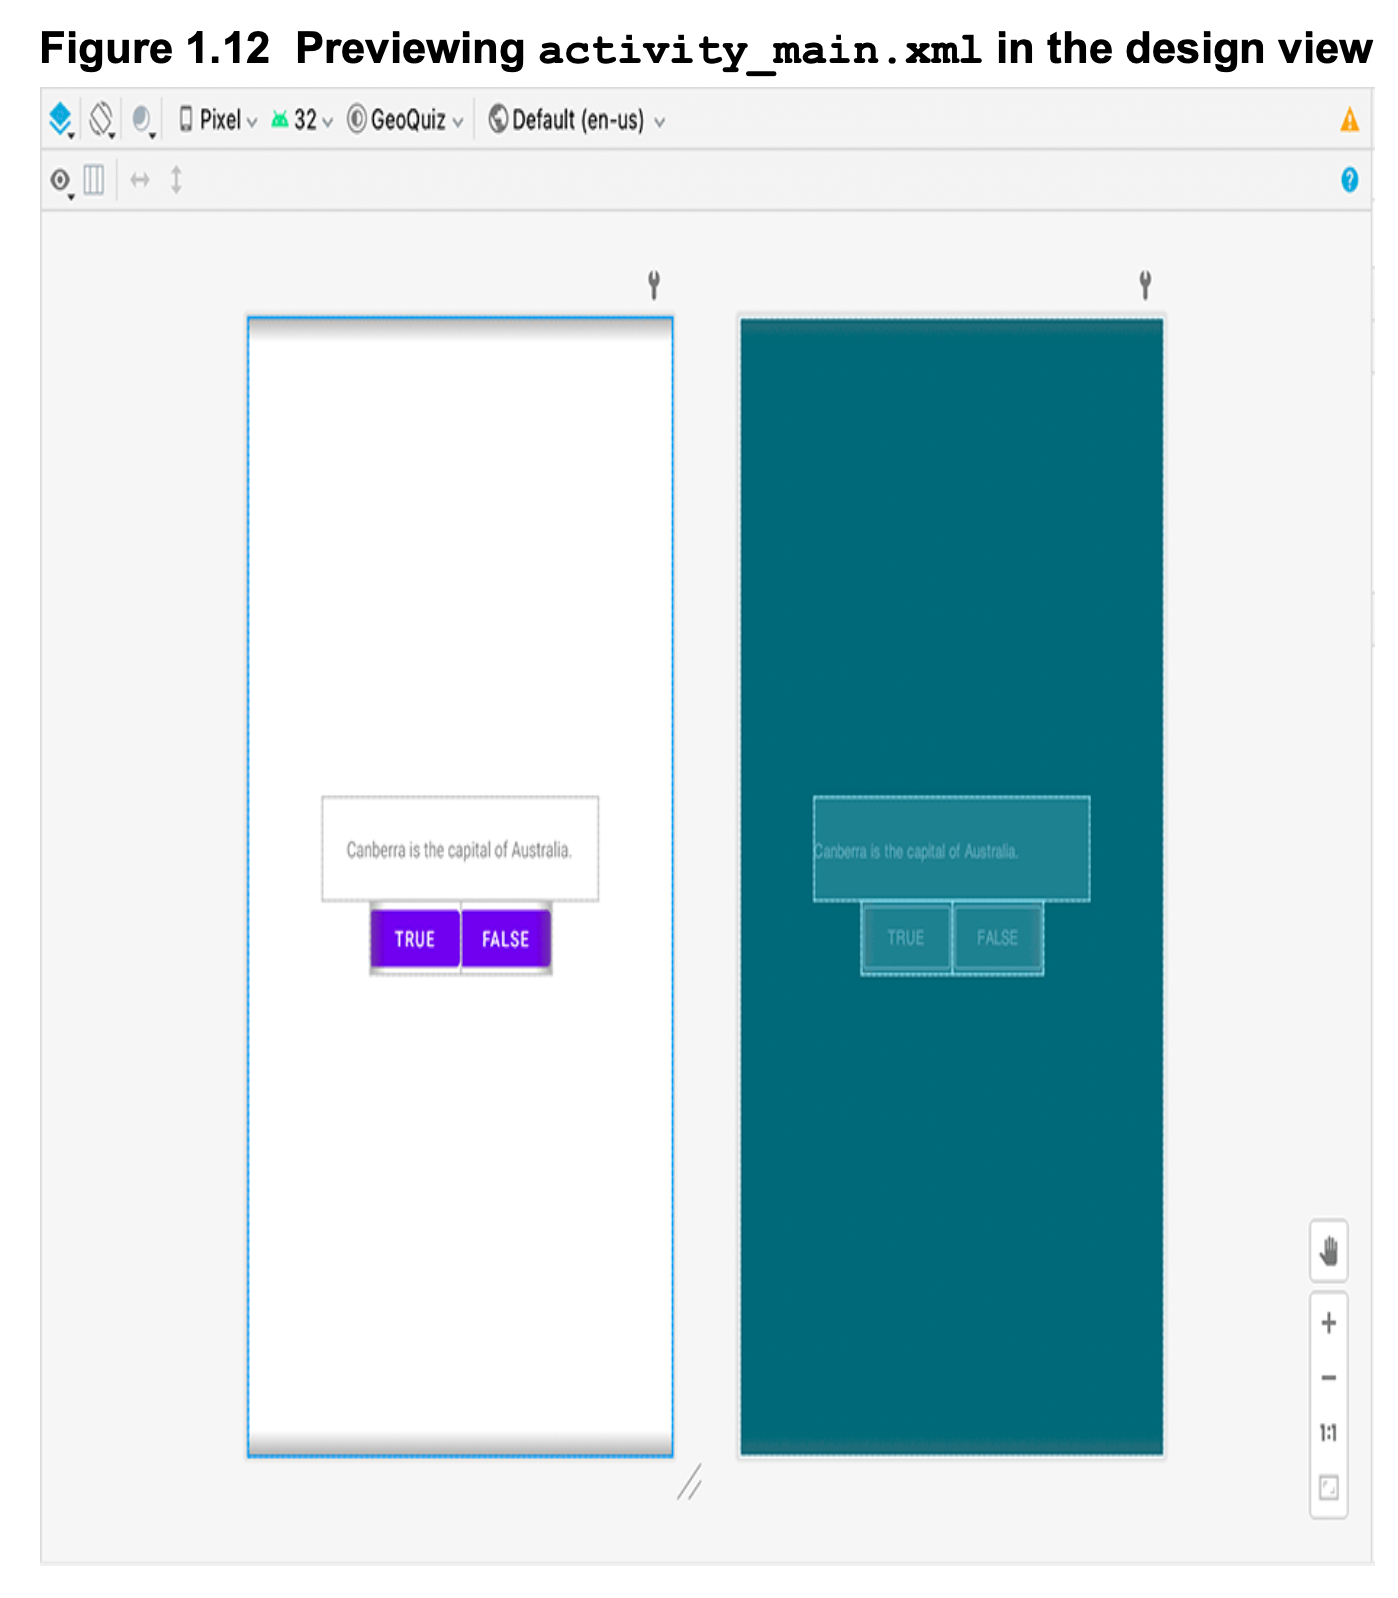
Previous image shows the two kinds of preview available. The preview on the left is the 'Design' preview. This shows how the layout would look on a device, INCLUDING THEMING.
The preview on the right is the 'Blueprint' preview. This preview focuses on the size of the views and the relationships between them. The design view also allows you to see how your layout looks on different device configurations. At the top of the preview window, you can specify the type of device, the version of Android to simulate, the device theme, AND THE LOCALE to use when rendering your layout.
It's important to test your app using the different localizations, themes, configuration, etc
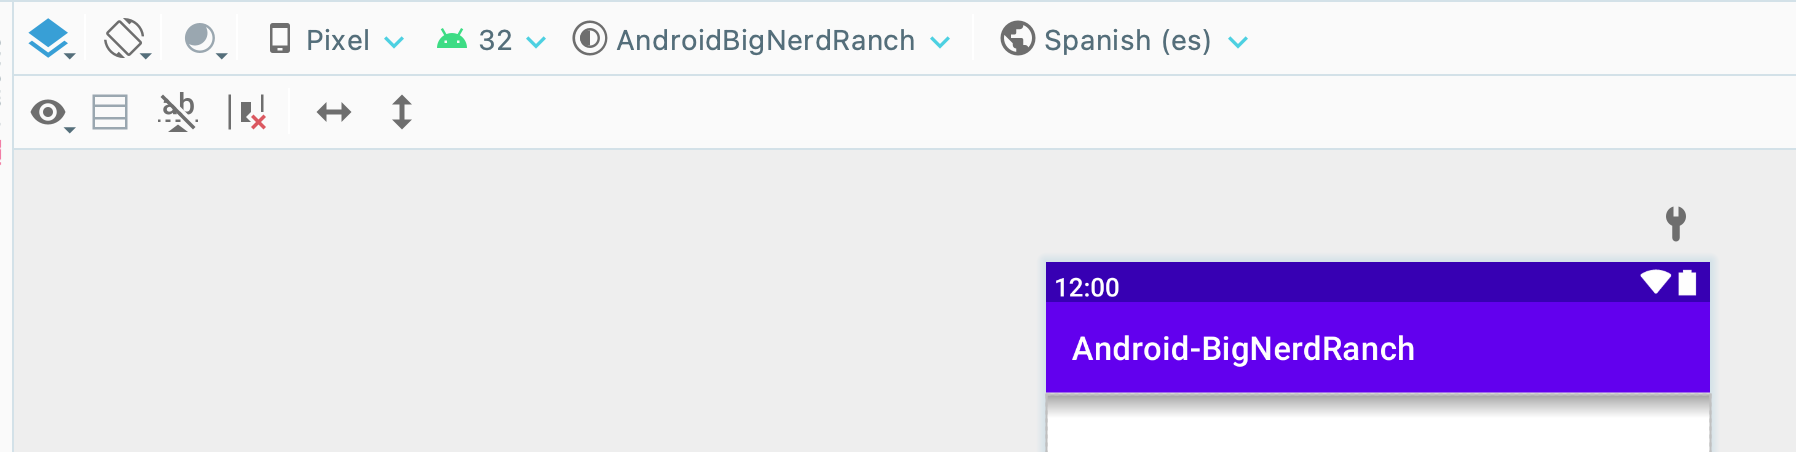
The next image shows the preview with 'layout decorations' the device status bar, app bar with GeoQuiz label, and virtual device button bar. To see these decorations, click the eye-shaped button in the toolbar just above the preview and select Show System UI
A quick aside about the directory src/main/java. This directory is called 'java' because Android originally supported only Java code. In your project, when you configure it to use Kotlin, the 'java' directory is where the Kotlin code lives. You could create a 'kotlin' directory and place your Kotlin files there, but that would provide no real benefits and requires additional configuration, so most developers just place their Kotlin files in the 'java' directory.
AppCompatActivity is a subclass of Android's Activity class that provides compatibility support for older versions of Android.
When a layout is inflated, each view in the layout file is instantiated as defined by its attributes.
Resources and resource IDs A layout is a resource. A resource is a piece of your application that is not code -things like image files, audio files, and XML files.
Resources for your project live in a subdirectory of the app/res directory.
To access a resource in code, you use its resource ID. You don't define the 'R.layout.resource_id' yourself. As a part of compiling your app, the build process automatically generates that resource ID for you. In fact, the build process generates resource IDs for all the resources in your project.
During the compilation and packaging of your app, the build tools generate a class known as the R class. This class contains a long list of IDs as integer constants, allowing you to access and use your resources in your application. When referencing 'R.layout.activity_main', you are actually referencing an integer constant named 'activity_main' within the layout inner class of R. As you add, remove, and change resources, the build process will automatically update the file in order to maintain the correct mapping between resources and their IDs.
Your strings also have resource IDs. Android generates a resource ID for the entire layout and for each string resource. To generate a resource ID for a view, you include an 'android:id' attribute in the view's definition.
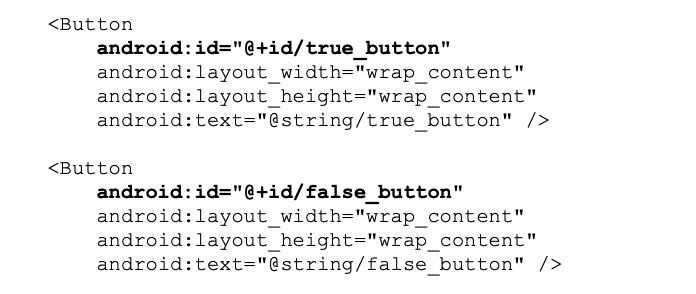
Notice that there is a + sign in the values for 'android:id' but not in the values for 'android:text'. This is because you are creating the resource IDs and only referencing the strings.
You use 'lateinit' on your property declarations to indicate to the compiler that you WILL PROVIDE A NON-NULL value before you attempt to use the contents of the property.
Android applications are typically EVENT DRIVEN. Unlike command-line programs or scripts, event-driven applications start and then wait for an event, such as the user pressing a button. (Events can also be initiated by the OS or another application, but user-initiated events are the most obvious)
When your application is waiting for a specific event, we say that it is 'listening for' that event. The object that you create to respond to an event is called a listener, and the listener implements a listener interface for that event.
The Android SDK comes with listener interfaces for various events, so you do not have to write your own. In this case, the event you want to listen for is a button being pressed (or "clicked"), so your listener will implement the 'View.OnClickListener' interface.
The Android framework defines View.OnClickListener as a Java interface with a single method, onClick(View). Interfaces with a single abstract method are common enough in Java that the pattern has a pet name, SAM.
Kotlin has special support for this pattern as part of its Java interoperability layer. It lets you write a function literal, and it takes care of turning that into an object implementing the interface. This behind-the-scenes process is called SAM conversion.
A toast is a short message that informs the user of something but does not require any input or action.
When you use code completion, YOU DO NOT HAVE TO DO ANYTHING TO IMPORT THE MISSING/NEW CLASS. When you accept a code completion suggestion, the necessary classes are imported automatically.
Expose metadata that helps tools and other developers understand your app's code. These annotations help the code inspector built into Android Studio (named Lint) verify at compile time that you call a valid string resource ID. This prevents runtime crashes where the code is used with invalid resource IDs. Second, these annotations make your code more readable for other developers.
A common through-line of many software architecture patterns (such as Movel-View-controller, Model-View-Presenter, Model-View-ViewModel, and so on) is the concept of the 'model'. In these architecture patterns, models are classes that CONTAIN INFORMATION THAT THE UI WILL DISPLAY. We recommend that you create these classes using the 'data' keyword. Doing so clearly indicates that the class is meant to hold your life easier, such as defining useful functions like equals(), hashCode(), and a nice formatted toString().
The tools namespace allows you to override any attribute on a view for the purpose of displaying it in the Android Studio preview. The tools attributes are ignored when rendering the views on a device at runtime. You could also use 'android:text' for example and just overwrite the value at runtime, but using 'tools:text' instead makes it clear that the value you provide is for preview purposes only.
String resources, you can use ALL THE USUAL ESCAPE SEQUENCES IN YOUR STRING RESOURCES, SUCH AS '\n' FOR A NEW LINE
ViewBinding is a feature of the build process that generates the 'findViewById' boilerplate code for you and allows you to safely and easily interact with your UI elements
For each view with the 'android:id' attribute defined in a layout XML, View Binding will generate a property on a corresponding 'ViewBinding' class. Even better, View Binding automatically declares the type of the property to match the type of the view in your XML. So, for example, binding.trueButton is of type 'Button', because the view with the ID true_button is a .
Unlike a 'findViewById()' call, this has the benefit of keeping your XML layouts and activities in sync if you change the kinds of views in your UI.
Since Android 5.0 (API 21), the Android platform has provided support for vector graphics using the 'VectorDrawable' class. Whenever possible, we recommend that you use vector drawables to display vector graphics in your apps. Vector drawables are scalable without any loss of visual quality, so they always look crisp and free of image artifacts. And they are more space efficient than traditional bitmap images, resulting in a smaller final application.
To provide a consistent experience on all devices, Android provides density-independent dimension units that you can sue to get the same size on different screen densities. Android translates these units using the device's defined density bucket to pixels at runtime, so there is no tricky math for you to do. These density buckets range from low density (LDPI) to medium density (MDPI) to high density (HDPI) and all the way up to extra-extra-high density (XXXHDPI).
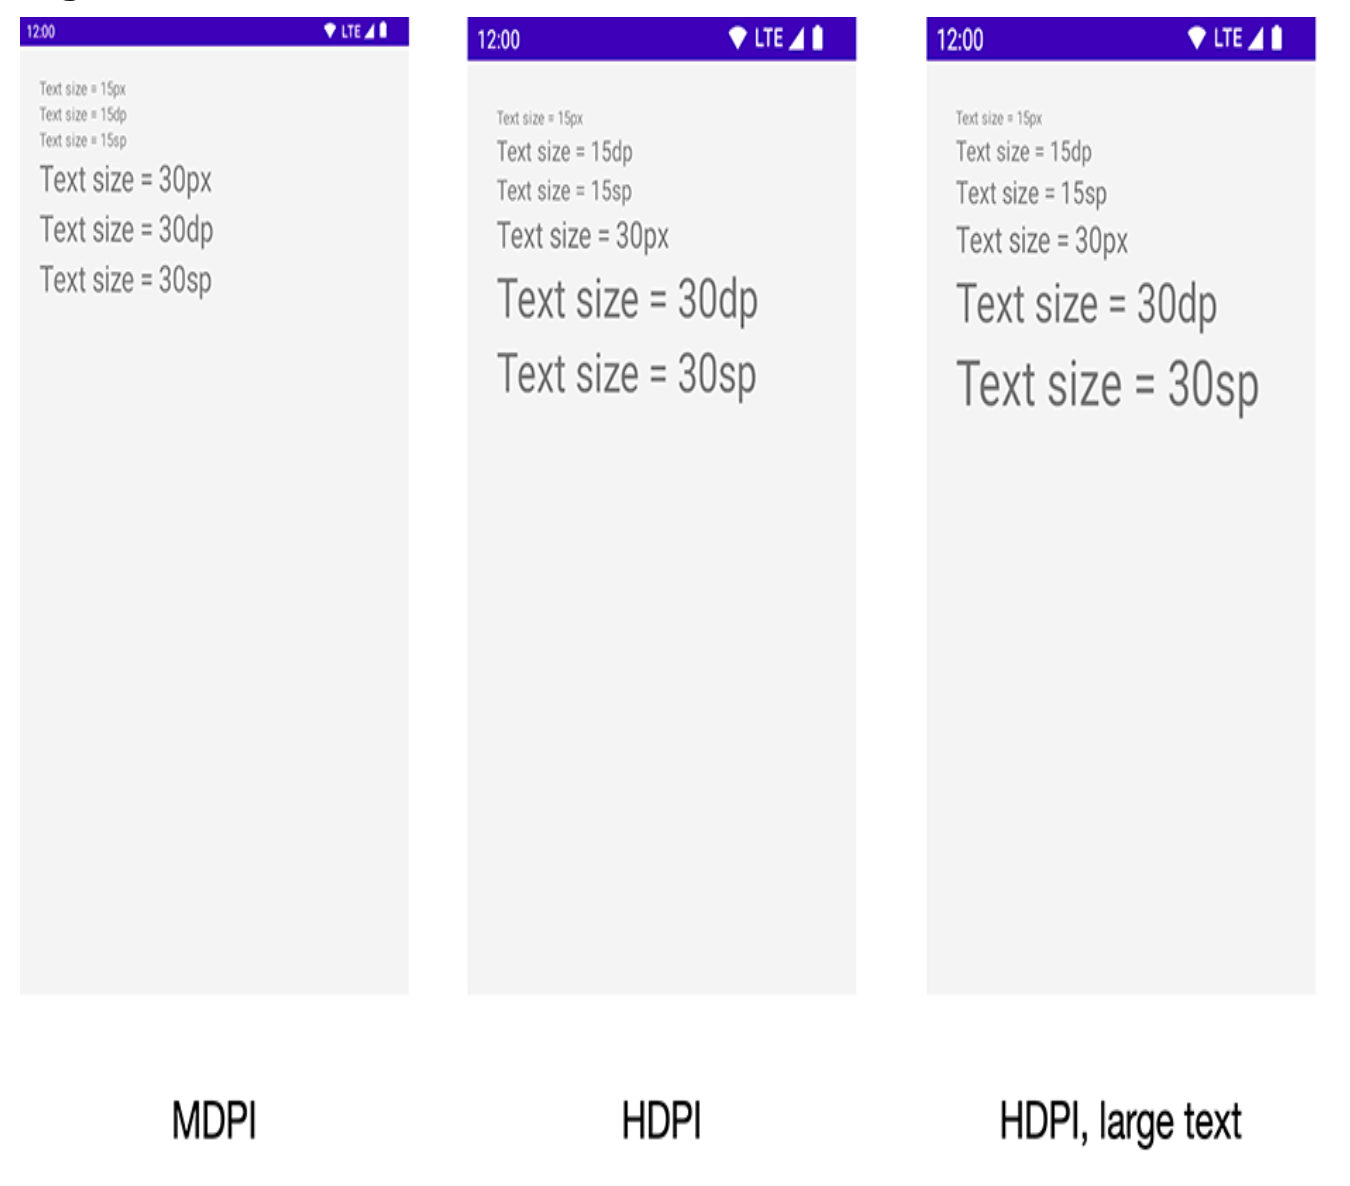
sp -> Short for 'scale-independent pixel'. Scale-independent pixels are density-independent pixels that also take into account the user's font size preference. you will almost always use 'sp' to set display text size.
Android translates 'dp' and 'sp' into pixels at runtime.
Every instance of an activity has a lifecycle. During this lifecycle, an activity transitions between 4 STATES:
- Resumed
- Started
- Created
- NonExistent
For each transition, there is an Activity function that notifies the activity of the change in its state.
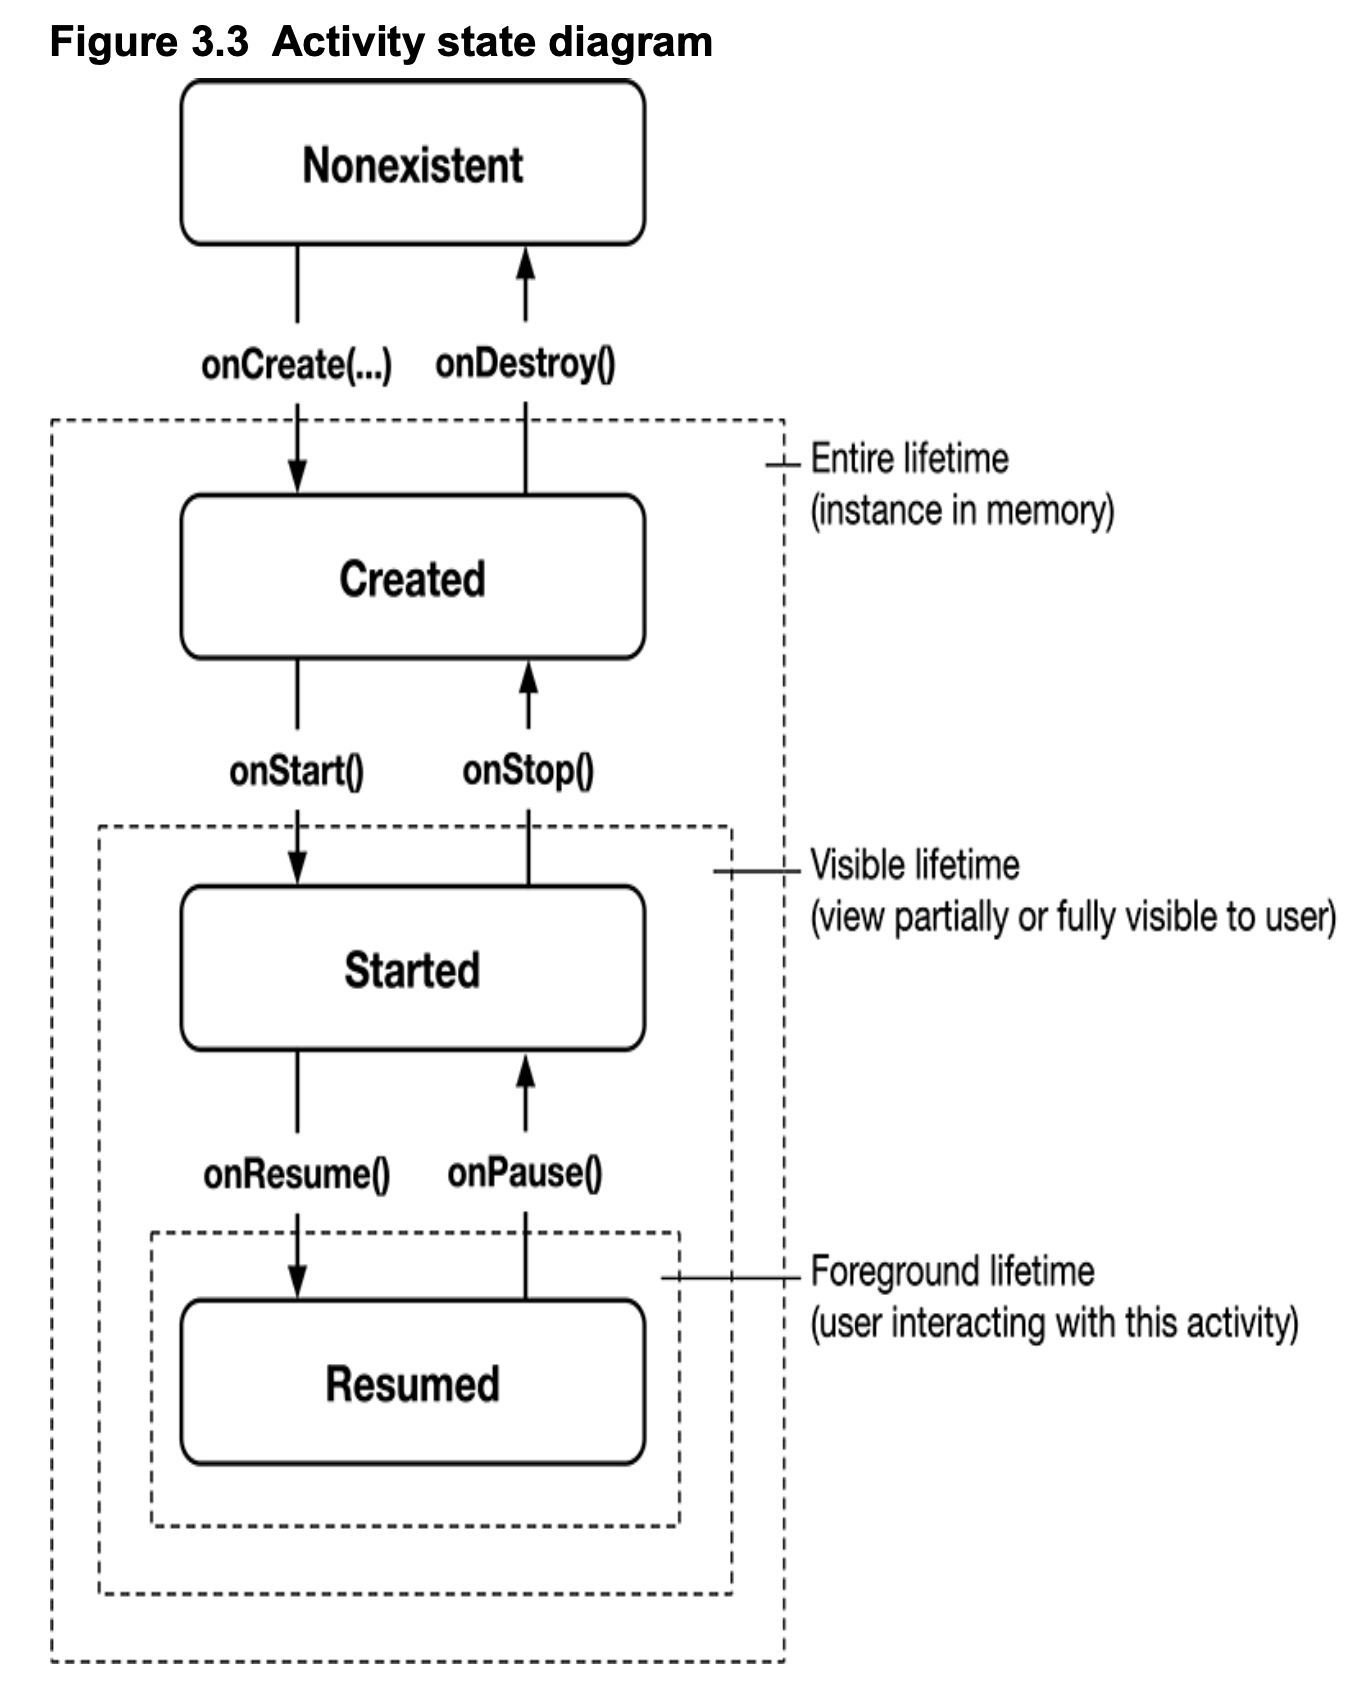

Depending on the circumstances, a started activity may be fully or partially visible.
-
Nonexistent represents an activity that has not been launched yet or an activity that was destroyed (by the user completely killing the app, for example). For that reason, this state is sometimes referred to as the "destroyed" state. There is no instance in memory, and there is no associated view for the user to see or interact with.
-
Created represents an activity that has an instance in memory but whose view is not visible on the screen. This state occurs in passing when the activity is first spinning up and reoccurs any time the view is fully out of view (such as when the user launches another full-screen activity to the foreground, navigates to the Home screen, or uses the overview screen to switch tasks).
-
Started represents an activity that has lost focus but whose view is visible or partially visible. An activity would be partially visible, for example, if the user launched a new dialog-themed or transparent activity on top of it. An activity could also be fully visible but not in the foregroudn if the user is viewing two activities in multi-window mode (also called "split-screen mode").
-
Resumed represents an activity that is in memory, fully visible, and in the foreground. It is usually the state of the activity the user is currently interacting with.
It is important to understand that you never call onCreate(Bundle?) or any of the other Activity lifecycle functions yourself. You simply override the callbacks in your activity subclass. Then Android calls the lifecycle callbacks at the appropriate time to notify the activity that its state is changing.
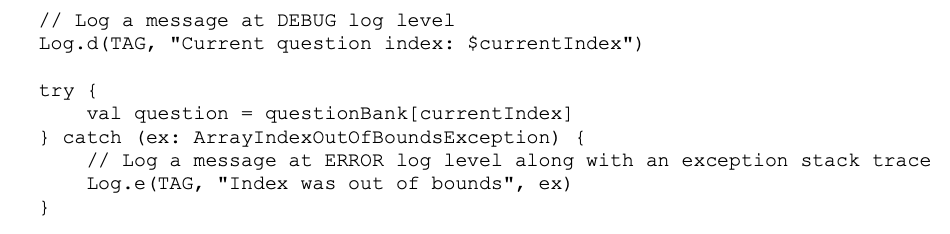
In Android, the android.util.Log class sends log messages to a SHARED SYSTEM-LEVEL LOG. Log has several functions for logging messages. The one that you will use most often is 'd()', which stands for 'debug'. This function takes two parameters, both Strings. The first parameter identifies the source of the message, and the second is the contents of the message. The first string is typically a TAG constant with the class name as its value. This makes it easy to determine the source of a particular message.
Notice that you call the superclass implementations in the lifecycle callbakcs. These superclass calls are required. Calling the superclass implementation should be the first line of each callback function override implementation.
Rotating the device changes the 'device configuration'. The device configuration is a set of characteristics that describe the current state of an individual device. The characteristics that make up the configuration include screen orientation, screen density, screen size, keyboard type, dock mode, language, and more.
Applications can provide alternative resources to match device configurations. When a 'runtime configuration change' occurs, there may be resources that are a better match for the new configuration. So Android destroys the activity, looks for resources thata are the best fit for the new configuration, and then rebuilds a new instance of the activity with those resources.
Prior to Android 7.0 Nougat, most activities spent very little time in the started state. Instead, activities passed through the started state quickly on their way to either the resumed state or the created state. Because of this, many developers assumed they only needed to update their UI when their activity was in the resumed state. It was common practice to use 'onResume()' and 'onPause()' to start or stop any ongoing updated related to the UI (such as animations or data refreshes).
When multi-window mode was introduced in Nougat, it broke the assumption that resumed activities were the only fully visible activities. This, in turn, broke the intended behavior of many apps. Now, started activities can be fully visible for extended periods of time when the user is in multi-window mode. And users will expect those started activities to behave as if they were resumed.
Consider video, for example. Suppose you had a pre-Nougat app that provided simple video playback. You started (or resumed) video playback in onResume() and paused playback in onPause(). But then multi-window mode comes along, and your app stops playback when it is started but users are interacting with another app in the second window. Users start complaining, because they want to watch their videos WHILE they send a text message in a separate window.
Luckily, the firs is relatively simple: Move your playback resuming and pausing to 'onStart()' and 'onStop()'. This goes for any live-updating data, like a photo gallery app that refreshes to show new images as they are pushed to a Flickr stream. In short, your activities should update the UI during THEIR ENTIRE VISIBLE LIFECYCLE, from 'onStart()' to 'onStop()'.
Unfortunately, not everyone got the memo, and many apps still misbehave in multi-window mode. To fix this, the Android team introduced multi-resume for multi-window mode in Android 10. Multi-resume means that the fully visible activity in each of the windows will be in the resumed state when the device is in multi-window mode, regardless of which window the user last touched. Still, until multi-resume becomes a readily available standard across most devices in the marketplace, use your knowledge of the activity lifecycle to reason about where to place UI update code.
When you use the android.util.Log class to send log messages, you control not only the content of the message but also a 'level' that specifies how important the message is. Android supports five log levels.
- ERROR - Log.e
- WARNING - Log.w
- INFO - Log.i
- DEBUG - Log.d - debug output (may be filtered out)
- VERBOSE - Log.v - development only
In addition, each of the logging functions HAS TWO SIGNATURES: one that takes a TAG string and a message string, and a second that takes those two arguments plus an instance of Throwable, which makes it easy to log information about a particular exception that your application might throw.
A ViewModel is the perfect complement to an Activity because of its simple lifecycle and ability to persist data across configuration changes. It is USUALLY scoped to a single screen and is a useful place to put logic invovled in FORMATTING the data to display on that screen. Using a ViewModel aggregates all the data the screen needs in one place, formats the data, and makes it easy to access the end result.
Before you can write a ViewModel class, you need to include two libraries in your project.
When your app is compiled, Gradle will find, download, and include the dependencies for you. Al you have todo is specify an exact string incantation, and Gradle will do the rest.
- androidx.lifecycle:lifecycle-viewmodel-ktx
- androidx.activity:activity-ktx
The onCleared() function is called just before a ViewModel is destroyed. This is a useful place to perform any cleanup, such as unobserving a data source.

The 'by' keyword indicates that a property is implemented USING A PROPERTY DELEGATE. In Kotlin a property delegate is, as the name suggests, a way to DELEGATE THE FUNCTIONALITY OF A PROPERTY TO AN EXTERNAL UNIT OF CODE. A very common property delegate in Kotlin is lazy. The lazy property delegate allows developers to save resources by waiting to initialize the property only when it is accessed.
The viewModels() property delegate works the same way: Your ViewModel will not be initialized unless you access it. Under the hood, the 'viewModels()' property delegate handles many things for you. When the activity queries for a QuizViewModel for the first time, viewModels() creates and returns a new ViewModel instance. When the activity queries for the ViewModel after a configuration change, the instance that was first created is returned. When the activity is finished, the ViewModel-Activity pair is removed from memory.
You shouldn't directly instantiate the ViewModel within your Activity. Instead, rely on the viewModels() property delegate. It might seem like instantiating the ViewModel yourself would work just the same, but you would lose the benefit of the same instance being returned after your Activity's configuration change.
When the user finishes an activity, they expect their UI state to be reset. When the user rotates an activity, they expect their UI state to be the same after rotation. ViewModel offers a way to keep an activity's UI state data in memory across configuration changes. Its lifecycle mirrors the user's expectations: it survives configuration changes and is destroyed only when its associated activity is finished.
When you associate a ViewModel instance with an activity's lifecycle, the ViewModel is said to be SCOPED to that activity's lifecycle. This means the ViewModel will remain in memory, regardless of the activity's state, until the activity is finished. Once the activity is finished, the ViewModel instance is destroyed.
This means that the ViewModel stays in memory during a configuration change, such as rotation. During the configuration change, the activity instance is destroyed and re-created, but any ViewModels scoped to the activity stay in memory.
The relationship between an Activity and a ViewModel is unidirectional. The activity references the ViewModel, but the ViewModel does not access the activity. Your ViewModel SHOULD NEVER HOLD A REFERENCE TO AN ACTIVITY OR A VIEW, OTHERWISE YOU WILL INTRODUCE A MEMORY LEAK.
A memory leak occurs when one object holds A STRONG REFERENCE to another object that SHOULD BE DESTROYED. The strong reference prevents the garbage collector from clearing the object from memory. Memory leaks due to a configuration change are common bugs.
Your ViewModel instance stays in memory across rotation, while your original activity instance gets destroyed. If the ViewModel held a strong reference to the original activity instance, two problems would occur: First, the original activity instance would not be removed from memory, and thus the activity would be leaked. Second, the ViewModel would hold a reference to a stale activity. If the ViewModel tried to update the view of the stale activity, it would trigger an IllegalStateException.
KEEPING ACTIVITIES AS SIMPLE AS POSSIBLE IS A GOOD THING, any logic you put in your activity might be unintentionally affected by the activity's lifecycle. Also, removing presentation logic means the activity is only responsible for handling what appears on the screen, not the logic behind determining the data to display.
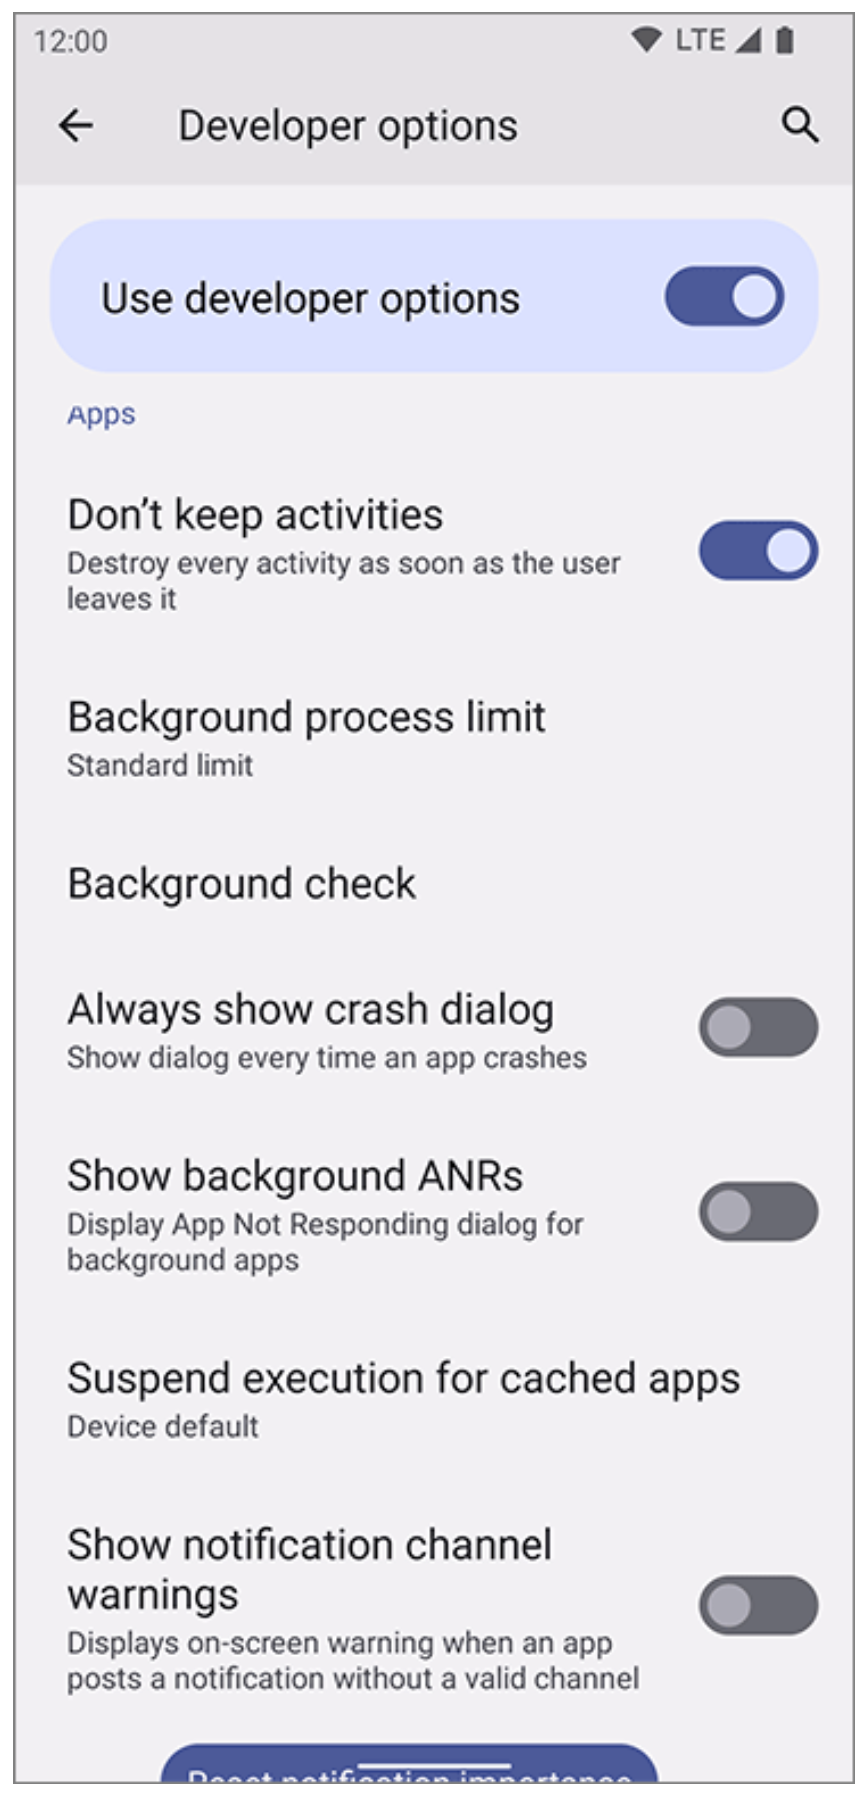
Configuration changes ARE NOT THE ONLY TIME THE OS CAN DESTROY AN ACTIVITY even though the user does not intend it to.
Each app gets its own process (more specifically, a Linux process) CONTAINING A SINGLE THREAD TO EXECUTE UI-RELATED WORK ON AND A PIECE OF MEMORY TO STORE OBJECTS IN. YES, READ IT AGAIN, A PIECE OF MEMORY TO STORE OBJECTS IN. An app's process can be destroyed by the OS if the user navigates away for a while and Android needs to reclaim memory. When an app's process is destroyed, all the objects stored in that process' memory are destroyed.
Processes containing resumed or started activities get higher priority than other processes. When the OS needs to free up resources, it will select lower-priority processes first. Practically speaking, a process containing a visible activity WILL NOT BE RECLAIMED BY THE OS. If a foreground process does get reclaimed, that means something is horribly wrong with the device (and your app being killed is probably the least of the user's concerns).
But processes that do not have any activities in the started or resumed state are fair game to be killed. So, for example, if the user navigates to the Home screen and then goes and watches a video or plays a game, your app's process might be killed.
Activities themselves are not individually destroyed in low-memory situations. Instead, Android clears an entire app process from memory, taking any of the app's in-memory activities with it.
When the oS destroys the app's process, any of the app's activities and ViewModels stored in memory will be wiped away. And the OS will not be nice about the destruction. There is no guarantee that it will call any of the activity or ViewModel lifecycle callback functions. So how can you save UI state data and use it to RECONSTRUCT the activity so that the user never even knows the activity was destroyed? One way to do so is to store data in 'save instance state'. Saved instance state is DATA THE OS TEMPORARILY STORES OUTSIDE OF THE ACTIVITY. You can add values to saved instance state by using a 'SavedStateHandle'.
Back in the early days of Android, you would be responsible for handling saved instance state like it was a lifecycle callback. Now, you can pass a SavedStateHandle into your ViewModel through the constructor. You can use the SavedStateHandle like a key-value map, storing simple pieces of data like integers and strings.
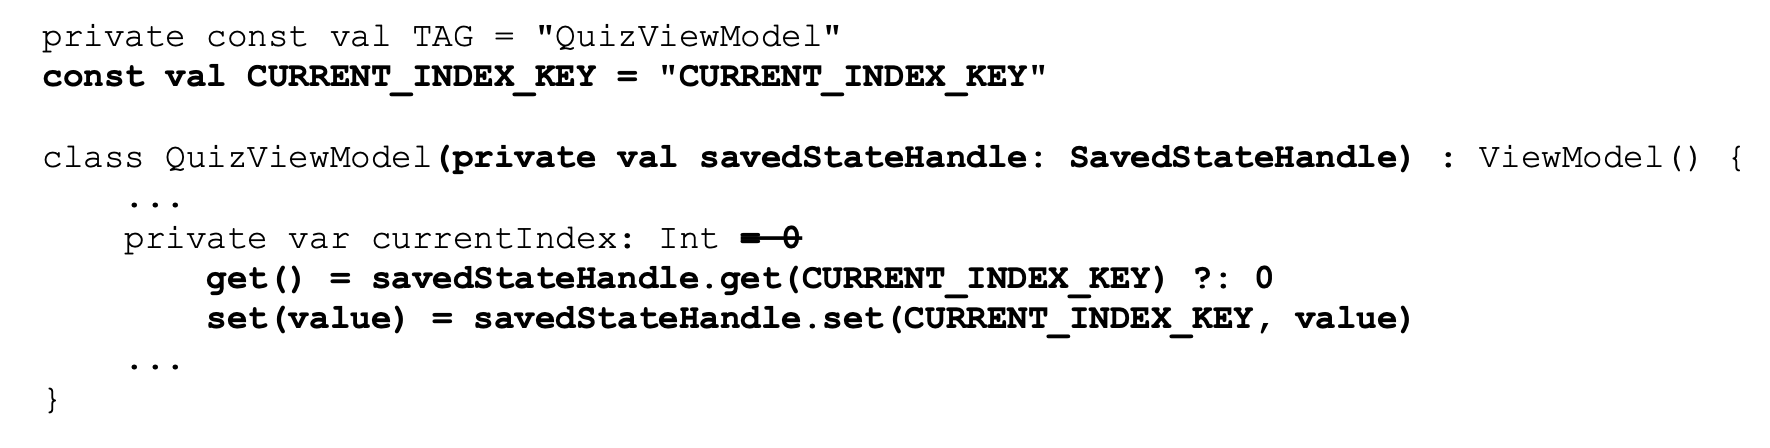
SavedStateHandle has its limitations. The data within SavedStateHandle is SERIALIZED and written to disk, so you should avoid stashing any large or complex objects. You should only use SavedStateHandle to store the minimal amount of information necessarry to re-create the UI state.
AndroidX and Jetpack ARE USED INTERCHANGEABLY.
Some people try to address the UI state loss on configuration change bug in their app by disabling roation. If the user cannot rotate the app, they never lose their UI state, right? That is true but, sadly, this approach leaves your app prone to other bugs. While this smooths over the rough edge of rotation, it leaves other lifecycle bugs that users will surely encounter, but that will not necessarily present themselves during development and testing.
First, there are other configuration changes that can occur at runtime, such as window resizing and night mode changes. And yes, you could also capture and ignore or handle those changes. But this is a bad practice -it disables a feature of the system, which is automatically SELECT THE RIGHT RESOURCES BASED ON THE RUNTIME CONFIGURATION. Second, disabling rotation does not solve the process death issue. If you want to lock your app into portrait or landscape mode 'because it makes sense for your app', you should still program defensively against configuration changes and process death. In short, dealing with UI state loss by BLOCKING CONFIGURATION CHANGES is bad form.
SavedStateHandle is an easy-to-use API that allows you to safely store and retrieve instance state and persist that information even if your process is killed. But it has not always been around. With the adoption of the ViewModel library, the old APIs became awkward and resulted in confusing code. There were multiple places where you had to pass data between your ViewModel and Activity, and keeping state consistent between the two was error prone. With the SavedStateHandle and ViewModel classes, you can keep all the instance state business logic within your ViewModel. That means you can avoid the awkward dance between your ViewModel and Activity, and also make your Activity simpler.
If you are coming from other programming languages and platforms, your first instinct might be to call the constructor on the activity you want to start. Unfortunately, that will not work. Instead you ahve to call 'startActivity(Intent)', and the OS will manage creating your activity for you.

How does the ActivityManager know which Activity to start? That information is in the Intent parameter.
An Intent is an object that a component can use to communicate with the OS.
Intents are multipurpose communication tools, and the Intent class PROVIDES DIFFERENT CONSTRUCTORS DEPENDING ON WHAT YOU ARE USING THE INTENT TO DO.
The 'Class' argument you pass to the Intent constructor specifies the activity class that the 'ActivityManager' should start. The 'Context' argument tells the 'ActivityManager' which application package the activity class can be found in. Before starting the activity, the ActivityManager checks the package's manifest for a declaration with the same name as the specified Class. If it finds a declaration, it starts the activity, and all is well. If it does not, you get a nasty 'ActivityNotFoundException', which will crash your app. This is WHY ALL YOUR ACTIVITIES MUST BE DECLARED IN THE MANIFEST.
When you create an Intent with a Context and a Class object, you are creating an EXPLICIT INTENT. You use explicit intents to start specific activities, most often within your own application. It may seem strange that two activities within your application must communicate via the ActivityManager, which is outside your application. However, this pattern, makes it easy for an activity in one application to work with an activity in another application. When an activity in your application wants to start an activity in another application, you create an IMPLICIT INTENT.
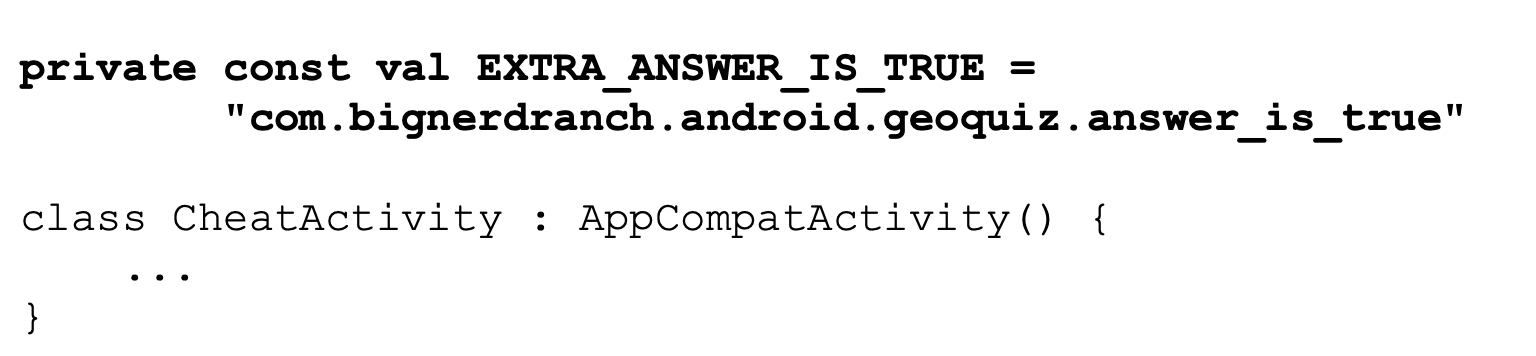
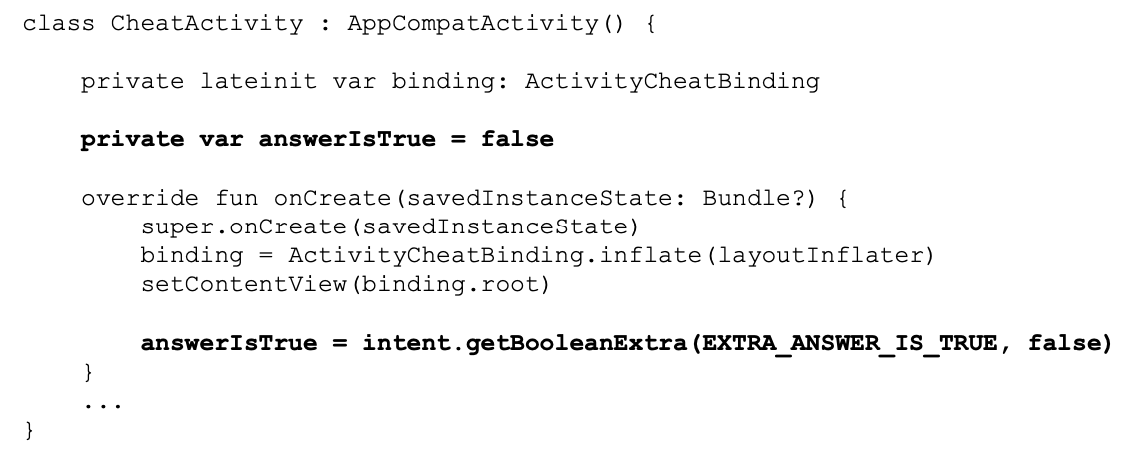
Extras are arbitrary data that the calling activity can include with an intent. You can think of them like constructor arguments, even though you cannot use a custom constructor with an activity subclass. An extra is structured as key-value pair. To add an extra to an intent, you use the Intent.putExtra(....). Intent.putExtra(...) comes in many flavors, but it always has two arguments. The first argument is always a String key, and the second argument is the value, whose type will vary. It returns the Intent itself, SO YOU CAN CHAIN MULTIPLE CALLS IF YOU NEED TO.
An activity may be started from several different places, so you should define keys for extras on the activities that retrieve and use them. Using your package name as a qualifier for your extra, prevents name colissions with extras from other apps.

A companion object allows you to access functions without having an instance of a class, similar to static functions in Java. Using a 'newIntent(...)' function inside a companion object like this for your activity subclasses WILL MAKE IT EASY FOR OTHER CODE TO PROPERTY CONFIGURE ITS LAUNCHING INTENTS.
Note that 'Activity.getIntent()' always returns the 'Intent' that started the activity. This is what you sent when callingn 'startActivity(Intent)'.
When you want to hear back from the child activity, you register your MainActivity for an 'ActivityResult' using the Activity Results API.
The Activity Results API is different from other APIs you have interacted with so far. INSTEAD OF OVERRIDING A LIFECYCLE METHOD, YOU WILL INITIALIZE A CLASS PROPERTY WITHIN YOUR Activity using the registerForActivityResult() function. That function takes in two parameters:
- The CONTRAT that defines the input and output of the Activity you are trying to start.
- A lambda in which you parse the output that is returned.
Applying an Activity Result consists of three steps:
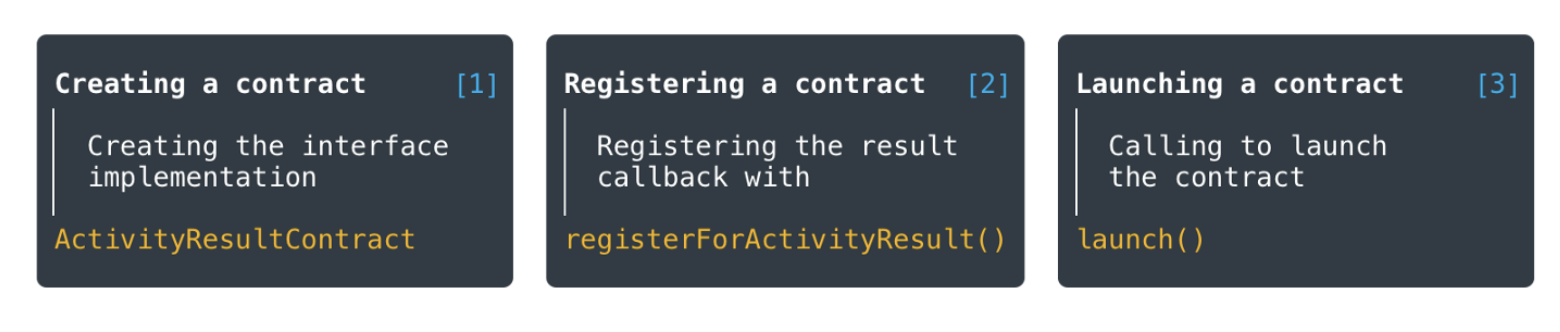
- Creating a contract Contract is a class that implements the ActivityResultContract<I,O> interface. Where you define the type of input data necessary to start the Activity, and defines the callback result type. For typical tasks, you can use out-of-the-box implementations: PickContact, TakePicture, RequestPermission, and others. When creating a contract, we should implement two of its methods:
- createIntent(): accepts input data and creates an intent, which will be later launched by calling launch()
- parseResult(): is responsible for returning the result, handling resultCode, and parsing the data.
Another method, getSynchronousResult(), can be overriden if necessary. It allows you to return the result immediately, without starting the Activity, for example, if the received input data is invalid. If this behavior is not required, the method returns null by default.
- Registering a contract The next step is to register the contract in the activity or fragment by calling 'registerForActivityResult()'. You need to pass ActivityResultContract and ActivityResultCallback as parameters. The callback will be invoked when the result is received.

**Registering a contract won't start a new Activity, but only returns a special ActivityResultLauncher object that is necessary for the following step.
- Launching a contract To start the Activity, we only need to call 'launch()' on the ActivityResultLauncher object that we have obtained in the previous step.

IMPORTANT!
- Contracts can be registered at any point of the activity or fragment lifecycle, but they cannot be launched before going to the CREATED state. A common approach is to register contracts as class fields.
- If we start an implicit Intent and the operating system is not able to find a suitable Activity, an exception ActivityNotFoundException: "No Activity foudn to handle Intent" will be thrown. To avoid this situation, you need to check resolveActivity() with PackageManager before calling launch() or in getSynchronousResult() method.
The Activity Result APIs provide components for registering for a result, launching the result, and handling the result once it is dispatched by the system.
registerForActivityResult() takes an ActivityResultContract and an ActivityResultCallback and returns an ActivityResultLauncher which you'll use to launch the other activity.
registerForActivityResult() is safe to call before your fragment or activity is created, allowing it to be used directly when declaring member variables for the returned ActivityResultLauncher instances. But you cannot launch the ActivityResultLauncher until the fragment or activity's CREATED.
There are two functions you can call in the child activity to send data back to the parent:

Typically, the 'result code' is one of two predefined constants:
- Activity.RESULT_OK
- Activity.RESULT_CANCELED
Setting result codes is useful when the parent needs to take different action depending on how the child activity finished. For example, if a child activity had an OK button and a Cancel button, the child activity would set a different result code depending on which button was pressed. Then the parent activity would take a different action depending on the result code.

ActivityManager lives with the OS instead of a single application.
Based on the AndroidManifest.xml the back button and the activity lifecycle can differ. When you are in the launcher activity and you press the back button, it keeps the launcher activity in memory to allow users to quickly resume using the app in a "warm state" after navigating back instead of having to completely restart the application. This is a fairly new behavior on Android, introduced with Android 12 (API 31). In previous Android versions, your launcher activity would mirror as others, and be popped off the back stack and removed from memory when the user navigated back.