Turning infinite loop to game loop (Part 3)
With the background image and ability to render sprites, it's time to move toward "game" with the code. Most of the classic 8bit action games have a code called "game loop", which repeats all the time and calls various subroutines to read player input, process it, process the enemies, calculate collisions between objects and reactions, score, etc...
The SpecBong game will be about avoiding snowballs while trying to reach the Santa, to help him with presents (and past tense and futures / joke). So let's try to code at least some fake version of snowball enemy, not yet with full logic or collisions, but already "ticking" in some way in the new "game loop".
(here is a good spot to open the SpecBong.asm file and try to match the source code lines with this text)
(you can also check the total difference between "Part 3" and "Part 2")
First we are defining syntax sugar of sjasmplus - STRUCT S_SPRITE_4B_ATTR - to avoid too many "magic" numbers in the code, like hard-coding sprite data length as four bytes and having number "4" everywhere in the source. The sjasmplus will define new symbols like S_SPRITE_4B_ATTR itself (contains size of the structure, i.e. 4 in this case), and S_SPRITE_4B_ATTR.x, S_SPRITE_4B_ATTR.y, ... labels which contain address offset from start of structure, to the desired "field" of structure.
The structure represents 1:1 binary image of the same data, which are uploaded to I/O port $57 "sprite attribute upload", in the case of four-byte sprite type.
The mirrored data of sprites for processing of enemies and uploading the final result to FPGA will reside in the 16ki "Bank 2", right after the code and ahead of the stack area. The definition DS 128 * S_SPRITE_4B_ATTR, 0 reads as "define space" and it will reserve 128*4 = 512 bytes, which is enough to define all 128 sprites.
Because the later sprites (with higher index) are drawn above the earlier ones, we will allocate certain index ranges for different type of sprites. Starting at zero we will reserve 32 sprites for snowballs, and then the player sprite will follow, so it will display above any snowball when the sprite graphics overlap between the two. This mental acrobatics results in two labels defined - SprSnowballs and SprPlayer - pointing at the beginning of designed area in memory. BTW the sprite engine of Next can be reconfigured also to draw earlier sprites above the later ones, but only for the whole batch of sprites, by changing the priority bit in NextReg $15 "Sprite Control".
The code displaying 8x8 grid of all patterns is deleted and instead the game will set up 32 snowballs and one player.
For a start we will make the snowballs flying mindlessly from left to right (or some of them doing the same from right to left), without any real logic. For convenience I'm often using register IX or IY to access structures, as I can easily load particular field value by using the address of the element, like ld a,(ix+S_SPRITE_4B_ATTR.vpat) to fetch directly the sprite-attribute byte containing visibility bit and pattern number. This convenience and simplicity comes with some extra performance cost, but you can often start projects with simple code, getting it correct first, then optimize it later (if even needed). So we will write loop going through all 32 reserved slots for snowballs (with the pointer to slot in IX) and initializing them to fill screen from top to bottom, each sprite being 5px below the previous and 13px right of it. There are two snowball patterns in graphics, so the sprites will alternate between both 52 and 53 patterns.
After 32 snowballs the init of single player is even more straightforward, just setting sprite with pattern 2 to position [48,206] to have it somewhere at screen. Also all these newly set sprites have visibility bit set, so they should be displayed after successful upload to FPGA sprite memory.
Now the GameLoop will be defined. We want to start simple (and build, test and debug very often), so the game-loop code will reset sprite-attribute upload index to zero and output full Sprites buffer (512 bytes) to I/O port $57, to upload sprite attributes to the FPGA.
After that the super simple snowball logic code is called, to update their positions and state for next tick of game loop and that's all for a start, so the game loop will loop infinitely from here.
The simple snowball logic code (SnowballsAI label) will go through all 32 snowballs and move them from left to right or right to left, depending on their index, moving them by speed of +-3 or +-1 pixel per game-tick. It will also set "mirrorX" flag to snowballs flying from right to left, and alternate patterns between 52 and 53 every game-tick.
There is no logic for player yet.
This is more than enough of new code and changes to the project to verify if it works, so assemble the NEX file and launch it in emulator or with real Next.
(While programming in assembly, don't fool yourself by checking your code only by judging the visible output by simply "running it". It is very easy in assembler to write wrong code producing correctly-looking results by accident, but with some damaging side effects, or stopping producing the seemingly correct results with the next tiny change of code, maybe even in some unrelated part of project. To avoid big headache later, build your code often after small code changes and debug each new instruction meticulously to verify that it really does only what was intended and nothing else. Also try to think of non-trivial input data for your routines, exercising all corner-cases and special code paths.)
Just to see the snowballs flying over the screen way too fast, like crazy.
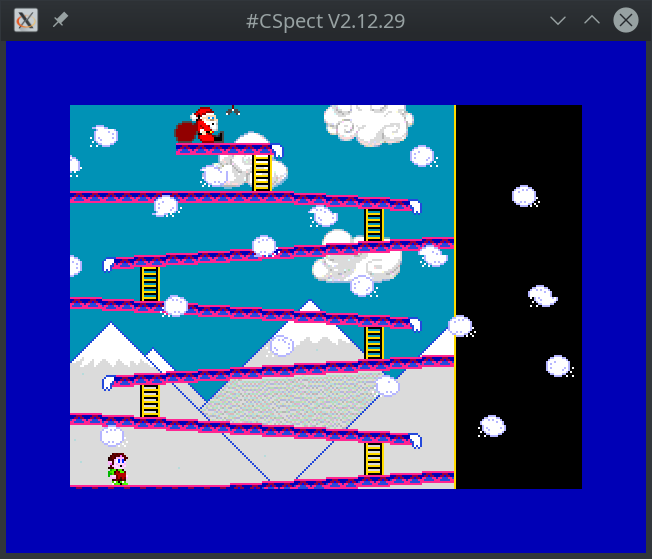
That's because we don't address the flow of human time in any way in the code, the game-loop is actually ticking very fast and it could process the whole game loop many times per second, even snowball flying at +1 pixel speed per single frame will travel across screen in a blink of an eye.
And that's something to address in fourth part of this example.