Home
Note
See the README file for a briefer summary of the following guide.
Installing Lazarus
Download the installer for 64-bit Windows from https://sourceforge.net/projects/lazarus/files
Note
The Free Pascal compiler that comes with Lazarus is not cross-platform. To cross-compile a project, install an add-on package after installing the IDE.
To build 32-bit Windows binaries using a 64-bit IDE, choose the installer named like this:
lazarus-x.y.z-fpc-x.y.z-cross-i386-win32-win64.exe
To build 64-bit Windows binaries using a 32-bit IDE, the installer will be named like this:
lazarus-x.y.z-fpc-x.y.z-cross-x86_64-win64-win32.exe
Lazarus can also be installed with Scoop. See the package details in the 'extras' repository.
- Open the Lazarus project directory in File Explorer
- Double-click the
HelloWorld.lpifile - If prompted, click the Open project button
- Expand the IDE's Run menu and click Build
Important
The location of lazbuild.exe must be in your PATH environment variable.
If you installed the Scoop package, your user account's PATH will be configured automatically. Test your installation with the command: %LazarusDir%\lazbuild -v
If you used an installer from SourceForge, you will have to configure the PATH variable as shown below.
Windows version 10.0.19042.x (20H2) or later
- Press ⊞ (Windows key) + X
- Click System, or type Y
- If you're running...
Windows 11 – open the Device specifications tab, find Related links, and select Advanced system settings
Windows 10 – select Advanced system settings from the menu on the far right
Older Windows versions
- Press ⊞ + Pause/Break
When the System Properties dialog appears:
- Click on the Advanced tab
- Click the Environment Variables button near the bottom of the dialog
- In the dialog box labelled User variables for
%Username%, select PATH and click the Edit button - If you're running...
Windows 8 or newer – in the Edit environment variable dialog, click the New button
An older Windows version – in the Variable value text field, type a semicolon (;) after the current value - Paste in the path to the top directory of your Lazarus installation, e.g.,
C:\Program Files\lazarus\4.6 - Click OK
-
Start the Command Prompt or PowerShell in the root source directory (
delphiplugintemplateor whatever directory name you cloned into) -
cdinto the Lazarus project directory:cd .\Lazarus -
To build a 64-bit DLL in debug mode (the default configuration), run:
lazbuild --cpu=x86_64 HelloWorld.lpior, simply:
lazbuild HelloWorld.lpiTo build a 64-bit DLL in release mode, run:
lazbuild --bm=Release --cpu=x86_64 HelloWorld.lpior, simply:
lazbuild --bm=Release HelloWorld.lpiTo build a 32-bit DLL in debug mode, run:
lazbuild --cpu=i386 HelloWorld.lpiTo build a 32-bit DLL in release mode, run:
lazbuild --bm=Release --cpu=i386 HelloWorld.lpi
Install the free Community Edition of Delphi RAD Studio. Make sure to select the 64-bit Windows platform during installation.
- Open the Delphi project directory in File Explorer
- Double-click the
HelloWorld.dprfile - Press SHIFt + F9, or right-click the name of the project in the project explorer panel and select "Build"
Note
Command line tools are only available in the Professional edition of Delphi RAD Studio or better.
-
First, open the *.dpr file in RAD Studio and save all changes. This will generate a *.dproj file that's compatible with your version of Delphi
-
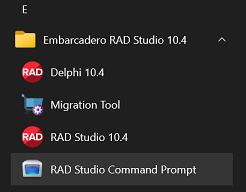
Launch the RAD Studio Command Prompt from the Windows Start Menu:
-
Change into the Delphi project directory (
delphiplugintemplate\Delphior wherever else you cloned the source code) -
To build a 64-bit DLL in debug mode, run:
MSBuild /p:Config=Debug;Platform=Win64 /t:Build HelloWorld.dprojTo build a 64-bit DLL in release mode, run:
MSBuild /p:Config=Release;Platform=Win64 /t:Build HelloWorld.dprojTo build a 32-bit DLL in debug mode, run:
MSBuild /p:Config=Debug;Platform=Win32 /t:Build HelloWorld.dprojTo build a 32-bit DLL in release mode, run:
MSBuild /p:Config=Release;Platform=Win32 /t:Build HelloWorld.dproj
-
Clone or download the template source code
-
Open the
packagesdirectory in File Explorer
-
Double-click the
notepadplusplusplugin.lpkfile -
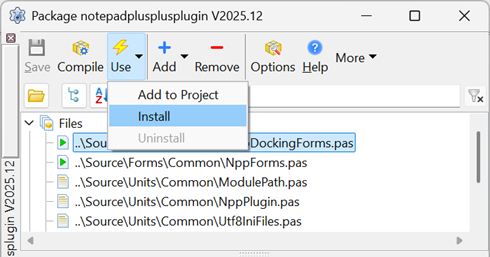
In the Package dialog, expand the Use menu and click Install:
-
Double-click the
notepadplusplusplugin_group.groupprojfile -
Make sure the project window is showing (if not, press CTRL + ATL + F11)
-
Expand the Project menu and click Build All Projects
-
Right-click on the
notepadplusplusplugin_design.bplproject and select Install: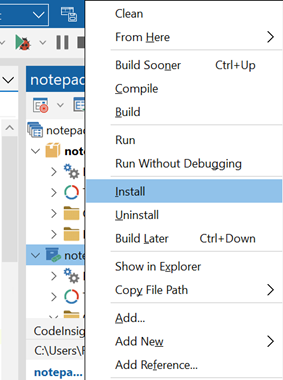
Debuggers are typically designed for applications, meaning *.exe binaries that can run by themselves. DLLs cannot run by themselves, so the debugger must be attached to whatever program will load the DLL.
In the case of Notepad++, the code that loads your plugin DLL executes well before the main window becomes visible. Conditional debug messages can be sent to standard output or a log file, but debug code can quickly become as complex as the main business logic, and it will not be helpful in tracing the cause of an unhandled exception.
The following guide is meant to provide a starting point only; the best method for your particular use case will have to be figured out with lots of trial and error.
-
Open your project's *lpi file in Lazarus.
-
Open the Project Options... dialog:
- press SHIFt + CTRL + F11, or
- expand the IDE's Project menu and select Project Options...
-
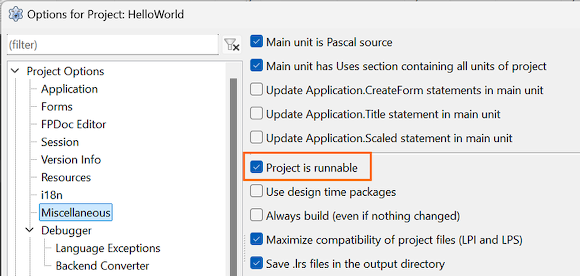
Find Miscellaneous options and make sure that Project is runnable is checked:
-
Expand the IDE's Run menu and open the Run Parameters... dialog.
-
Fill the Host application field with the full path to the Notepad++ application that will load your plugin, e.g.,
C:\Program Files\Notepad++\notepad++.exe: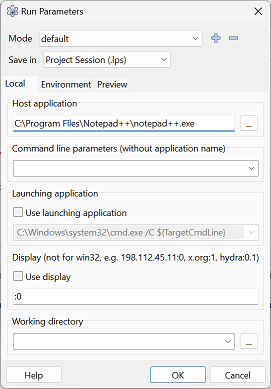
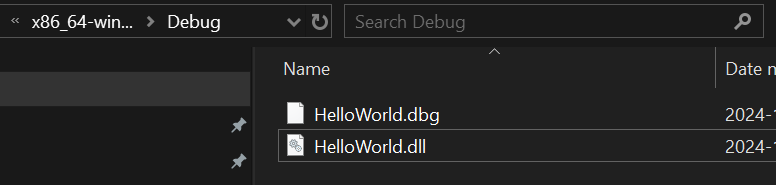
-
Build your plugin (in debug mode) and copy both the DLL and the matching *.dbg symbols file to the plugin's load directory, e.g.,
C:\Program Files\Notepad++\plugins\your_plugin_name. -
Set at least one breakpoint, i.e., move the caret (cursor) to a source file line and:
- press F5, or
- right-click the mouse, select Debug and click Toggle breakpoint
-
Start Notepad++:
- press F9, or
- expand the IDE's Run menu and click the Run
The object code generated by the Free Pascal compiler is binary compatible with the GNU compiler toolchain, including gdb, objdump, strip and other utilities. GDB is included in every Lazarus installation and can be used inside the IDE or independently.
For example, to use GDB with VS Code on Windows, first install the Microsoft C/C++ extension.
Optionally, install a Pascal coding extension like Pascal magic or OmniPascal. Note that the latter is closed source; end users can still report issues however.
Create a file named .vscode/launch.json in the root folder of your plugin project. (A complete list of configuration options can be found here.)
Set the configurations[0].miDebuggerPath key to the full path to your Lazarus installation's gdb,exe executable. Set the configurations[0].program key to the full path of the Notepad++ application that will load the plugin. The rest of the file should resemble the following:
{
  "version": "0.2.0",
  "configurations": [
    {
      "name": "Notepad++",
      "request": "launch",
      "args": [],
      "stopAtEntry": false,
      "cwd": "${workspaceFolder}",
      "type": "cppdbg",
      "MIMode": "gdb",
      "miDebuggerPath": "${env:LAZARUSDIR}\\mingw\\x86_64-win64\\bin\\gdb.exe",
      "setupCommands": [
        {
          "description": "Enable pretty-printing for gdb",
          "text": "-enable-pretty-printing",
          "ignoreFailures": true
        },
        {
          "description": "Set Disassembly Flavor to Intel",
          "text": "-gdb-set disassembly-flavor intel",
          "ignoreFailures": true
        }
      ],
      "logging": {
        "moduleLoad": true
      },
      "program": "${env:PROGRAMFILES}}\\Notepad++\\notepad++.exe"
    }
  ]
}
Make sure the plugin's load directory contains both the DLL (built in debug mode) and the matching *.dbg symbols file:
Start VS Code, open a source file and confirm that F5 launches Notepad++.
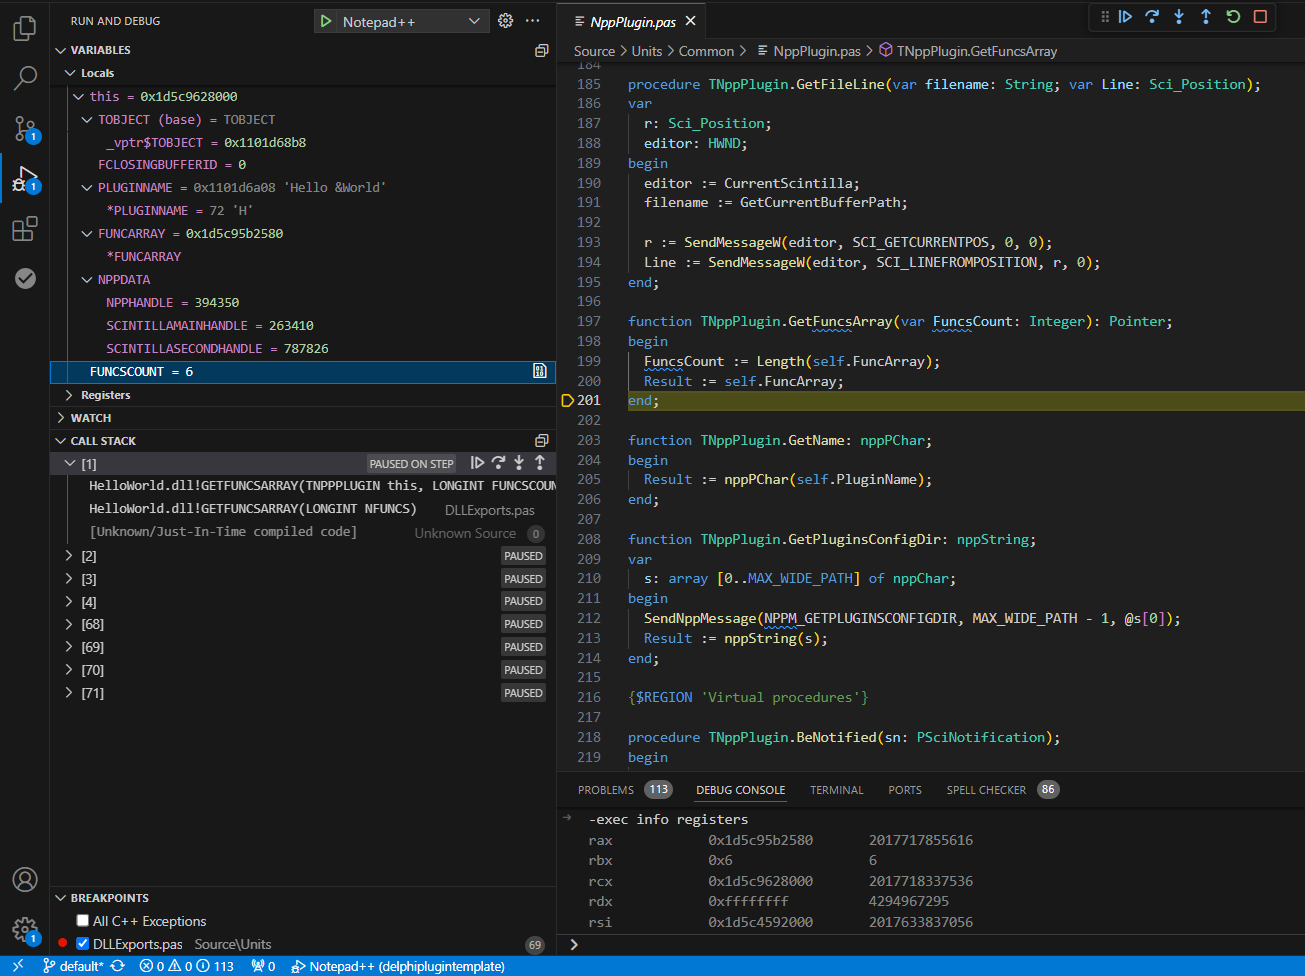
Focus the DEBUG CONSOLE tab of the terminal window and make sure you see a line similar to this:
Loaded 'C:\Program Files\Notepad++\plugins\HelloWorld\HelloWorld.dll'. Symbols loaded.
If successful, any breakpoints that you set by clicking in the line number margin will pause the program:
To launch Notepad++ from RAD Studio's built-in debugger, navigate to
Project > Options > Debugger Run > Parameters > Debugger
Fill the "Host Application" field with the full path of the Notepad++ application that will load the plugin.
Make sure the plugin's load directory contains both the DLL (built in debug mode) and the matching *.rsm symbols file:
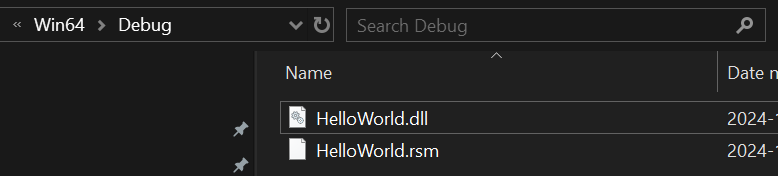
Then set breakpoints and press F9 to start Notepad++.