LoRaComm aims to allow easily creating pairs of portable, encrypted, point-to-point LoRa communicators.
The project is developed and tested on Arduino Uno R3's and was created as part of a university project. As such, many technical choices (language, GUI framework, etc.) do not reflect my usual preferences.
- 1x Arduino Uno R3 or similar board
- Needs 3.3V out for LoRa module
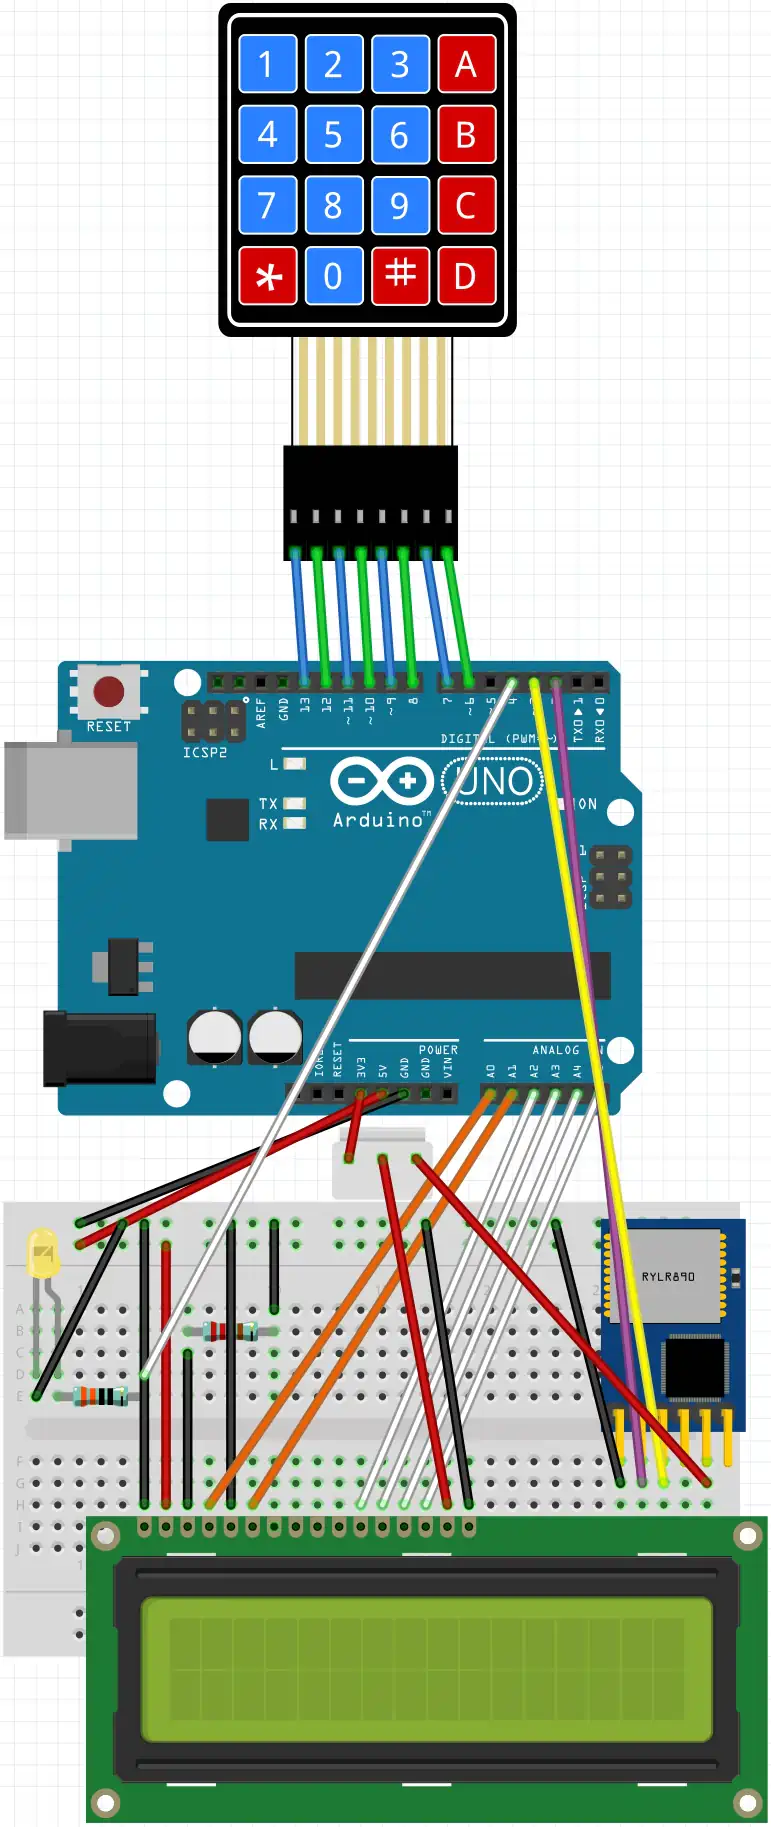
- 17 digital pins are needed for a full portable build; only 2 are needed for a minimal docked build
- Analog pins can be repurposed as digital
- 1x REYAX RYLR998 UART LoRa modules
- A method of powering the devices (battery for portable use OR USB serial for docked/web GUI use)
- Connection medium (breadboard/jumper wires/etc.)
- 1x 1602 LCD + 2.2kΩ resistor (for contrast control)
- Used to display in-progress and received messages
- Can be used without by docking to web GUI
- 1x 4x4 digital matrix keypad
- Used as portable input
- Can be used without by docking to web GUI
- 1x LED + relevant resistor (330Ω used in testing)
- Used as notification LED
- 1x USB UART adapter
- Used for easy programming of LoRa modules
- Can be done from Arduino directly if needed (just somewhat annoying and harder to debug)
- See here for an excellent tutorial on programming and understanding basic usage of these LoRa modules
- A friend to use the devices with
Please note that the LoRa module in the diagram (RYLR890) is not the one intended for use in this project (RYLR998). A Fritzing part for the RYLR998 does not currently exist.
All settings for the RYLR998 LoRa modules are left at factory defaults except for:
- Baud rate
- Set to 9600 to compensate for slower Arduino boards/for consistency with Arduino IDE
- Configure with
AT+IPR=9600
- Network ID
- Set to 18, as this is required for manually configuring the programmed preamble for increased transmission reliability
- Configure with
AT+NETWORKID=18
- Address
- One module should use
1as the address and the other should use2 - Configure with
AT+ADDRESS=<n>
- One module should use
- Advanced parameters
- Refers to SF (spreading factor), bandwidth, coding rate, and programmed preamble
- Set to 9,7,4,24 for best results (higher reliability; still maintains ~1.1 kbps bitrate)
- RYLR998 firmware disallows setting SF higher than 9 without increasing bandwidth, which is detrimental to reliability
- Documentation for programmed preamble in not very specific, but through trial and error I found no ill effects from maxing it out at 24, which the RYLR998 manual states should have the lowest chance of losing data
- Configure with
AT+PARAMETER=9,7,4,24
See here for any dependencies not included in Arduino IDE.
Simply create a 1loracomm folder in your Arduino project directory and download all of the provided *.ino files from this repository.
Warning
The 3DES encryption/decryption key (desKey) provided in 1loracomm.ino is meant to be a placeholder and must be changed before flashing.
Since the placeholder key is publicly visible in this repository, it functionally provides no security.
Once you've modified desKey, flash both Arduino boards with the same code. Target LoRa addresses do not need to be specified in the code, as they are determined dynamically at runtime based on the address of the local LoRa module.
- Node-RED
- Palettes
@flowfuse/node-red-dashboard(AKA Dashboard 2.0)node-red-node-serialport
- Palettes
The web GUI is a very simple application built in Node-RED. The flows.json containing the GUI is included in this repository. Import it into your Node-RED editor and change the physical serial interface assigned to the serial port to match your environment.
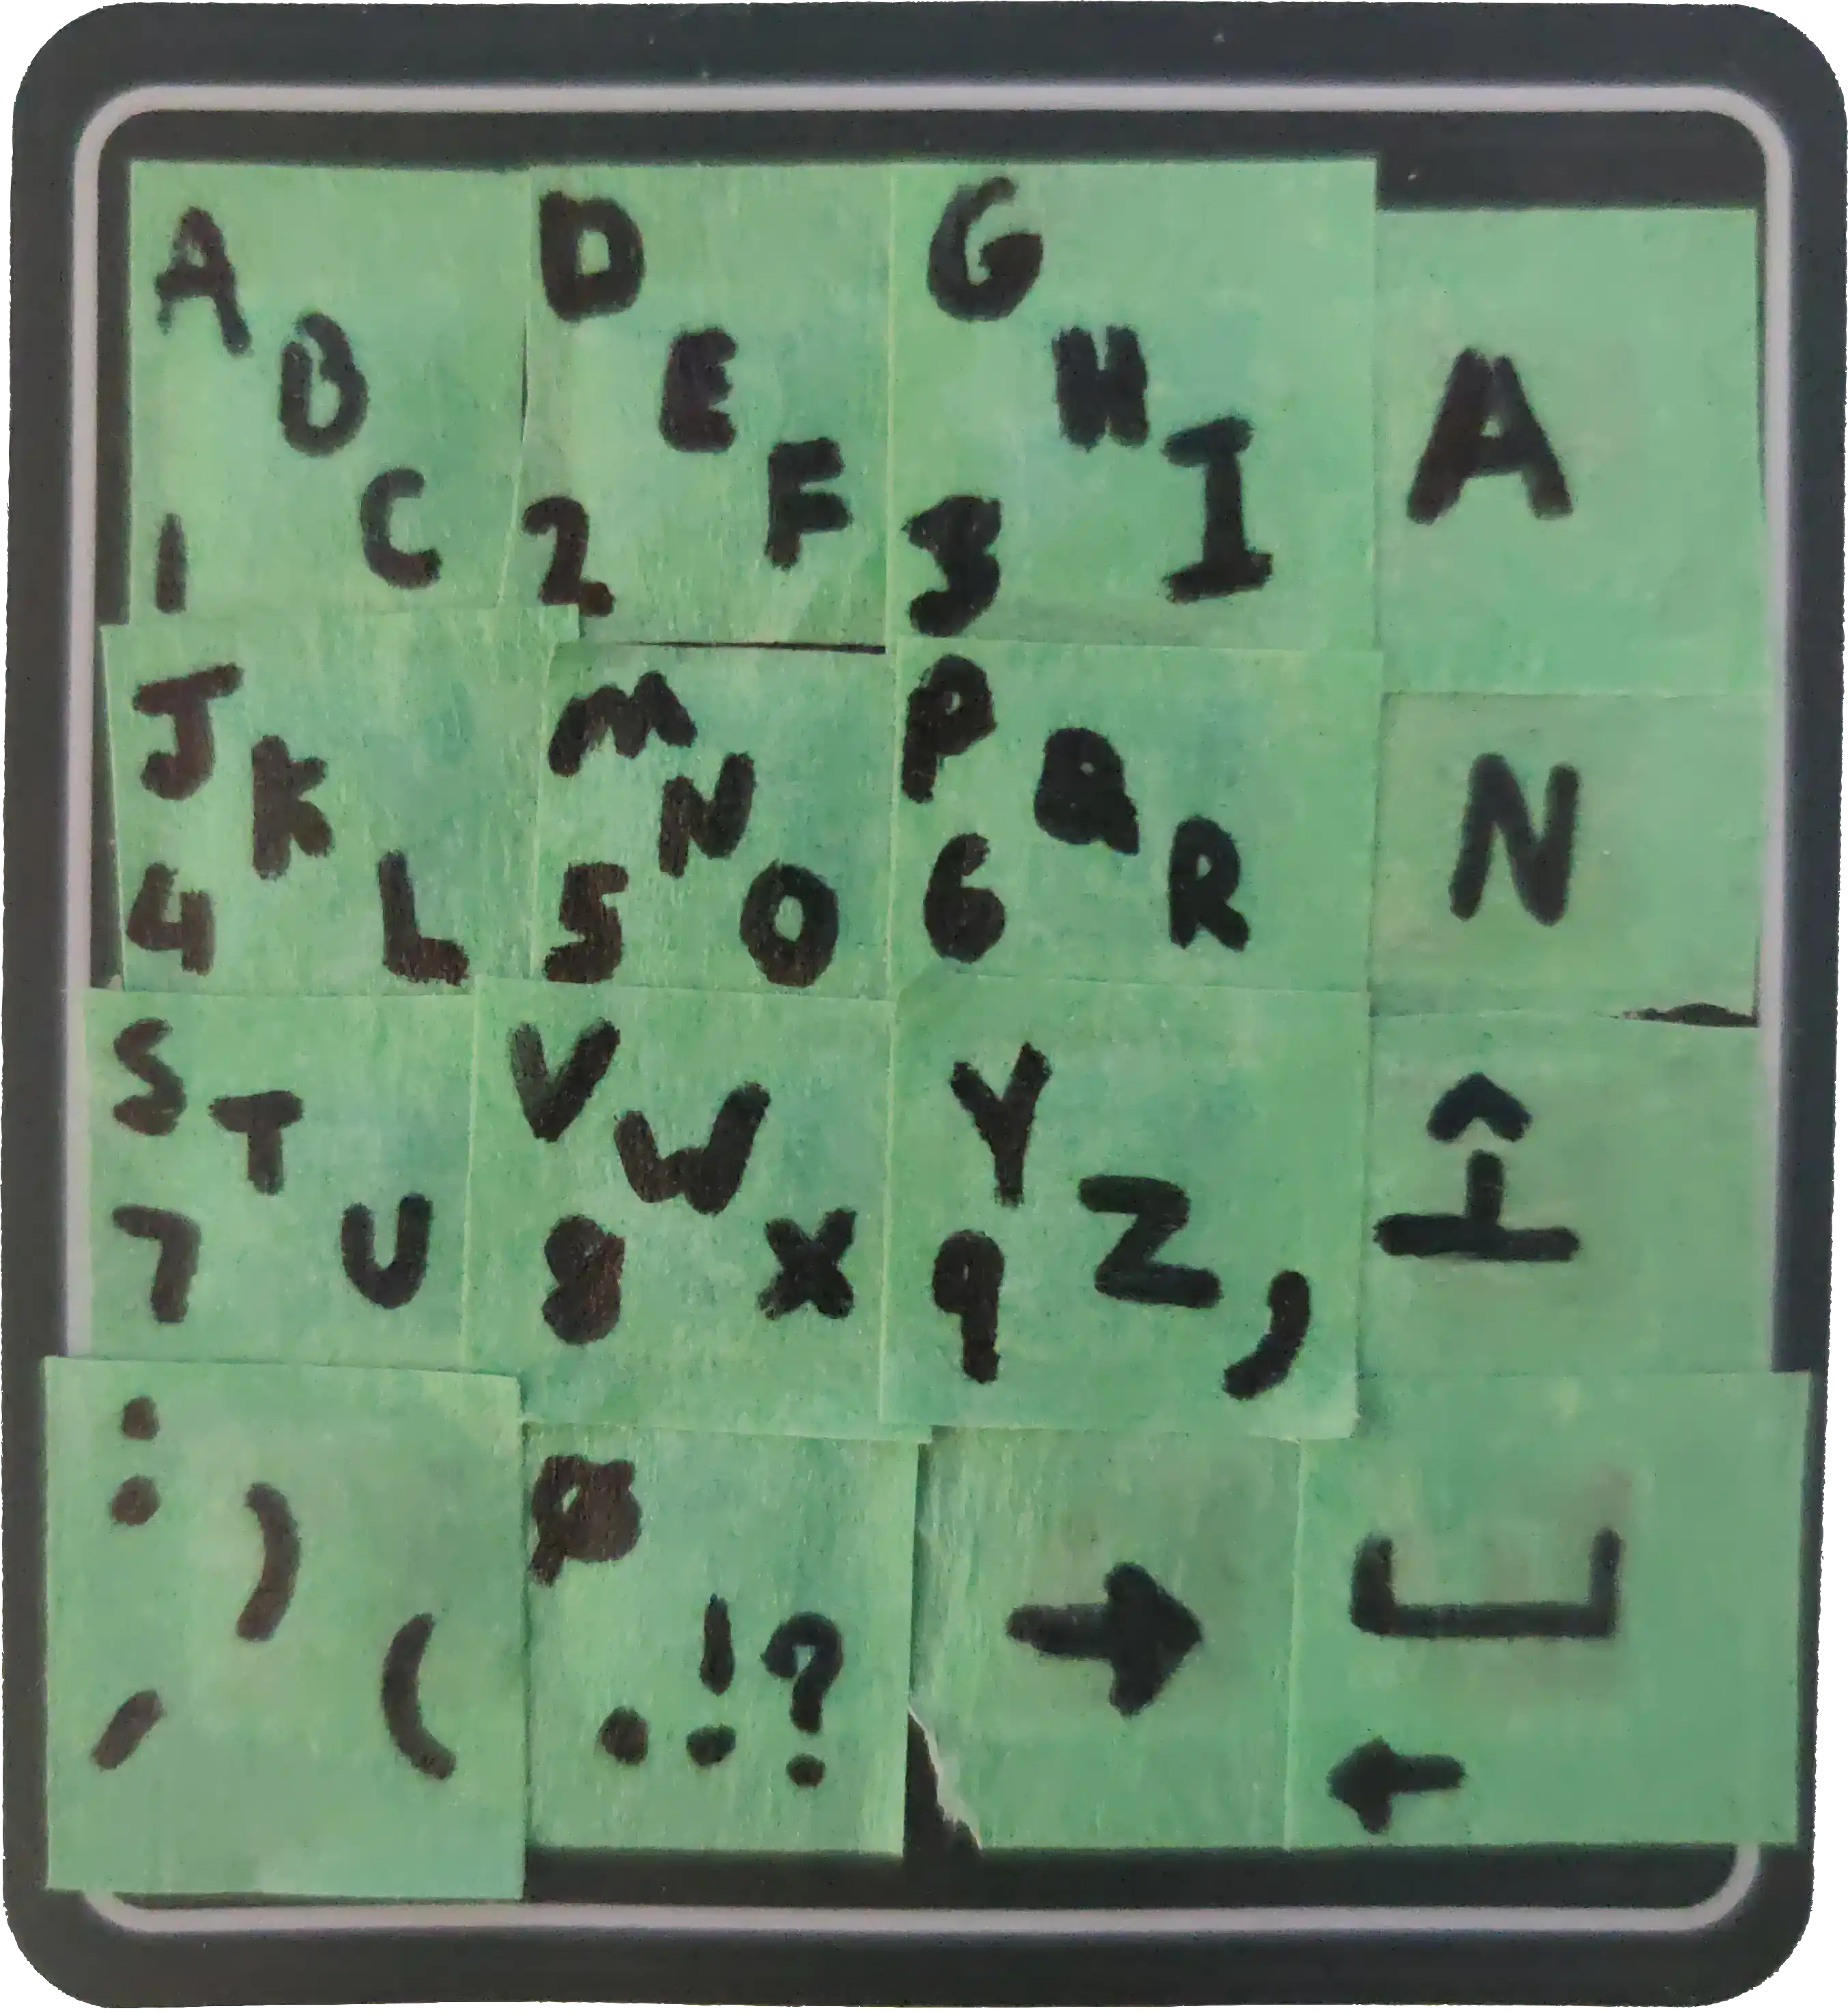
The keypad uses a custom rendition of manual multi-press dialing. Each character key has 4 possible outputs (three that alternate on sequential presses and one that can only be typed from numeric mode).
To use it, press a key the number of times necessary to correspond to your desired character. If you want to type a number or an apostrophe, you must first switch to numeric mode using the "N" key (you can switch back using the "A" key). You may also use the shift key to type capital variations of any letter or to perform a backspace using the "space" key.
After typing your desired input, you must follow it up with the "space" key to confirm it and display it on the connected LCD. To simply type a space, you must press "space" twice.
Once you are ready to send your message, press the "->" key. Once the message is verified to have been received by the LoRa peer, the message will clear from the LCD. If the message never clears from the LCD, either the message itself or the peer verification was lost in transit. Simply press send again (the peer will not display duplicate messages when just the verification was lost).
Coming soon
To be published upon completion of university course

