
The quickest way to setup your own modern VPN server.
WireGuard VPN is a rethink of how VPN software are designed and is receiving genuine appreciation from the community. This Azure ARM template helps you to setup a WireGuard VPN server quickly, taking care of all the configuration steps.
- Create an Ubuntu Server Virtual Machine.
- The only inputs you provide are the administrator username and password.
- The name of all resources are generated automatically to avoid any conflicts.
- An Azure Network Security Group with firewall rules is attached to the Virtual Machine.
- Install WireGuard Server.
- Configure WireGuard Server
- Create Private and Public Keys for Server and Client.
- Create the Server Configuration.
- The WireGuard interface IP address is set to 10.13.13.1.
- Setup NAT on the server to forward client traffic to the internet.
- Start the WireGuard Interface.
- Configure WireGuard to auto start.
- Generate ten client configuration files, which you can download and start using.
- The ten clients are given the IP addresses 10.13.13.101 to 10.13.13.110.
- The Client DNS server is set to 1.1.1.1.
- Enable UFW firewall.
- Install Ubuntu Server Upgrades.
- Schedule a Reboot after 24 hours, to ensure all Ubuntu Server Upgrades are applied.
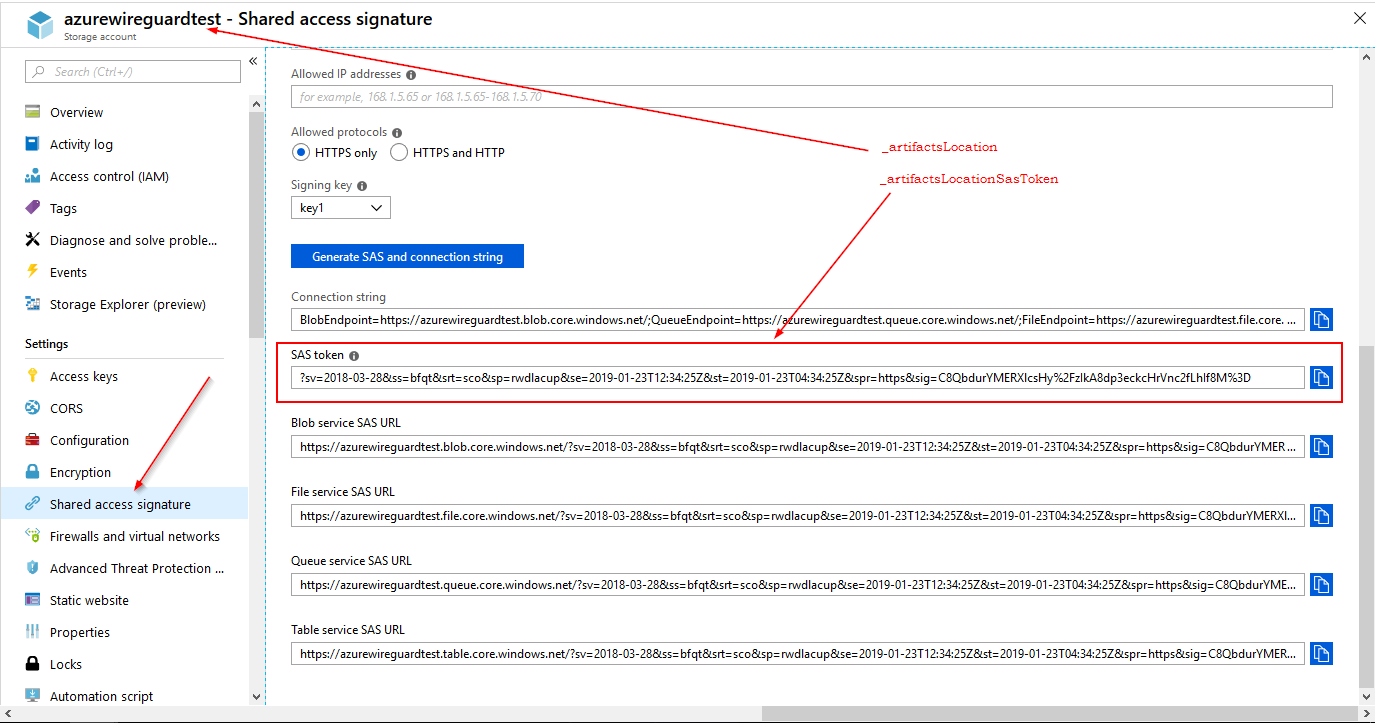
Some knowledge of how Azure ARM templates work is really helpful. Azure ARM needs a Storage Account (_artifactsLocation) with access controlled via a Shared access signature (_artifactsLocationSasToken), to upload this template while deploying. If you use Visual Studio this Storage Account is created automatically in the Resource Group called ARM_Deploy_Staging.
Method 1 - From Visual Studio
- Clone the git repository.
- Open the solution file in Visual Studio and deploy from Visual Studio.
Method 2 - From Azure Deploy
- Create a storage account (you can also use an existing one) for ARM to upload this template. (_artifactsLocation)
- Create a Shared access signature (SAS Token) for that storage account with full permissions. (_artifactsLocationSasToken)
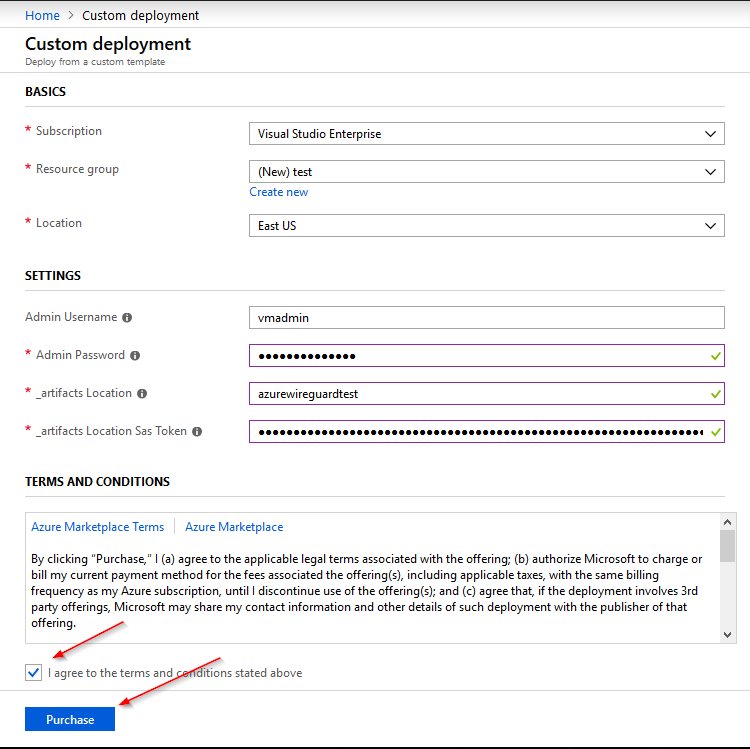
- Hit the Deploy to Azure button at the top.
- Fill the necessary parameters along with _artifactsLocation and _artifactsLocationSasToken from above and hit the Purchase button.
- There are multiple ways to deploy an Azure ARM template like Powershell, Azure CLI, Azure Portal and REST API.
-
The client configuration files are named wg0-client-1.conf, wg0-client-2.conf, ..., wg0-client-9.conf and wg0-client-10.conf.
-
They are located in the administrator users home folder (~/).
-
You can use tools like scp and pscp to download the client configuration files directly from the server.
scp <admin-user>@<server-fqdn>:/home/<admin-user>/wg0-client-1.conf /local/dir/
pscp <admin-user>@<server-fqdn>:/home/<admin-user>/wg0-client-1.conf c:\local\
Example:
scp vmadmin@awgyj5lzwixbj3ng.westus.cloudapp.azure.com:/home/vmadmin/wg0-client* /local/dir/
- The client configuration files generated have Linux Line Endings (LF) while Windows WireGuard clients would expect DOS Line Endings (CRLF).
- Recommended to have a separate Azure Resource Group for this deployment so that when you want to destroy the setup you can easily delete the Azure Resource Group and all the associated Azure resources are removed.
- Recommended to have a VM with atleast two cores.
- Once the configuration files are downloaded, you can disable the SSH port 22 on the Azure Network Security Group for added security.
- Azure Accelerated Networking is enabled by default for better network performance, this limits the choice of Azure VM sizes.
- Fork the repo on GitHub
- Clone the project to your own machine
- Commit changes to your own branch
- Push your work back up to your fork
- Submit a Pull Request so that changes can be reviewed and merged
NOTE: Be sure to pull the latest from "upstream" before making a pull request!

