-
Notifications
You must be signed in to change notification settings - Fork 0
Home
The Editor Helpers wiki contains guides on how to use the many features of the tool as well as explanations of what the tool is doing under the hood in many cases. Hopefully, by reading this you can enhance your understanding of the plugin as well as the Trackmania map editor in general.
- How To Guides
- Other Editor Plugins
The Editor Helpers plugin is a tool developed using the Openplanet scripting platform to expose capability in the Trackmania map editor which has no developer provided user interface. Additionally, the plugin is able to apply automation to some tasks in the map editor using the Openplanet provided scripting API.

Open the plugin's interface by clicking the "Main Window" option in the Plugins menu under "Editor Helpers". This menu option also acts as a toggle and if the window is already shown then a check mark will be shown and clicking the option will cause the window to close.

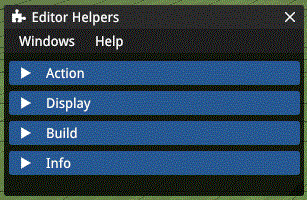
The interface of the plugin is sorted in 4 distinct sections: Action, Display, Build, and Info. Contained within each of these sections there are a variety of functions which can manipulate or interact with the editor.
The Action section contains specific actions which can be performed in the editor.

The "Save Map" button will instantly save the map. This uses a function inside the game's API which just accepts the map name and saves to a file without any dialogs. If you would like to save the map to a different map name then use the normal saving method through the editor UI or with the hotkey S.
In the settings for quicksave, there is an option to create a backup copy of the map each time it is saved. When this is enabled these copies will be placed in a folder called Quicksaves_EditorHelpers in the Maps folder. Additionally, there is another setting which will enable a brief notification with the name of the copied map.
"Hover for Active Hotkeys" will display a tooltip with the currently active plugin hotkeys. This does not include game hotkeys but only hotkeys from the plugin.
Plugin hotkeys can be enabled, disabled, and rebound from within the plugin settings. Open the plugin settings from the top bar menu Openplanet | Settings | Editor Helpers. Then scroll down until you see the "Hotkeys" header.

To enable a hotkey, select the checkbox labeled "Enabled". The current key bound to an action is displayed in the "Key" column. To rebind the key assignment, click the "Rebind" button then press the new key. If you change your mind after clicking "Rebind" you will noticed that the button text changes to "Cancel". Click the "Cancel" to abort the rebinding.
If multiple actions are bound to the same key, all of them will be triggered.
Any configured presets will display buttons in this second of the action group. Clicking the buttons will apply the associated preset.
Presets are quick ways to apply specific settings to certain parts of the Editor Helpers plugin. For instance, you could create a preset that would reset the Custom Item Placement grid back to 32x8 whenever you press it. Anything you see in the Editor Helpers Main Window can be controlled from a preset.
You can open the Presets window from the Openplanet top bar under Plugins | Editor Helpers | Presets or from the Windows | Presets menu bar in the plugin main window.

From the Preset window you can create new presets, delete existing presets, or update the data in presets.
To create a new preset, click the "New Preset" button. A new preset will be created and it will be displayed as a below named "Preset". To rename the preset to something more meaningful, type your desired name into the textbox next to "Set Name" and then click that button. When there is more than one preset you can reorder the tabs using the "Shift Left" and "Shift Right" buttons.
The preset tab is split into a left and right area. On the left side, you select which elements in the Editor Helpers window should be controlled by the preset. If you have the Editor Helpers main window open, as you hover over the checkboxes in this section you will see the linked elements on the Editor Helpers main window get highlighted.
On the right side of the preset tab you will see the data which is stored in the preset. To change the data in the preset, make changes to the linked portions of the Editor Helpers main window and then click the "Update Preset Data" button. You can then use the "Apply Preset" button to test and see what will happen when the preset is activated.
Each preset can be bound to a hotkey. See Hotkeys for information about binding and configuring hotkeys.
The "Plugin Defaults" preset will be created automatically. This contains the default state of the Editor Helpers plugin. Unlike other presets, it cannot be edited but it can be deleted. If you delete it and then wish to recreate it there is a button in the settings.
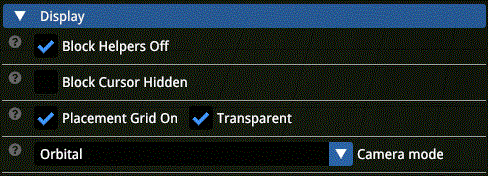
The display section has controls which can change the display of information in the map editor as well as the visibility of additional windows.

"Block helpers", sometimes also called "Clip helpers" are the brightly colored geometry that covers the connectors of certain blocks. The display of these helpers can be toggled on or off using the "Block Helpers Off" checkbox.

The left side shows what blocks in the editor look like with the helpers enabled which is the default state of the editor. On the right side is what you would see with the helpers turned off.
The block cursor is the partially transparent colored geometry surrounding the selected block before you place it. If you do not want to see that as you build then you can enable the setting "Block Cursor Hidden" to turn it off.

The left side shows what a block with the cursor geometry looks like which is the default state of the editor. On the right side is what you would see with the cursor hidden.
The placement grid, also called "Helpers" shows a visualization of the block grid across the entire building area. It is very helpful for placing blocks on the grid when mapping in Freeblock Mode or in Item mode. The "Helpers" can be turned on by selecting "Placement Grid On".

The default "Helpers" have a white alpha layer that somewhat obstructs the map below the current elevation. Selecting the "Transparent" option will remove this and leave only the grid.
NOTE: You must change the vertical altitude at least one tick in order for the placement grid transparency to update after you select or deselect it.
The camera mode selector lets you choose an alternate camera mode to view in the editor. The Orbital camera is the default editor camera. It is rotated using the NumPad2/NumPad8 for elevation and NumPad4/NumPad6 for direction. You can pan the Orbital camera by panning your mouse to the edge of the screen. The Orbital camera can also be controlled using Alt+LMB to rotate, Alt+RMB to pan, and Alt+LMB+RMB to raise and lower.
The Free camera has the same controls as the racing cam 7. It can be moved using the arrow keys, rotated using the RMB button, and raise/lowered with PG UP/PG DN.
The build section of the plugin interface contains functions which interact with blocks and items as you are building.
The Custom Item Placement function allows you to manipulate the placement parameters of items on the fly. Normally, the placement grid of an item is preset by the item author and cannot be changed without going into the item editor. However, using this interface you can override the data set by the item author without changing or saving over the existing item files.

The "Ghost Item Mode" checkbox toggles whether items should be forced into ghost item mode. Ghost item mode disables items from interacting with existing blocks or items in the map when you place them. Items placed in ghost mode will be placed directly at your cursor location.
When the "Item Autorotation" checkbox it will enable the autorotation flag for the currently selected item as well as force the item grid to be 0 in horizontal and 0 in vertical. Item autorotation makes the item align itself to the angle of whatever surface you place it on.
Items placed in autorotation mode need to anchor to a block which has been placed in normal block mode. To put the item on a block that was placed in ghost or free block mode you need to put a normal block such that the bounding box intersects with the other block.
The "Apply Grid to Items" checkbox, when selected, will forced the selected item to be placed on a grid matching the values of the "Horizontal Grid" and "Vertical Grid". The values of Horizontal/Vertical Grid are used like step sizes so if you would like for the item to be forced to the normal block grid then use 32 for Horizontal and 8 for Vertical. To have a grid that would be the same as the freeblock mode placement set the Horizontal and Vertical to 1.
The Item pivot is the point about which the item rotates when you Left click or using arrow keys. Sometimes you may want to pivot an item in a very specific way that requires the pivot point be moved. Clicking the "Apply Custom Pivot" will take the values in the "Pivot X", "Pivot Y", and "Pivot Z" and apply them to the item pivot.
NOTE: Some items may have multiple pivot points already created by the author. In that case, press Q to cycle through the pivots until you reach the last one. This is the one that will be manipulated by the plugin.
The precise rotation function allows for more fine grained rotation of items and freeblocks in the pitch and roll axes than what the game provides with the Left/Right/Up/Down arrow keys.

To change the pitch or roll of the current freeblock or item in your cursor, simply enter the desired rotation in degrees.
As an added convenience, the step size is provided for matching angles of ingame slopes. The step size dropdown selection changes what will get added or subtracted from the current angle when you click the "+" or "-" buttons to the right of the angle. The slope step sizes are:
| Preset Name | Angle (degrees) |
|---|---|
| Default | 15.0 |
| Half-Bislope | atan(4.0/32.0) |
| BiSlope | atan(8.0/32.0) |
| Slope2 | atan(16.0/32.0) |
| Slope3 | atan(24.0/32.0) |
| Slope4 | atan(32.0/32.0) |
In Trackmania Stadium, the ingame slopes are BiSlope for road and Slope2 for platform. You might find some usefulness out of the additional presets nevertheless.
The rotation randomizer sets a random rotation along every configured axes of rotation each time a block or item is placed. There are two randomizer modes: RANDOM and FIXED_STEP.

The random mode can be enabled by selecting RANDOM from the Randomizer dropdown box. Once RANDOM is selected you will see checkboxes for the Y, X, and Z rotation axes as well as a Min and Max adjacent to each axis. Clicking the checkbox and selecting one or more of the Y, X, or Z axes will enable randomization along that axis. The Min and Max define a configurable range for the axis in degrees. When the axis is randomized, the result will be between the Min and the Max values.

The FIXED_STEP randomizer mode will add a fixed increment to the selected axes after a block or item is placed. The checkboxes for Y, X, or Z axes will enable the rotation step for all that are selected. The Step is the value of the fixed increment to add to the angle in degrees. This can be any number from -180 to 180.
To disable the Rotation Randomizer select OFF from the Randomizer dropdown box.
The Freeblock Placement function allows you to force the blocks to a grid that is different than the default 1x1x1. It also has the ability to apply a translation offset to a block which allows you to place blocks at increments smaller than the 1x1x1 grid.

Selecting the checkbox for "Apply Grid to Freeblocks" will force freeblocks to be placed along the vertical and horizontal grid as defined by the values of the "Horizontal Grid" and "Vertical Grid". The plugin overwrites the mouse location with the new grid location so you will need to keep your mouse still when you place it.
NOTE: Apply Grid to Freeblocks works best with whole numbers and does not support numbers less than 1.
Selecting the checkbox for "Apply Translation to Freeblocks" will add the values of the X, Y, and Z translations to the X, Y, and Z, axes, respectively. This works well to offset a block slight amounts less than 1.0 allowing you to place freeblocks in places that would normally not be reachable by the 1x1x1 default grid.
Are you switching back and forth between Block, Item, and/or Macroblock mode and tired of always pressing the button multiple times to toggle to the correct placement mode? That's where this function comes into play!

The mode defaults interface allows you to enable or disable a default for Block, Item, or Macroblock placement mode individually. To enable for one of those three, select the checkbox next to the desired mode and then pick what you would like to be the default. Next time you switch to that placement mode, it will automatically go to your selected default mode instead of the game's default.
To disable the mode default, deselect the checkbox next to the placement mode.
The mood changer function is an interface to the map's time of day. From this you can set the map to be any time of day from 00:00:00 to 23:59:59.

To change the time of day to something else, enter your desired time into the box labeled "Set map time". If the time you enter is in the valid form of HH:MM:SS where HH is two digits for hours, MM is two digits for minutes, and SS is two digits for seconds, then the red X icon will change to reveal a "Set time" button. Clicking the button will apply your entered time to the map.
The dropdown box above also includes a variety of preset times. These can be the default times for Sunrise, Day, Sunset, and Night but also include several interesting times dealing with when the stadium lights and night effects turn on and off. Selecting a preset mood from the dropdown will immediately apply the time to the map.
The info section of the plugin interface contains functions which provide information about the map and the editor.
The Locators function reads the map file after every save and displays the embedded locator urls. When you include media in your map such as signs, mods, or music, the actual file itself is not included in the map. Instead, the map contains a link to where that particular piece of media can be downloaded.

Expand or collapse the Locators table by clicking on the "Locators" header. The icon on the right shows that the referenced media either contains a valid url or is an embedded game resource. The columns are the following:
- Status Icon: Displays a green checkmark when the media is valid and a red X when there is not a URL associated with the media.
- URL Validity Icon (Optional): Enabled in the plugin settings, this column displays either a green chain link icon or a red broken chain icon to indicate whether or not there was a valid response from the embedded media URL.
- File: The file column of the locators table contains the filename as the game sees it. It is a relative path to a real or virtual location in the game files.
- Url: If the media is not an embedded game resource then this will display the link to the media which is embedded into the map file. If it is a game resource then greyed out text will be displayed with the words "<ingame resource>".
- Open Link Button: If the media is not a game resource then this column will contain a button which, when clicked, will open the embedded URL in the default browser.
The podium check function scans the map file after each save looking for podium blocks/items. The podium is a special type of block/item which displays the top 3 players following a match in online play and is a nice thing for players on the map. However, it can be quite easy to forget to place a podium when you are building and releasing a map.

The podium check shows a simple display in the Info section. When there is a valid number of podiums, a green checkmark icon will be displayed. Otherwise, a red X icon will be shown as depicted above.
The podium check also includes an option to display a small notification in the upper left corner of the screen if there is an invalid number of podiums on the map whenever it is saved. This notification can be enabled, disabled, and configured in the Openplanet settings.
If you want a more game-native podium reminder check out my port of dommy's reminder plugin from Trackmania 2.

The cursor position function is a very simple display of the <X,Y,Z> position of the block cursor according to the freeblock coordinate grid. In this grid, each standard block unit is 32.0 wide and 8.0 tall. There is really not anything else to this function.
There are other feature of the Editor Helpers plugin that do not appear in a section on the main window. These could have their own windows or no user interface at all.
This function works entirely in the background and covers three very specific use cases:
- When you are testing a map, it remembers what placement mode (Block/Item/Macroblock) you were using before going into test mode. Then when you press Esc or Ctrl to get out of test mode, it swaps you back to your previous mode instead of always going to Block mode.
- When you are in the selection mode doing "Selection Remove" and then press Alt to use the camera, the game would return you to "Selection Add" but the plugin remembers and returns you to "Selection Remove"
- When you have color selections on the block color widget or the force macroblock color widget and you leave the editor, the plugin will remember those selections when you reenter the editor.
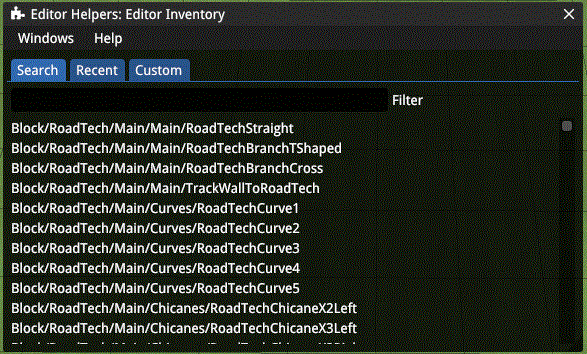
The Editor Inventory function provides a searchable interface to find blocks, items, or macroblocks. It also keeps track of the recently used blocks, items, or macroblocks and allows you to create your own custom collections.
You can open the Editor Inventory window from the Openplanet top bar under Plugins | Editor Helpers | Editor Inventory or from the Windows | Editor Inventory menu bar in the plugin main window.

The Editor Inventory window shows three tabs: Search, Recent, and Custom. The Search tab contains a list of everything
in your inventory including custom items and custom blocks. Every inventory object is listed with the full folder bath
using / as the separator. Blocks begin with "Block/", items begin with "Item/", and macroblocks begin with
"Macroblock/".
Typing into the Filter textbox will filter down the list as you type. The search is case insensitive and will match your filter text against the full path name of the inventory object.
The "Recent" tab of the Editor Inventory window contains a history of the recent blocks, items, or macroblocks you have used. By default, the last 10 will be displayed in a list here with the top being the most recent. You can configure the amount to show here in the Openplanet settings for Editor Helpers.

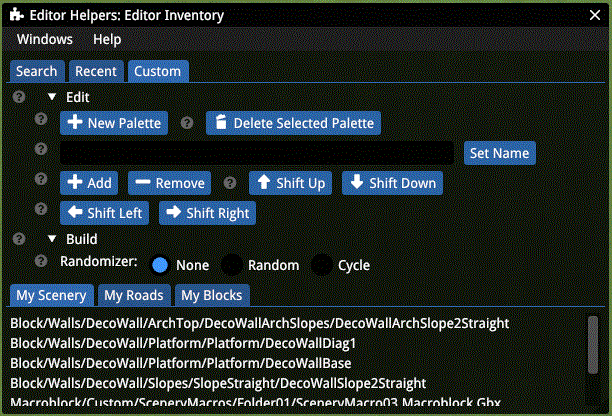
The Custom tab of the Editor Inventory window allows you to create your own custom collections (or "Palettes") of inventory objects. Clicking "New Palette" will create a new empty palette. The default name is "Palette" but you can change that by clicking on the tab for it, entering your desired name in the textbox adjacent to the Set Name button, and then clicking the Set Name button.
Add or remove inventory objects (Blocks, Items or Macroblocks) to the current palette by selecting them from the game's inventory and then clicking either the "Add" or "Remove" button. The "Shift Up" and "Shift Down" buttons will move the currently selected object up or down in the current palette.
Reorder the custom palette tabs using the "Shift Left" and "Shift Right" buttons.
Under the "Build" category on the Custom tab there is a Randomizer which has two active modes: Random and Cycle. When the Random mode is selected, a random object will be chosen from your active palette right after you place a block, item, or macroblock in the map. When the Cycle mode is selected, instead of chosing a random object from within the palette it will simply choose the next object in the list and loop around when it reaches the end.
Selecting the "None" mode for the Randomizer will turn it off.