A QR code scanning and reporting API for SQL/Data Saturday conferences
Back in the day when we used to have SQL Saturdays, attendees would have QR codes that they could scan in exhibitor booths. Event organizers could download a database extract from the SQL Saturday site with all scans, and send that extract to each respective exhibitor.
This is a framework to
- Create QR codes as PNG files, as well as inline HTML data objects
- Register when a QR code is scanned
- Associate a terminal (QR code scanner/smart phone) to a specific exhibitor
- Create a report of all scanned QR codes for an event
- Purge data for expired events
The solution works with integer identities, so it does not contain any personally identifiable information. This means that you'll have to connect those IDs to your attendee records yourself.
No IP addresses, locations, etc, are used or checked or stored, unless specifically entered in the note field by vendors.
The solution does not use passwords, with the exception of the EventSecret, which the event owner will need to extract reporting data if they don't have database access.
You'll need:
- A web server that runs Node.js, for example IIS or Azure WebApps (recommended).
- A SQL Server instance, any edition or capacity.
-
Create a new Azure WebApp
-
Configuration
- FTP Basic Auth -> off
- FTP state -> Disabled
- HTTP version -> 2.0
- Runtime stack: Node, version 22 LTS
-
Deployment Center -> New/Settings
- Source: Github
- Select your organization and branch
- Build Provider: App Service Build Service (important)
-
Synchronize the git repo either automatically, or by clicking the "Sync" button. This may take a couple of minutes.
- Add an environment variable:
PORT, set it to8080 - Add a startup command:
npm start
- The Github repository does not consistently deploy changes automatically on Linux WebApps, in my experience. If you've updated the repo, make sure to check if it was deployed, and if it's stuck in "Pending", you can click the "Sync" button to get it going.
- Deploy the Git repository in the web root.
- You may have to use npm to install all of the dependencies.
To set up:
- Run the database deployment script in a SQL Server database. The entire solution runs in its own schema, "Scan", so it should play nice with other apps if you need to.
- Create a user to the SQL Server database. It can be a contained user (without login) if you want.
GRANT EXECUTE ON SCHEMA::Scan TO {database user};
Note Do not include the login or database user in any other roles. Apply the principle of least privilege.
Environment variables:
- cookieSecret: Used to encrypt cookies. (Not required, but recommended)
- dbserver: Fully qualified name of the database instance
- dbname: Database name
- dblogin: Login name
- dbpassword: Password
Note The app currently only supports SQL Authentication.
Here's how the scanning flow works.
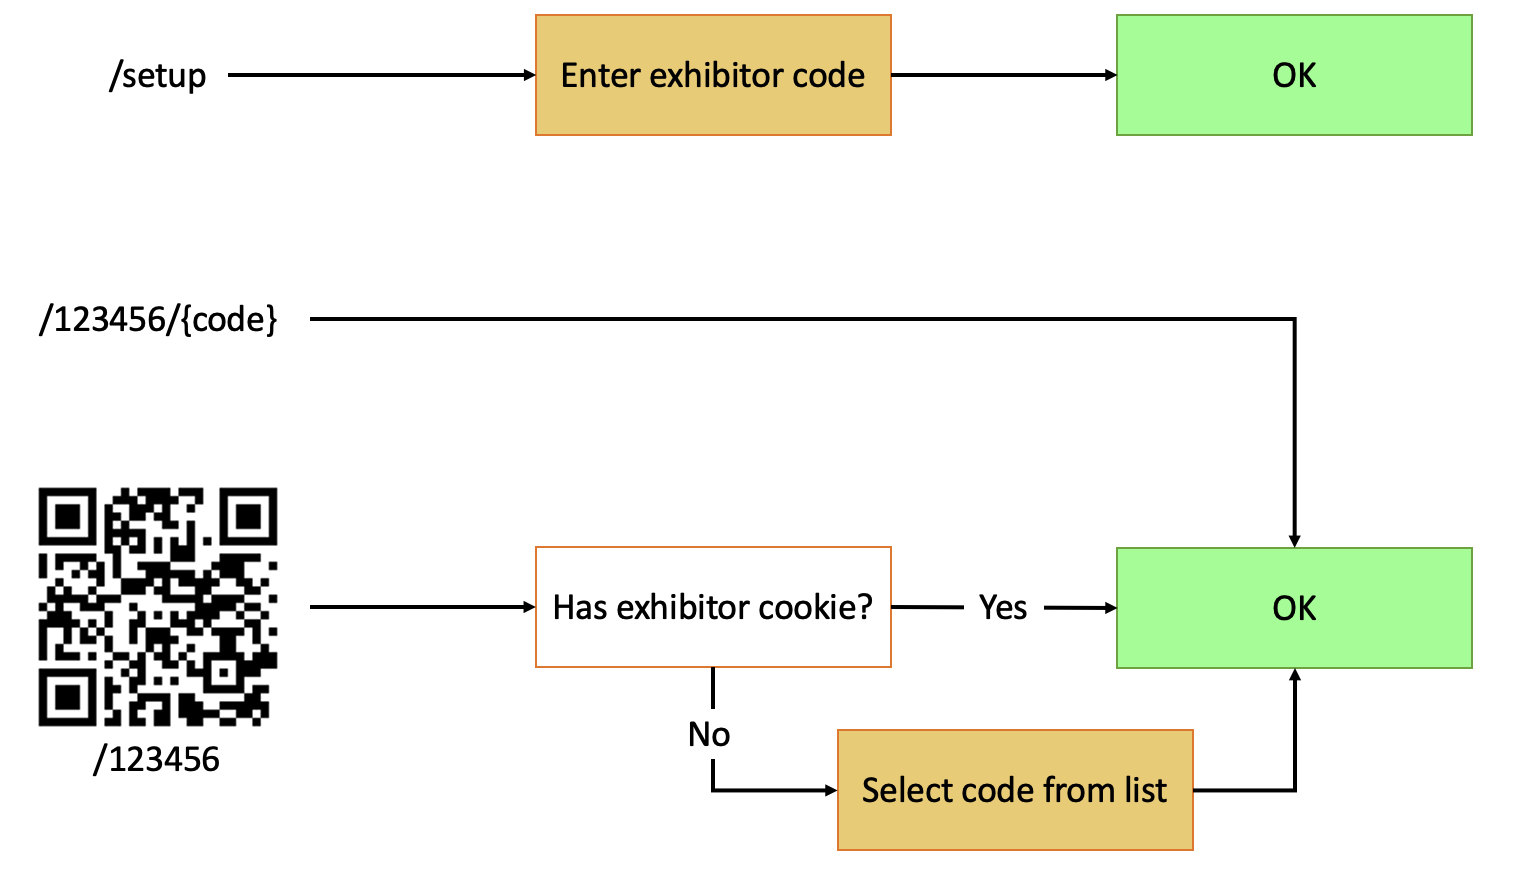
- An exhibitor will first go to
/setupto create and store an exhibitor code. This code is stored as a cookie on the browser, so the process needs to be completed for each terminal. - When the exhibitor scans a QR code, the browser will load the
/123456789. The cookie on the browser identifies which exhibitor code to associate the scan with.
The embedded browser in iOS (including the QR code scanning app) does not store cookies persistently across sessions, and it does not inherit persistent cookies from Safari, so this alternate workflow is required:
- The exhibitor scans the QR code, which loads
/123456789. - Because the web server does not detect a cookie, it will present the user with a list of codes.
- When the user clicks one of the codes, the browser loads
/123456789/exhibitorcode, which completes the scan. - If the user long-presses an exhibitor code, they are given the option to add a custom note to the scan.
Not supported in the API.
EXECUTE Scan.New_Event @Event;
The stored procedure returns an "EventSecret", which acts like an API key or password, used to access event data. Store this event secret if you don't have access to the production database.
GET /new/{event code}
GET /new/{event code}/{manual integer id}
Creates a new identity for an existing event. Identities are normally generated randomly, not in a sequential or otherwise predictable manner, but you can opt to set an ID manually. This could be useful if you want to integrate with another system and want to inherit the ID from that data source.
Example output:
{ "id":"19380729426",
  "url":"https://www.example.com/19380729426",
  "imgsrc":"https://www.example.com/event_code/19380729426.png",
  "data":"data:image/png;base64,iVBORw0KGgoAAAANSUhEUgAAAJ..."}
- The "imgsrc" URL is persisted, and can be embedded in other solutions, like confirmation emails to attendees, etc.
- The "data" object is a Base64-encoded QR code of the URL, which allows for embedding in HTML documents or emails.
Currently only available in the database, you can store the names, titles and contact info of your attendees in the database if you want. This information is encrypted by a key that you can choose.
EXECUTE Scan.Update_Identities
    @EventSecret='{secret}',
    @EncryptionKey='',
    @Identities_blob=N'[
        {"id": 1000012345, "name": "Name goes here", "description": "This is a demo"},
        {"id": 1000012346, "name": "Another name"}
    ]';
Valid attributes for the JSON blob are:
- id (required)
- name (200 characters)
- description (400 characters)
- jobTitle (150 characters)
- phone (150 characters)
- email (150 characters)
- location (150 characters)
String lenghts for these attributes are approximate. They may vary with unicode characters, and the encryption adds some overhead.
If you do not specify the @EncryptionKey parameter, a blank string is used as your key by default. A blank string is required in order to be able to see the name in clear text using the random scan feature.
GET /{identity}
GET /{identity}/{code}
POST /{identity}/{code} with note parameter
Scans the identity. Code is optional, and can be added to re-use the identity for multiple purposes/exhibitors/etc. Remember that the QR URL only contains the identity, not the code.
Displays a very brief status to the user to indicate if the scan was successful.
Returns HTTP/200 if successful, 500 if not.
Displays an error message if there's no cached code, prompting the user to set up the terminal first.
For POST requests, the "note" parameter is saved as a plaintext description in the "Note" column of the scans table.
GET /setup
If the exhibitor uses a smartphone or other browser to scan the QR codes, the exhibitor code can be stored in a cookie in the browser. A simple web form found in /setup guides the user.
When the cookie is set in the browser, all scans made with that browser will include this code. The cookie expires after 24 hours.
You programmatically set the cookie by using a POST request to /setup, with the exhibitor code in the "code" parameter.
GET /report/{secret}
Returns a JSON report of all identities, whether scanned or not. If the identity was not scanned, the "Scanned" property is blank.
Example output:
[{"ID":"19380729426","Scanned":null,"Code":null},
 {"ID":"17560301726","Scanned":"2021-09-27T18:12:23.509Z","Code":null},
 {"ID":"17560301726","Scanned":"2021-09-27T18:12:26.852Z","Code":null},
 {"ID":"17560301726","Scanned":"2021-09-27T18:13:08.743Z","Code":null},
 {"ID":"17560301726","Scanned":"2021-09-27T18:13:17.322Z","Code":null},
 {"ID":"17560301726","Scanned":"2021-09-27T18:13:43.244Z","Code":null},
 {"ID":"17560301726","Scanned":"2021-09-27T18:15:34.198Z","Code":"Exhibitor 1","Note":"Spoke about cloud monitoring."},
 {"ID":"17560301726","Scanned":"2021-09-27T18:15:39.511Z","Code":null},
 {"ID":"17560301726","Scanned":"2021-09-27T18:17:13.824Z","Code":"Exhibitor 2"},
 {"ID":"17560301726","Scanned":"2021-09-27T18:18:36.513Z","Code":"Exhibitor 2"},
 {"ID":"17560301726","Scanned":"2021-09-27T18:18:42.966Z","Code":"Lunch ticket"}]
GET /random/{secret}/{code}
GET /random/{secret}
Returns a single, random scan.
- If the vendor code is specified, the scan is chosen only from that vendor's scans.
- If the attendee record includes a name, and the encryption key is a blank string, the name is also returned in the record.
Example output:
[
  {
    "ID": "15025612099",
    "Scanned": "2024-05-25T07:06:28.111Z",
    "Code": "(Registration)",
    "Name": “Attendee name goes here"
  }
]
GET /expire
Evicts all events, identities and scans that have expired. By default, an event expires 365 days after its creation, but this is configured in the Expires column of the Scan.Events table.

A sample integration would GET https://scan.example.com/new/EventCode
... which returns
{ "id":"19380729426",
  "url":"https://scan.example.com/19380729426",
  "imgsrc":"https://scan.example.com/eventcode/19380729426.png",
  "data":"data:image/png;base64,iVBORw0KGgoAAAANSUhEUgAAAJ..."}
You can parse the output as JSON with the following schema:
{
    "type": "object",
    "properties": {
        "id": {
            "type": "string"
        },
        "url": {
            "type": "string"
        },
        "imgsrc": {
            "type": "string"
        },
        "data": {
            "type": "string"
        }
    }
}
... and then write that information back to Mailchimp.
Method: PATCH
URL:
https://us5.api.mailchimp.com/3.0/lists/@{triggerOutputs()?['body/list_id']}/members/@{triggerOutputs()?['body/id']}?skip_merge_validation=true
Request body:
{
  "merge_fields": {
    "SCANID": "@{body('Parse_JSON')?['id']}",
    "QR": "@{body('Parse_JSON')?['imgsrc']}"
  }
}
Use basic authentication; anything goes in the username field, use your API key as the password.
Pull request welcome. My DMs are open, or create a new issue in the repo.