Presentation Material and Sample Code from the Blockchain and Machine Learning Workshop at START Summit 2017 in Switzerland
The purpose of this code is to demonstrate in a simple example, how to bring Blockchain technology, smart contracts and Machine Learning together. It implements a simple chat client that can transmit messages, images and tags to the Blockchain. Tags are automatically extracted via a simple Deep Neural Network using the Keras Python Package with Tensorflow backend. In addition to just sending messages, the client also supports listening for new messages on the Blockchain from other participants. For details, please view the workshop presentation.
- runTestnet.sh: launches a local development Blockchain for easy testing
- contract.sol: contains the smart contract code in solidity language
- installContract.py: Python script for sending our contract to the Blockchain
- user.py: Python script that contains the actual chat client
- classify.py: Python script to classifiy an image file
I really recommend using Linux at this point. The installation guidelines will focus on Ubuntu Linux 16.04 LTS, but should be similar for other distributions.
open a Linux Terminal and enter the following command:
sudo apt-get install python2.7 python-pip curl git build-essential libssl-dev
curl -sL https://deb.nodesource.com/setup_7.x | sudo -E bash -
sudo apt-get install -y nodejs
sudo npm install -g ethereumjs-testrpc solc
sudo pip install -U pip
sudo pip install -U numpy keras==2.0.0 tensorflow ethjsonrpc h5py Pillow scipy
cd
git clone https://github.com/thoschm/START-Summit-2017-Blockchain-Machine-Learning-Workshop.git workshop_code
cd
git clone https://github.com/fchollet/deep-learning-models.git
cp deep-learning-models/resnet50.py workshop_code/code/
cp deep-learning-models/imagenet_utils.py workshop_code/code/
cd
cd workshop_code/code
[get some image file in there]
python classify.py image.jpg
When you run it the first time, it will download pre-trained network weights from the internet. No need to train on your own. Output:
Using TensorFlow backend.
content:

Downloading data from https://s3.amazonaws.com/deep-learning-models/image-models/imagenet_class_index.json
>  tree_frog  <
cd
cd workshop_code/code
./runTestNet.sh
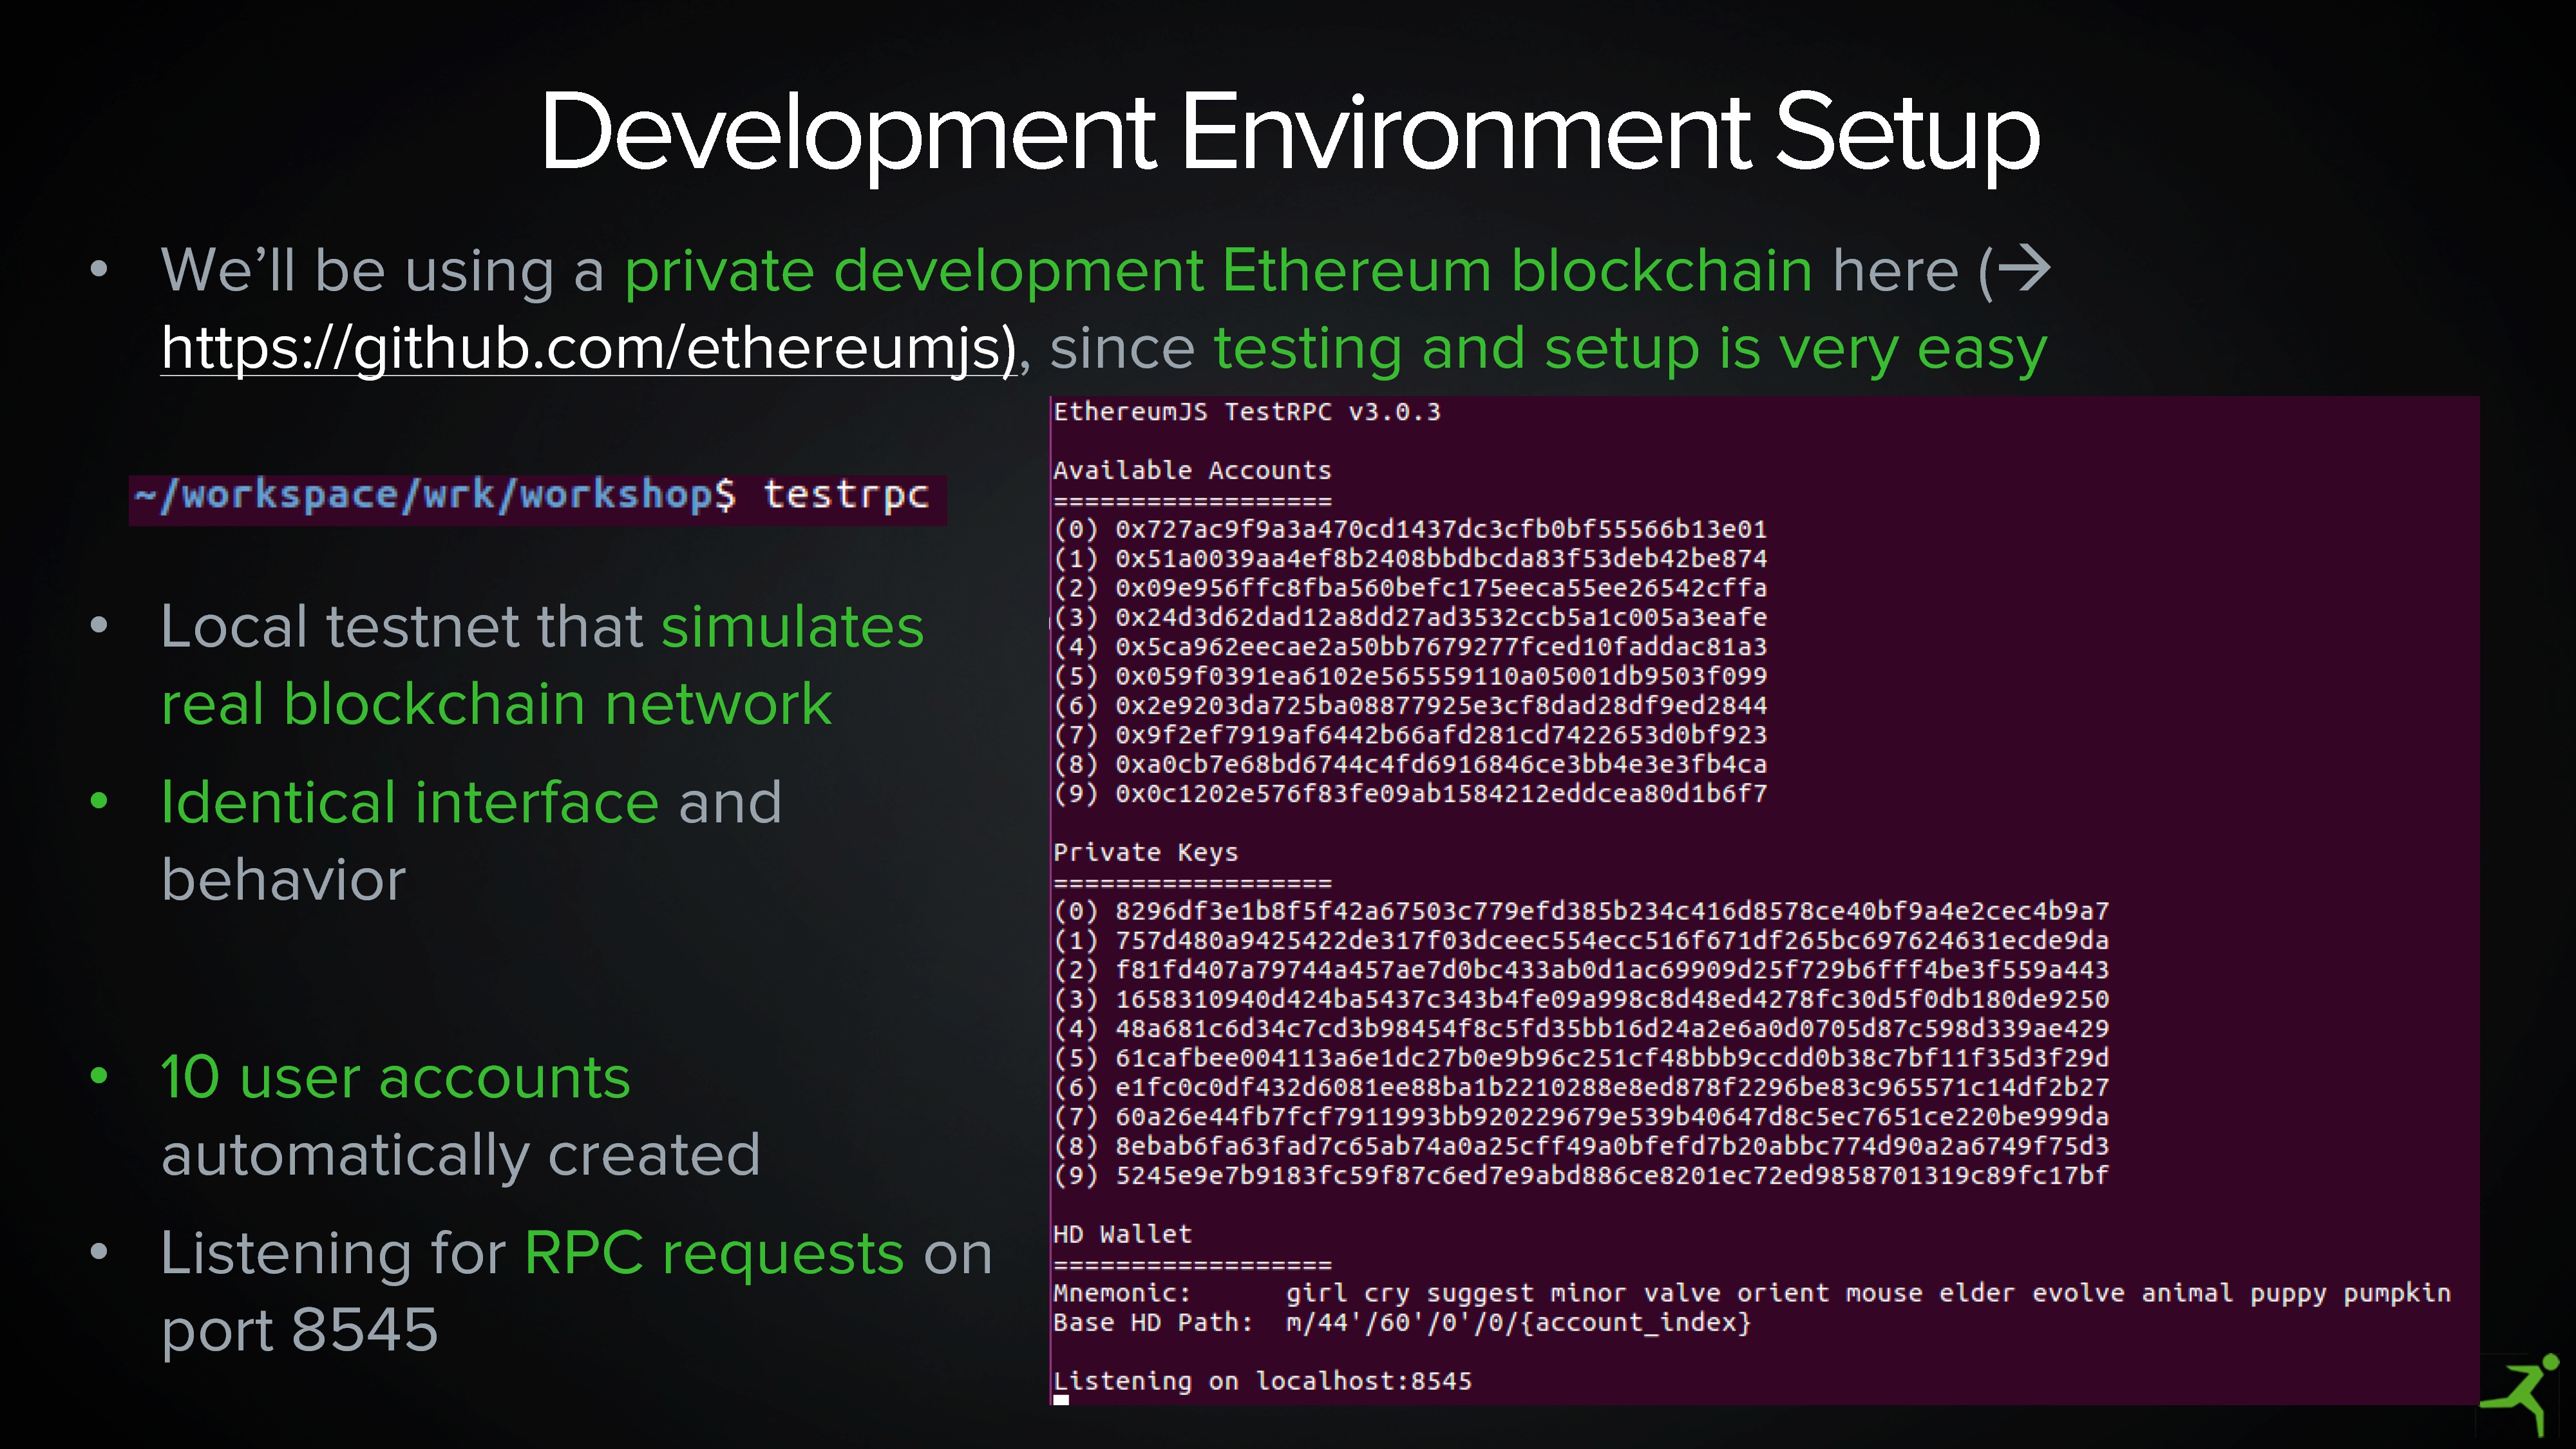
Here's the workshop slide:
 And here's our current output:
EthereumJS TestRPC v3.0.3

Available Accounts
==================
(0) 0x0d56bafa9c8181199e99956a3f67eb937a47ce80
(1) 0xc590c4d665805458171411ac442b1c8b291f32f5
(2) 0x68b3555067cbd45d438ab6718d471e45ea658e97
(3) 0x2b91ec12075da8e7c400788108aa37d77eede040
(4) 0xa9e1315284a36b1cf03c008bf58f01e649641467
(5) 0x0bdda62c2ec3b4cbcc7c4eef73da1151822552a5
(6) 0x5bbeeb78b4dba70687e67f59efb087e759f61501
(7) 0x07a2a4db9732210252bf672a7a02ff387a8bd793
(8) 0x28b2cc00b3618dc16cc8db1cbe76a11bf59870db
(9) 0x30e0284721f67667538edeb2bf894bdc515e883d

Private Keys
==================
(0) f1961f0b7437d703815fe85ff3e1a2f9f92e3a050e74d2cf471006c20aa3ad16
(1) 01307d3f762e45c483c45fe769cc2791e203e27837c911866e2de61e3b8db7fb
(2) 58d8fb6e827ab4c84619d458abae27a7ec8553fcceb8adf602ec4f8e0ab2b277
(3) d3ec9d32db5b128d0bad0ce5323badba618e327c90553463751cd631ebaeece4
(4) 87c288352be5bbf38ecf22b571b4a2c8f8936e50ddd98ff678a4c5d0f5c5105c
(5) 35bd1c6339e7eef3d7c879e363c89e23578d25289c5994b76f8542771e5fb1f2
(6) e5895317d53a9422bc39ae0709e2074343f57666e290d27a7c12e4fb7adcfba6
(7) 5e2e5fbfe292efe294ecfbf832a589e625fa4145a6069f841935c4eb61076d27
(8) 053d66ed79f92307daae8db58280206a8a700ca864bf69fac8406a8ed29eda6a
(9) c25bba1d0ccd6d8fc48efa5708427a5944c79a5f5e1a28b6ab7d28e1cd15ccf3

HD Wallet
==================
Mnemonic:      enable debate helmet sport sort young flash ginger letter inside stone quiz
Base HD Path:  m/44'/60'/0'/0/{account_index}

Gas Limit
==================
21489604

Listening on localhost:8545
We have now created a local testnet that will look and feel the same way as a'normal' node (RPC communication is the same). The addresses under 'Available Accounts' are the IDs that will identify our network users - like nicknames on a chat platform. Normally they would be sitting on difference computers distributed over the internet and the good news is, the workshop code will work in a 'real' Blockchain network without any modification.
Now open a new terminal and let the testnet run, we need it. In the new console, enter:
cd
cd workshop_code/code
python installContract.py
This will compile the smart contract from the file 'contract.sol' into byte-code and print it to the console. Also the code is sent to the Blockchain via transaction. To access it there, we need to remember the contract-address that is output as well.
--------------------------------------------------------------------------------
client software: EthereumJS TestRPC/v3.0.3/ethereum-js
block: 0
address: 0x0d56bafa9c8181199e99956a3f67eb937a47ce80
--------------------------------------------------------------------------------
compiling contract...
0x606060405234610000575b6107df806100186000396000f3606060405260e060020a600035046303c0bfb5811461003457806324af4cdb1461016d578063416ae7681461023c575b610000565b3461000057610041610378565b604051808060200180602001806020018481038452878181518152602001915080519060200190808383829060006004602084601f0104600302600f01f150905090810190601f1680156100a95780820380516001836020036101000a031916815260200191505b508481038352868181518152602001915080519060200190808383829060006004602084601f0104600302600f01f150905090810190601f1680156101025780820380516001836020036101000a031916815260200191505b508481038252858181518152602001915080519060200190808383829060006004602084601f0104600302600f01f150905090810190601f16801561015b5780820380516001836020036101000a031916815260200191505b50965050505050505060405180910390f35b346100005761023a600480803590602001908201803590602001908080601f0160208091040260200160405190810160405280939291908181526020018383808284375050604080516020601f89358b0180359182018390048302840183019094528083529799988101979196509182019450925082915084018382808284375050604080516020601f89358b018035918201839004830284018301909452808352979998810197919650918201945092508291508401838280828437509496506103b495505050505050565b005b34610000576100416004356105e5565b604051808060200180602001806020018481038452878181518152602001915080519060200190808383829060006004602084601f0104600302600f01f150905090810190601f1680156100a95780820380516001836020036101000a031916815260200191505b508481038352868181518152602001915080519060200190808383829060006004602084601f0104600302600f01f150905090810190601f1680156101025780820380516001836020036101000a031916815260200191505b508481038252858181518152602001915080519060200190808383829060006004602084601f0104600302600f01f150905090810190601f16801561015b5780820380516001836020036101000a031916815260200191505b50965050505050505060405180910390f35b6040805160208181018352600080835283518083018552818152845192830190945281529091906103a8336105e5565b9250925092505b909192565b826000600033600160a060020a031681526020019081526020016000206000019080519060200190828054600181600116156101000203166002900490600052602060002090601f016020900481019282601f1061041d57805160ff191683800117855561044a565b8280016001018555821561044a579182015b8281111561044a57825182559160200191906001019061042f565b5b5061046b9291505b808211156104675760008155600101610453565b5090565b5050816000600033600160a060020a031681526020019081526020016000206001019080519060200190828054600181600116156101000203166002900490600052602060002090601f016020900481019282601f106104d657805160ff1916838001178555610503565b82800160010185558215610503579182015b828111156105035782518255916020019190600101906104e8565b5b506105249291505b808211156104675760008155600101610453565b5090565b5050806000600033600160a060020a031681526020019081526020016000206002019080519060200190828054600181600116156101000203166002900490600052602060002090601f016020900481019282601f1061058f57805160ff19168380011785556105bc565b828001600101855582156105bc579182015b828111156105bc5782518255916020019190600101906105a1565b5b506105dd9291505b808211156104675760008155600101610453565b5090565b50505b505050565b604080516020808201835260008083528351808301855281815284518084018652828152600160a060020a0387168352828452918590208054865160026001808416156101000260001901909316819004601f810188900488028301880190995288825296979396949592949185019391850192909185918301828280156106ae5780601f10610683576101008083540402835291602001916106ae565b820191906000526020600020905b81548152906001019060200180831161069157829003601f168201915b5050855460408051602060026001851615610100026000190190941693909304601f81018490048402820184019092528181529598508794509250840190508282801561073c5780601f106107115761010080835404028352916020019161073c565b820191906000526020600020905b81548152906001019060200180831161071f57829003601f168201915b5050845460408051602060026001851615610100026000190190941693909304601f8101849004840282018401909252818152959750869450925084019050828280156107ca5780601f1061079f576101008083540402835291602001916107ca565b820191906000526020600020905b8154815290600101906020018083116107ad57829003601f168201915b505050505090509250925092505b919390925056
--------------------------------------------------------------------------------
contract sent, waiting for it to be mined...
contract mined (block: 1)
--------------------------------------------------------------------------------
contract_address:


--> 0x86817fbb2715c45d70163ba9de0b7af9c90f6282 <--


--------------------------------------------------------------------------------
Please open now two new terminal (and leave the testnet running, we still need it, since our smart contract in now inside the Blockchain). Also please have an arbitrary image ready (I like using images of frogs or beer, but that's just my preference). In the first one, enter:
cd
cd workshop_code/code
python user.py 0x86817fbb2715c45d70163ba9de0b7af9c90f6282 0x0d56bafa9c8181199e99956a3f67eb937a47ce80
Remember that we need to provide the address of our contract inside the chain and the address of our user account (let's take the first one in the list). Therefore:
- copy the contract address from the terminal where the contract was installed in the chain
- copy the 1st account address from the testnet terminal under 'Available Accounts'
- both will be given as arguments to the user.py program Output:
Using TensorFlow backend.
--------------------------------------------------------------------------------
client software: EthereumJS TestRPC/v3.0.3/ethereum-js
block: 1
address: 0x0d56bafa9c8181199e99956a3f67eb937a47ce80
--------------------------------------------------------------------------------
found contract on blockchain!
--------------------------------------------------------------------------------
starting chat command line...
>>
Now let's do the same in our second empty terminal, but with account address 2 as argument (the contract address remains the same):
cd
cd workshop_code/code
python user.py 0x86817fbb2715c45d70163ba9de0b7af9c90f6282 0xc590c4d665805458171411ac442b1c8b291f32f5
You see, the second parameter is different.
Output:
Using TensorFlow backend.
--------------------------------------------------------------------------------
client software: EthereumJS TestRPC/v3.0.3/ethereum-js
block: 1
address: 0x0d56bafa9c8181199e99956a3f67eb937a47ce80
--------------------------------------------------------------------------------
found contract on blockchain!
--------------------------------------------------------------------------------
starting chat command line...
>>
Take one of the two chat windows and let it listen for a certain tag. (I'll take tree_frog, since I know that my image will be classified as tree_frog, however, in normal use people will only be notified if a messages arrive that match their topic filter).
Using TensorFlow backend.
--------------------------------------------------------------------------------
client software: EthereumJS TestRPC/v3.0.3/ethereum-js
block: 1
address: 0x0d56bafa9c8181199e99956a3f67eb937a47ce80
--------------------------------------------------------------------------------
found contract on blockchain!
--------------------------------------------------------------------------------
starting chat command line...
>> help
commands: help, send, status, topics, search, listen
>> topics tree_frog hi hello #how_are_you
filter set for messages on topics: ['tree_frog', 'hi', 'hello', '#how_are_you']
>> listen
With the 'listen' command I have set the chat client into listening mode to receive messages (this could run in parallel in the background but it's just a demo).
Now, finally, take the other chat window, compose a new message and give it the image you have downloaded:
Using TensorFlow backend.
--------------------------------------------------------------------------------
client software: EthereumJS TestRPC/v3.0.3/ethereum-js
block: 1
address: 0x0d56bafa9c8181199e99956a3f67eb937a47ce80
--------------------------------------------------------------------------------
found contract on blockchain!
--------------------------------------------------------------------------------
starting chat command line...
>> send
--------------------------------------------------------------------------------
[composing new message]
message....: Hi, this is a test message and will be stored inside the Blockchain along with a frog.
image file.: image.jpg
custom tags: #I_like_green_animals
--------------------------------------------------------------------------------
sending...
precessing image...
label: tree_frog
done, transaction id: 0x39a707aab2f5993366ec762afe0f9a66c99f61d16ba4b03de31a057261260ffe
>>
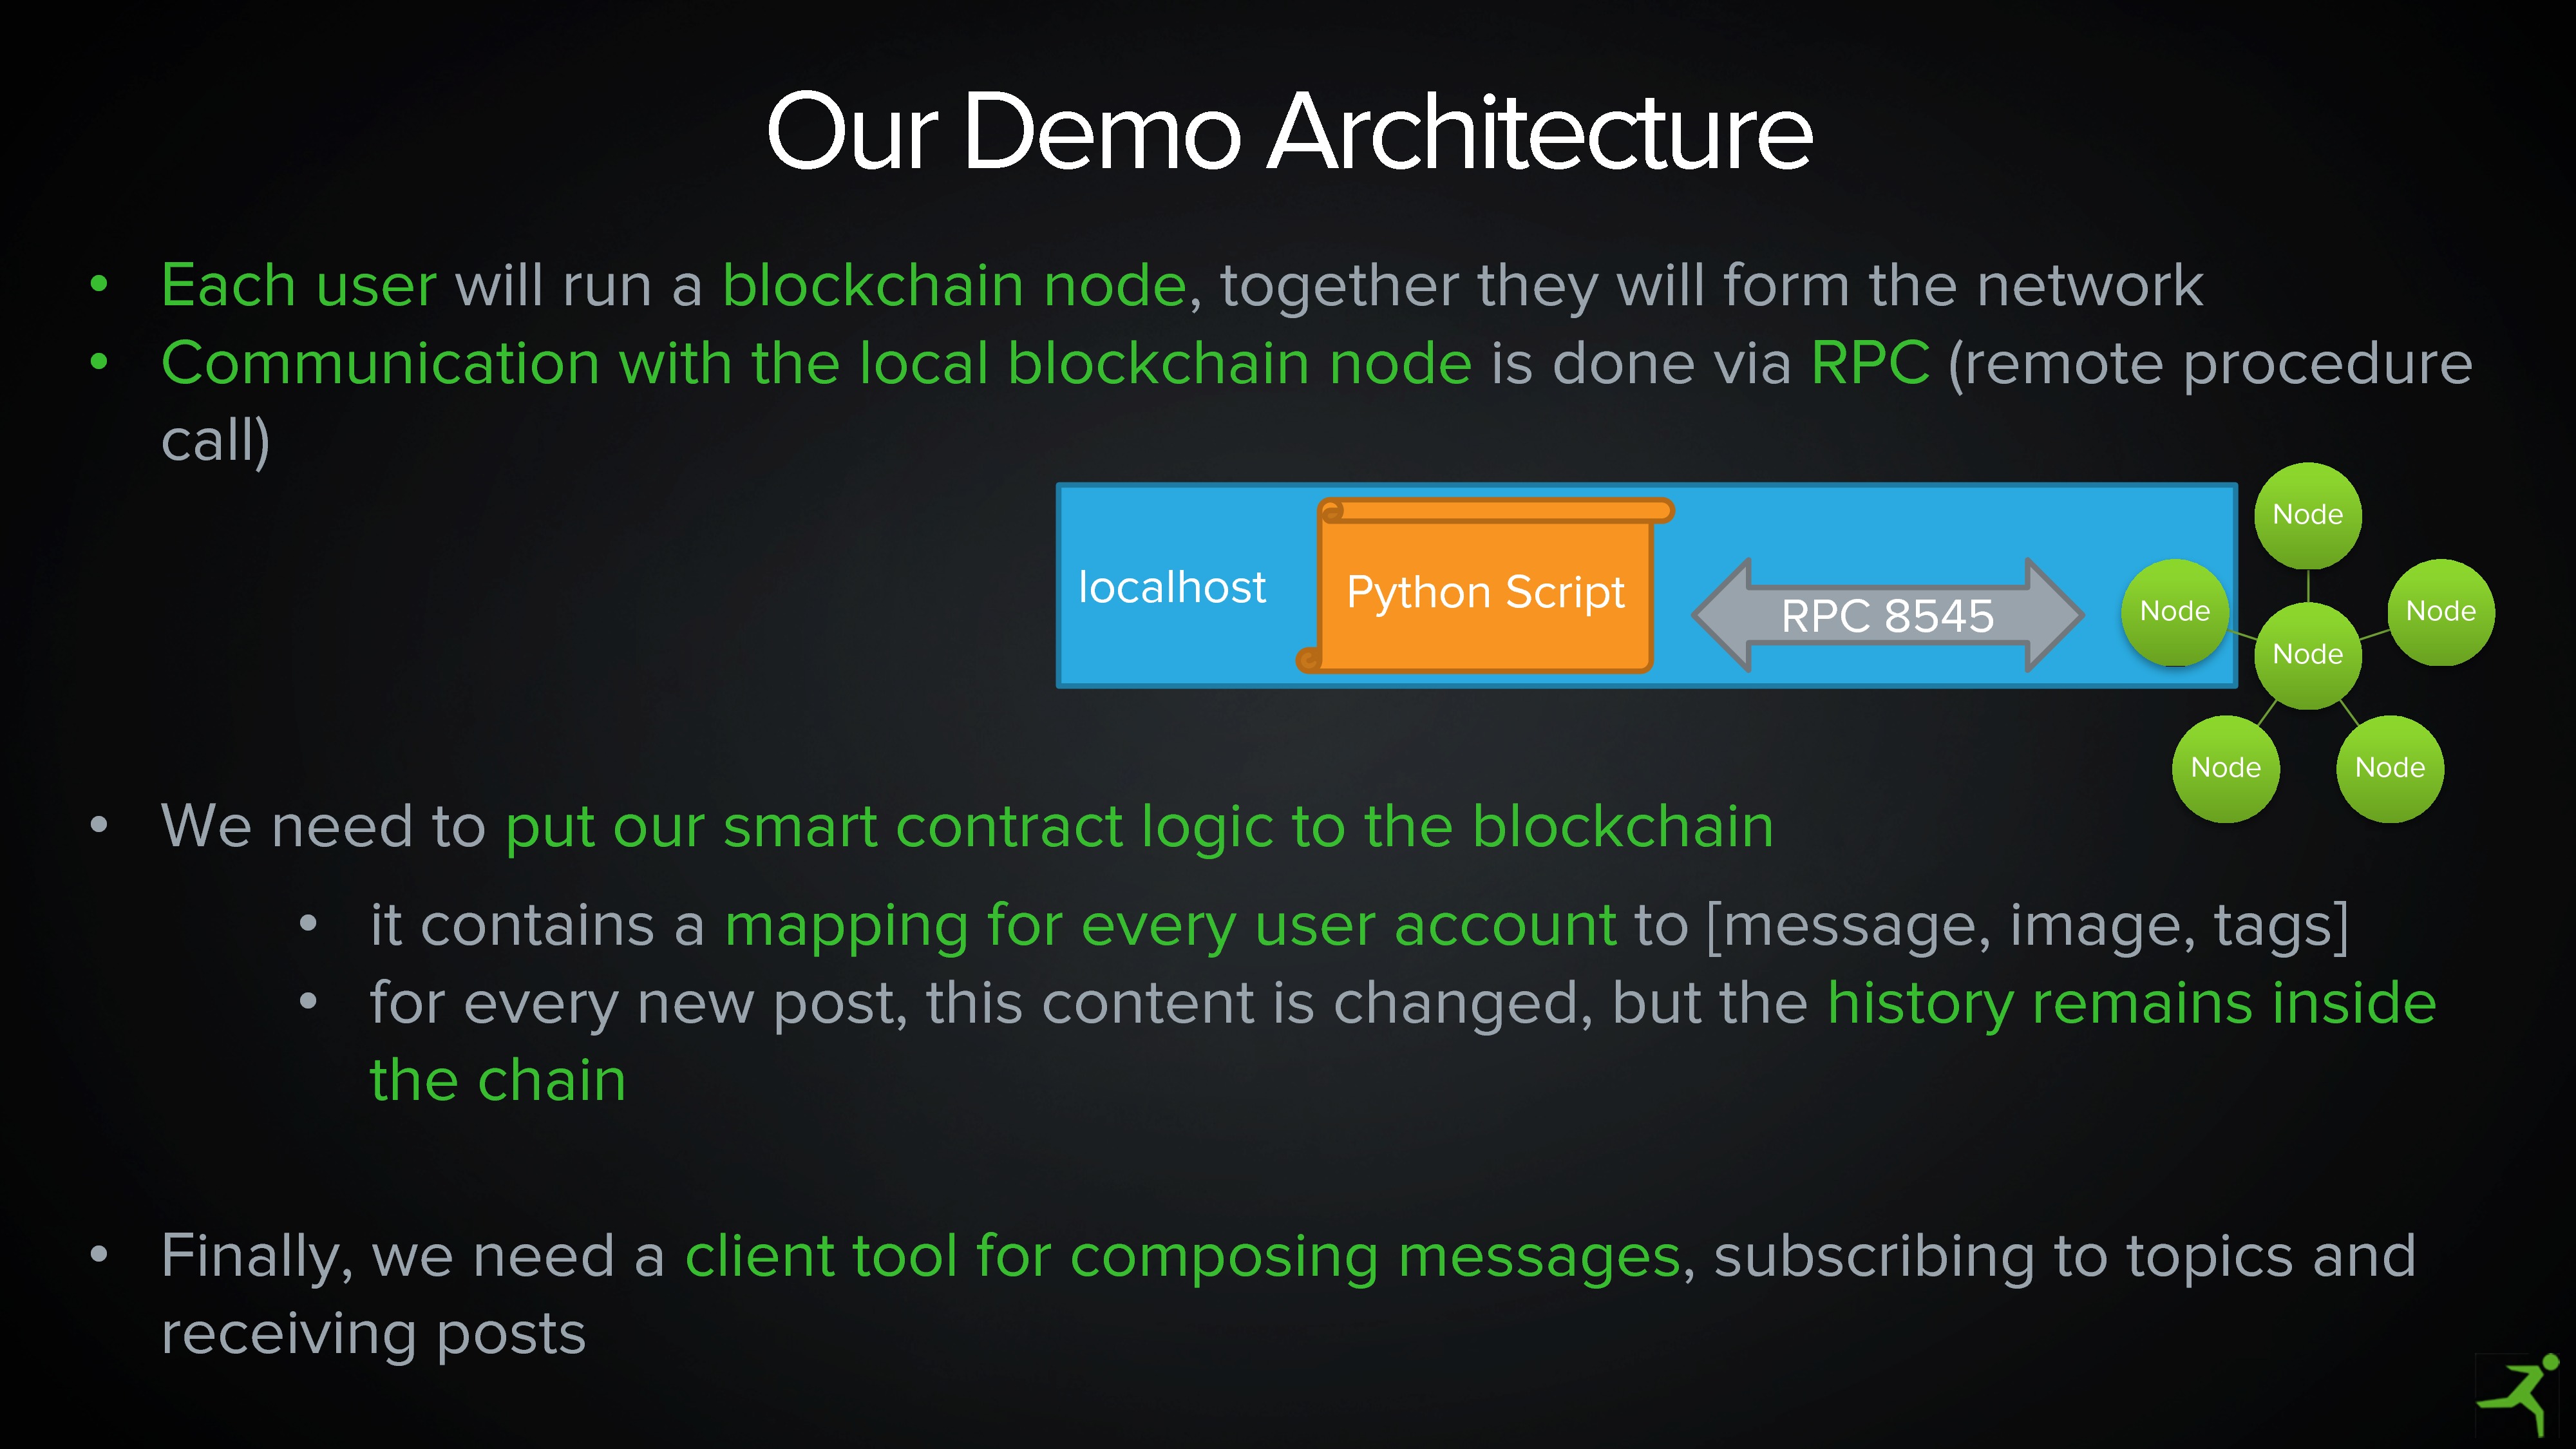
Now the magic happens inside the other chat window. Please note that the complete communication has taken place over the Blockchain, no other channels were used. Window 1 sends the message, image and tags to our smart contract inside the chain and window 2 listens for events and tags on the blockchain. If a new message with certain tags (which were automatically extracted from the image via machine learning) arrives, it will materialize message, image and tags from the chain:
Using TensorFlow backend.
--------------------------------------------------------------------------------
client software: EthereumJS TestRPC/v3.0.3/ethereum-js
block: 1
address: 0x0d56bafa9c8181199e99956a3f67eb937a47ce80
--------------------------------------------------------------------------------
found contract on blockchain!
--------------------------------------------------------------------------------
starting chat command line...
>> help
commands: help, send, status, topics, search, listen
>> topics tree_frog hi hello #how_are_you
filter set for messages on topics: ['tree_frog', 'hi', 'hello', '#how_are_you']
>> listen
new block detected (2)
--------------------------------------------------------------------------------
message from user 0x0d56bafa9c8181199e99956a3f67eb937a47ce80 (block 2):
  content: Hi, this is a test message and will be stored inside the Blockchain along with a frog.
  tags...: #I_like_green_animals #tree_frog
Also, the received image will be displayed:
That's it. An decentralized chat demo application using Blockchain and Machine Learning technology in a few lines of Python code and some cool properties:
-
users are anonymous (nickname is a hash)
-
as long as people support the network, it cannot be taken down or modified
-
it supports easy search for topics and messages (use the 'search' command within the chat console)
-
and finally, it shows how to combine ML and Blockchain in an easy way and provides the building-blocks for you to dive deeper into the matter
-
if you have questions, drop me an email
-
Btw: DataReply can build enterprise-ready Machine Learning and Blockchain solutions for you ;-)


