
==============
- End to End DevOps
End-to-End DevOps is a project that creates the automation processes from committing a code to a version control system to deploying it to the production environment. It includes creating infrastructure, environment and CI/CD pipelines.
- Application: Java Spring Boot Framework
- Source Control Management: Gitlab
- Build: Maven
- Continuous Integration: Jenkins
- Continuous Deployment: ArgoCD
- Repository: Nexus
- Test: SonarQube
- Configuration Management: Ansible
- Infrastructre Provisioning: Terraform
- Container Runtime: Docker
- Container Orchestration: Kubernetes
- Compute: Google Cloud Provider
- Application Server: WebSphere Liberty
- Database: MySQL
- Operating Systems: CentOS 8
- Change the source code of your application in your IDE locally.
- Commit the change to the Gitlab.
- Jenkins will be triggered by commit.
- Jenkins Continuous Integration Pipeline will be started.
- Source code will be cloned to Jenkins server.
- Source code will be built by Maven.
- Source code will be tested by SonarQube.
- Application will be containerized by Docker.
- New application Docker image version will be pushed to Nexus.
- Image section in rollout.yaml will be replaced with new image version.
- New rollout.yaml will be pushed to Gitlab.
- ArgoCD will acknowledge new rollout.yaml in Gitlab project.
- ArgoCD will deploy application to Kubernetes Cluster using Blue/Green method.
- New application pods will run on Kubernetes while old application pods continue to run via different service.
- Application will run on WebSphere Liberty in a pod and ready to serve clients.
First of all, we need to create infrastructure which includes servers, network and firewall rules. We will use Google Cloud Provider for this. You can get 300 $ free balance for 3 months. All you need is a new Google account. This is more than enough for this project. We will use Terraform to create servers, network and firewall rules. Since we need to create many servers and configure many things, Terraform script will simplify all these things. Let's start. First we need to create 2 different images on Gcp. On default, CentOS 8 images don't allow to ssh themselves with using root password. We can use ssh keys, but this will simplify things. Second image is for Ansible. We will install Ansible and take image of that. So after we execute Terraform script. Ansible will be ready to go for configuration management. We need to create a CentOS 8 image manually for one time. Go to Compute Engine --> Vm Instances --> Create Instances . Select CentOS 8 and ssh into created instance. Use these commands;
dnf updatesudo su root
cd
passwd rootChange to password of your will.
vi /etc/ssh/sshd_configChange “PermitRootLogin” to “yes” and “PasswordAuthentication” to “yes”, then save and close.
service sshd restartGo to Compute Engine --> Images --> Create Image . Select the current instance and save the image. Execute these commands for install Ansible.
dnf epel-releasednf ansibleAgain save the image. Now we need to install Terraform. You can download Windows version of Terraform in here. We will install Terraform on our local computer and connect to GCP. After you extract Terraform, don't forget to configure environment parameters. We also need a credentials.json file that Terraform use for connecting to Gcp. I advise you to create a new service account for Terraform on Gcp and from it get the necessary keys for json file. Then open main.tf file on the repository with your favored code editor. You need to replace the "your-ip" lines in the main.tf file with your ip. These firewall rules allow only us to access interfaces like Jenkins. Also be careful for image names. You can change the lines 'image = "centos8-noldor"' with your image names. To execute Terraform script use these;
terraform initterraform planterraform applyNow check on Gcp. Instances, network and firewall rules should be created. It should look like this;

Ssh into ansible-controller instance and type "sudo su" for change user to root. You should do this whenever you connect an instance. Upload IAC_role folder to the server. Don't forget to change server passwords in inventory.txt . In IAC_role folder, execute this command;
ansible-playbook main.yaml -i inventory.txtIt will take a while. Ansible will create baremetal 1 Master, 2 Slave Kubernetes cluster, Jenkins, Gitlab, Nexus and Sonarqube. All configurations will be done and ready to go.
You can access Gitlab with http://gitlab-external-ip . After you changed the password, you can sign in with root. Then, you should create a project that contains the application source code. To do this, after you create blank project in Gitlab, enter folder in your local computer which contains application and write these one by one in command window;
git init
git remote add origin your-repo-address
git add .
git commit -m "Initial commit"
git push -u origin master
You should be able to see your application code on Gitlab project that you created like this;
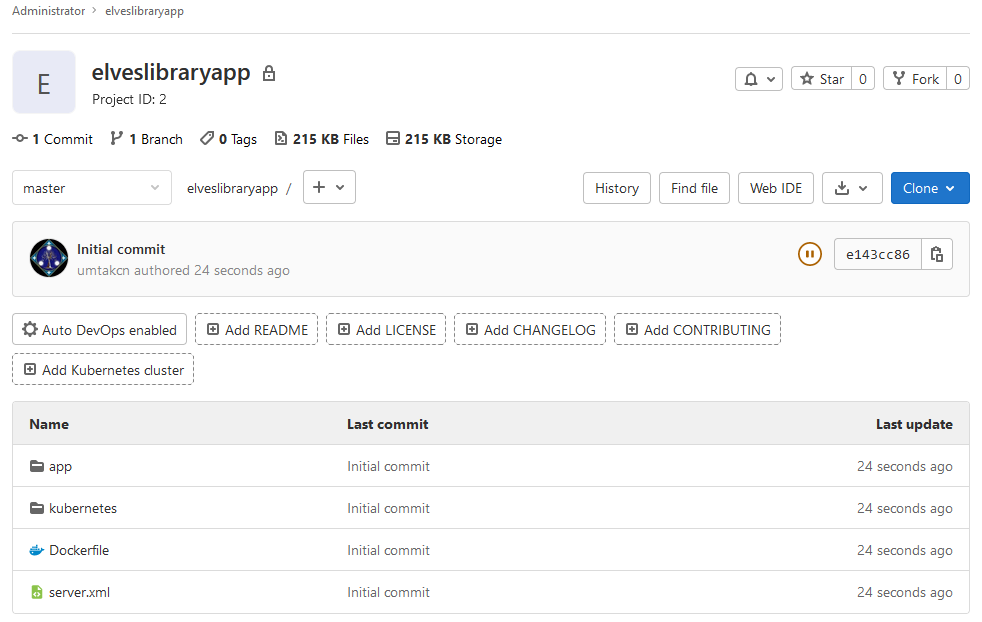
Also we need to create a webhook to integrate Gitlab with Jenkins. Go to project that you created --> Settings --> Webhooks . Write URL area http://jenkins-external-ip:8080/generic-webhook-trigger/invoke . Write Secret token elveslibraryapp . Tick Push Events and add webhook. Untick Enable SSL verification.
You can access Nexus with http://nexus-external-ip:8081 . After you login Nexus, click on settings symbol --> Repositories --> Create repository --> docker (hosted) . Configure like this;

You can access SonarQube with http://sonarqube-external-ip:9000 . Default username is admin, password is admin. After you login SonarQube, click on A, right top corner --> My Account --> Security --> Generate Tokens . Save this generated token. We will use it for Jenkins. Then, go to Administration --> Configuration --> Webhooks --> Create . Write URL area http://jenkins-external-ip:8080/sonarqube-webhook/ .
You can access Jenkins with http://jenkins-external-ip:8080 . After you login Jenkins interface, install suggested plugins. We need to configure a couple of things.
- Go to Manage Jenkins --> Manage Plugins --> Available . Install these plugins;
- Docker Pipeline
- Pipeline Utility Steps
- Sonarqube Scanner
- Generic Webhook Trigger
- We need to set credentials. Go to Manage Jenkins --> Manage Credentials --> Jenkins --> Global Credentials --> Add Credentials .
- Gitlab Username with password
- Nexus Username with password
- Sonarqube secret text
- Go to Manage Jenkins --> Configure System --> Sonarqube servers --> Add SonarQube . Configure like this;

- Go to Manage Jenkins --> Global Tool Configration --> Sonarqube Scanner --> Add Sonarqube Scanner . Configure like this;

- Go to New Item --> Pipeline . Tick Generic Webhook Trigger in Build Triggers section and configure like this;
changed_files
$.commits[*].['modified','added','removed'][*]
$changed_files
"app/[^"]+?"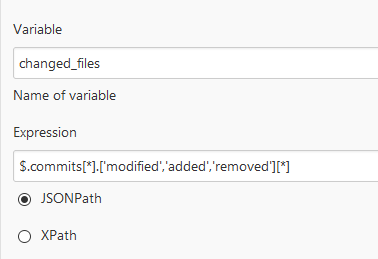


- Copy the script in repository named jenkinsfile and paste it to pipeline section. Don't forget to set environments in the script. Our Continuous Integration pipeline is ready to go.
Ssh into master instance. Execute this command for edit the argocd-server service;
kubectl edit svc argocd-server -n argocdReplace ClusterIP value with NodePort like this;

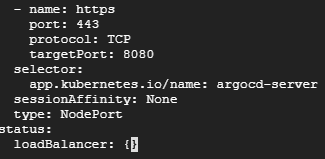
Execute this command to see NodePort value;
kubectl get services -n argocd
Also, we need to create a secret that contains nexus authentication informations. Use this command, replace your nexus password;
kubectl create secret docker-registry nexus --docker-server=35.222.88.107:8083 --docker-username=admin --docker-password=passwordYou can access with https://slave1-external-ip:nodeport . Get password by running this command;
kubectl -n argocd get secret argocd-initial-admin-secret -o jsonpath="{.data.password}" | base64 -dAfter you login ArgoCD, Go to Settings --> Repositories --> Connect Repo Using Https . Write there your Gitlab repo address and username, password. Click connect. Then Go to Application --> New App . Configure like this;


Our application is a simple Spring Boot Java web application. It is not a complex work since we don't need one. We focus devops processes of any application only. We have a main page and three definition which user can select. After it selected, application gets the related information of selected object from MySQL database.
Ssh into master instance. We need to insert table contents of MySQL database. Enter MySQL using this command;
kubectl run -it --rm --image=mysql:5.6 --restart=Never mysql-client -- mysql -h mysql -ppasswordAfter you enter MySQL, we need to create database and user for our application;
CREATE DATABASE elveslibraryapp;CREATE USER 'elveslibrary'@'%' IDENTIFIED BY 'password';GRANT ALL PRIVILEGES ON elveslibraryapp.* TO 'elveslibrary'@'%';USE elveslibraryapp;Make sure tables are created;
SHOW TABLES;Then use INSERT commands from data.sql file in repository. You should INSERT those contents one by one.
Our Jenkins pipeline should look like this after we trigger Build;

Our Nexus repository should look like this after we push the images;

Our SonarQube should look like this after we test the source code of application;

Our ArgoCD deployment should look like this after Jenkins pipeline passed successfully;

And finally our application should look like this;

