-
-
Notifications
You must be signed in to change notification settings - Fork 10
How to contribute via GitHub
Zacharias Steinmetz edited this page Mar 7, 2022
·
5 revisions
- For absolute beginners: https://youtu.be/8Dd7KRpKeaE
- For programmers new to git and GitHub but used to the command line: https://youtu.be/SWYqp7iY_Tc
- A GitHub account (https://github.com)
- A git client running on your local computer (git, GitHub desktop); RStudio has some basic git functionality but you may need to resort to the command line for the majority of operations.
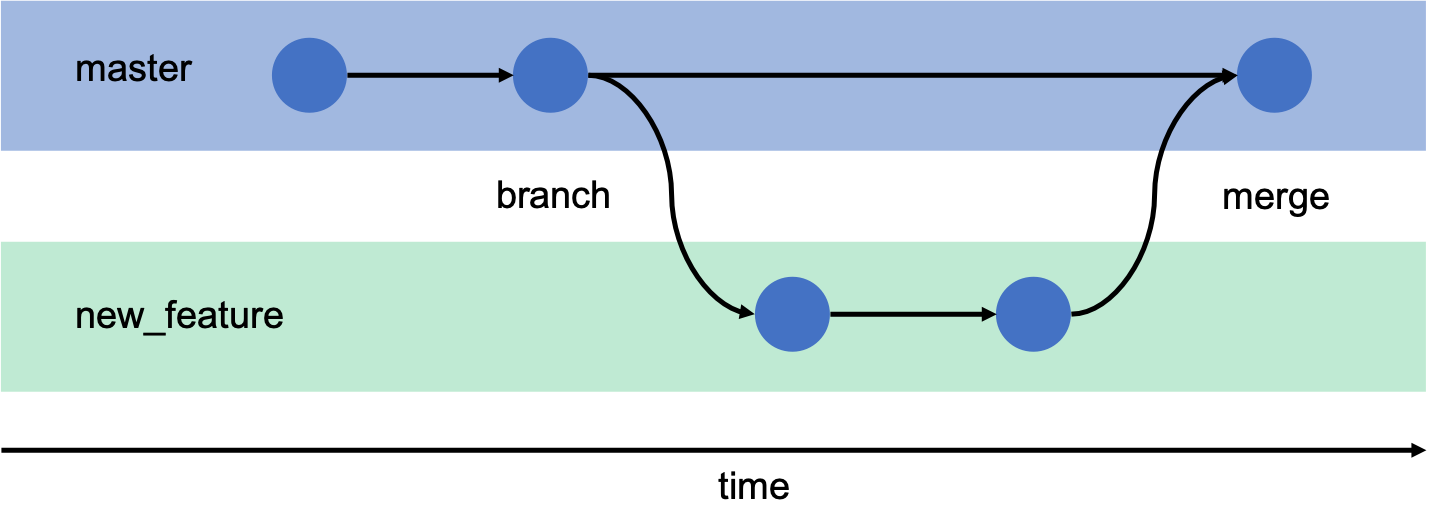
git is a distributed version control system; GitHub is an online platform for git.

(Source: Git & GitHub Tutorial for Scientists: It’s Not Only for Programmers)
| Term | Description |
|---|---|
| Commit | Save points (blue dots in the figure above) you can refer to our go back to at a later stage |
| Branch | Another working copy within a repository (shaded bands in the figure above) |
| Checkout | Switching between branches |
| Merge | Adding commits/changes from one branch to another branch |
| Push | Upload local changes (commits) to a remote repository, e.g. on GitHub |
| Pull | Download remote changes from a GitHub repository |
| Fork | Make a traceable and linked remote copy of another repository |
| Clone | Download a complete remote repository to your local disk |
| Pull request | Ask for changes made in your fork to be accepted in the original repository |
- Fork a GitHub repository: navigate to a repository on GitHub and click the Fork button on the top right.
- Clone the repository locally:
git clone https://github.com/<your username>/OpenSpecy-package.git. - Link the local clone to the original remote repository; this is typically called "upstream" repository:
git remote add upstream https://github.com/wincowgerDEV/OpenSpecy-package.git. - Create a new branch (here called "new_feature", this should be a descriptive name):
git checkout -b new_feature.
Note: creating branches does not require the command line but may be easily done from the RStudio "git" tab. - Make the desired changes to the local repository on this branch and commit those changes:
git commit -m "This is an awesome new feature".
Note: commiting can be easily done from the RStudio "git" tab. - Update your local repository with new changes from the upstream repository to avoid merge conflicts later on.
- Go back to the main branch of your local repository:
git checkout main. - Pull updates from the upstream repository:
git pull upstream main. - Sync your feature branch with the updated main branch:
git checkout new_featureandgit merge main. - Push changes to your remote repository:
git push origin new_feature.
Note: checking out branches, pulling, and pushing changes can be easily done from the RStudio "git" tab.
- Go back to the main branch of your local repository:
- Open a pull request on GitHub merging your changes with the upstream (original) repository.
- As long as the pull request is open, new pushes to your feature branch will be automatically added to the pull request. Once the pull request is accepted, you’ll want to pull those changes into your origin (forked repository).
- Change to main:
git checkout main, - And pull:
git pull upstream main.
- Change to main:
- Delete your feature branch using the GitHub website or
- Delete the local branch:
git branch -d new_feature, - And delete the remote:
git push origin --delete new_feature.
- Delete the local branch:
See https://www.tomasbeuzen.com/post/git-fork-branch-pull for all the details.
A test repository is live at https://github.com/wincowgerDEV/sandbox to try out the workflow above without breaking anything.
- Use the fork-branch-pull workflow described above
- @mention people in issues and pull requests
- Don't make forks private
- Ask for help