-
Notifications
You must be signed in to change notification settings - Fork 34
Automate Data Upload
IBM Food Trust™ APIs are provided for your Data Integration Experts to automate data uploads for your Organization. IBM Food Trust APIs are simple REST APIs, so the automated process is similar to manually uploading data. To automate, a registered IBM Food Trust System User for your Organization will simply authenticate and upload conforming XML data.
Attention: To comply with EU General Data Protection Regulation (GDPR) data privacy requirements, you must ensure that no personal data is uploaded to IBM Food Trust in any free-form text fields or in any comments.
IBM Food Trust runs on IBM Cloud, so the Service ID that you create for your System User must first be configured for both environments. First, the Service ID must authenticate to IBM Cloud using the API Key (password) and request a Cloud IAM Token. Using the Cloud IAM Token, the System User must then authenticate the Service ID to IBM Food Trust and request an IBM Food Trust Service Token. This service token is then used by the System User to authenticate API calls, until the token expires (after one hour).
Complete the following steps to prepare for automating your IBM Food Trust data uploads:
- Obtain the Product and Facility Identifiers (GS1 or IBM Food Trust) that your Supply Chain Experts have mapped.
- Verify that the Product and Facility Identifiers have been registered with IBM Food Trust.
- Identify your critical supply chain events and translate them into their corresponding EPCIS events.
- Prepare templates for the EPCIS events, in either XML or Spreadsheet format (Microsoft® Excel™). To facilitate automated workloads for a variety of environments, process flexibility is provided. For example, you could build templates for each EPCIS event for a product, for groups of similar products, or based on the event type.
- Determine which of the optional fields to use for EPCIS events, if any.
- Decide how to capture the data for your EPCIS templates. Any data not available from your current environment will need to be generated. For example, EPCIS events require a Universally Unique Identifier (UUID), which in most cases requires new code.
To automate your EPCIS Event uploads to IBM Food Trust, apply the following methodology. Your automation code must:
- Generate or collect the required EPCIS Event data.
- Create and complete the EPCIS Event XML file.
- Upload the XML file using the Connector API.
- Handle errors resulting from the REST API calls.
To facilitate error handling, your automation code should also:
- Error check the HTTP request and response. The HTTP request could fail if there are network connection issues between the HTTP client and IBM Food Trust. The HTTP response from IBM Food Trust could contain an error code if there are problems with the request, such as a 401 authorization error or a 400 invalid XML format error. Your automation code should include specific error handling, such as printing error messages to application logs and retrying the request.
- Save a) the assetIdUri from the JSON returned by the Connector API POST request, b) the UUID of the event loaded, and c) details of the event for future reference or debugging.
Apply the following rules when automating your EPCIS Event uploads to IBM Food Trust:
- Event IDs must be unique to be viewed in the IBM Food Trust UI, so using UUIDs is highly recommended.
- Any duplicate Event IDs are replaced in the UI by the most recent upload, but are not overwritten on blockchain.
- An erroneous event upload cannot be removed from blockchain, but it can be removed from the IBM Food Trust UI by uploading a new event with the identical Event ID.
- Events cannot be combined into a single event. For example, a commission event is required when a product instance is created, and an aggregation event is required when the product is packed and shipped.
- For any specific supply chain product scenario, the order in which the events are uploaded has no effect on the sequential ordering of the supply chain events. Only the event timestamps in the XML uploads determine the sequential ordering of supply chain events.
As described in the Automation Procedure below (which includes direct links), you will complete the following steps to configure a System User for automated data uploads:
- Configure an IBM Food Trust System User.
- Create an IBM Cloud Service ID and API Key (password).
- For the IBM Cloud Service ID, create a System ID in the IBM Food Trust UI.
- Use the Service ID API Key to generate an IBM Cloud Identity and Access Management (Cloud IAM) Service Token.
- Use the Cloud IAM token to generate an IBM Food Trust Service Token.
- To authorize the client to send XML data to IBM Food Trust, specify the IBM Food Trust Service Token in the Authorization Header of each API call.
- Regenerate IBM Food Trust Service Tokens as needed; they expire after one hour.
Complete each step below to configure your System Users for automated data upload to IBM Food Trust:
a. Create an IBM Cloud account if you do not already have one.
b. Sign in to IBM Cloud Service IDs with your IBMid.
c. Click the Create button:
Figure 1. Service IDs tab

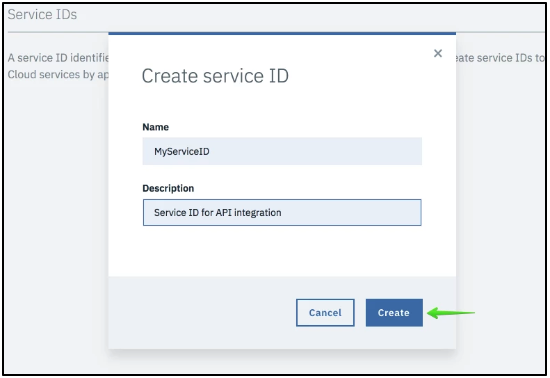
Enter a Name and a Description, and click the Create button.
Figure 2. Create Service ID

d. Copy and Save the "ServiceId" value at the top of the screen (for example, ServiceId-4807b3fb-11d9-4304-b3da-8205a77d6f8a). This value is required to register the Service ID with IBM Food Trust.
Figure 3. API keys tab

e. Click the API keys tab and then click the Create button.
f. Enter a name and description and click the Create button.
g. Click the Download button and save the value of the API key to a secure location. The API key is the password for the Service ID. If the API Key is lost it cannot be regenerated, which would require creating a new Service ID.
Figure 4. Copy and Save or Download the API Key

Once the API Key is securely saved and readable, close the window.
The next step is to define the IBM Cloud Service ID as an IBM Food Trust System ID:
a. From the IBM Food Trust UI menu, select the Users module.
b. Select the SYSTEM IDS tab and click the Create button.
c. Record your Organization ID, which is required for future token generation steps.
Figure 5 System ID Tab

d. Enter the IBM Cloud Service ID as the IBM Food Trust System ID and click the Add System ID button.
Figure 6. IBM Cloud Service ID entered as IBM Food Trust System ID
e. Press the Close button. The System ID will be created.
Attention: The examples below use an HTTP client for illustration purposes. For automation, simply integrate these HTTP requests into your user application code.
Use the System ID API Key from the previous step to generate an IBM Cloud Identity and Access Management (Cloud IAM) Token:
Use the following HTTP request for the IBM Cloud IAM Service Token format:
POST https://iam.cloud.ibm.com/identity/token
Header: Content-Type: application/x-www-form-urlencoded
Body: grant_type=urn:ibm:params:oauth:grant-type:apikey&apikey=YOUR_API_KEY
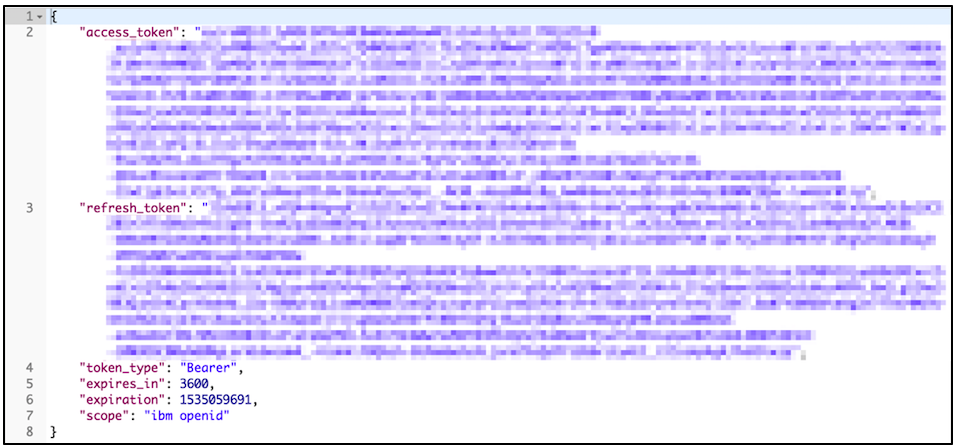
A successful response is an HTTP 200 message that includes the IBM Cloud IAM Service Token. You will send this token to IBM Food Trust in exchange for an IBM Food Trust Service Token.
Figure 7. Response with IBM Cloud IAM service token

Use the Cloud IAM Token to generate an IBM Food Trust Service Token. To request an IBM Food Trust Service Token, use the following HTTP format:
POST
https://food.ibm.com/ift/api/identity-proxy/exchange_token/v1/organization/{Org_Id}
Header: Content-Type: application/json
Body: The entire JSON response from the Cloud IAM token in step 2
Figure 8. IBM Cloud IAM token generation (a)
Figure 9. IBM Cloud IAM token generation (b)

A successful response is an HTTP 200 message that includes the IBM Food Trust service token. Attention: Only the onboarding_token value is used in subsequent requests, not the entire returned JSON string.
Figure 10. Response with onboarding token

To authorize the client to upload XML data to IBM Food Trust, specify the IBM Food Trust service token in the Authorization Header of each API call.
From the generated IBM Food Trust service token, specify only the onboarding_token value (no double quotes) in the Authorization Header. This Bearer Token authorization requires the Authorization Header format of 'Bearer onboarding_token_value'.
The following example API call demonstrates the required Authorization Header format:
POST https://food.ibm.com/ift/api/connector/fs/connector/v1/assets
Header: Content-Type: application/xml
Header: Authorization: Bearer ONBOARDING_TOKEN_VALUE
Body: IBM Food Trust conforming XML
Figure 11. Specify Service Token in Authorization Header (a)
A successful response is an HTTP 201 message that includes the asset ID.
Figure 12. Specify service token in Authorization Header (b)

Generate new IBM Food Trust Service Tokens as needed; they expire after 3 hours. If an expired service token is specified with an API call, an HTTP 401 (Unauthorized) message is returned. New tokens can be generated at any time; the System User does not have to wait until the current token has expired. To maximize the active duration, the current token can be cached and reused.
The following simple approaches can be used to generate a new Service Token to replace an expired or expiring token:
- Request a new a token after getting a 401 for the current token. The application must also retry the failed request(s).
- To avoid authorization failures, set a timer for fewer than 3 hours when generating a Service Token. When the timer elapses, the application can generate a new Service Token.
WELCOME!
Modules
Membership
Languages
Browsers
ONBOARDING
Onboarding Steps
Data Requirements
Data Types
Supplier Data
Payload Data
Insights Data
HOW-TO
Join by Invitation
Log in as New User
Authenticate Human Users
Authenticate System Users
Java Sample
Typescript Sample
IIB Sample
Assign User Roles
Upload Data
Automate Data Upload
Convert Spreadsheets
Convert Data
Whitelist Custom URLs
APIs-Swagger
Connector API
Documents API
Converter API
Trace API
Insights API
APIs-Usage
APIs
Insights API
Insights API Usage
Trace API
Connector API Errors
API Error Codes
REFERENCE
GS1
GS1 Identifier Reuse
Authentication
Identifiers
Message Codes
Cryptographic
Signatures
Signature Header
Access Control
Firewall Settings
XML to JSON
EPCIS Aggregation Add
EPCIS Aggregation Delete
EPCIS Object Add
EPCIS Object Delete
EPCIS Object Observed
EPCIS Transformation
Purchase Order
Despatch Advice
Receiving Advice
Master Data Item
Master Data Facility
Standard Business
Document Header