BPD classroom
Almost everything in here is courtesy of LightChaosMan so go say thanks, that said don't annoy him about this stuff since its complicated.
- Table of contents
Welcome to the BPD-classroom. Here we will be explaining how BPDs (Behavior Provider Definition) work, and how you can change them, without crashing your game, as well as the parts that are currently unknown.
There are a couple of tools which may come in useful as you start diving into BPDs.
- BLCMM is the main tool which you should already be quite familiar with. Its Object Explorer will be invaluable in taking a look at BPDs and navigating around to find out how things work. (And, of course, you'll be using it to make whatever changes you want to make.)
- FT/BLCMM Explorer is a tree-based view into the same data available in BLCMM's Object Explorer, and is sometimes useful as a higher-level overview. BLCMM's OE should still be your first stop for data, but it may be useful to have this as well (it's useful for getting a nice visual list of all the Behaviors inside a BPD, for instance)
- BPD/Kismet Grapher (sourcecode) is an online tool to generate nice visual graphs of BPDs (and Kismet sequences, though we won't be talking about those here). These graphs are just about invaluable to get a feel for how a BPD actually flows, without having to do a ton of legwork yourself.
Additionally, some older tools are still available:
- Adudney's Behavior Tool can also be used to get a feel for the structure of BPDs, though it's been largely superceded by the BPD/Kismet Grapher.
BPDs govern most interesting stuff in the game.
NPC's transfering during quests, the Butcher ammo gimmick, intersting skills like blood soaked shields, all action skills, amp shields, enemies spawning attached to each other and 100s of more things probably.
What does a BPD do?
- Well, it's all in the name, it provides behavior to whatever it is it is attached to.
Some things that have just a single behavior, like splash damage, can use the
Behavior_xxxxxdirectly.
If you need more than one Behavior to accomplish your goal, a BPD comes into play.
A BPD will combine multiple Behaviors into a single neat package, that works on it's own. It can be thought of as a different level of code inside the Borderlands code.
This is because you can make the separate Behaviors in a BPD affect one another.
For example, with amp shields, the BPD more or less translates to
If current shield == max shield then damage shield and play sound effect
All 3 code blocks above are separate Behaviors, and the latter two will only be executed if they get the okay sign from the first.
Like this, you can create complicated if-then-else things, with random chance, delay and whatnot in between, hence my comparison to a different level of code.
If you want an example of a full blown web of behaviors, have a look at the BPD of an action skill.
Alright, so we know it does cool stuff, but what does it actually look like?
we'll be using one main BPD during this tutorial, which is the one chaos used to teach myself how they work, the BPD for amp shields. GD_Shields.Skills.Impact_Shield_Skill:BehaviorProviderDefinition_0
Using a certain awesome tool, you can make it look somewhat organized, as shown here 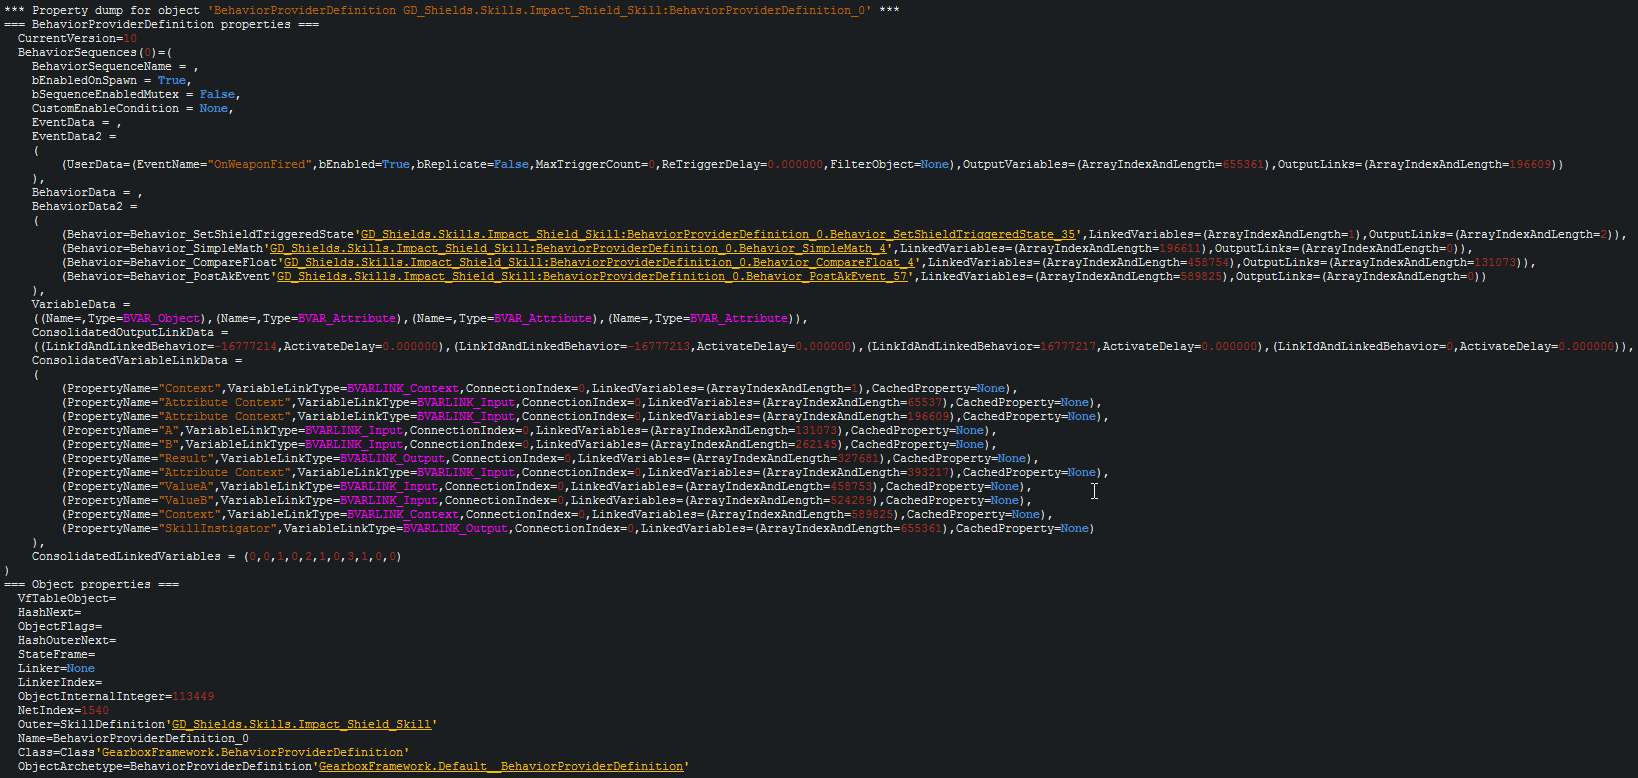
Like in the example above, all BPDs contain an array BehaviorSequence. This array will usually only contain a single entry, which is the actual BehaviorSequence we're interested in.
When referring to a BPD in the rest of class, we will be referring to whatever is inside this BehaviorSequence.
Each BehaviorSequence contains a couple of fields of its own. The parts that are interesting to us are EventData2, BehaviorData2, ConsolidatedOutputLinkData, ConsolidatedVariableLinkData and ConsolidatedLinkedVariables.
As the name implies, a BehaviorSequence, is actually a sequence of behaviors. That is, it is a load of behaviors linked together, in some way.
The actual behaviors that are being linked are the ones listed in BehaviorData2.
How they are linked, is not clear at all, at least not at first glance. You'll notice throughout the entire BPD, there's all these wierd looking numbers, that seem completely random.
Well, they're not random. These numbers are actually the things that connect everything together, in a 'connect the dots' kind of fashion.
Alright, let's start with the cornerstone of BPDs, the magic that's used to connect everything: what do all those weird looking numbers mean?
These numbers, are actually two numbers merged together, for efficiency and stuff.
This is implied by the names of the fields that precede these weird numbers, like LinkIdAndLinkedBehavior or ArrayIndexAndLength.
Okay, so how are there two numbers in there?
The answer is binary numbers.
Borderlands uses 32 bit integers for most things in the game, and these weird numbers are integers.
So how do you put 2 numbers into a single 32 bit number?
Well, you give each number 16 bits, and then just push them together.
So, lets look at a specific example, the first weird number in the BPD, in the eventdata of our example: OutputLinks=(ArrayIndexAndLength=196609).
If we convert 196609 to binary we find 110000000000000001.
Since this is just two 16 bit numbers pushed together, we can split them by taking the rightmost 16 bits and whatever is leftover (since leading zer0's aren't shown).
This would turn 11 0000000000000001 into 11 and 1, which are both binary numbers, representing 3 and 1 in base 10.
Combining this with the name ArrayIndexAndLength, it makes sense that it means that the number represents an array index of 3, and a length of 1, for whatever that may be used.
Now that we know how to read the weird numbers, lets see how a BPD uses them to 'connect the dots'.
Every sequence needs a start, so let's start there, how do we find the first behavior in the sequence?
Naturally, the behavior in question is somewhere in BehaviorData2. The first weird number that we need is the OutputLinks of the event that triggers this sequence, which happens to be the number that we analyzed above.
We know that this number, 196609, actually means 3 and 1.
You might think: "alright, so the first behavior is the one at index 3 of BehaviorData2", but, you'd be wrong.
All pointers towards behaviors are actually rerouted trough ConsolidatedOutputLinkData.
This means, the thing we just found is whatever the things are at index 3 through 3 (length 1) of ConsolidatedOutputLinkData, which is the single element LinkIdAndLinkedBehavior=0,ActivateDelay=0.000000.
Now, this being a great example, LinkIdAndLinkedBehavior=0 is actually one of those compound numbers, except this time it represents a LinkId of 0 and a linkedBehavior of 0, which combines to a total number of 0.
For now, ignore LinkId, the thing we we are interested in the second number, the LinkedBehavior, which happens to also be 0.
This means that the first behavior in this sequence is the behavior at index 0 of the BehaviorData2 array.
This happens to be
(
    Behavior =
Behavior_SetShieldTriggeredState'GD_Shields.Skills.Impact_Shield_Skill:BehaviorProviderDefinition_0.Behavior_SetShieldTriggeredState_35',
    LinkedVariables =
    (ArrayIndexAndLength=1),
    OutputLinks =
    (ArrayIndexAndLength=2)
)
We now know the starting point of our sequence. All that's left is to figure out how the rest of the behaviors are linked together.
Luckily, if you were able to follow along this far, that part is relatively easy. Each entry in the BehaviorData2 array, contains a field OutputLinks.
This field tells us which behaviors follow this one. Again, this is one of these compound numbers, and since it is used to eventually point us to other behaviors, it will first point us to ConsolidatedOutputLinkData, just like with the initial link.
In this case, our compound number is 2, which translates to an ArrayIndex of 0 and a Length of 2, after doing the binary conversion.
This means we look at the two entries (length 2) starting at index 0, so concretely, we look at the elements at index 0 and index 1.
These are the following two elements: LinkIdAndLinkedBehavior=-16777214,ActivateDelay=0.000000 and LinkIdAndLinkedBehavior=-16777213,ActivateDelay=0.000000.
Starting with -16777214, which translates to 1111111100000000 0000000000000010, which translates to -256 and 2. Similarly, -16777213 translates to -256 and 3.
This would be the moment to tell that we're using so called 2's complement to convert from and to binary notation, which is what enables negative numbers.
To convert them yourself, you can use something like this.
Whenever converting to binary, always use 32 bit options, since that's what BL2 uses to generate these numbers in the first place.
When converting back, leave in the leading zer0s, they are important for 2's complement.
As before, we disregard the (negative) linkIDs, and look at just the LinkedBehaviors, for which we have found the indices 2 and 3.
So, the two behaviors following the initial behavior are those stored at index 2 and 3 of BehaviorData2, or the third and fourth element, since in computer science, we count starting from 0.
These are the Behavior_CompareFloat and Behavior_PostAkEvent behaviors. Following the same procedure, we find that the Behavior_PostAkEvent isn't followed by anything, and Behavior_CompareFloat is followed by the Behavior_SimpleMath, trough the third element of ConsolidatedOutputLinkData.
So, we now know how the behaviors are linked together, but how do the behaviors know what to do?
Some behaviors work fine as a standalone behavior, like Behavior_Explode. Others, like Behavior_SimpleMath require some sort of input/output to work their magic.
For the amp shield example we're using, shield stats are of particular interest. Such data is conveyed trough variables, or properties if you will.
Each entry in the BehaviorData2 array has a field LinkedVariables. Using the same compound numbers as before, this points towards sub-arrays of ConsolidatedVariableLinkData.
So, for example, Behavior_SimpleMath_4 has a field LinkedVariables equal to ArrayIndexAndLength=196611, which translates to an Array index of 3 and a length of 3.
So, that means that Behavior_SimpleMath_4 uses the entries 3, 4 and 5 of ConsolidatedVariableLinkData, or
(PropertyName="A",VariableLinkType=BVARLINK_Input,ConnectionIndex=0,LinkedVariables=(ArrayIndexAndLength=131073),CachedProperty=None),
(PropertyName="B",VariableLinkType=BVARLINK_Input,ConnectionIndex=0,LinkedVariables=(ArrayIndexAndLength=262145),CachedProperty=None),
(PropertyName="Result",VariableLinkType=BVARLINK_Output,ConnectionIndex=0,LinkedVariables=(ArrayIndexAndLength=327681),CachedProperty=None)
Like earlier with behaviors, this is just an intermediate step.
From here we follow the next LinkedVariables field, which is another ArrayIndexAndLength.
As far as we've yet to find an exception, the Length part of the numbers stored in these particular LinkedVariables is always equal to 1, since it points to a single entry in the ConsolidatedLinkedVariables array.
Let's take the first entry from above as an example, which has LinkedVariables=(ArrayIndexAndLength=131073), which translates to index 2 and length 1.
Similarly, the numbers corresponding with B are index 4 and length 1, and result maps to index 5 and length 1.
From these 3 indices (2,4 and 5) (and yes, they are actually just indices, since they are all of length 1), we go to ConsolidatedLinkedVariables, which is equal to (0,0,1,0,2,1,0,3,1,0,0) for our BPD.
Indices 2, 4 and 5 point towards the numbers 1, 2 and 1 respectively. This makes sense, as that behavior is the thing that actually causes amp drain, so 1 corresponds to current shield value, and 2 corresponds to the amp drain of the shield.
It the performs 1-2, and writes it to its BVARLINK_Output variable Result, which happens to be the same variable as A, or the current shield value.
Finally, these numbers in ConsolidatedLinkedVariables are actually another layer of indices. This time, they point towards VariableData of the BPD.
Concretely, this means that the first (Name=,Type=BVAR_Attribute) you see in there is the current shield value, the second one is the amp drain, and, as you would discover trough more digging, the third is the max shield value.
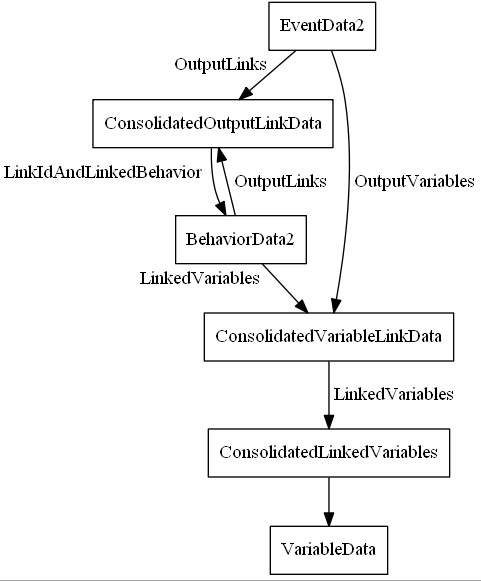
This was a humongous wall of text, but that is how the dots of a BPD are connected. Once you understand what's going on, this image should help you to keep the things organized:
So, you've managed to get this far without being intimidated by a wall of text? Good on ya! grab a beer or something to celebrate.
Once you understand it till here, it will only get easier.
Next on the agenda is actually modifying a BPD.
Unlike most things in this game, behaviors and BPDs are NOT static. That is, changes you make to them can be overwritten, seemingly at random sometimes.
Remember those Behavior_Delay things that you tried to change once with no luck?
That is because Behavior_Delay uses input variables, and each time the BPD is executed, the value inside the Behavior_Delay is overwritten with this new input.
BPDs are also subject to change mid-game (in particular, the CachedProperty of the ConsolidatedVariableLinkData), all changes we make to a BPD must be done trough hotfix, where we navigate the various arrays and fields to the exact thing we want to change, for each change we make.
So, having said that, what can we change?
There are multiple ways we can change things. We'll start with variable swapping.
So, for instance, to make amp shields drain 100% of shield on each amp shot, we could replace the variable that is now using the amp drain variable, by the one that uses the current shield value.
The new shield value will then always evaulate to current shield - current shield = 0.
From above, we know that the second operand of the Behavior_SimpleMath uses the variable at index 4 of ConsolidatedLinkedVariables, and we know that the first operand is current shield, which is variable 1.
To realize completely draining amps we would wanna make something like
set GD_Shields.Skills.Impact_Shield_Skill:BehaviorProviderDefinition_0 BehaviorSequences[0].ConsolidatedLinkedVariables[4] 1
Similarly, one can plug in different variables into other behaviors, like in the Behavior_CompareFloat.
If Behavior_CompareFloat does not return true (it checks if current shield == max shield), the behavior sequence is halted.
So, if you plug in two of the same variables into the Behavior_CompareFloat, it will always return true, and hence, the BPD will continue execution no matter the current shield value.
Notice that, to make continously draining amp shields, more needs to be done outside of the BPD, which we won't go over here.
Next we'll go over modifying Behavior delays. There are two ways we can go about this.
- The most commonly found way that the game makes a BPD wait is with a
Behavior_Delay.
A Behavior_Delay takes an input variable, which we can change to another variable in the BPD.
- Another way is by modifying
ConsolidatedOutputLinkData. Each entry of this array has two fields:LinkIdAndLinkedBehavior, which points towards abehavior, andActivateDelay, which is a number of seconds the BPD waits before executing the linked behavior.- Since this number must be positive, all we can do is make behaviors execute later.
One could use this to make amp shields drain 1 second after firing, allowing you to get off multiple amp shots, and probably getting multiple drains afterwards, which would look like this
set GD_Shields.Skills.Impact_Shield_Skill:BehaviorProviderDefinition_0 BehaviorSequences[0].ConsolidatedOutputLinkData[3].ActivateDelay 1
This method alone can't be used to remove delays completely, unless there is some variable in the BPD that seems to always be equal to 0.
- For instance, the Landscaper only has fixed variables at 0.2 seconds, so you can make the pellets explode quickly, but not instantly with this method.
Next on the agenda is actually rewiring a BPD, removing and adding of behaviors.
We'll start with removing a behavior. Say you have a Behavior_CompareXXX or Behavior_Delay, Behavior_RandomBranch or whatever else is getting in the way of executing your BPD all the way trough.
You'll wanna remove that behavior.
The way we remove the behavior, is not by actually removing the behavior from BehaviorData2, but by redirecting every behavior that links towards this blocking behavior towards the behavior the blocking behavior points to.
For this example, we'll cut out the Behavior_CompareFloat from the sequence, which will effectively achieve the same result as we got by remapping the variables.
First off, we need to know what points to the Behavior_CompareFloat.
As we discovered above, Behavior_CompareFloat is one of the two behaviors following the Behavior_SetShieldTriggeredState, where Behavior_PostAkEvent is the other behavior following Behavior_SetShieldTriggeredState. The goal now becomes to make Behavior_SetShieldTriggeredState point directly to Behavior_PostAkEvent and Behavior_SimpleMath, which is the single behavior following Behavior_CompareFloat.
From above we know that the OutputLinks of the Behavior_SetShieldTriggeredState points towards the two (LinkIdAndLinkedBehavior=-16777214,ActivateDelay=0.000000) and (LinkIdAndLinkedBehavior=-16777213,ActivateDelay=0.000000) entries in ConsolidatedOutputLinkData, which in turn mean linkID -256 with LinkedBehaviors 2 and 3.
We want the linkedBehaviors to now be 1 and 3, since 1 is Behavior_SimpleMath, and 2 is Behavior_CompareFloat.
Converting a linkID of -256 and a LinkedBehavior to a single number yields -16777215.
The final code for this rewiring thus becomes
set GD_Shields.Skills.Impact_Shield_Skill:BehaviorProviderDefinition_0 BehaviorSequences[0].ConsolidatedOutputLinkData[0].LinkIdAndLinkedBehavior -16777215
The procedure for adding behaviors is similar, but, we have far less experience with that, and from what we know from @FromDarkHell and @the_Nocturni, it's much more .... volatile, from the attempts they had with it.
To add a new behavior to the BPD, the first step is to add it to the BehaviorData2 array. This is again done trough hotfix, but you'll need to copy-paste the entire old array, and append the new behaviors to it.
When adding a new behavior, the cleanest way to do it is to leave LinkedVariables and OutputLinks both being equal to (ArrayIndexAndLength=0), and give them the proper values in a later hotfix.
For this it is important to realize that, just like regular set commands, the order of hotfixes do matter.
- hotfixes are executed in the order they are in the filtertool. (top -> down)
This means you can first create a big array, and in a later hotfix, modifify what you just created.
After you have the behavior plugged in, you're gonna need one or more entries in ConsolidatedOutputLinkData that point towards your new behavior. It is usually good practice to give these new links a unique LinkID, and naturally, have the LinkedBehavior be the index of your newly added behavior. Furthermore, if you have a single behavior linking to multiple next behaviors, you'll wanna have all those links have the same LinkID. Something we ignored up till now
After that it's a matter of having an existing behavior in the BPD link towards the new ConsolidatedOutputLinkData entry, and it shouldtm be done.
So, we now have 3 ways to modify BPDs, we can rewire them, remap the variables, and mess with delays.
We however can not modify ConsolidatedVariableLinkData and VariableData.
- The reason for this is twofold. First off,
ConsolidatedVariableLinkDatais modified by the game each time the BPD is executed, itsCachedPropertyis updated. - The second reason is that we have no clue where the game is pulling the actual values from. By trial and error, and dumping in-game, one can usually piece together what a
(Name=,Type=BVAR_Attribute)actually is, likemax shield, for example.
Since we don't even know how the game is getting all these values, we can't hope to modify them with our current understanding
It is probably related to the BVAR_Object and BVARLINK_Context parts in the BPD, or possible it's coming from somewhere outside of the BPD, like maybe LockedSkillDetailStr=<Locked> in GD_Shields.Skills.Impact_Shield_Skill, or who knows where.
Consequently, when adding behaviors to a BPD, you are inherently limited to behaviors that do not require inputs/outputs, or at least only those inputs/outputs that are already present in the BPD you are changing.
Having said that, there's probably also some cross-DLC mixing issues, like some of our gunsmiths have experienced (the reason why the OM, pimpernel and sandhawk are popular ones to replace).
All in all, with these 3 methods of changing BPD's, we're more or less free to modify a BPD any way we want in it's original sandbox, and if we're lucky we can bring in a new toy, but nothing too spectacular.
As a conclusion to this class, we'll consider a different example: custom delay spikers.
You know those spiker pistols, which take 1.8 or so seconds to detonate, meaning that enemies don't die when you want them to?
We can change that with BPD edits.
First off, for those reading alone, the BPD in question is GD_Weap_Pistol.Projectiles.Projectile_Spiker:BehaviorProviderDefinition_0, and it looks like this:
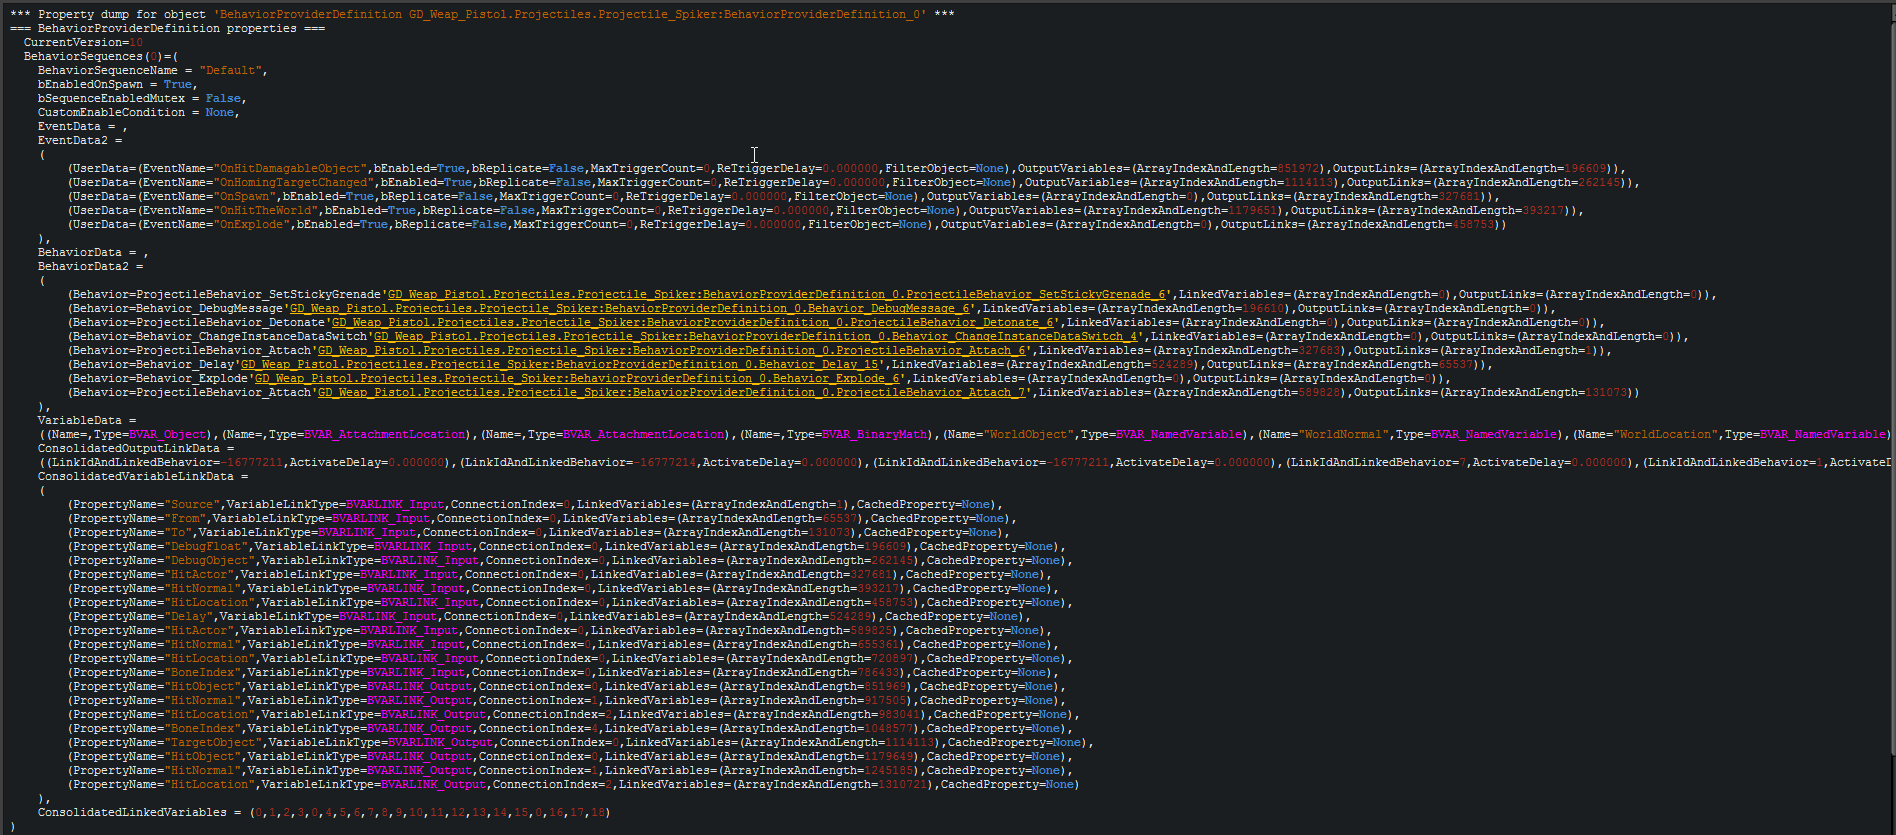
So, the problem in this BPD would be our friend Behavior_Delay. Step one will be to get rid of that one. Behavior_Delay is the 6th element, so it has index 5 in BehaviorData2.
It's output link has ArrayIndexAndLength=65537, which translates to an ArrayIndex of 1 and a length of 1 in ConsolidatedOutputLinkData. Element 1 of ConsolidatedOutputLinkData is (LinkIdAndLinkedBehavior=-16777214,ActivateDelay=0.000000), which is a LinkID of -256 and a LinkedBehavior of 2, which is the ProjectileBehavior_Detonate.
Next we see which of the other behaviors point towards Behavior_Delay, by inspecting all of the elements of ConsolidatedOutputLinkData, and see which have a LinkedBehavior of 5. The ones that have this are those on index 0 and index 2, which are -16777211 and -16777211, which both translate to -256 and 5.
Then, the next question we wanna solve is, which behaviors link to a subarray that contains index 0 or 2? Both of these are only used by a single behavior, which each only link to the delay behavior, namely ProjectileBehavior_Attach_6 and ProjectileBehavior_Attach_7.
These behaviors are on index 4 and 7 of BehaviorData2.
We're now ready to redirect these behaviors directly to ProjectileBehavior_Detonate, by using the OutputLink of Behavior_Delay, which is 65537.
This results in the following code:
set GD_Weap_Pistol.Projectiles.Projectile_Spiker:BehaviorProviderDefinition_0 BehaviorSequences[0].BehaviorData2[4].OutputLinks.ArrayIndexAndLength 65537
set GD_Weap_Pistol.Projectiles.Projectile_Spiker:BehaviorProviderDefinition_0 BehaviorSequences[0].BehaviorData2[7].OutputLinks.ArrayIndexAndLength 65537
Next, we need to add in our own delay, to replace the one we just removed. We do this by modifying the element with index 1 of ConsolidatedOutputLinkData, the one that points to ProjectileBehavior_Detonate and is used by both ProjectileBehavior_Attach now.
set GD_Weap_Pistol.Projectiles.Projectile_Spiker:BehaviorProviderDefinition_0 BehaviorSequences[0].ConsolidatedOutputLinkData[1].ActivateDelay 0.345
And with that, we have custom-delay spikers.
Even with all this knowledge & stuff, it's very easy to make a mistake, do something the game doesn't like, or otherwise crash your game.
BPD's are sensitive bastards, so if you're gonna attempt to edit them, don't get mad if your game decides to crash on you, multiple times. Especially, since a core part of it is inherently still just trail and error.
And, that's basically it folks. Nothing too complicated, right?
If you made it this far, good job. If anything is unclear, try reading that part again, or ask a question in the discord.