-
Notifications
You must be signed in to change notification settings - Fork 65
DocFaqHandling
Prev (Databases and projects) | Home | Manual | Index | (Routing) Next
Table of contents
-
Frequently Asked Questions - Data handling
- How to create waypoint from POI (point of interest) in map?
- Why are new waypoints always saved in a single workspace project?
- Where are new waypoints and tracks saved?
- How to find distance between waypoints?
- Which track data is saved in GPX files?
- How to access data from legacy Garmin devices?
- What is the difference between speed and gpxtpx:speed?
- How to remove DEM info from elevation graph?
- How to edit tracks without losing track data?
- How to compose a track from pieces of other tracks?
- What is the difference between a clone and a copy of a QMS GIS object?
If the mouse pointer is moved on a POI in a vector map, a small red square around this POI pops up. Right-click to open the context menu and select the menu entry
Add POI poi_name as waypoint (poi_name is the POI name!). The POI name and its coordinates are used in the new waypoint.

(See next topic)
(Inspired by the discussion of QMS issue #394)
There can be several or even many projects in the QMS workspace. When creating new GIS objects (waypoints, tracks, ...) within QMS they have to be assigned to an existing or a new workspace project. The following selection resp. input window appears for this purpose:
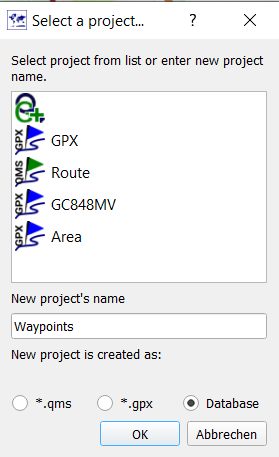
In this window, the user has to select an existing project or define a new project (type its name in the edit field) as the target location of the new object.
If many objects are to be created for the same project, this procedure is cumbersome. Therefore, the user can specify a project in which all newly created GIS objects are saved. This selection is made via the menu entry Active project in the context menu of the selected project. A project selected in this way is called an active project. It is marked with a yellow asterisk in front of the project name in the workspace:
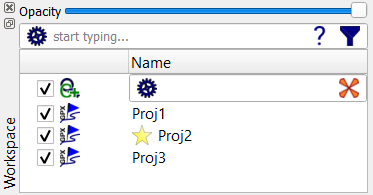
If an active project exists, then the previously described selection window no longer appears. Further details on active projects are described in section Active projects.
-
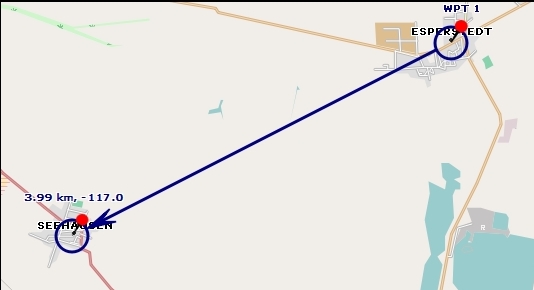
Find the direct distance from a waypoint to some other point: set a waypoint and move it to the other point. This will give you the distance and the course (direction) to the other point. When done abort the operation (right mouse click) and remove the waypoint.
-
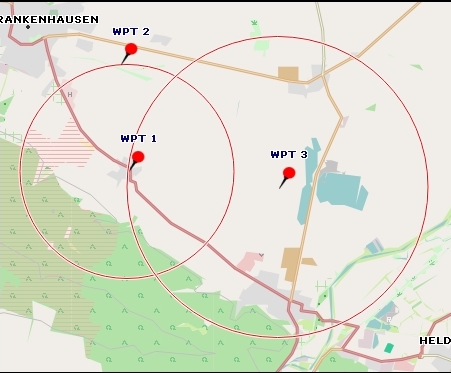
Find a defined distance from several waypoints: add the distance as proximity to the waypoints.

-
Find the street distance or the direct distance between several points: start to create a track with or without routing.

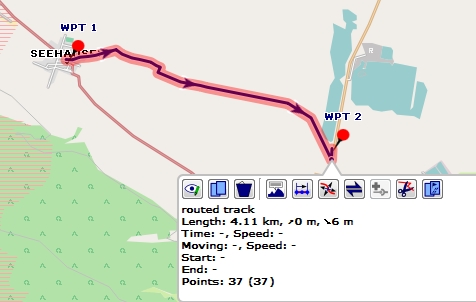
(valid starting with QMS patch version 7ac34c818ec1/2016-12-06)
QMS supports 2 kinds of GPX files:
- GPX files that follow strictly the rules of the GPX 1.1 standard,
- GPX files using additional extensions (special format).
In both cases the following track data is saved in the GPX file:
- track name,
- location of each trackpoint,
- timestamp of each trackpoint (if available),
- elevation of each trackpoint (if available).
The additional extensions used in the special format provide information about
- the track history (can't be re-activated when GPX file is re-loaded into QMS),
- the track display color
- the type of trackpoint (trackpoint created by routing engine (so-called subpoint) or trackpoint created by user interaction, hidden trackpoint, activity)
Trackpoints created by a routing engine can't be edited by the user whereas trackpoints created by a user can be edited (compare section "Edit items with multiple points").
(inspired by newsgroup discussion)
The internal memory of legacy Garmin devices (e.g. the well-known Garmin GPS 60Csx) can't be connected as a USB drive to the computer even if they are connected via USB to the computer.. Thus, data in the internal memory (e.g. the so-called ActiveLogs or waypoints saved in the device) can't be accessed directly from QMS.
GPSBabel (available for Windows, MacOS, and Linux) can be used to download tracks and waypoints stored in the internal memory of
a Garmin GPS device by using the command:
gpsbabel -t -w -i garmin -f usb: -o gpx -F gpsdata.gpx
Drag and drop the output file gpsdata.gpx to the QMS workspace or call
qmapshack.exe gpsdata.gpx
to see the tracks and waypoints.
Compare the GPSBabel documentation for more details.
Various GPS receivers record different data for trackpoints. Some Garmin navigators use for this purpose
a special GPX trackpoint extension
named gpxtpx. One of the data fields within this extension is gpxtpx:speed. It records the speed at the given trackpoint.
This speed is measured in meters per second whereas the calculated speed at a trackpoint is measured in kilometers per hour.
QMS reads this speed value and can display it in form of a graph in the track edit window.
A similar data field is gpxtpx:course. This field contains an angle measured in degrees in a clockwise direction from the true north line
(the course).
Compare also section Recorded and calculated track data.
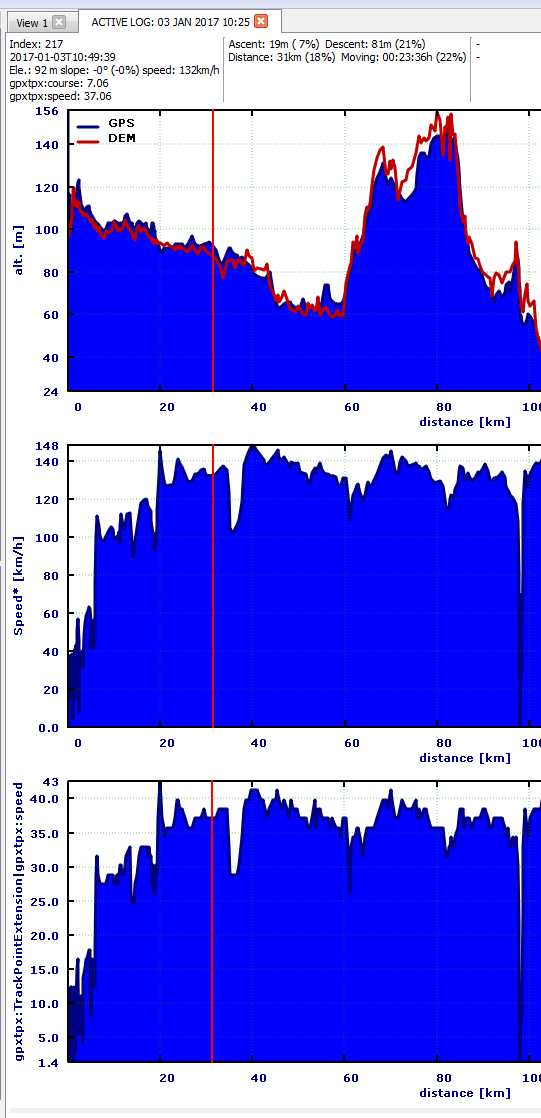
(inspired by newsgroup discussion "Option to disable DEM plot in track profile view")
Assume
- a (recorded) track has elevation information,
- DEM data is available for the area in which the track is located,
- DEM data is activated in the view in which the track is displayed,
- the (extended) track profile is activated for the track.
Then the track elevation profile displays the recorded elevation together with the elevation obtained from the DEM data (red line).
To remove the DEM data from the track profile proceed as follows:
- clone the existing view (use menu entries
View - Clone map view), - deactivate DEM data in the cloned view,
- open the track profile in the cloned view.
Now, the track profile shows only the elevation data of the track.
Hint: Use the track profile in the map view, not the one in the track edit window!
(inspired by newsgroup discussion How to edit this track?)
Trackpoint data of tracks recorded by a GPS device consists not only of a position and a timestamp. Modern devices record different amounts of other (fitness) information such as elevation, cadence, pulse rate, temperature ...
While recording a track on a GPS device, the quality of GPS signals may vary. Signals may be weak or even disappear due to various reasons. In such a case the recorded track data is not reliable or even completely wrong. A need occurs to remove such non-reliable or wrong data by editing the track manually.
QMS offers the following track editing methods:
-
Edit track in map window by going into the track edit mode and removing their single trackpoints.
This method is very convenient because it is easy to identify and remove wrong trackpoints.
The disadvantage of this method is that all trackpoint information except the position gets lost for all remaining trackpoints.
-
Edit track using range selection.
This method can be used in the map window or in the track edit window.
If working in the map window:
- click the track,
- click the range selection icon,
- select the range of the track(points) that should be removed.
By that, the selected trackpoints are hidden and do not add to the statistics. If you want to remove them permanently:
- go to the track edit window of the track,
- click the
Filtertab, - open the
Reduce visible pointsfilter group, - run the
Remove trackpointsfilter.
This procedure removes the selected range of trackpoints from the track without losing information from other trackpoints.
-
Edit track using the cut tool (scissors).
If working in the map window:
- click the track,
- click the cut tool (scissors) icon at the first trackpoint that should be removed,
- select option
Keep both parts of the trackand clickOk. The range of trackpoints to be removed is now at the start of one of the track parts. - Cut the track again to remove the remaining wrong trackpoints at the start of the track part (use option
Delete first part ...resp.Keep first part ...properly!). - If necessary, merge the remaining track parts into a new track.
Warning: As long as you stay in the QMapShack universe - using the database or the QMS files - you can revert all these steps in the history. However, if you save to a GPX file the data will be lost permanently. In this case, save a backup copy of the track before editing it!
Even as it is possible to remove incorrectly recorded trackpoints with both methods, the latter is the recommended one. The intended use-case for the track edit mode is to create artificial tracks to plan a tour. That is why additional data like timestamps and sensor data is removed as it won't be valid when moving points or combining different track fragments.
(topic inspired by a discussion in mendiak.net)
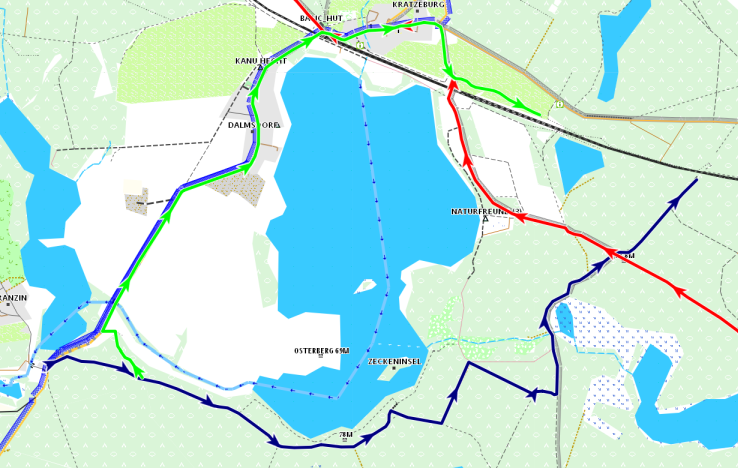
Assume, that you have several tracks as demonstrated in the next image with 3 tracks:
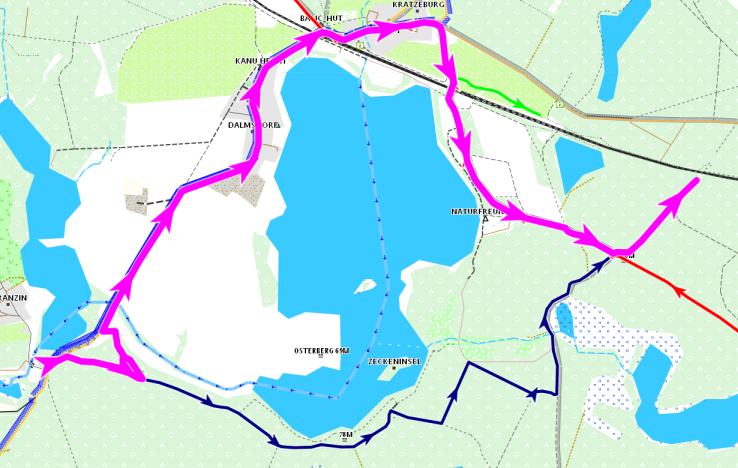
The task is to compose a new track from adjacent pieces of these existing tracks. The wanted new track is shown in the next image (the magenta line):
QMS offers various ways to build this new track:
-
Using splits of tracks:
- Cut the given tracks into pieces necessary for the new track.
- If necessary, reverse track pieces with wrong orientation (in the example, the red track has wrong orientation).
- Join the required pieces into a new track.
This approach is quite cumbersome and requires many single steps.
-
Using track ranges:
- Select the track pieces necessary for the new track as ranges of the given tracks and copy them as new track pieces.
- If necessary, reverse track pieces with wrong orientation.
- Join the required pieces into a new track.
This approach is less cumbersome than the previous one but still requires many single steps.
-
Using track routing:
-
Select the first point of the new track. If necessary, change the zoom level of the map to hit an existing track as exactly as possible.
-
In the options toolbar, select the routing option
T(press keyT). -
Move the mouse pointer along the first existing track segment. The track under the mouse will be highlighted in yellow.
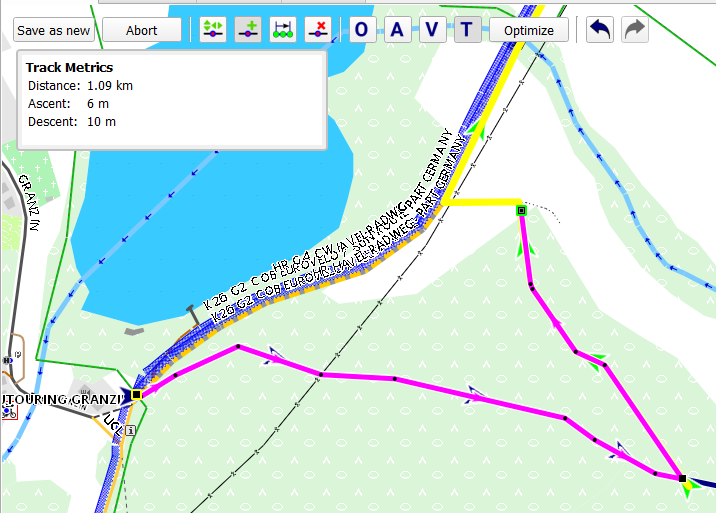
-
When hitting the next existing track, left-click to fix the first new track part.
-
Follow the next existing track as long as necessary and so on.
-
Save the new track after reaching its endpoint.
This approach is again less cumbersome than the previous one and should be preferred. It avoids dealing with a lot of single track pieces.
-
(derived from a naviboard.de newsgroup discussion)
Each GIS item in the QMS workspace has a context menu entry Copy to.... Clicking this menu entry opens a small window where the user has to select a new or existing target project for the copy of the selected object. Having done this, several different situations can occur:
- the target project is a new one: the new project is created and a copy of the object is put into the new project
-
the target project already exists:
- a copy of the object is not yet in the target project: put a copy of the object into the target project
-
a copy of the object already exists in the target project: ask the user to choose one out of 3 options:
- replace the existing copy in the target project with a copy of the object from the source project (one of the 2 objects may have been edited!)
- do not copy the object and keep the existing one in the target project
- create a clone of the object in the target project
Here,
- a clone is a completely new data object with an additional name suffix
_clone - a copy does not create a new data object but only a new reference to an already existing object
Data objects in QMS are identified by an internal unique key. Cloned objects have different keys because they are different objects but data in both objects are equal at the moment of the creation of the clone/copy. Copied objects can be edited in the workspace and can therefore be different as long as they are not saved to a database. As soon as an attempt is made to save such edited objects the user is forced to decide which of the above-mentioned 3 options he wants to choose. As a result, there will be either 2 different (cloned) objects or 1 data object belonging to several workspace projects and thus to different database folders. One is the copy of the other one. They have the same key and the same data.
The situation is slightly different in a QMS database. A database consists of a table for all database folders, a table for all data objects, and a reference table in which each data object is assigned to one or several folders. There is no way to copy or clone a data object directly in the database. Such operations must be carried out by loading the involved database folders as projects into the workspace, copying or cloning objects here, and then saving the workspace projects back to the database. As a result, there are 2 entries for the same object in the reference table pointing to different folders.
Prev (Databases and projects) | Home | Manual | Index | Top | (Routing) Next