-
Notifications
You must be signed in to change notification settings - Fork 65
ReferenceTool
Prev (Cut tool) | Home | Manual | Index | (Grid tool) Next
Table of contents
Raster maps are typically obtained by scanning maps or collecting aerial photographs and satellite images. They are saved as image files in
common formats such as TIF, JPG, PNG (QMT can handle all image formats for which GDAL provides a driver, a list can be obtained by calling gdalinfo --formats,
prefer the TIFF format).
(Geo-)referencing a raster map means
- to add reference points to the map that link known raster positions to known positions in map coordinates,
- to save the georeferencing information when the referencing is satisfactory (output format, for instance, GeoTIFF).
QMT's reference tool provides an easy way to reference raster maps.
To work with the QMT reference tool proceed as follows:
-
Select the menu entry
Window - Shellto open the QMT shell window (docked window, can be moved on the desktop). -
Find more than 3 reference points in the raster map with known WGS84 lat/lon coordinates. Remark: An easy way to get reference points with coordinates is to use a map (e.g. OpenStreetMap) in QMS.
-
Click the
Reference toolbutton in the QMTToolswindow (docked window, can be moved on the desktop). -
Click the
Open(Add map files to list) icon ( ) and select a raster map. The raster map is loaded into the QMT map window.
 -
Click the
Add reference pointicon ( ). The map cursor now is a cross-hair one.
 -
Move the mouse cursor on each of the known reference points as precisely as possible (use mouse wheel to zoom map!) and left-click to fix the reference point.
-
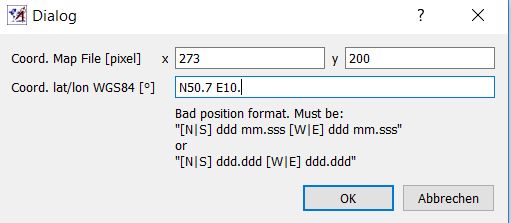
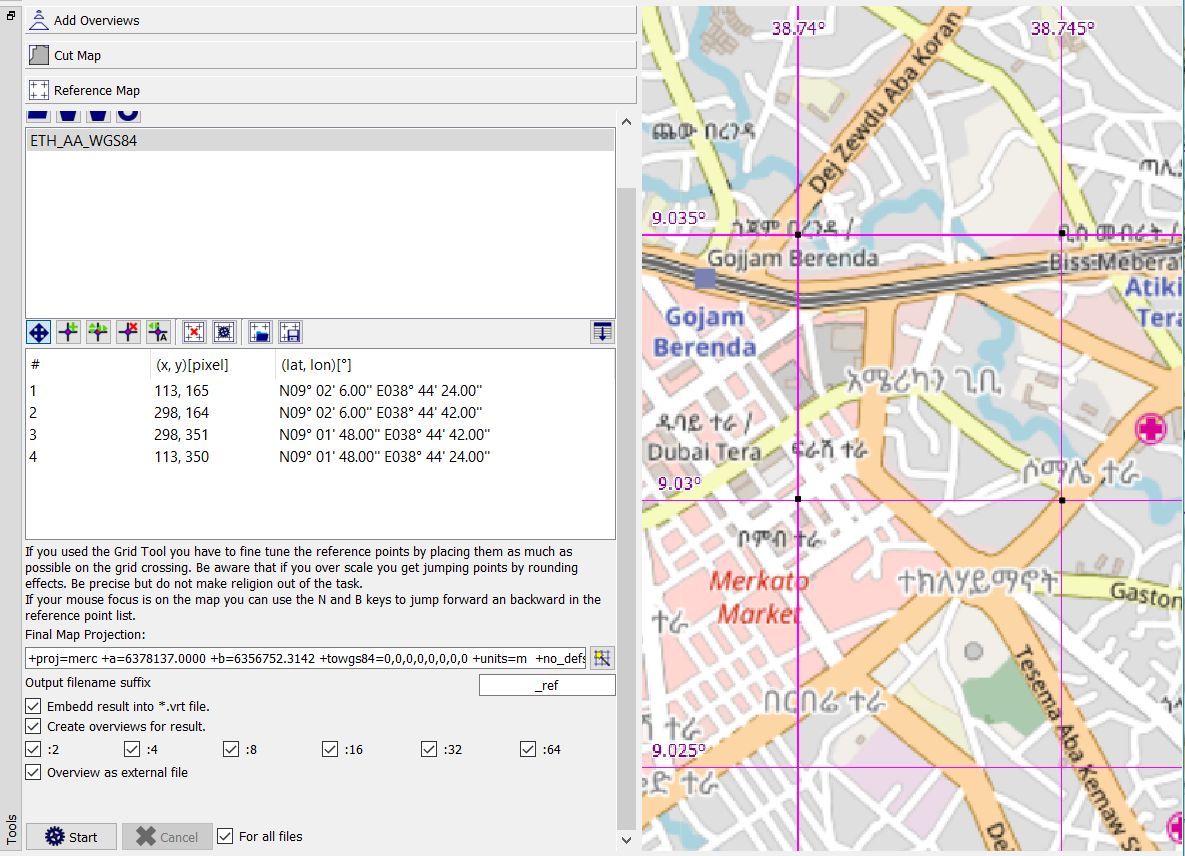
Insert the WGS84 coordinates of the reference point into the pop-up window. The input format is shown as soon as input is started. A small black square is shown at the reference point on the map. The coordinates and the pixel location of the reference point are inserted into the list of reference points in the tool window.

Remark: An easy way to get reference points into QMT is to use QMS. Find some reference point which is on the raster map and the QMS map as well. Right-click the QMS map at the reference point location to get a context menu and then click
Copy position. This copies the current position to the clipboard. Now, go to the QMT window and add the reference point. When being asked for the coordinates simply pressCTRL-Vto insert the coordinates found in QMS. -
Click the
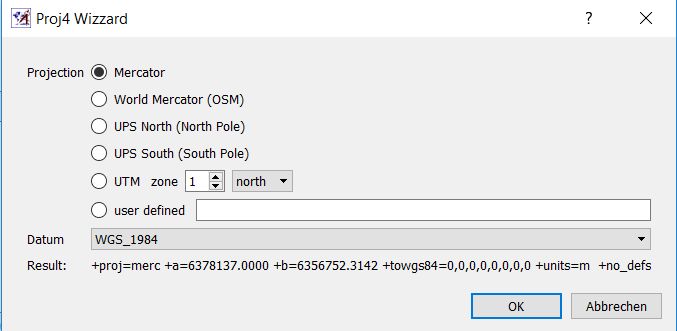
Start projection wizardicon ( ) and select the coordinate system for the output of referenced data. An example is shown in the next image.
-
Leave defaults for other settings.
-
Click the
Startbutton to get a referenced image file and a VRT file in the directory of the original raster map. The shell window displays the GDAL commands run.
In addition to the basic steps described in the previous section some more actions with maps and reference points can be carried out in the reference tool:
| Icon | Tooltip | Comment |
|---|---|---|
 |
Remove selected (map) file from the list | Reference points are deleted, too. |
 |
Clear complete list of map files | Reference points are deleted, too. |
 |
Reload the currently selected map | Reference points aren't changed. |
 |
Move the map and zoom | Zoom with mouse wheel. |
 |
Add reference point | Move mouse to wanted point, left-click and insert coordinates into the coordinate definition window. |
 |
Move reference point | Reposition misplaced reference point. A selected reference point either in the list or in the map changes the square color to red. Left-click the reference point on the map, move it to new location, and left-click again to fix it. |
 |
Remove single reference point | A selected reference point either in the list or in the map changes the square color to red. Left-click in the map to remove it. |
 |
Move reference point with automode. This will pick up (move the mouse to) the next point after you moved a reference point. | Press b or n on the keyboard to jump to the previous or next reference point in the list. |
 |
Remove all reference points | Requires additional confirmation of deletion. |
 |
Switch to the grid tool | Reference tool add-on for fast creation of reference points if map has known grid. |
 |
Load reference points from GCP file | Load previously defined and saved reference points from file. |
 |
Save reference points into GCP file | Save reference points for future use. |
 |
Sort list of reference points |
-
If the field labeled
Embed result into *.vrt fileis not checked, then the above-mentioned VRT file (needed for displaying the map in QMS) is not created. Remark: Leave the checkbox selected, if the referenced map should be used in QMS. -
It is possible to open several map files and to reference each of these maps. If the checkbox
For all filesat the bottom of the tool is checked, then the referencing is carried out for each of the loaded map files.
Remarks:
- The
Create overviews ...option is available in 4 QMT tools (cut tool, overview tool, reference tool, palette tool). This is necessary because there is no fixed order of using these tools. When one of these tools calls GDAL for some operation, then GDAL doesn't read the overview information contained in the raster map file. Thus, overview information should be recreated after such a GDAL operation and this is supported in each of the tools. - Experienced users may change some GDAL default parameters to equilibrate performance, image file size, and image accuracy using a special group box for GDAL parameters. For details compare the page "Optional GDAL settings".
http://loadmap.net is a server for a wide variety of raster maps covering large parts of the world. Among them are various kinds of Russian army and topographic maps.
These maps have a large boundary for map metadata information.
Typically, Russian military maps are georeferenced with reference information provided in the OziExplorer MAP format. As a rule, the Krassowski ellipsoid (epsg 4284, Pulkovo 1942) is used in the MAP file for lat/lon coordinates. In this example, it is assumed that the differences between these coordinates and the WGS84 lat/lon coordinates used in the reference tool can be neglected.
Using a text editor and the information from the MAP file it is easy to cut and reference such maps with QMT. Follow these steps for downloading and referencing a (cut) map:
-
Select a map on http://loadmap.net.
-
When downloading the selected map, 2 files are offered: a GIF and a MAP file. Download both files and put them into some directory.
-
As an example, the files
001m--m36--(1989).gif,001m--m36--(1989).mapwill be used in this discussion. -
Open the MAP file in a text editor and find the lines labeled
POINTnear the top of the file. -
Assume the MAP file has non-zero values in the latitude and longitude columns of the line labeled
Point01(the other case is described at the end of this subsection). -
In the example these lines are
  Point01,xy,  219,   86,in, deg,  52,  0.0000,N,  30,  0.0000,E, grid,   ,           ,           ,N
  Point02,xy, 1842,  121,in, deg,  52,  0.0000,N,  33,  0.0000,E, grid,   ,           ,           ,N
  Point03,xy, 3466,   90,in, deg,  52,  0.0000,N,  36,  0.0000,E, grid,   ,           ,           ,N
  Point04,xy,  147, 1839,in, deg,  50,  0.0000,N,  30,  0.0000,E, grid,   ,           ,           ,N
  Point05,xy, 1839, 1873,in, deg,  50,  0.0000,N,  33,  0.0000,E, grid,   ,           ,           ,N
  Point06,xy, 3533, 1842,in, deg,  50,  0.0000,N,  36,  0.0000,E, grid,   ,           ,           ,N
  Point07,xy,   74, 3591,in, deg,  48,  0.0000,N,  30,  0.0000,E, grid,   ,           ,           ,N
  Point08,xy, 1835, 3629,in, deg,  48,  0.0000,N,  33,  0.0000,E, grid,   ,           ,           ,N
  Point09,xy, 3598, 3594,in, deg,  48,  0.0000,N,  36,  0.0000,E, grid,   ,           ,           ,N
(use only lines where values are filled in!)
-
Convert this block with the editor to
  #V1.0
  #gcpproj: +proj=longlat +ellps=WGS84 +datum=WGS84 +no_defs
  -gcp 219 86 52.00000000 30.00000000
  -gcp 1842 121 52.00000000 33.00000000
  -gcp 3466 90 52.00000000 36.00000000
  -gcp 147 1839 50.00000000 30.00000000
  -gcp 1839 1873 50.00000000 33.00000000
  -gcp 3533 1842 50.00000000 36.00000000
  -gcp 74 3591 48.00000000 30.00000000
  -gcp 1835 3629 48.00000000 33.00000000
  -gcp 3598 3594 48.00000000 36.00000000
Remark: In the above block the fractional part of the geographical coordinates is obtained by dividing the seconds part of the geographical coordinate 60!
-
Save these lines to a new file with filename
001m--m36--(1989).gcp. -
Start QMT and open the reference map tool in QMT.
-
Load
001m--m36--(1989).gifinto the reference tool (hint: a map file previously cut with the cut tool can be used here, too). -
Select the
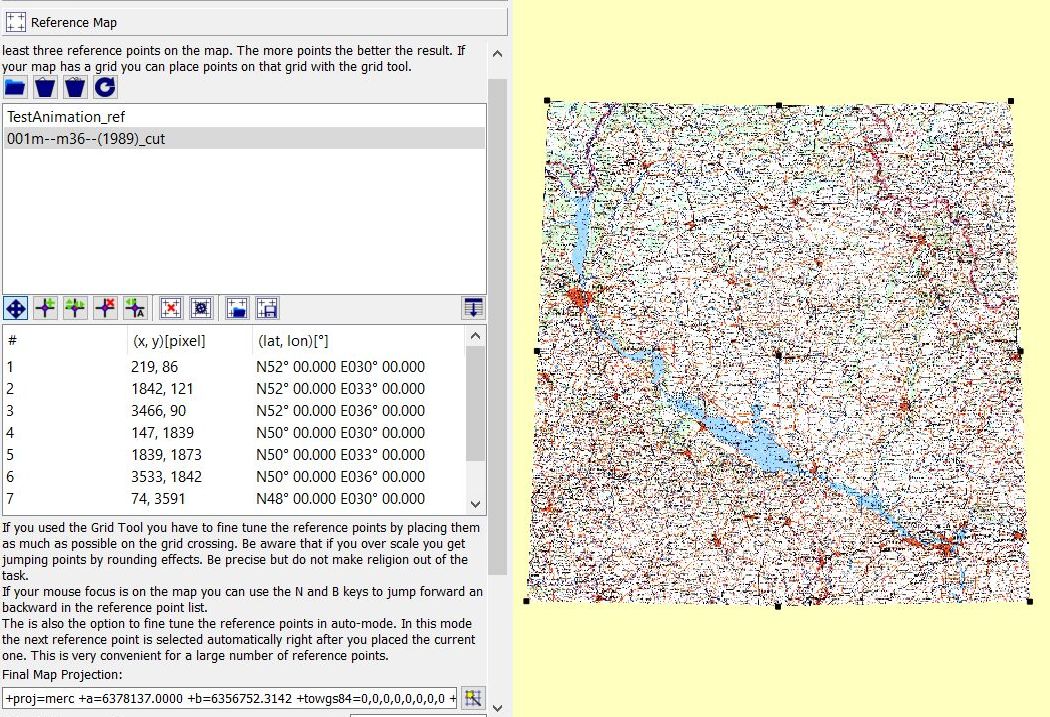
Load reference points from GCP fileicon in the toolbar and load the file001m--m36--(1989).gcp. -
The map window shows now 9 reference points (4 points in the corners, 4 points in the middle of the 4 edges of the map, 1 in the center of the map).

If necessary, improve reference points manually as described on this page.
-
Define final map projection.
-
Click
Startto create a new referenced map file.
For some MAP files, the described procedure may fail because there are no latitude/longitude coordinates in the Point lines.
In this case, the described procedure for creating the GCP output file should be changed slightly as follows:
-
Find lines labeled
MMPXYandMMPLLnear the end of the MAP file. -
An example of such lines is
MMPXY,1,5,180 MMPXY,2,4068,162 MMPXY,3,4091,3915 MMPXY,4,16,3933 MMPLL,1,39.25,44.0 MMPLL,2,39.5,44.0 MMPLL,3,39.5,43.8333333333 MMPLL,4,39.25,43.8333333333 -
The
MMPXY,ilines give the values for the first two fields (pixel coordinates) in the new output line. -
The corresponding
MMPLL,ilines gives the longitude and latitude coordinates for the new output line. -
Build for each such pair a new line of the form
-gcp 5 180 44.0 39.25(for the example
i = 1was used, pay attention that the output order is latitude - longitude!). -
Proceed as described in the first part of this subsection.
Prev (Cut tool) | Home | Manual | Index | Top | (Grid tool) Next