-
Notifications
You must be signed in to change notification settings - Fork 65
DocFaqMaps
Prev (Routing) | Home | Manual | Index | (WMS Examples) Next
Table of contents
-
Frequently Asked Questions - Maps
- How to control visibility of POI info?
- Why are waypoints shown with a blue dot icon?
- How to find information about a position (a POI) on the Web?
- How to move map to a certain location?
- What is the difference between
Copy positionandCopy position (Grid)? - Is there a possibility to display small roads/tracks in a vector map without zooming in too much?
- Does QMS support the use of single Garmin-style map tiles?
- How to change the layout of vector maps?
- Why is Google Terrain map a black-and-white map?
- Which raster map formats are supported?
- How to use Russian military and similar raster maps with QMapShack?
- Why is a raster map not displayed?
- How to find the location of a raster map?
- Is it possible to use several VRT files?
- When to use GDALWarp to get VRT file?
- Is it possible to use EPSG codes for the coordinate system setup?
- What requirements must a WMTS file fulfill?
- How to use WMTS files without ResourceURL?
- How to build the URL when using WMS via TMS?
- What are the differences between the WMTS and the WMS approach in QMS?
- How to get information about a WMTS or WMS service?
(Inspired by newsgroup discussion)
The possibility to control the waypoint visibility in QMS map windows depends on the type of the displayed map:
- Raster and online maps: All map info is hard-coded in the map. Visibility of map elements (POI, roads, ...) can't be changed within QMS.
-
Vector maps: The QMS user has various ways to control the display of the information contained in a map:
-
Using the maps tab: (if closed, open it with the help of the menu entry
Window - Maps) After clicking the small triangle at the front of an active map the following map display options can be modified:- Map opacity. Use slider to increase or decrease map opacity. This controls the visibility of maps in a stack of active maps.
- Zoom levels for map display. Select minimum resp. maximum zoom level of map display by clicking the small buttons at the left resp. right of the scale. If the zoom level slider is in the green interval, then the map is displayed.
- Type of displayed map objects. Use the checkboxes to switch on or off the display of areas, lines, and points (POI).
- Details level. Use levels between -5 and 5 to select the number of map objects for a given zoom level.
-
Using the main menu.
- The menu entry
View - POI Textis a toggle. If it is selected, then the name of a POI (if available on the map) is displayed. The font used can be changed with the help of the menu entryView - Setup Map Font. - The menu entry
View - Map Tooltipis a toggle. If it is selected, then after moving the mouse pointer to a map object (POI, line, area) in a vector map a small tooltip window pops-up with information about the object (typically, the name of the object is shown).
- The menu entry
-
Using the maps tab: (if closed, open it with the help of the menu entry
Remarks:
-
Several (vector) maps may have the same data source (e.g. OpenStreetMap/OSM). It is up to the author/publisher of the map to select
- the data to be included in the map,
- the style in which the data is displayed,
- the zoom levels at which data objects are displayed.
Thus, maps having the same data source may have rather different content and layout. QMS cannot alter this map data.
-
Workspace GIS data (waypoints, tracks, routes, areas) is drawn on an extra layer on the map window. The rules described above for map data don't apply to GIS data. The display of GIS data is controlled via checkboxes in the workspace.
Source: Newsgroup discussion
Example:
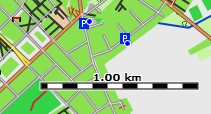
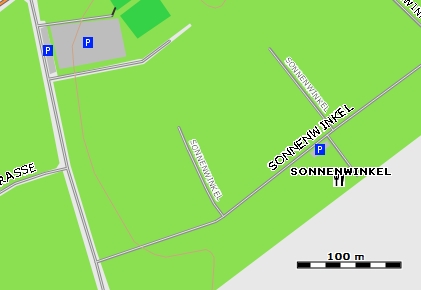
The blue dots shown on the map are not the icons of waypoints but they are used as indicators that at the given zoom level of the map and the given locations there are several waypoints on the map. Thus, cluttering of the map is avoided.
Changing the zoom level results in the display of all waypoints at the given location with the necessary icons (exception: several waypoints with equal coordinates).
(valid starting with QMS commit c57ba23001c7, Wed Jul 25 13:02:57 2018)
-
Open a map view and move the mouse to the position (location) of interest.
-
Right-click the mouse to open the context menu (this menu is included in the waypoint context menu, too).
-
Select
Search Web for positionand then one of the preconfigured web services that provide information about the position. The default browser opens the web service which displays information about the selected position (if available).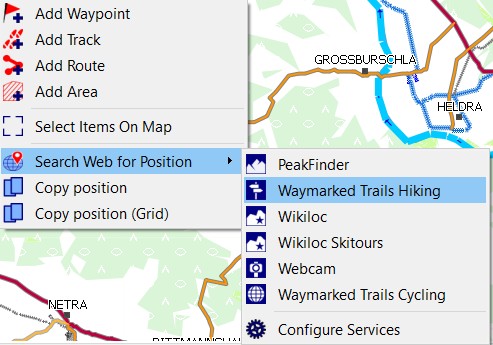
-
Select the menu entries
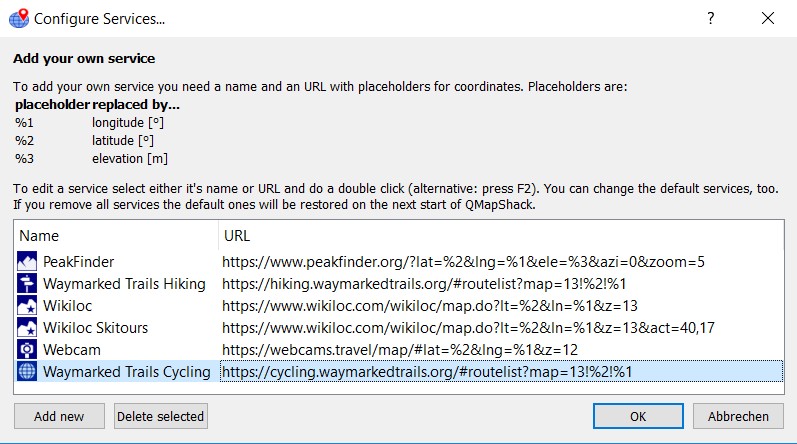
Search Web for position - Configure servicesto view the configuration of the default services and to add or remove web services with the help of the service configuration window: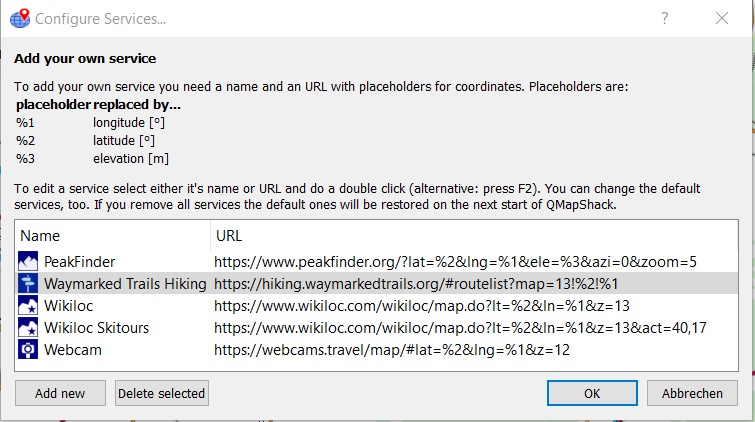
-
To add a new service insert a name in the name field and a valid URL in the URL field. Use placeholders %1, %2 resp. %3 in the URL for the longitude, latitude resp. elevation. QMS replaces the placeholders with the data of the selected position.
-
Each web service (the default ones, too!) can be deleted. After deleting all web services QMS re-establishes the default configuration at the next start.
The configuration of web services is saved in the QMS INI file.
Here is an overview of some web services (composed by Mitxel in the QMapShack newsgroup, items labeled with an asterisk are default web services in QMS):
-
Peakfinder (*)
Purpose: Get 360° panorama with the names of all mountains visible from the given location.
URL: https://www.peakfinder.org/?lat=%2&lng=%1&ele=%3&azi=0&zoom=5
Hints: As DEMs are not very accurate, sometimes the summit itself could hide your view. To avoid this add
&off=10to the URL. This raises the viewpoint by 10m. -
Waymarked trails (*)
Purpose: Get waymarked hiking trails near the given location.
URL: https://hiking.waymarkedtrails.org/#routelist?map=13!%2!%1
Hints: Clicking on the name in the track list opens additional information about the track and you can download the track. In the upper menu you can change the settings to get cycling trails, MTB trails,...
-
Waymarked cycling trails
Purpose: Get waymarked cycling trails near the given location.
URL: https://cycling.waymarkedtrails.org/?lang=en#routelist?map=13!%2!%1
Hints: Just a second example for the waymarked trails server: display cycling trails and use English as language.
-
Wikiloc (*)
Purpose: discover outdoor trails for hiking, cycling, and many other activities near the given location.
URL: https://www.wikiloc.com/wikiloc/map.do?lt=%2&ln=%1&z=13
Hints: This lists all activities near the given location. A filter can be used for a more specific selection of trails.
-
Wikiloc Skitours (*)
Purpose: discover ski tours near the given location.
URL: https://www.wikiloc.com/wikiloc/map.do?lt=%2&ln=%1&z=13&act=40,17
Hints: This pattern filters ski tour and snowshoe activities from Wikiloc. You can follow this sample to get other activities by changing the value
act=40,17or add other filters, too. -
Wikiloc MTB
Purpose: discover MTB tours near the given location.
URL: https://www.wikiloc.com/wikiloc/map.do?lt=%2&ln=%1&z=13&act=2
Hints: This filters MTB activities from Wikiloc. When using filters, you will be asked to log in.
-
Webcam (*)
Purpose: Find webcams near the given location.
URL: https://webcams.travel/map/#lat=%2&lng=%1&z=12
Hints: If you don't see webcams near the chosen location, try zooming out with the mouse wheel.
-
MeteoBlue 7 days (*)
Purpose: Get 7-day weather forecast at the given location.
URL: https://www.meteoblue.com/en/weather/forecast/week/%2N%1E
Hints: The default URL points to the web page in English. You can change it easily. Example: Replace
/en/by/es/in the URL to get the Spanish version. -
MeteoBlue 5 days (*)
Purpose: Get 5-day weather forecast at the given location.
URL: https://www.meteoblue.com/en/weather/forecast/meteogramfive/%2N%1E
-
MeteoBlue Multi model (*)
Purpose: Get 3/6/7-day weather forecast at the given location with data from different weather models.
URL: https://www.meteoblue.com/en/weather/forecast/multimodel/%2N%1E
-
MeteoBlue Map (*)
Purpose: Get weather forecast maps for various weather parameters near the given location.
URL: https://www.meteoblue.com/en/weather/webmap/index/%2N%1E?level=surface&zoom=8
Hints: Once on the map site choose the map type to display: precipitation, wind, .. and you can see the evolution by hours.
-
Ventusky (*)
Purpose: Get weather forecast maps for various weather parameters near the given location. Default map: rain.
URL: https://www.ventusky.com/?p=%2;%1;6&l=rain-3h
Hints: Once on the map site choose the type of map to display: precipitation, wind, etc. and you can see the evolution by hours. Clicking on a point displays a weather table for the clicked location.
-
Rome2Rio
Purpose: Find public transport between two points including alternative routes with information about stops, transfers, schedules, and operators' phone numbers and websites.
URL: https://www.rome2rio.com/es/map/Bilbao/%2,%1
Hints: In the given URL Bilbao (Spain) is used as the start point and the selected location is the endpoint for the route. You must replace Bilbao with the name of your town or city. If the name is composed use hyphens, e.g.: Selva-di-Val-Gardena. You can also use your home coordinates e.g.:
43.164,-1.236. -
Transport Públic de Catalunya
Purpose: Find public transport between two points in Catalonia.
URL: https://mou-te.gencat.cat/index.html#/ca/transportProper/%1/%2
Hints: This is a local service for the Catalonia region. It looks for bus stops near the given point. Once on the web, you can consult lines, timetables, and A-B routes. If you live in Catalonia you could build a URL similar to the one for
Rome2riofrom your home to the given location. -
GoogleMaps driving routes
Purpose: Find a route between two points including alternative routes with information about stops, transfers, ...
URL: https://www.google.com/maps/dir/?api=1&origin=Bilbao&destination=%2,%1&travelmode=driving
Hints: In the given URL Bilbao (Spain) is used as the start point and the selected location is the endpoint of the route. You must replace Bilbao with the name of your town or city. If the name is composed replace spaces with +, e.g.: Selva+di+Val+Gardena. You can also use your home coordinates e.g.:
43.164,-1.236(... but remind that this is Google!). Select the type of transportation in the Google maps window. -
GoogleMaps
Purpose: Show the Google map at the given location.
URL: https://www.google.es/maps/@%2,%1,16z?hl=en
Hints: Contributed by JOSEPV. Once in Google maps, you can use the StreetView function.
-
StreetView
Purpose: Show the StreetView image at the given location if available.
URL: https://www.google.com/maps/@?api=1&map_action=pano&viewpoint=%2,%1
Hints: Contributed by pdenessen.
-
GoogleEarth
Purpose: Show the GoogleEarth map at the given location.
URL: https://earth.google.com/web/@%2,%1,10000a,0d,35y,0h,0t,0r
Hints: This might not work with older browsers. Contributed by JOSEPV.
-
OpenStreetMap Editor
Purpose: Open the OSM webpage at the given location in edit mode (ID editor), so you can edit some things quickly.
URL: https://www.openstreetmap.org/edit?editor=id#map=19/%2/%1
Hints: When opening, it will prompt you to log in to OSM. The value after
map=is the zoom level, you can change it. Contributed by JOSEPV.
Centering a map at a certain location defined by its coordinates is possible with the help of the Geosearch tool in the workspace. Select options "Nomatim" or "Google". Proceed as described for these options in section Geosearch and double-click on a result. The map will be centered on the search result.
A right-click in a map window at a certain position opens a context menu that offers (among others) the 2 choices:
Copy positionCopy position (grid)
In the first case the position is copied in the format used to display coordinates (see menu View - Setup Coord. Format),
e.g. N49° 21.734 E012° 44.146
In the second case, the position is copied as a pure grid coordinate.
For long/lat coordinates it is degrees (49.599924 10.599991 or -15.065344 -39.915421). For northing/easting
coordinates it is meters. (6307013m, 1415953m)
Remark: The copied position is the position selected with the mouse pointer on the map window. Its accuracy depends on the zoom level of the map. It is not the position of a POI, waypoint, or trackpoint at the same location!
Source: www.naviboard.de
This problem appears with a vector map like Freizeitkarte where smaller roads/tracks are only visible at a zoom level where the overview gets lost.
There is no such possibility in QMapShack. The detail levels for vector map data are defined by the map author and can't be changed within QMapShack.
Users reported the following ways to improve the visibility of small roads:
- Choose the menu item
View - Setup Map View - Projections&Datum - Append to the given configuration string one of the following strings:
-
+lat_ts=60This sets the latitude of true scale for a Mercator projection. The closer you get to the polar regions the more the map will be skewed horizontally in comparison to the vertical scale. At the latitude of true scale (usually 0 for the equator) the scales are equal. -
+k_0=0.3(Source: gmane.comp.gis.qlandkartegt) This is an additional scale factor on the normal scale. A value of 1.0 will have no effect. Try to increase or decrease the given value to get the wanted result
-
A map in the Garmin format consists of single map tiles plus a so-called type file that describes how the elements on the map should be displayed. The map tiles for a given area are typically packed together with a type file into a special container format. A typical name for such a container file is `gmapsupp_xxx.img.
QMS does support maps loaded from gmapsupp container files. It doesn't allow the use of single tiles.
(valid starting with QMS version 1.9.0)
The layout of a vector map in QMS is defined by rules found in a so-called type file. Type files are contained in the gmapsupp.img files required for the display of vector maps in QMS.
There is a strong relationship between the object types used in the description of the map data and the object types defined in a type file used for the display of the map.
The layout of a vector map can be changed in QMS by loading a new type file in the following way:
-
open the Maps tab in the workspace (select menu entries
Window - Mapsif tab is closed), -
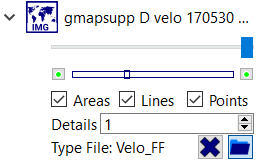
open the map features window of the activated map for which the layout should be changed,
-
click on the
Load external type fileicon in the Type file row of this window and select a type file (extension TYP), -
click the
Forget external type fileicon to return to the original map layout.
The following image shows various layouts of a vector map obtained by using 4 different type files.

The first layout is the default one for the map, the second one displays the same map data as the first one but in a slightly different way.
The third and the fourth layouts illustrate how important and even dangerous layout changes can be when changing to an incompatible type file. If wanted, certain object types are not displayed anymore (a motorway might be of no interest for a bicycle user). The fourth layout results from a type file not built for the given vector map. As a result, even the motorway is not displayed correctly.
Source: Discussion at https://sourceforge.net
Google maps offers different map layers as overlays to some basic map. Among the overlay layers is a Terrain layer.
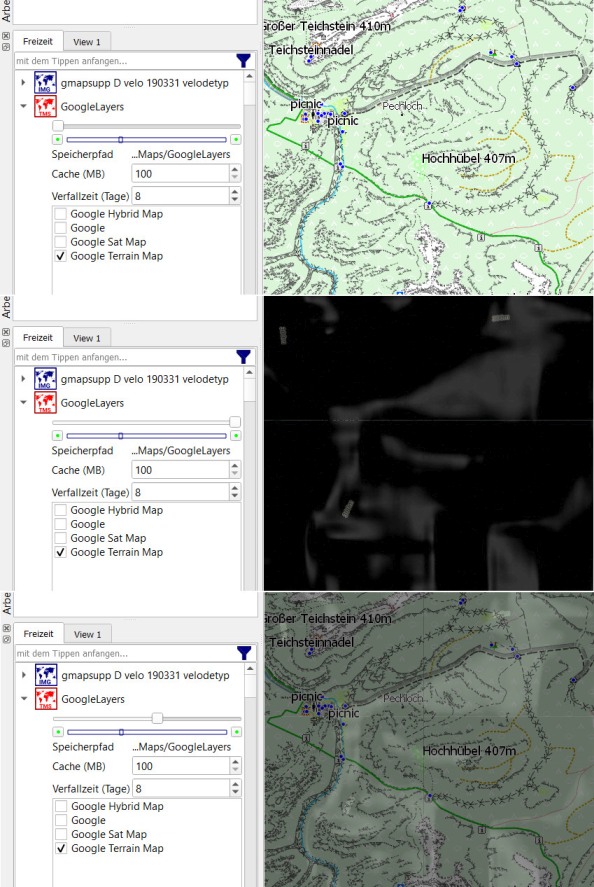
Using various TMS files these maps and their layers can be visualized in QMS. The next image shows in its upper part a map of some mountainous area without any overlays.
In the middle of this image, the Google terrain overlay is activated and shows the same area as the upper part. This overlay isn't a map in the proper sense of the word. It is used to show hillshading on some base map. The white/gray spots in this layer indicate hillshading.
Changing the opacity of the terrain layer with the help of the opacity slider reveals the hillshading on the base map (compare lower part of the next image with its upper and middle parts).
There are various sources of raster maps in various formats.
QMS supports raster formats that are
- supported by the
GDALversion used with QMapShack. Create a VRT file for the given raster map. Then it can be used in QMS. To get a list of formats supported byGDALrungdaltransform.exe --formatsin a console window. - of type RMAP, GEMF, JNX (formats directly loaded by QMS).
An advantage of the GEMF format is that reading the tiles from the map file is very fast.
The MOBAC Mobile Atlas Creator can be used as a source of raster maps. With the help of this application, the user can load tiles of online maps as well as some other map formats and save them as raster maps. Use GEMF or RMAP as output formats. For details check the MOBAC Wiki.
The proprietary Mapsforge vector map format, which is rather popular on mobile phones, can be read by the latest version of MOBAC. After converting a Mapsforge map to a GEMF map with MOBAC, the GEMF map can be loaded with QMS. Remark: This conversion can take some time depending on the size and the structure of the map!
The MAPC2MAPC64 map converter is designed as a converter between various raster map formats.
Remark about the QMS Windows version: Many applications handling geodata use the GDAL package. Thus, several versions of this package
can be found on the computer with different support for raster map formats. To avoid version conflicts, QMS works exclusively with the GDAL version in its
installation directory. Thus, a change of the GDAL related environment variables doesn't result in a change of the GDAL version used by QMS.
Source: Newsgroup thread sourceforge.net/p/qlandkartegt
-
Calibrated Russian military and other raster maps can be downloaded from various locations. Some servers are
When downloading a map tile 2 files are created: a GIF file (or another image file) with the raster map and an
OZIExplorerMAP file with geodetic calibration data. -
QMapShack supports the use of raster maps via VRT files. These files can be created with the
GDALBuildVRTtool and can also be accessed from within QMapShack. Doing so leads for the above-mentioned maps to an error message indicating that georeference data can't be found within the MAP files. -
To make the raster map usable for QMapShack the following procedure (described for a Windows installation) can be used:
-
Ensure that the
GDALtoolset and theproj.dllare in the QMapShack installation directory. -
Add this directory to the PATH environment variable
-
Ensure that the
datasubdirectory of the QMapShack installation directory is properly installed -
Add this directory to the GDAL_DATA environment variable
-
Move the image and the map file to a location where QMS is looking for maps or add the directory where these files are located to your QMapShack map paths.
-
Run
gdalwarp -of VRT full_path_to_your_raster_map.map full_path_to_your_raster_map.vrt -
Remarks:
- It is unclear why
GDALBuildVRTdoes not find the georeference information. - If there is a need to move the files discussed in this topic to a different location then repeat this procedure! The VRT file has a pointer to the relative or absolute path of the MAP file.
- It is unclear why
-
-
Raster maps may have borders. Use QMapTool to cut the map to the wanted shape without borders. For details compare section "Raster maps"
Source: http://article.gmane.org/gmane.comp.gis.qlandkartegt.user/2624
Consider the following hints:
-
Use
gdalinfoto verify if the required VRT file provides proper information. Keep in mind that the VRT file is just an XML wrapper around your real raster map file. It stores a path to that file. If the path changes, the VRT file has to be created again. -
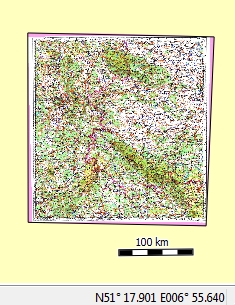
If the map is loaded correctly, QMS may suppress drawing the map because it would take too long. In this case, the map boundary is still visible as a black frame as shown on the left of the following images.
To force drawing of the map zoom in into the map.
Raster map not displayed Raster map displayed 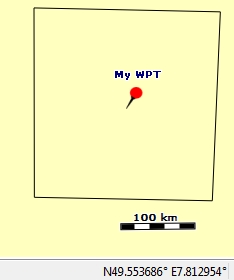
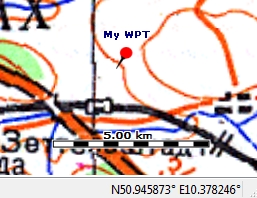
If overview maps are supported (compare section Basic knowledge about maps and DEM files) then the raster map is displayed with a lower level of detail when zooming out.
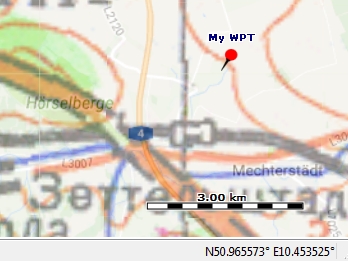
Data of raster maps may be outdated. To assess the data quality, use the possibility to overlay the raster map with a map providing recent data (e.g. online Google map) in QMS. The following example reveals that the German motorway A4 was reconstructed and avoids now some mountain areas.
-
If you have a layer of raster maps reading the files and scaling the content to an upper zoom level is getting more and more resource-intensive the more you zoom out. To avoid endless map loading, QMS will skip the map if the effort to display it is getting too large. However, if QMS detects overview levels attached to the map it will use them.
gdaladdois the tool to do so. Things are getting a bit more difficult for insane large map collections.gdaladdowill create an overview file over all maps combined in the VRT file. That might get too large. In this case, you have to create single overview files and combine them in a VRT file.
A raster map requires a VRT file to display it in QMS. The location of a raster map is part of the information
of the VRT file.
The gdalinfo tool can be used to display this information in a readable way. Call the tool
from the commandline as follows:
gdalinfo complete_path_to_vrt_file
Be sure the path to
-
gdalinfois set in thePATHenvironment variable, - the GDAL
datasubdirectory is set in theGDAL_DATAenvironment variable.
Here is an example of the result:
Files: c:\Maps\WT\500k--m32-2.vrt
       c:\Maps\WT\500k--m32-2.map
...
Corner Coordinates:
  Upper Left  (  490191.757, 5773077.762) (  8d51'24.88"E, 52d 5'11.35"N)
  Lower Left  (  490191.757, 5534334.766) (  8d51'48.12"E, 49d56'25.79"N)
  Upper Right (  719872.602, 5773077.762) ( 12d12'17.72"E, 52d 2'34.72"N)
  Lower Right (  719872.602, 5534334.766) ( 12d 3'38.19"E, 49d54' 0.62"N)
  Center      (  605032.180, 5653706.264) ( 10d29'46.95"E, 51d 0'14.73"N)
The coordinates given help to identify the location of the raster map on the QMS map screen. An easy way to do so is to define a waypoint in QMS with coordinates at the center of the raster map defined above and then to double-click on the waypoint. This centers the map in QMS to the waypoint and thus to the raster map.
Compare: naviboard.de newsgroup
Raster maps and DEM (Digital Elevation Model) data are supported in QMS via corresponding VRT files. Several VRT files can be used. It is up to the user to organize the files properly.
The fastest way to create a VRT file for a raster map is the VRT builder included in QMS (select menu Tool - VRT Builder). This tool calls the GDAL GDALBuildVRT.exe for the creation of the VRT file. For some raster maps, the tool may fail with some error message, e.g. of the form
Warning 6: gdalbuildvrt does not support rotated geo transforms.
The reason for this error message is that GDALBuildVRT can not create VRT files for raster maps that need additional projection transformations (in the example due to a rotated map). Such transformations can be carried out with the help of GDALWarp. GDALWarp has VRT as one of its output formats. Thus, in the described situation run the following command from a commandline:
gdalwarp -of VRT input_raster_file_name output_VRT_file_name
and use the VRT thus obtained in QMS.
Remark: The VRT file obtained from GDALWarp has a more complicated structure than the one obtained from GDALBuildVRT. They show in the first line of the VRT file the additional info
subClass="VRTWarpedDataset"
(inspired by newsgroup discussion)
Geodetic coordinate systems can be identified by a so-called EPSG code. If this code is known for a coordinate system, then it can be used for the setup of the coordinate system used for the map or the map grid.
Examples:
-
WGS 84, geographic:
+init=epsg:4326more detailed proj.4 setting of this coordinate system:
+proj=longlat +datum=WGS84 +no_defs -
WGS 84 / Pseudo-Mercator (selected in QMS/QMT via "World Mercator (OSM) - datum WGS_1984")
+init=epsg:3857more detailed proj.4 setting of this coordinate system:
+proj=merc +a=6378137 +b=6378137 +lat_ts=0.0 +lon_0=0.0 +x_0=0.0 +y_0=0 +k=1.0 +units=m +nadgrids=@null +wktext +no_defs
Parts of the coordinate system (projection, datum ellipsoid) can be described similarly if the EPSG code is known.
The WMTS specification offers a wide range of possibilities to describe the necessary map information in a WMTS capabilities file. QMS can handle only some of them. It assumes that the following requirements are fulfilled in a WMTS file:
- The filename extension of a WMTS capabilities file must be
wmts. - The WMTS server must support RESTful
Getoperations. - A
ResourceURLentry can be found for each layer in the WMTS capabilities file. QMS can't display a map without such a piece of information. WMTS services with the support of RESTful operations provide this information whereas services that support only KVP operations in most cases don't provide it explicitly. - The coordinate reference systems (CRS) of all tile matrix sets in the WMTS capabilities file must be known to the Proj.4 version used in QMS.
- The CRS of the first tile matrix set linked to a layer must have coordinate axes measured in meters. EPSG:3857 and EPSG:25830 - EPSG:25833 are examples of such coordinate systems (check the proj.4 description of the CRS for
+units=m). - The tile size of each tile matrix in the first tile matrix set of a layer must be 256 * 256.
- WMTS server access should be without user authentication (username/password).
If a WMTS capabilities file doesn't satisfy these requirements, it can't be used directly for map display in QMS. The next section describes some ways to use such files anyway. But not each of these ways will be successful!
Many WMTS files satisfy the mentioned requirements and can be used immediately and successfully in QMS. Nevertheless, some of them may cause difficulties or fail. Here are some known reasons:
- The WMTS capabilities file can be broken:
- XML structure of the file is incorrect or broken.
- Resource URL are missing or broken (wrong URL structure,
httpinstead ofhttps). - Branches in the
OperationsMetadatapart of the file can be missing.
- Map data is provided only for an unknown and restricted area.
- The type of the map data is unclear or can't be visualized on a map.
- A layer without content covers an underlying layer and makes it invisible.
- A layer is visible only on a small range of QMS zoom levels.
- There can be an extremely large number of layers and tiles which require extremely long processing times.
- Access to the tile server is forbidden.
- A CRS in some tile matrix set is not known.
- Some tile matrix in the used tile matrix set has a size different from 256 * 256.
QMS cannot detect each of the difficulties listed. Therefore, in the worst case, it may even happen that a map is displayed in QMS but it is in the wrong position and/or has the wrong size.
The use of a TMS wrapper for a WMTS file as described in the next section nevertheless makes the rendering of WMTS map layers possible in many cases.
Some online map servers can be accessed via the WMTS service.
QMS supports WMTS services directly or by wrapping them into TMS services (TMS files). Examples for calling a WMTS service via TMS can be found in section "Use WMTS server as TMS server". The current section gives some more insight into the subtleties of using WMTS files in QMS and of building the resource URL used in such a TMS wrapper.
The WMTS standard specifies several exchange mechanisms between clients and servers. The most important ones are
-
RESTfuloperations (a resource-oriented architectural style), -
KVPoperations (a procedure-oriented architectural style, KVP = Key-Value-Pair).
If a WMTS file fulfills some QMS-specific requirements it can be used immediately. In some other cases, it is still possible to render the maps defined in a WMTS file:
- In the case that
Restfuloperations are not supported, a missingResourceURLcan be built from other pieces of information in the WMTS file and inserted into the WMTS file. In many cases, QMS can successfully load online maps with such an updated WMTS file. - A layer can have several linked tile matrix sets. If the CRS of the first one can't be handled by QMS/Proj.4, but another one can, then put the link to this tile matrix set to the first position in the WMTS file.
- If the server requires user authentication, then insert the authentication data manually into the resource URL in the WMTS file. An example is shown in the section "How to build the URL when using WMS via TMS".
- Instead of modifying the WMTS file, it is possible to build a TMS file with the necessary resource URL and load the online map with the help of this TMS wrapper. This approach is described in this section for layers that support CRS EPSG:3857. The resource URL in a TMS file is bound to one layer and one of the tile matrix sets linked to the layer. Authentication information can be included in the resource URL, too.
The possibility to use TMS files instead of WMTS ones leads to yet other advantages:
- QMS loads and displays all layers in a WMTS file at once and in a given fixed order. The user can make a selection in QMS but without the possibility to change the order of the layers. A user may want to display only a certain part of these layers in an order different from the one used in the WMTS file. With the help of a TMS file, this can be achieved easily.
- When using a WMTS file its content is parsed completely. Using a TMS wrapper avoids this parsing step. Thus, a TMS file may work successfully even if the associated WMTS file fails to work due to failures in the XML structure of the file.
- Some of the possible obstacles in WMTS files can be removed by manipulating the XML structure of this file. This step is relatively error-prone and can be avoided by using a TMS file.
Remember when using a WMTS or TMS file that only certain areas and zoom levels might be supported by the server.
Let's take as an example a WMTS capabilities file of the French IGN geoserver.
Here is some extract of this XML file (some line numbers are added as a reference for the following discussion):
...
<ows:OperationsMetadata>
...
1 <ows:Operation name="GetTile">
    <ows:DCP>
      <ows:HTTP>
2       <ows:Get xlink:href="https://wxs.ign.fr/beta/geoportail/wmts?">
          <ows:Constraint name="GetEncoding">
3           <ows:AllowedValues>
4             <ows:Value>KVP</ows:Value>
...
<Contents>
5 <Layer>
6   <ows:Title>Délimitation parcellaire AOC viticole</ows:Title>
    ...
7   <ows:Identifier>Aire-Parcellaire</ows:Identifier>
    <Style isDefault="true">
      ...
8     <ows:Identifier>normal</ows:Identifier>
      ...
    </Style>
9   <Format>image/png</Format>
    ...
    <TileMatrixSetLink>
10    <TileMatrixSet>PM</TileMatrixSet>
      ...
    </TileMatrixSetLink>
  </Layer>
...
  <TileMatrixSet>
11   <ows:Identifier>PM</ows:Identifier>
12     <ows:SupportedCRS>EPSG:3857</ows:SupportedCRS>
To check whether adding a resource URL is necessary, proceed as follows:
- Find each
Layertag (line 5) in the WMTS file. - For each
Layerelement (tag) check, if it has a child with the tagResourceURL.- If yes, then check the next layer.
- If no (as can be seen in the example), then a
ResourceURLelement (tag) must be built before the WMTS file can be used in QMS. This resource URL must be inserted as a child element to theLayerelement.
- Find the entry
<ows:Operation name="GetTile">(line 1) in the WMTS file. Such an entry can be missing in the WMTS capabilities file but then there must be aResourceURLchild element in eachLayerelement. - Check, if the text of one of the
<ows:Value>entries (line 4) below the entry<ows:AllowedValues>(line 3) isKVP.- If yes, find and remember the URL part of the entry
<ows:Get xlink:href="some_url">(line 2). - If no, then either a resource URL is defined for each layer or a missing resource URL can't be added to this layer.
- If yes, find and remember the URL part of the entry
If a new resource URL has to be built, then this can't be the case for servers supporting the resource-oriented architectural style. Therefore, the server should support the procedure-oriented style and, consequently, the following procedure-oriented (KVP) template can be used for building a resource URL:
<ResourceURL format="[format]"
resourceType="tile"
template="[url]
SERVICE=WMTS&
REQUEST=GetTile&
VERSION=1.0.0&
LAYER=[layer]&
STYLE=[style]&
FORMAT=[format]&
TILEMATRIXSET=[tilematrixset]&
TILEMATRIX={TileMatrix}&
TILEROW={TileRow}&
TILECOL={TileCol}"/>(some line breaks have been added for better visibility of the structure of the string)
The values to be replaced in the template are:
- [format]: replace with the text of a
Formatchild element of the layer (line 9), preferablyimage/pngorimage/jpeg. - [url]: replace with the URL found in the
xlink:hrefattribute ("some_url", line 2) below theGetTileelement (line 1). Be sure, there is exactly one question mark at the end of this string! - [layer]: replace with the text in the
Identifiertag of the considered layer (line 7). - [style]: can be replaced either with the string
{Style}for automatic selection of the first layer style by QMS or with the text of theIdentifiertag below theStyletag of the layer (line 8). - [tilematrixset]: can be replaced either with the string
{TileMatrixSet}for automatic selection of a tile matrix set by QMS or with the text of one of theTileMatrixSetelements in the layer (line 10, child of aTileMatrixSetLink).
The complete new resource URL element for the given example is
<ResourceURL resourceType="tile"
             format="image/png"
             template="https://wxs.ign.fr/beta/geoportail/wmts?
             SERVICE=WMTS&
             REQUEST=GetTile&
             VERSION=1.0.0&
             LAYER=Aire-Parcellaire&
             STYLE={Style}&
             FORMAT=image/png&
             TILEMATRIXSET={TileMatrixSet}&
             TILEMATRIX={TileMatrix}&
             TILEROW={TileRow}&
             TILECOL={TileCol}"/>
Add this new XML entry (without line breaks) as last child node to the Layer tag (just before the closing </Layer> tag) in the WMTS file and save this file.
The map server response for a TMS or WMTS service request is a map tile. The tiles for both service types are identified using different rules. As a consequence, calling a WMTS service from a TMS service must include a rule for converting the TMS tile identifiers to WMTS identifiers. These rules also depend on the used coordinate reference system (CRS).
One of the parameters for a TMS tile is its zoom level described by an integer number. A zoom level in WMTS belongs to a tile matrix. The identifier of a tile matrix can be a string. If so, a rule for getting the TMS zoom level from the tile matrix identifier must be found and used.
Since many servers support the world-wide coordinate reference system EPSG:3857 (WGS 84/Pseudo-Mercator, axes: easting, northing in meters), only this CRS is discussed below.
Each layer used in a TMS wrapper for a WMTS file has to be linked with one of the tile matrix sets belonging to this layer. This tile matrix set must support the CRS EPSG:3857 and each tile matrix in this set must have a width and a height of 256. If none of the tile matrix sets of a layer supports EPSG:3857 or if the tile size is not 256, then building of a TMS file is not possible.
One of the parameters for a TMS tile is its zoom level described by an integer number. A zoom level in WMTS belongs to a tile matrix in the selected tile matrix set. The identifier of a tile matrix can be a string. If so, a rule for getting the TMS zoom level from the tile matrix identifier must be found and used. Tile numbering of the WMTS service and the TMS one must be the same. Otherwise, a TMS wrapper doesn't work as expected.
Thus, the approach described in this section is some guideline for building a TMS wrapper for a WMTS. It is not guaranteed, that for any WMTS service the TMS wrapper works as expected.
A TMS file can be used for rendering in QMS several layers from one or several WMTS files.
The structure of the resource URL depends on the architectural style (KVP or RESTful) supported by the server. Compare line 4 in the example capabilities file shown above to find the supported styles.
For more information compare also the page "Examples of the use of WMTS services".
Here is a template TMS XML file for procedure-oriented requests (KVP style):
<TMS>
<Layer idx="0">
<Title>[title]</Title>
<Script><![CDATA[(
function convert(z1,x1,y1)
{return "[url]
        SERVICE=WMTS&
        VERSION=1.0.0&
        REQUEST=GetTile&
        LAYER=[layer]&
        STYLE=[style]&
        FORMAT=[format]&
        TileMatrixSet=[tilemmatrixset]&
        TileMatrix="+z1+"&
        TileRow="+y1+"&
        TileCol="+x1}
)]]></Script>
</Layer>
<Copyright>[copyright]</Copyright>
</TMS>
(some line breaks have been added for better visibility of the structure of the string, remove them before using the TMS file!)
Here, the term [title] resp. [copyright] is to be replaced by a descriptive title resp. copyright notice. The text of the Title child element of the Layer element (line 6) or the global title in the WMTS capabilities file can be used as [title] (line 6).
The values for [url], [format], [style], and [layer] are found as described in the previous subsection.
[tilematrixset] has to be replaced with the text of one of the TileMatrixSet elements in the layer (line 10). Because of the limitation to certain CRS the tile matrix set must support CRS EPSG:3857. To find the CRS for a tile matrix set go to the tag SupportedCRS below the Identifier tag of your tile matrix set and check, if it is EPSG:3857 (line 11, 12).
The final TMS file for the given example is
<TMS>
<Layer idx="0">
<Title>Délimitation parcellaire AOC viticole</Title>
<Script><![CDATA[(
function convert(z1,x1,y1)
{return "https://wxs.ign.fr/beta/geoportail/wmts?
        SERVICE=WMTS&
        VERSION=1.0.0&
        REQUEST=getTile&
        LAYER=Aire-Parcellaire&
        STYLE=normal&
        FORMAT=image/png&
        TileMatrixSet=PM&
        TileMatrix="+z1+"&
        TileRow="+y1+"&
        TileCol="+x1}
)]]></Script>
</Layer>
<Copyright>IGN.fr</Copyright>
</TMS>
Remark: It was mentioned at the begin of this section that special care must be taken if the identifiers of tile matrix sets are not numbers but strings. This situation is explained with a WMTS capabilities file for Norway. A tile matrix for EPSG:3857 in this capabilities file looks as follows:
-<TileMatrixSet>
  <ows:Identifier>EPSG:3857</ows:Identifier>
  <ows:SupportedCRS>urn:ogc:def:crs:EPSG::3857</ows:SupportedCRS>
  -<TileMatrix>
    <ows:Identifier>EPSG:3857:0</ows:Identifier>
Here, the prefix EPSG:3857: is added to the zoom level. In this case an additional line can be inserted into the convert function of the TMS file to achieve the correct selection of a tile matrix:
<Script><![CDATA[(
function convert(z1,x1,y1)
{z1 = "EPSG:3857:" + z1.toString();
return "http://opencache.statkart.no/gatekeeper/gk/gk.open_wmts?SERVICE=WMTS&request=getTile&VERSION=1.0.0&Layer=norgeskart_bakgrunn&STYLE=default&TileMatrixSet=EPSG:3857&format=image/png&TileMatrix="+z1+"&TileRow="+y1+"&TileCol="+x1
}
)]]></Script>
In this case, each layer should have a ResourceURL in the capabilities file pointing to a URL with the structure:
[url]/
[layer]/
[style]/
[tilematrixset]/
"+z1+"/
"+y1+"/
"+x1+".[formatext]
The values for [layer], [style], and [tilematrixset] are found as described for the KVP style.
To find the value for [url] go to the template attribute of the ResourceURL tag and use the first part of the value of this template. This part ends with tile/1.0.0.
[formatext] is the filename extension for the used image format in [format] (png or jpg).
Here is an example for a resource URL:
"https://sgx.geodatenzentrum.de/wmts_topplus_open/tile/1.0.0/
web/
default/
WEBMERCATOR/
"+z1+"/
"+y1+"/
"+x1+".png"/>
In this example the [url] part is https://sgx.geodatenzentrum.de/wmts_topplus_open/tile/1.0.0 and the [formatext] value is png.
The complete TMS file (using values from the relevant WMTS capabilities file and including 2 layers) is
<TMS>
<Layer idx="0">
<Title>TopPlusOpen</Title>
<Script><![CDATA[(
function convert(z1,x1,y1)
{return "https://sgx.geodatenzentrum.de/wmts_topplus_open/tile/1.0.0/
       web/
       default/
       WEBMERCATOR/
       "+z1+"/
       "+y1+"/
       "+x1+".png"}
)]]></Script>
</Layer>
<Layer idx="1">
<Title>TopPlusOpen Graustufen</Title>
<Script><![CDATA[(
function convert(z1,x1,y1)
{return "https://sgx.geodatenzentrum.de/wmts_topplus_open/tile/1.0.0/
       web_grau/
       default/
       WEBMERCATOR/
       "+z1+"/
       "+y1+"/
       "+x1+".png"}
)]]></Script>
</Layer>
<Copyright>BKG</Copyright>
</TMS>
For more details compare the page "Examples of the use of WMTS services".
Many online map servers can be accessed via the WMS service. An advantage of a WMS service is that it typically provides access to many different types of information organized in (map) layers.
QMS supports WMS services by wrapping them into TMS services (TMS files). Examples for calling a WMS service via TMS can be found in section "Use WMS server as TMS server". The current section gives some more insight into the subtleties of building the URL used in such a TMS file.
The map server response for a TMS or WMS service request is a map tile. The tiles for both service types are identified using different rules. As a consequence, calling a WMS service from a TMS service must include a rule for converting the TMS tile identifiers to WMS identifiers. These rules also depend on the used coordinate reference system (CRS).
Since most servers support the world-wide coordinate reference systems EPSG:4326 (WGS84, axes: latitude, longitude in degrees) and/or EPSG:3857 (WGS 84/Pseudo-Mercator, axes: easting, northing in meters), only these 2 CRS are discussed below. If neither of these 2 CRS is supported, then a coordinate transformation formula must be known for building a TMS wrapper for the WMS file.
The TMS file for the CRS EPSG:4326 has the form
<TMS>
<Layer idx="0">
<Title>TITLE</Title>
<Script><![CDATA[(
 function convert(z,x,y)
{function tile2lon(x, z) {return x / Math.pow(2.0, z) * 360.0 -180.;}
  function tile2lat(y, z) {
    n = Math.PI - (2.0 * Math.PI * y) / Math.pow(2.0, z);
    return (Math.atan(Math.sinh(n)))*180.0/Math.PI;
  }
  north = tile2lat(y, z);
  south = tile2lat(y + 1, z);
  west = tile2lon(x, z);
  east = tile2lon(x + 1, z);
  bbox = south + "," + west +"," + north + "," + east;
  return "URL" + bbox
}
)]]></Script>
</Layer>
<Copyright>COPYRIGHT</Copyright>
</TMS>
The TMS file for the CRS EPSG:3857 has the form
<TMS>
<Layer idx="0">
<Title>TITLE</Title>
<Script><![CDATA[(
function convert(z1,x1,y1)
{ function M(n){return 256*n*(156543.03392804062/(1<<z1))-20037508.342789244}
  y=(1<<z1)-1-y1;
  bbox=M(x1)+','+M(y)+','+M(x1+1)+','+M(y+1);
  return "URL" + bbox
}
)]]></Script>
</Layer>
<Copyright>COPYRIGHT</Copyright>
</TMS>
Thus, both variants of TMS files differ by the rules for finding the bounding box coordinates.
In both cases the term TITLE resp. COPYRIGHT is to be replaced by a descriptive title resp. copyright notice.
The placeholder URL is to be replaced by a complete URL. All values required for building this URL can be found in the WMS capabilities file for the given WMS server. The capabilities file can be downloaded from the homepage of the server. Details are explained using the following extract of a WMS capabilities file for a Spanish WMS server as an example.
<?xml version="1.0" encoding="UTF-8"?>
1 <WMS_Capabilities ... version="1.3.0" ...>
<Service>
<Name>WMS</Name>
2 <Title>Cartografía Ráster de España del IGN</Title>
...
<Capability>
<Request>
...
<GetMap>
3 <Format>image/png</Format>
...
<DCPType>
<HTTP>
<Get>
4 <OnlineResource xlink:type="simple" xlink:href="http://www.ign.es/wms-inspire/mapa-raster?SERVICE=WMS&"/>
...
<Layer>
...
5 <CRS>EPSG:4326</CRS>
...
5 <CRS>EPSG:3857</CRS>
...
<Layer queryable="0">
6 <Name>mtn_rasterizado</Name>
...
<Style>
7 <Name>default</Name>
...
</Style>
</Layer>
...
</Layer>
</Capability>
</WMS_Capabilities>A complete WMS URL is built by choosing values for the following URL parameters:
- The value of the attribute
xlink:hrefin theGetMap/.../OnlineResourcetag (line 4) as server address. Attention: There must be exactly one question mark at the end of this value. If there is a question mark within this value, then avoid repeated name-value pairs. - SERVICE: must be
WMS. - VERSION: must be either
1.1.0or1.3.0. This is the value of the attributeversionof theWMS_Capabilitiestag (line 1). - REQUEST: must be
GetMap. - LAYERS: a comma-separated list of names of layers to display. Names are taken from the text of the
Nameschild tags of theLayertag (line 6). TheLayertags in a WMS capabilities file are in a hierarchical (tree-like) order. Some values (among them theCRSvalues) are inherited by the child elements. Only layers with aNametag have map tiles. If some required value can't be found on the level of the selected layer, then check, if the value can be found in one of the predecessor nodes of this layer. - STYLES: defines the styles for the displayed layers (preferably
default). For each used layer the value must be taken from the text of theStyle/Namechild tag of the layer (line7). - FORMAT: should be
image/pngorimage/jpeg(the so-called MIME type). Recommendation: preferimage/png. The value is taken from the text of aFormattag below theGetMaptag (line 3). - SRS/CRS: must be
EPSG:4326orEPSG:3857. Represents the Coordinate Reference System. UseCRSwith WMS version 1.3.0 as parameter name, otherwiseSRS. Check, if one of the CRS is listed below theLayertag (lines 5). If not, then a TMS file can't be built. - BBOX: represents the boundary box of the requested image tiles. Its format is xmin,ymin,xmax,ymax. The values depend on the selected CRS. Placeholders have to be used instead of specific values which are replaced with a concrete value when QMS requests a map tile.
- WIDTH: should be
256. Width of the requested image in pixels. - HEIGHT: should be
256. Height of the requested image in pixels.
Here is the complete final URL for the discussed example with some comments:
1   http://www.ign.es/wms-inspire/mapa-raster?
2     SERVICE=WMS&
3     REQUEST=GetMap&
4     VERSION=1.3.0&
5     LAYERS=mtn_rasterizado&
6     FORMAT=image/png&
7     CRS=EPSG:4326&
8     STYLES=default&
9     WIDTH=256&
10    HEIGHT=256&
11    BBOX=
Line numbers and line breaks are inserted for discussion and better visibility of the structure. They have to be removed in the final result!
- Line 1: the URL of the WMS server. Be sure, exactly one question mark is at the last position.
- Line 4: the WMS version supported by the server.
- Line 5: a comma-separated names list of layers to display. In the example just 1 layer.
- Line 6: the image format to be used.
- Line 7: the CRS to be used. The WMS version
1.3.0implies that the parameter name isCRS. - Line 8: a comma-separated list of styles for the display of the layers. In the example just one entry for the 1 layer used.
Here is the complete TMS file for the discussed example:
<TMS>
<Layer idx="0">
<Title>Cartografía Ráster de España del IGN/mtn_rasterizado - 4326 lon/lat</Title>
<Script><![CDATA[(
 function convert(z,x,y)
{function tile2lon(x, z) {return x / Math.pow(2.0, z) * 360.0 -180.;}
  function tile2lat(y, z) {
    n = Math.PI - (2.0 * Math.PI * y) / Math.pow(2.0, z);
    return (Math.atan(Math.sinh(n)))*180.0/Math.PI;
  }
  north = tile2lat(y, z);
  south = tile2lat(y + 1, z);
  west = tile2lon(x, z);
  east = tile2lon(x + 1, z);
  return "http://www.ign.es/wms-inspire/mapa-raster?SERVICE=WMS&SERVICE=WMS&REQUEST=GetMap&VERSION=1.3.0&LAYERS=mtn_rasterizado&FORMAT=image/png&CRS=EPSG:4326&STYLES=default&WIDTH=256&HEIGHT=256&BBOX=" + south + "," + west +"," + north + "," + east
}
)]]></Script>
</Layer>
<Copyright>Geobasis xxxx</Copyright>
</TMS>
Hints:
-
When checking a map rendered with the help of a TMS file in QMS, then pay attention to the following facts:
-
Map tiles might be available only for certain regions (defined by some bounding box).
-
Map tiles might be displayed only on some zoom levels. Try to find them in QMS.
-
The server might be sensitive to the correct
STYLESvalues of a layer. -
The requested service might be not or no more available on the server. Check the QMS debug log to get more information.
-
In case of trouble, take the resource URL for EPSG:4326, fill in appropriate latitude and longitude coordinates for your region as bounding box values and open the resource URL in a web browser. An image or an error message should be displayed. Example for the discussed Spanish server:
http://www.ign.es/wms-inspire/mapa-raster?SERVICE=WMS&SERVICE=WMS&REQUEST=GetMap&VERSION=1.3.0&LAYERS=mtn_rasterizado&FORMAT=image/png&CRS=EPSG:4326&STYLES=default&WIDTH=256&HEIGHT=256&BBOX=40.4,-3.6,40.5,-3.5
-
-
There is some confusion with the coordinate order when using
EPSG:4326. WMS version 1.3.0 mostly supports the latitude/longitude order. Some servers, mainly those with WMS version 1.1.0, assume the opposite order. In this case, thebboxline in the TMS file must be replaced bywest + "," + south + "," + east + "," + north;Checking the bounding boxes for EPGS:4326 in the WMS capabilities file can help to reveal the proper coordinate order. Here are a few examples:
-
<BoundingBox CRS="EPSG:4326" minx="-88" miny="-180" maxx="88" maxy="180"/>.Obviously, the y-coordinate describes longitudes, the x-coordinate describes latitudes. The region defined by the bounding box is the whole world without polar areas.
-
<BoundingBox CRS="EPSG:4326" maxx="53.2057" maxy="14.3058" minx="50.8002" miny="9.0407"/>.This bounding box belongs to a German map server. With this additional information the coordinate orientation is easily found: the y-coordinate describes longitudes, the x-coordinate describes latitudes.
-
<LatLonBoundingBox maxy="84" maxx="-52" miny="41" minx="-141"/>.This bounding box belongs to a Canadian map server. With this additional information the coordinate orientation is easily found: the y-coordinate describes latitudes, the x-coordinate describes longitudes.
-
-
The CRS denoted as
CRS:84is a relatively new coordinate system. It is equivalent to CRS EPSG:4326 but with longitude/latitude order of the coordinate axes. If there is a need to use this coordinate system, then use the approach described for CRS EPSG:4326 and change the coordinate order as described in the previous point. -
Some servers require a user authentification and, possibly, some user key. This information must be included in the server URL. An example is the server of the French Institut national de l’information géographique et forestière (IGN). Here, the user has to register and to get a user login and a user key.
Having registered, an example of a user-specific URL is
https://user:password@wxs.ign.fr/userkey/geoportail/r/wms -
A TMS file can consist of several
<Layer idx=".."> ... </Layer>blocks even if they use different servers and CRS. If several layer blocks are used, then theidxattributes must be numbered consecutively starting from 0. Here is an example TMS file with 3 layers:<TMS> <Layer idx="0"> <Title>WMS-Toporama/limits</Title> <Script><![CDATA[( function convert(z1,x1,y1) { function M(n){return 256*n*(156543.03392804062/(1<<z1))-20037508.342789244} y=(1<<z1)-1-y1; bbox=M(x1)+','+M(y)+','+M(x1+1)+','+M(y+1); return "http://maps.geogratis.gc.ca/wms/toporama_en?SERVICE=WMS&REQUEST=GetMap&VERSION=1.1.1&LAYERS=limits&FORMAT=image/jpeg&SRS=EPSG:3857&STYLES=default&WIDTH=256&HEIGHT=256&BBOX=" + bbox; } )]]></Script> </Layer> <Layer idx="1"> <Title>WMS-Toporama/road network</Title> <Script><![CDATA[( function convert(z1,x1,y1) { function M(n){return 256*n*(156543.03392804062/(1<<z1))-20037508.342789244} y=(1<<z1)-1-y1; bbox=M(x1)+','+M(y)+','+M(x1+1)+','+M(y+1); return "http://maps.geogratis.gc.ca/wms/toporama_en?SERVICE=WMS&REQUEST=GetMap&VERSION=1.1.1&LAYERS=road_network&FORMAT=image/jpeg&SRS=EPSG:3857&STYLES=default&WIDTH=256&HEIGHT=256&BBOX=" + bbox; } )]]></Script> </Layer> <Layer idx="2"> <Title>WMS-Toporama/combined limits & roads</Title> <Script><![CDATA[( function convert(z1,x1,y1) { function M(n){return 256*n*(156543.03392804062/(1<<z1))-20037508.342789244} y=(1<<z1)-1-y1; bbox=M(x1)+','+M(y)+','+M(x1+1)+','+M(y+1); return "http://maps.geogratis.gc.ca/wms/toporama_en?SERVICE=WMS&REQUEST=GetMap&VERSION=1.1.1&LAYERS=limits,road_network&FORMAT=image/jpeg&SRS=EPSG:3857&STYLES=default,default&WIDTH=256&HEIGHT=256&BBOX=" + bbox; } )]]></Script> </Layer> <Copyright>Open Government Licence - Canada</Copyright> </TMS>The first 2 layers are layers for the boundaries and the roads in Canada. The third layer is a combination of boundaries and roads. It shows the roads as an overlay on the boundaries layer. The layers are listed in the
Layersparameter. For each layer, there is a style entry in theStylesparameter.
Many map servers offer their services in WMTS and WMS form. The following features of the services may help to make an appropriate choice.
- WMTS services are supported by QMS, WMS services aren't.
- WMTS files without a resource URL for each layer can't be used in QMS.
- A wide range of CRS is supported for WMTS services.
- WMS services can only be used with the help of a TMS wrapper and only if a layer supports CRS EPSG:4326 and EPSG:3857.
- Layer handling differs:
- WMTS: All layers are displayed at once, the user can make a selection in QMS, but can't change the order of rendering the layers.
- WMS: When building the resource URL for the TMS wrapper file, the user can choose the necessary layers and their order.
- The rules described here for TMS wrappers assume that the
- WMTS service supports EPSG:3857,
- WMS service supports EPSG:3857 or EPSG:4326.
Often WMTS and WMS services offer many map layers and coordinate reference systems (CRS). Their proper and successful selection can therefore become difficult and require additional information. A tool that can provide additional insight in online maps downloaded with a WMTS or WMS service is GDAL. GDAL is required when running QMS. For Windows systems, it is installed together with QMS into the QMS installation folder.
Map information can be obtained with the following steps (details can be found in the GDAL WMTS and WMS driver documentation):
-
Preliminary remark: The success of the described procedure heavily depends on the features of the map server and the GDAL driver. Therefore, the procedure may fail!
-
Open a console window and be sure that the GDAL tools are on your path.
-
If a capabilities file is not yet available, download it from the server. Here are some examples:
- http://geoportal-zm.cuzk.cz/WMTS_ZM/service.svc/get?service=WMTS&request=GetCapabilities: WMTS service in procedure-oriented style.
- http://maps.wien.gv.at/wmts/1.0.0/WMTSCapabilities.xml: WMTS service in resource-oriented style.
- https://isk.geobasis-bb.de/mapproxy/dtk50farbe/service/wms?SERVICE=WMS&VERSION=1.3.0&REQUEST=GetCapabilities: WMS service.
It depends on the server, if the procedure- or the resource-oriented style has to be used to get the capabilities file.
-
Save the obtained capabilities information in a file with the name
Capabilities.xml(this ambiguous filename is chosen to make the following discussion easier). -
From the console call
gdalinfo "Capabilities.xml"(add paths, if necessary!)The result of this call is a description of the essential features of the online map. Here is part of it for the first example:
 Driver: WMTS/OGC Web Map Tile Service
 Files: Capabilities.xml
 Size is 7295971, 3318615
 Coordinate System is:
 GEOGCS["ETRS89",
     DATUM["European_Terrestrial_Reference_System_1989",
         SPHEROID["GRS 1980",6378137,298.257222101,
             AUTHORITY["EPSG","7019"]],
         TOWGS84[0,0,0,0,0,0,0],
         AUTHORITY["EPSG","6258"]],
     PRIMEM["Greenwich",0,
         AUTHORITY["EPSG","8901"]],
     UNIT["degree",0.0174532925199433,
         AUTHORITY["EPSG","9122"]],
     AUTHORITY["EPSG","4258"]]
 Origin = (11.213963452366922,51.691737342750820)
 Pixel Size = (0.000001123034467,-0.000001123034467)
 Metadata:
   ABSTRACT=Základní mapy ČR
   TITLE=Základní mapy ČR
 Image Structure Metadata:
   INTERLEAVE=PIXEL
 Subdatasets:
   ...
   SUBDATASET_12_NAME=WMTS:Capabilities.xml,layer=zm,tilematrixset=wgs84:geographic2d:epsg:4326
   SUBDATASET_12_DESC=Layer Základní mapy ČR, tile matrix set wgs84:geographic2d:epsg:4326
   ...
 Corner Coordinates:
 Upper Left  (  11.2139635,  51.6917373) ( 11d12'50.27"E, 51d41'30.25"N)
 Lower Left  (  11.2139635,  47.9648183) ( 11d12'50.27"E, 47d57'53.35"N)
 Upper Right (  19.4075904,  51.6917373) ( 19d24'27.33"E, 51d41'30.25"N)
 Lower Right (  19.4075904,  47.9648183) ( 19d24'27.33"E, 47d57'53.35"N)
 Center      (  15.3107769,  49.8282778) ( 15d18'38.80"E, 49d49'41.80"N)
 ...
The
Subdatasetspart is the most interesting part. It lists each map layer with one feasible tile matrix and one coordinate reference system (CRS). -
Select one of the subdatasets (in the example:
SUBDATASET_12) to get more information about it. To do this, callgdalinfo WMTS:Capabilities.xml,layer=zm,tilematrixset=wgs84:geographic2d:epsg:4326(the
gdalinfoparameter is taken from the value of theSUBDATASET_12_NAMEfield)Here is part of the result:
Driver: WMTS/OGC Web Map Tile Service Files: none associated Size is 7295971, 3318615 Coordinate System is: GEOGCS["WGS 84", DATUM["WGS_1984", SPHEROID["WGS 84",6378137,298.257223563, AUTHORITY["EPSG","7030"]], AUTHORITY["EPSG","6326"]], PRIMEM["Greenwich",0, AUTHORITY["EPSG","8901"]], UNIT["degree",0.0174532925199433, AUTHORITY["EPSG","9122"]], AUTHORITY["EPSG","4326"]] Origin = (11.213963452366922,51.691737342750820) Pixel Size = (0.000001123034467,-0.000001123034467) Metadata: ABSTRACT=Základní mapy ČR TITLE=Základní mapy ČR Image Structure Metadata: INTERLEAVE=PIXEL Corner Coordinates: Upper Left ( 11.2139635, 51.6917373) ( 11d12'50.27"E, 51d41'30.25"N) Lower Left ( 11.2139635, 47.9648183) ( 11d12'50.27"E, 47d57'53.35"N) Upper Right ( 19.4075904, 51.6917373) ( 19d24'27.33"E, 51d41'30.25"N) Lower Right ( 19.4075904, 47.9648183) ( 19d24'27.33"E, 47d57'53.35"N) Center ( 15.3107769, 49.8282778) ( 15d18'38.80"E, 49d49'41.80"N) ... -
For the selected layer and (one of) its subdataset(s) now call
gdal_translate "WMTS:Capabilities.xml,layer=zm,tilematrixset=wgs84:geographic2d:epsg:4326" zm.tiff -of GTiff -outsize 2000 2000The result is a georeferenced TIFF file
zm.tiffwith size 2000 x 2000. This image file shows the complete map of the layer. -
Information about WMS services is obtained in the same way. The following example demonstrates some additional possibilities. When calling
gdalinfo Capabilities.xmlfor the third example, i.e. for a WMS example, then the layer information returned isSubdatasets: SUBDATASET_1_NAME=WMS:https://isk.geobasis-bb.de/mapproxy/dtk50farbe/service/wms? SERVICE=WMS&VERSION=1.3.0&REQUEST=GetMap&LAYERS=bb_dtk50_farbe&CRS=CRS:84& BBOX=11.152768795679583,51.263517011631606,15.392977959312176,53.60940433664921 SUBDATASET_1_DESC=Digitale Topographische Karte 1:50 000 FarbeTo get a TIFF image call next
 gdal_translate "WMS:https://isk.geobasis-bb.de/mapproxy/dtk50farbe/service/wms?
        SERVICE=WMS&VERSION=1.3.0&REQUEST=GetMap&LAYERS=bb_dtk50_farbe&CRS=CRS:84
        &BBOX=11.152768795679583,51.263517011631606,15.392977959312176,53.60940433664921"
         bb.tiff -of GTiff -outsize 2000 2000
(line breaks added!)
This call fails with the error message "The server returned exception code 'InvalidCRS': unsupported crs: CRS:84". This error is typical for layers with many and especially regional coordinate systems.
Looking into the WMS capabilities file reveals that the layer
bb_dtk50_farbesupports also other CRS, among them the well-known CRS EPSG:3857 which can be used in a TMS file for QMS. Information about this CRS is obtained with the callgdalinfo "WMS:https://isk.geobasis-bb.de/mapproxy/dtk50farbe/service/wms? SERVICE=WMS&VERSION=1.3.0&REQUEST=GetMap&CRS=EPSG:3857"which results in
 Subdatasets:
   SUBDATASET_1_NAME=WMS:https://isk.geobasis-bb.de/mapproxy/dtk50farbe/service/wms?
   SERVICE=WMS&VERSION=1.3.0&REQUEST=GetMap&LAYERS=bb_dtk50_farbe&CRS=EPSG:3857&
   BBOX=1241520.543270162,6668039.871372213,1713538.4682227147,7096526.47996629
   SUBDATASET_1_DESC=Digitale Topographische Karte 1:50 000 Farbe
Remark: This may fail for layers that inherit some of their properties from parent layers.
The main new piece of information is the bounding box for CRS EPSG:3857 which is required in the call for a TIFF image:
 gdal_translate  "WMS:https://isk.geobasis-bb.de/mapproxy/dtk50farbe/service/wms?
     SERVICE=WMS&VERSION=1.3.0&REQUEST=GetMap&LAYERS=bb_dtk50_farbe&CRS=EPSG:3857&
     BBOX=1241520.543270162,6668039.871372213,1713538.4682227147,7096526.47996629"
       bb.tiff -of GTiff -outsize 2000 2000
This call results in a TIFF file showing the complete map for the selected layer. Thus, this layer can be rendered in QMS with a TMS file.
If bounding box data is not found or not found for the CRS under consideration, then use the area you are interested in as a bounding box. Use the coordinates of the considered CRS! Prefer CRS EPSG:4326 where geographic coordinates can be used.
Prev (Routing) | Home | Manual | Index | Top | (WMS Examples) Next