Additional Channels, Subchannels and Presets
In Jamtaba you can have up to two independent channels each of which can have one additional sub channel (standalone version only) or one channel plus a video stream. The two channels and video stream are sent to the jam room separate from each other so others in the room can adjust the mix in their local computers.
To add a second channel, just click on the wheel at the right side of the text box and select “Add Channel”. If you want to add sub channels, just click “Add sub channel”.

To activate the video stream, just click the camera icon located at the bottom of the local channels. Video will always use the second channel (jamtaba 2.1.5 and above).
![]()
NOTES:
- Sub channels are not available in the VST/AU Plugin version.
- To stop sending video to the room just click the camera image again.
- If you have more than one camera available, Jamtaba will recognize all of them and allow you to choose the one you want to use during your jam session.
When you start Jamtaba for the first time, the instrument name for one or two channels will be blank showing a Jamtaba icon in your local tracks. Just choose the correct icon depending on your instrument from the icons available for others to see during a jam.
![]()
Please remember the process of encoding the audio and video streams to be sent over the internet is a very CPU intensive process, so for slow computers the use of one channel (and one subchannel if you need) only and no video is recommended.
NOTE: see appendix for CPU optimization on slow computers.
Another important thing to keep in mind is that the use of two channels doubles the amount of upload bandwidth required. Video stream can be very demanding on the upstream side too. This means that if you have a slow internet connection you should use one channel (plus one subchannel) only and no video stream. For more information on this topic, please go to the item Encoder Quality in the Setting up Jamtaba and Appendix pages.
- Input Channel Presets:
Presets are very useful when you want to keep your input channel’s configuration for later use. Saved presets include VST Plugins used, faders and pan positions and channels names. To do this, just click Save Preset and choose a name for the file and the location in your Hard Disk. To Load a Preset choose from the side Menu or click Load Preset to use a previously stored file. To delete a Preset, choose from the Delete Preset list. A confirmation dialog will appear in this case.

If you need to use a clean track, just click Reset Track Controls and start from scratch. Editing Preset names has to be done manually. See Appendix for more information.
- The Midi Tools Button:
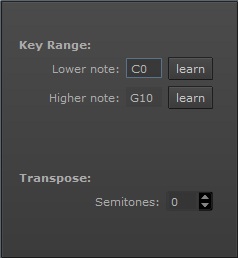
If you press this button you’ll find options to configure the split keyboard function of Jamtaba. This menu will allow you to use one Midi interface to control several midi tracks by selecting which range of keys will control a specific track.
NOTE: The Midi Tools Button is not available in the VST/AU Plugin version.
Route Midi Input to first Subchannel:

Use this checkbox when you need to input additional midi data to a channel. Because each channel (and subchannel) is allowed only one input at a time, you can use a subchannel to add a second input at the same time (useful for Vocoders, Loopers, etc.).
In this case, all midi data that comes in the second subchannel will be routed to the first subchannel and added to it's input. It uses the second subchannel as an additional midi input for the first subchannel. An indication will appear in the upper section of the second subchannel when enabled:
![]()
Another application of this feature is the possibility to have two different midi input sources for one plugin. For example you can load kontakt in the first subchannel and control it with two keyboards or one keyboard and a control pad, etc.
NOTE: When using the routing midi function all audio realted controls for the second subchannel will be disabled.
