Installation
Jamtaba is currently available as a VST plugin (x86/x64 Windows), AU plugin (Mac x64) and as Standalone version for Windows (32/64 bits), Mac OSX 10.7+ (64bits only) and Linux (32/64 bits). To install, you must download the correct version for your computer from www.jamtaba.com .
You just have to launch the file downloaded:

Follow the instructions and provide the right path in order to install the software correctly.

In order for VST plugins to work in JamTaba it’s important that the correct path is chosen here. This path will also be used to install the VST Plugin version of Jamtaba.

Once the installation is complete, close the installer and run the software.

JamTaba is not yet avaible as a package : it must be installed (and uninstalled) "manually", and the installer needs to be launched in a terminal (console). If you don't know what it means, please have a look about the terminal (console) on your linux distribution help/wiki before continuing.
(Then) in the console, go to the directory where you downloaded the installer, and make it executable:
chmod +x ./Jamtaba2_Installer_64bits.runFor a "fully integrated" installation, root's privileges are needed now. If you don't know what we are talking about, you should ask for some help around you (using root's privilieges can break your linux system if you are misteaken). Or else, continue with a "partially integrated" installation (it may not be a problem). In those two cases, the installer will create a 'Jamtaba2' directory into your 'home' directory (~/Jamtaba2).
We call it "fully integrated" installation, because it will give a "JamTaba" entry in the desktop menu.
sudo ./Jamtaba2_Installer_64bits.runThe directory ~/Jamtaba2 (and all files in) is owned by root.
You can delete the installer.
Now you will find JamTaba orin your desktop menu ("Other" category), or as an activity: let enjoy it!
To uninstall JamTaba:
- just run the uninstaller:
cd ~/
sudo cp ~/Jamtaba2/uninstaller.sh ~/uninstaller.sh
sudo ./uninstaller.sh
sudo rm ./uninstaller.sh- if you want to delete your configuration files to:
rm -rf ~/.local/share/Jamtaba\ 2/It's done!
We call it "partially integrated" installation, because JamTaba can't be launched from the desktop menu.
./Jamtaba2_Installer_64bits.runIt should return you error messages about '/usr/share/applications/Jamtaba2.desktop' and '/usr/share/icons/Jamtaba2.png' : don't care about it please, it's ok.
The directory ~/Jamtaba2 (and all files in) is owned by you.
You can delete the installer.
JamTaba has to be lauchned in the console:
~/Jamtaba2/Jamtaba2.shLet enjoy it!
If you know how to do, you can create a desktop entry by youself (or else, please refer to your desktop environnement help/wiki).
To uninstall JamTaba:
- just delete the directory owned by you:
rm -rf ~/Jamtaba2- if you want to delete your configuration files to:
rm -rf ~/.local/share/Jamtaba\ 2/- if you created a desktop entry for JamTaba by youserlf, you will probably want to erase it to. And it's done!
The following applies only to the Standalone Version of Jamtaba:
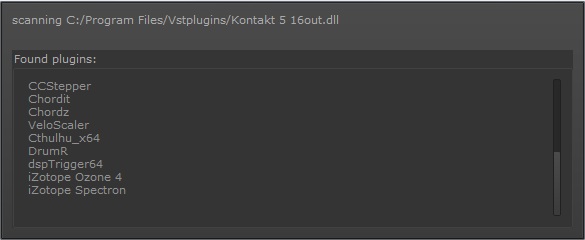
The first thing Jamtaba will do the first time is launched is scan for VST plugins in the folder specified during the installation. If you have a number of plugins this may take a while, but it is done only once. To cancel the Scan press X.
If you install more plugins you’ll need to add the path to the list using the (+) button and scan again pressing Refresh. In this case only new added plugins will be scanned. To remove any path press the (-) button located at the left side of the corresponding folder.
Use the Clear and Scan button to delete all the plugins already detected and scan again from scratch. If you have any non-working plugins, just add them to the Black list using the button.
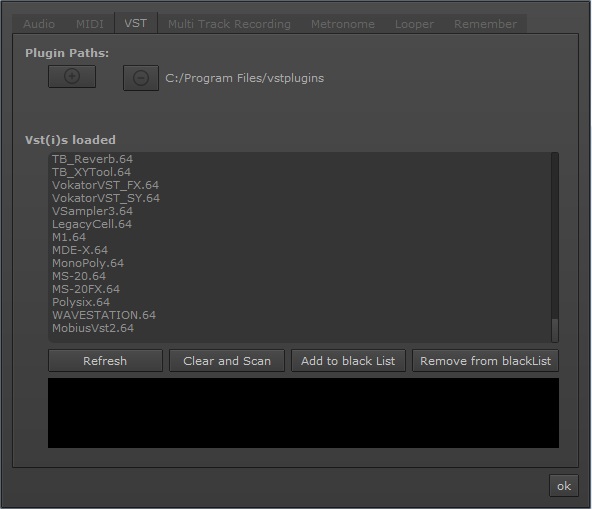
To access the VST menu you can use the F7 key instead (standalone only).
NOTE: When launching Jamtaba the first time a new directory is created in [user]/AppData/Roaming/ (windows), /Users/[user]/Library/Application Support/ (mac) or ~/.local/share/ (linux) called JamTaba 2 where all configuration files, themes, presets, cache, etc. will be stored.