Ninjam Looper
Jamtaba provides each channel (and subchannel in standalone version) with an internal looper that is always in sync with the BPI and BPM of the Ninjam server you are connected to.
- OverView
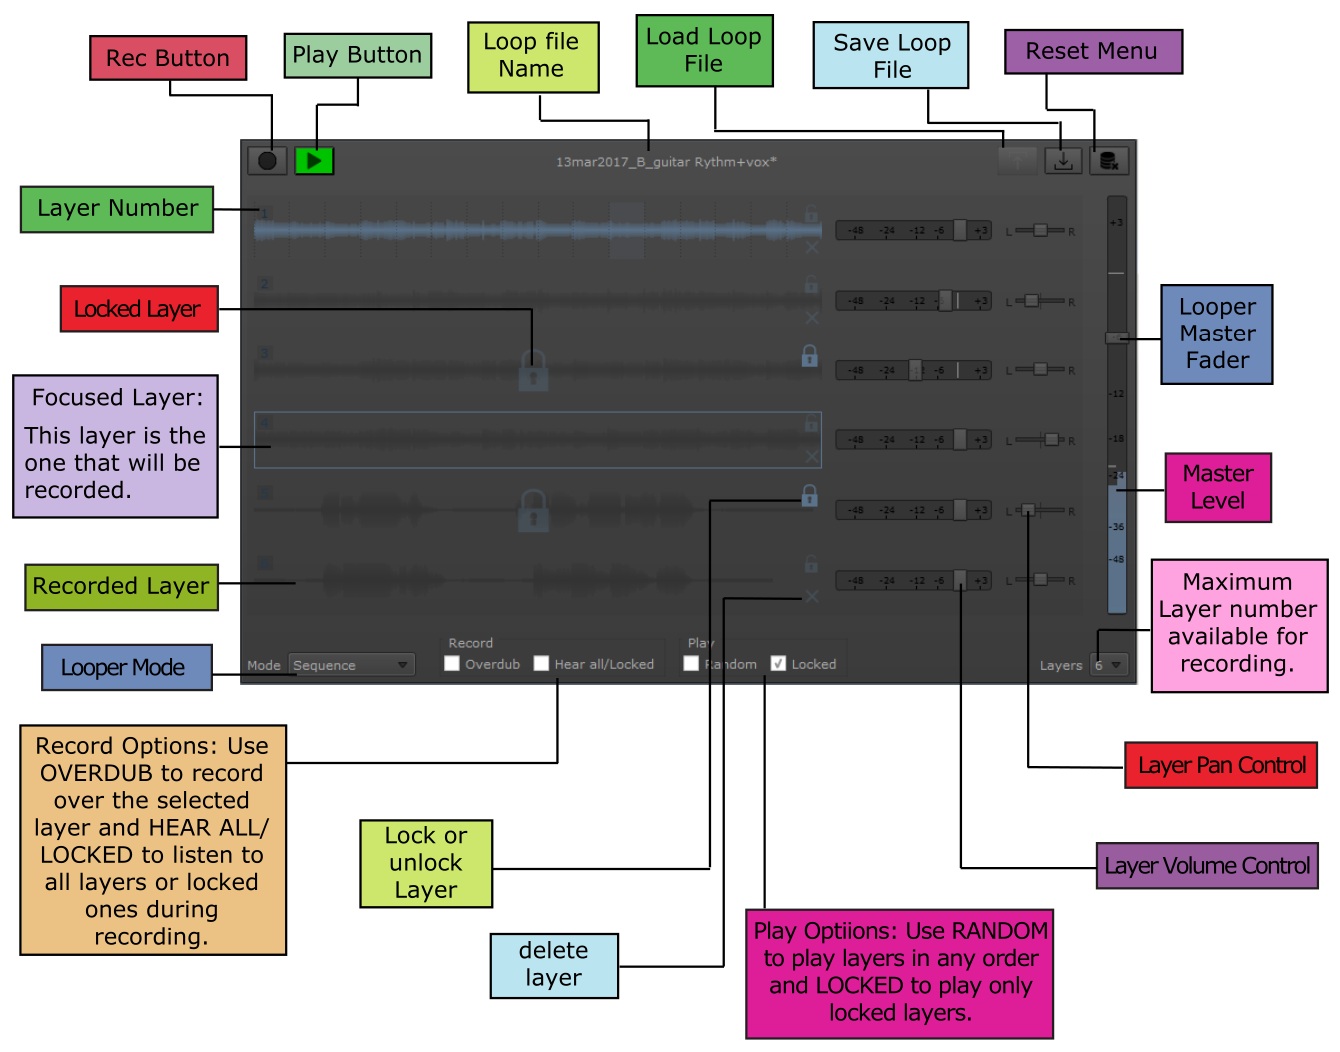
To access the looper you need to be connected to a server first and click the button located below the gain button. This will open the looper window:

There's no need for midi input nor foot pedals to make it work and it's very easy to use. You can access all its features using your mouse (or similar) device.
This is possible because during a Jam the BPM and BPI are fixed by the server for all clients, so the looper can use these values to create layers with the exact length of one BPI measure at the corresponding BPM. If the Server's BPI changes, then the looper will adapt automatically changing it's length to match the new BPI.
NOTE: If the BPM changes, the looper will stop and extend (or shrink) the recorded layers to match the new BPM. Sometimes the layers will not sound in sync depending on the new BPM value, but this is expected. It is recommended to start a new loop from scratch in this cases.
- Recording Loops:
Recording is very intuitive in Jamtaba. The same signal that feeds the input channel is also used as the input for the looper corresponding to that channel (or subchannel). The only difference is that when recording (and waiting for recording to start), the audio you hear will go through the looper instead of the input channel until play is resumed, so the level and pan is controlled by the looper in this case, not by the local channel.
[IMG]
Each layer will be recorded one by one (except for the selected layer mode, where only one layer will be recorded). You can set any maximum number of layer you want between one and eight. (The maximum number of available layers is determined by the Max Layers combo box).
[IMG]
To start recording just click the REC button (located in the upper left corner of the looper) at any point in the BPI cycle. The button will start blinking indicating you are in waiting state (not recording yet). When the new cycle starts it will stop blinking and the audio will be actually recorded. Recording will stop when the last layer is recorded and play will start automatically.
NOTE: During waiting state and Recording the input signal will go through the looper instead of the normal channel, so any changes in layer volume, pan or Master volume will change what you hear! (but not what you record).
- Looper Modes (Playing):
[IMG]
The Ninjam Looper has three modes you can use and depending on the mode used, the layers will play in sequence, simultaneously or one at a time:
Sequence Mode: Layers will play one at a time starting from the upper most. Layers will be recorded one by one until the last layer is complete. After recording is complete, play mode will start automatically.
NOTE: When Random is selected, layers will play randomly, but recording will continue in order from top to bottom.
-
All Layers Mode: All Layers will play simultaneously. Recording will be one by one from up to bottom.
-
Selected Layer Mode: Only the selected layer will play/record.
NOTE: It is possible to change the looper mode while playing, but not during Recording/waiting state.
- Layer Mutes (All Layers mode only):
[IMG]
- Overdub:
The use of Overdubbing is very popular in looping and it consists of the recording over another recording many times. The Ninjam Looper's overdub checkbox activates this function for each layer (during recording only). When you use Overdubbing only the selected layer will be recorded over and over and recording will not stop until you press record again. Remember the overdubbed layer can't be edited, so all overdubs are final.
- Saving Loops:
[IMG]
- Loading Loops:
[IMG]
- Looper Configuration:

- Audio file format:
To save your files in 16 bit WAV format:

NOTE: When using 16bit depth WAV files for saving loops, very loud signals will be truncated (hard clipped), so the file may not sound the same as the original loop. To avoid this use 32bit depth


When you lock a layer, a big icon will appear on top of the layer indicating that the layer is not editable. To remove the lock, press the lock icon again.
.........under construction.............
It is possible to use the number keys to select layers or focus for recording.
double click the play button to stop the looper inmediately. Single clicking the play button stops the looper at the end of the BPI cycle .
- Playing Layers: .........under construction.............
It is possible to use the number keys to select layers or focus for recording.
double click the play button to stop the looper inmediately. Single clicking the play button stops the looper at the end of the BPI cycle .
- Playing Layers:
This button is available only when connected to a server. Next select the mode you are going to use. If you want the layers to play in order from top to bottom, select sequence. In this mode only one layer will be played at a time.
You can have a maximum of eight Layers for each looper instance
NOTE: Subchannels are available only in the standalone version and so is the looper in this case.